Table of Contents
Introduction
Listeners are an Activiti extension to the BPMN 2.0 standard that implement hook points inside a process definition. These are triggered by events during workflow execution. There are two type of listeners, task and execution.
Execution listeners can be configured on the process itself, as well as on activities and on transitions. Task listeners can only be configured on user tasks.
Listeners enable you to run code during the execution of the process instance. This can be script code or a call to a Java class. The following diagram shows the events in a process definition where you can configure a listener:
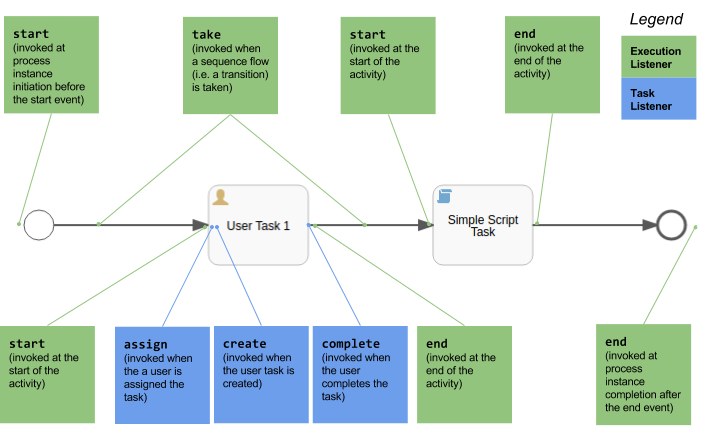
This picture also illustrates the order in which the event listeners will be invoked. Note for example that an assign task listener is invoked before a create task listener, which might be a bit surprising.
Listeners are described in more detail in the Activiti user guide, see the execution listeners docs and the task listeners docs.
Source Code
Source code for the Activiti Developer Series can be found here.
Prerequisites
Before starting with your listener implementation make sure to set up a proper Activiti Extension project.
Implementing Java backed Listeners
Let’s implement one execution listener and one task listener in Java and configure them for all the events shown for the process definition in the introduction section. The listeners will not do much more than print a log message.
Coding the Java classes
This section goes through how to implement both the execution and the task listener.
Implementing the Execution Listener
Here is the implementation of the Execution Listener class:
package com.activiti.extension.bean;

import org.activiti.engine.delegate.DelegateExecution;
import org.activiti.engine.delegate.ExecutionListener;
import org.slf4j.Logger;
import org.slf4j.LoggerFactory;

public class HelloWorldExecutionListener implements ExecutionListener {
  private static Logger logger = LoggerFactory.getLogger(HelloWorldExecutionListener.class);

  @Override
  public void notify(DelegateExecution execution) throws Exception {
      logger.info("[Process=" + execution.getProcessInstanceId() +
                  "][event=" + execution.getEventName() +
                  "][ExecutionListener=" + this +
                  "][ActivityId=" + execution.getCurrentActivityId() + "]");
  }
}
The class has been created in the com.activiti.extension.bean package, but it does not have to be located in this package. It is just good practice to put the class in this package if it ever needs to be converted to a Spring Bean backed listener in the future. Then this package is scanned automatically by Activiti and any beans are instantiated.
An Execution Listener needs to implement the org.activiti.engine.delegate.ExecutionListener interface, which contains the notify method. This methods takes one parameter of type org.activiti.engine.delegate.DelegateExecution, which is how we get access to the process instance that is invoking this Listener. An Execution Listener object instance is shared between process instances, so the DelegateExecution parameter is our way of finding out information about the active process instance.
Notice how we use an external class here for logging and that the logger.info method could be called concurrently by multiple threads. So it needs to be thread safe, which it is. Same thing applies for other class members that we define and use in the notify method. We can do whatever we want inside the notify method as all threads have independent call stacks.
Implementing the Task Listener
Here is the implementation of the Task Listener class:
package com.activiti.extension.bean;

import org.activiti.engine.delegate.DelegateExecution;
import org.activiti.engine.delegate.DelegateTask;
import org.activiti.engine.delegate.TaskListener;
import org.slf4j.Logger;
import org.slf4j.LoggerFactory;

public class HelloWorldTaskListener implements TaskListener {
  private static Logger logger = LoggerFactory.getLogger(HelloWorldTaskListener.class);

  @Override
  public void notify(DelegateTask task) {
      DelegateExecution execution = task.getExecution();

      logger.info("[Process=" + execution.getProcessInstanceId() +
                  "][event=" + task.getEventName() +
                  "][TaskListener=" + this +
                  "][ActivityId=" + execution.getCurrentActivityId() +
                  "][TaskAssignee=" + task.getAssignee() +
                  "][TaskForm=" + task.getFormKey() + "]");
  }
}
The class has been created in the com.activiti.extension.bean package, but it does not have to be located in this package. It is just good practice to put the class in this package if it ever needs to be converted to a Spring Bean backed listener in the future. Then this package is scanned automatically by Activiti and any beans are instantiated.
A Task Listener needs to implement the org.activiti.engine.delegate.TaskListener interface, which contains the notify method. This methods takes one parameter of type org.activiti.engine.delegate.DelegateTask, which is how we get access to the user task instance that is invoking this Listener. We can also get to the process execution via the task.getExecution method.
Via the passed in DelegateTask object you can also get to more details around the user task, such as who it is assigned to, its description, event, when it was created, what form it is using etc.
A Task Listener object instance is shared between process instances, so the DelegateTask parameter is our way of finding out information about the active process instance and user task instance.
Note. Task Listeners work only on User tasks, they will have no effect on for example a Service Task.
Testing the Listeners
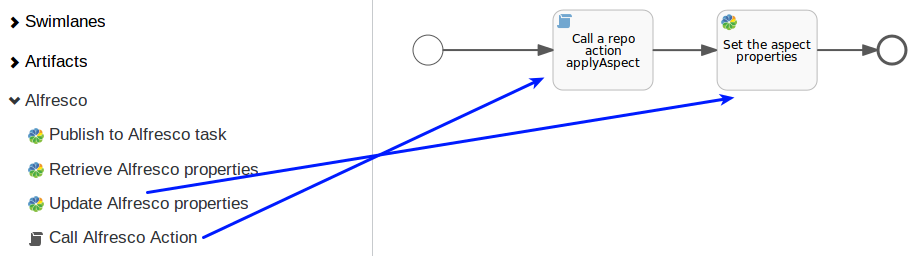
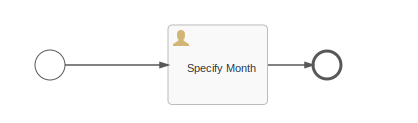
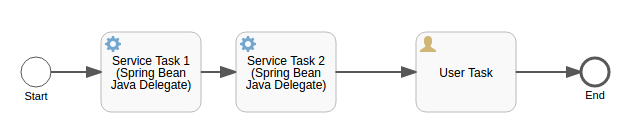
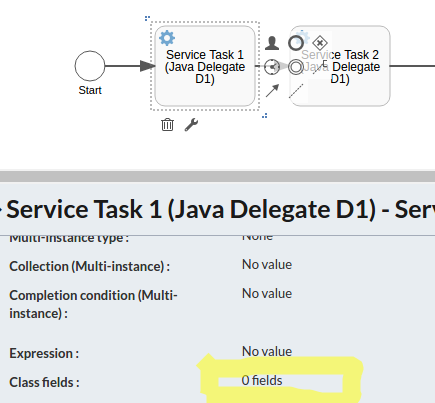
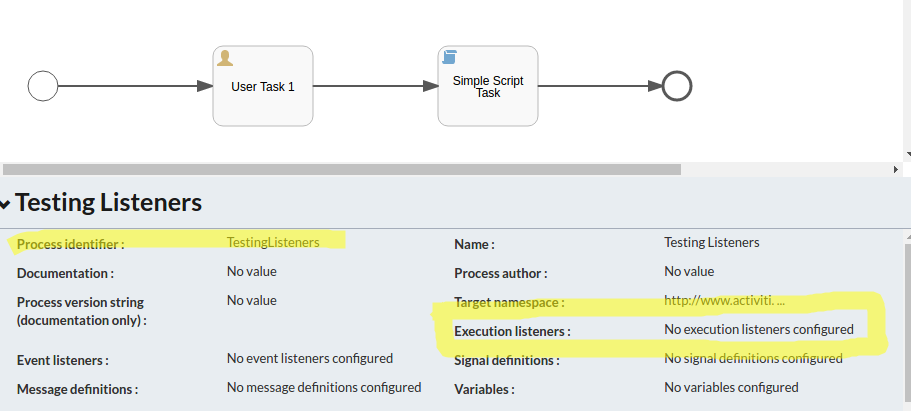
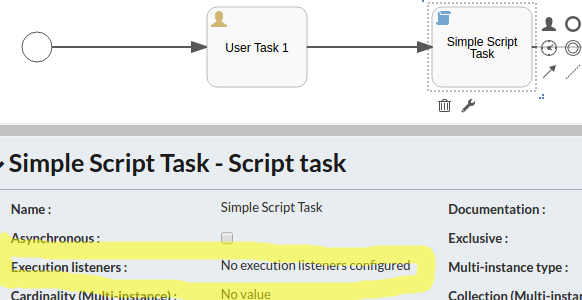
Now to test the Listener implementations create a process model looking like this:

Then set up the listeners as follows, start by clicking on the canvas (not on any activity or event) so you can set the process level execution listener:
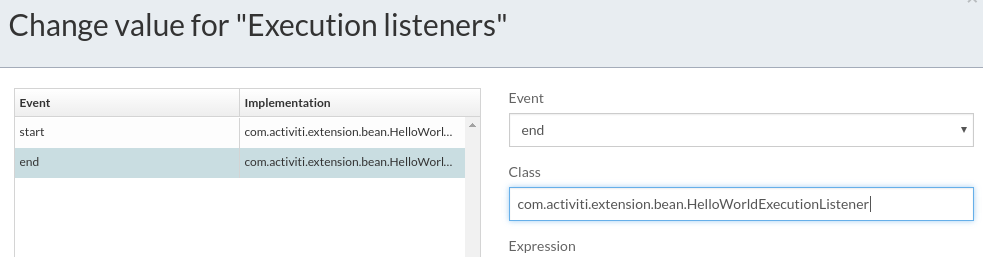
Clicking on the No execution listeners configured property brings up the following dialog:

Add the com.activiti.extension.bean.HelloWorldExecutionListener implementation for the start and end events. Then click on the User Task 1 activity:
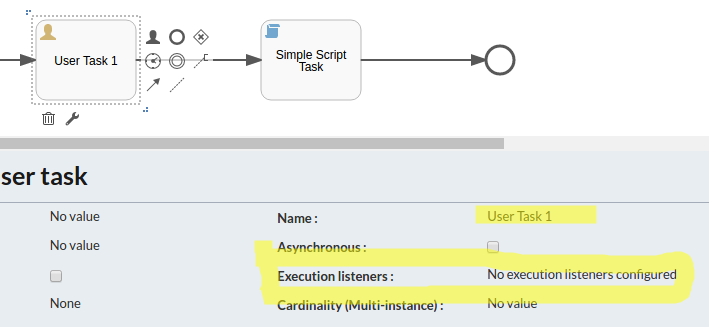
Clicking on the No execution listeners configured property brings up the following dialog where we can set up listener for start and end event for activity User Task 1:
Save the execution listener configuration and then click on the task listeners property:

This bring up a dialog where we can configure task listeners for the different events:

Here we are using the com.activiti.extension.bean.HelloWorldTaskListener implementation. We can also see a new task event called delete that we can attach a task listener to, it will be invoked when the task instance is completed and deleted.
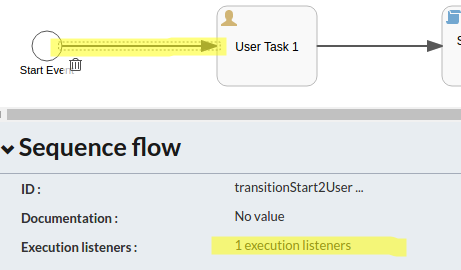
Now, for the sequence flow between the User Task 1 and the Simple Script Task set up an execution listener on the take event. First, click on the transition:
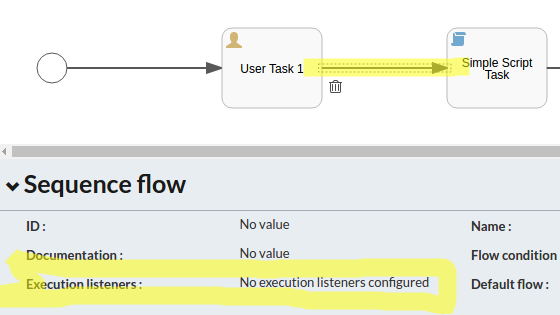
Then click on the No execution listeners configured property, which brings up the Execution Listener configuration dialog:
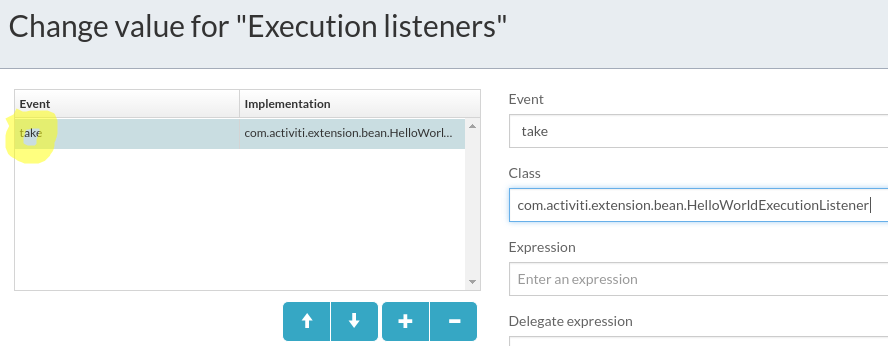
Use the com.activiti.extension.bean.HelloWorldExecutionListener implementation for the take event.
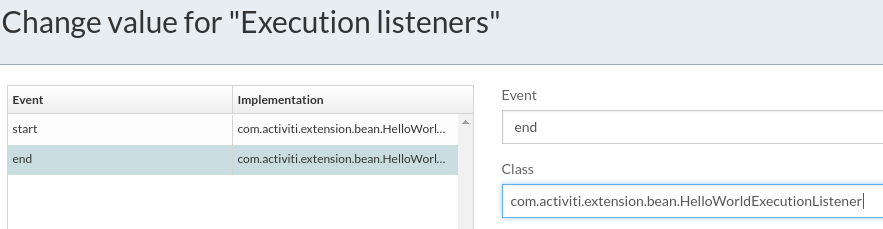
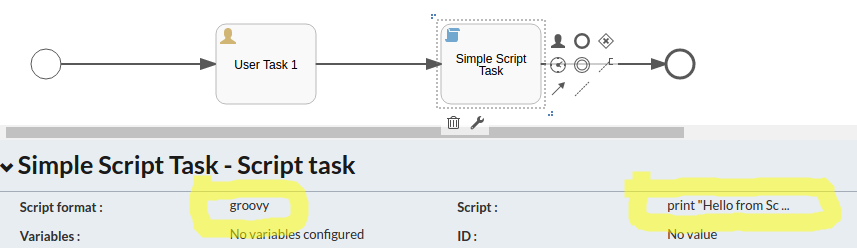
For the Simple Script Task set up execution listeners for the start and end event:
The configuration will look like this:
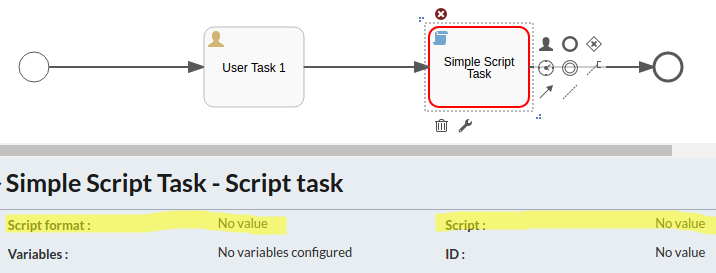
We also need to configure a script and script format for the Script task as it currently is failing validation:
Add a simple Groovy script that just prints a log message:
In BPMN 2.0 XML this will look like:
<process id="TestingListeners" name="Testing Listeners" isExecutable="true">
  <extensionElements>
      <activiti:executionListener event="start"
          class="com.activiti.extension.bean.HelloWorldExecutionListener"/>
      <activiti:executionListener event="end"
          class="com.activiti.extension.bean.HelloWorldExecutionListener"/>
  </extensionElements>

  <startEvent id="startEvent" name="Start Event"></startEvent>

  <sequenceFlow id="transitionStart2UserTask"
                sourceRef="startEvent"
                targetRef="userTask1"></sequenceFlow>

  <userTask id="userTask1" name="User Task 1" activiti:assignee="$INITIATOR">
      <extensionElements>
          <activiti:executionListener event="start"
              class="com.activiti.extension.bean.HelloWorldExecutionListener"/>
          <activiti:executionListener event="end"
              class="com.activiti.extension.bean.HelloWorldExecutionListener"/>
          <activiti:taskListener event="create"
              class="com.activiti.extension.bean.HelloWorldTaskListener"/>
          <activiti:taskListener event="assignment"
              class="com.activiti.extension.bean.HelloWorldTaskListener"/>
          <activiti:taskListener event="complete"
              class="com.activiti.extension.bean.HelloWorldTaskListener"/>
          <activiti:taskListener event="delete"
              class="com.activiti.extension.bean.HelloWorldTaskListener"/>
      </extensionElements>
  </userTask>

  <sequenceFlow id="transitionUserTask2ScriptTask"
                sourceRef="userTask1"
                targetRef="scriptTask">
      <extensionElements>
          <activiti:executionListener event="take"
              class="com.activiti.extension.bean.HelloWorldExecutionListener"/>
      </extensionElements>
  </sequenceFlow>

  <scriptTask id="scriptTask" name="Simple Script Task"
              scriptFormat="groovy"
              activiti:autoStoreVariables="false">
      <extensionElements>
          <activiti:executionListener event="start"
              class="com.activiti.extension.bean.HelloWorldExecutionListener"/>
          <activiti:executionListener event="end"
              class="com.activiti.extension.bean.HelloWorldExecutionListener"/>
      </extensionElements>
      <script><![CDATA[print "Hello from Script Task"]]></script>
  </scriptTask>

  <sequenceFlow id="transitionScriptTask2EndEvent"
                sourceRef="scriptTask"
                targetRef="endEvent"></sequenceFlow>

  <endEvent id="endEvent"></endEvent>
</process>
Note that the process definition has been updated so each element has a more descriptive ID. This will make it easier to see what is going on when we do logging. It is also easier to read the process definition.
When we start this process it will print similar logs to the following:
08:01:52,361 [http-nio-8080-exec-5] INFO com.activiti.extension.bean.HelloWorldExecutionListener - [Process=132501][event=start][ExecutionListener=com.activiti.extension.bean.HelloWorldExecutionListener@47c496c6][ActivityId=startEvent]
08:01:52,368 [http-nio-8080-exec-5] INFO com.activiti.extension.bean.HelloWorldExecutionListener - [Process=132501][event=start][ExecutionListener=com.activiti.extension.bean.HelloWorldExecutionListener@4dcb7e48][ActivityId=userTask1]
08:01:52,378 [http-nio-8080-exec-5] INFO com.activiti.extension.bean.HelloWorldTaskListener - [Process=132501][event=assignment][TaskListener=com.activiti.extension.bean.HelloWorldTaskListener@3df0a8c4][ActivityId=userTask1][TaskAssignee=1][TaskForm=null]
08:01:52,379 [http-nio-8080-exec-5] INFO com.activiti.extension.bean.HelloWorldTaskListener - [Process=132501][event=create][TaskListener=com.activiti.extension.bean.HelloWorldTaskListener@5cac7332][ActivityId=userTask1][TaskAssignee=1][TaskForm=null]
Here we can see that the execution listener set on the process level is invoked first when we get the process start event. Then we get the execution listener invoked again on the task start event. Then it moves on with task assignment and create event, invoking the task listener. All as expected. What might be unexpected is that there is actually one listener instance created for each event it is registered on. So here we have four unique listener objects (i.e. 47c496c6, 4dcb7e48, 3df0a8c4, and 5cac7332).
When we complete the User Task 1 the following logs are printed:
08:08:01,566 [http-nio-8080-exec-7] INFO com.activiti.extension.bean.HelloWorldTaskListener - [Process=132501][event=complete][TaskListener=com.activiti.extension.bean.HelloWorldTaskListener@1d06918c][ActivityId=userTask1][TaskAssignee=1][TaskForm=null]
08:08:01,567 [http-nio-8080-exec-7] INFO com.activiti.extension.bean.HelloWorldTaskListener - [Process=132501][event=delete][TaskListener=com.activiti.extension.bean.HelloWorldTaskListener@59681d0f][ActivityId=userTask1][TaskAssignee=1][TaskForm=null]
08:08:01,573 [http-nio-8080-exec-7] INFO com.activiti.extension.bean.HelloWorldExecutionListener - [Process=132501][event=end][ExecutionListener=com.activiti.extension.bean.HelloWorldExecutionListener@1687fdbb][ActivityId=userTask1]
08:08:01,577 [http-nio-8080-exec-7] INFO com.activiti.extension.bean.HelloWorldExecutionListener - [Process=132501][event=take][ExecutionListener=com.activiti.extension.bean.HelloWorldExecutionListener@4e282041][ActivityId=userTask1]
08:08:01,578 [http-nio-8080-exec-7] INFO com.activiti.extension.bean.HelloWorldExecutionListener - [Process=132501][event=start][ExecutionListener=com.activiti.extension.bean.HelloWorldExecutionListener@7224678f][ActivityId=scriptTask]
08:08:02,281 [http-nio-8080-exec-7] INFO com.activiti.extension.bean.HelloWorldExecutionListener - [Process=132501][event=end][ExecutionListener=com.activiti.extension.bean.HelloWorldExecutionListener@65230b79][ActivityId=scriptTask]
08:08:02,282 [http-nio-8080-exec-7] INFO com.activiti.extension.bean.HelloWorldExecutionListener - [Process=132501][event=end][ExecutionListener=com.activiti.extension.bean.HelloWorldExecutionListener@24183909][ActivityId=endEvent]
As expected, we can see the task complete and delete events, followed by the end of user task. Then we get the invocation of the execution listener for the take event on the transition. Then we get the execution listener invoked for the start and end event of the script task activity. And finally the end event for the whole process.
Note again that each registration of a listener will get its own listener instance during runtime. Let’s see what happens if we start two processes in parallel, without completing the User task. Here is the logs from process one:
08:13:43,809 [http-nio-8080-exec-7] INFO com.activiti.extension.bean.HelloWorldExecutionListener - [Process=132509][event=start][ExecutionListener=com.activiti.extension.bean.HelloWorldExecutionListener@47c496c6][ActivityId=startEvent]
08:13:43,811 [http-nio-8080-exec-7] INFO com.activiti.extension.bean.HelloWorldExecutionListener - [Process=132509][event=start][ExecutionListener=com.activiti.extension.bean.HelloWorldExecutionListener@4dcb7e48][ActivityId=userTask1]
08:13:43,812 [http-nio-8080-exec-7] INFO com.activiti.extension.bean.HelloWorldTaskListener - [Process=132509][event=assignment][TaskListener=com.activiti.extension.bean.HelloWorldTaskListener@3df0a8c4][ActivityId=userTask1][TaskAssignee=1][TaskForm=null]
08:13:43,812 [http-nio-8080-exec-7] INFO com.activiti.extension.bean.HelloWorldTaskListener - [Process=132509][event=create][TaskListener=com.activiti.extension.bean.HelloWorldTaskListener@5cac7332][ActivityId=userTask1][TaskAssignee=1][TaskForm=null]
And then we start the second process:
08:15:00,808 [http-nio-8080-exec-9] INFO com.activiti.extension.bean.HelloWorldExecutionListener - [Process=132515][event=start][ExecutionListener=com.activiti.extension.bean.HelloWorldExecutionListener@47c496c6][ActivityId=startEvent]
08:15:00,809 [http-nio-8080-exec-9] INFO com.activiti.extension.bean.HelloWorldExecutionListener - [Process=132515][event=start][ExecutionListener=com.activiti.extension.bean.HelloWorldExecutionListener@4dcb7e48][ActivityId=userTask1]
08:15:00,810 [http-nio-8080-exec-9] INFO com.activiti.extension.bean.HelloWorldTaskListener - [Process=132515][event=assignment][TaskListener=com.activiti.extension.bean.HelloWorldTaskListener@3df0a8c4][ActivityId=userTask1][TaskAssignee=1][TaskForm=null]
08:15:00,811 [http-nio-8080-exec-9] INFO com.activiti.extension.bean.HelloWorldTaskListener - [Process=132515][event=create][TaskListener=com.activiti.extension.bean.HelloWorldTaskListener@5cac7332][ActivityId=userTask1][TaskAssignee=1][TaskForm=null]
Important thing to be aware of here is that listener instances will be re-used between processes.
Listeners and Thread Safety
When using execution and task listeners, things are not thread safe even if each event the listener is registered for results in a unique listener instance. This is because listener instances are shared between process instances. This could potentially lead to library code used in the listener implementation being called concurrently, and as a result it needs to be thread-safe, as the log library we used in our example. Same thing for any class member variables, access needs to be synchronized.
So use thread-safe libraries and avoid class members.
Using Process Variables in a Listener
Most of the time when you implement a listener you would want to use some process variable values. Process variables are typically set when the process instance is started, through the API, or by different activities in the process. They are stored in the database for each process instance.
So how do you pass these process variable values into the listener? It is not necessary to pass any value, you can access all process instance variables via the DelegateExecution object, or the DelegateTask object, and the getVariable method.
What variables that are available in a listener depends on if it is an execution listener or a task listener. So let’s talk about them separately.
Using Process Variables in an Execution Listener
This is very similar to how you read and write process variables in a Java Delegate, read the docs here.
Let’s say we got the following execution listener implementation:
public void notify(DelegateExecution execution) throws Exception {
  logger.info("[Process=" + execution.getProcessInstanceId() +
              "][event=" + execution.getEventName() +
              "][ExecutionListener=" + this +
              "][ActivityId=" + execution.getCurrentActivityId() + "]");

  String initiator = (String)execution.getVariable("initiator");
  logger.info("Initiator of the process has user ID = " + initiator);

  execution.setVariable("greeting1Proc", "Hello World!");
  execution.setVariableLocal("greeting1ProcLocal", "Hello World Local!");

  logger.info("--- Process variables:");
  Map<String, Object> procVars = execution.getVariables();
  for (Map.Entry<String, Object> procVar : procVars.entrySet()) {
      logger.info("   [" + procVar.getKey() + " = " + procVar.getValue() + "]");
  }
}
It will result in the following log messages if we look at for example the output from the execution listener attached to the process start event:
09:10:02,994 [http-nio-8080-exec-5] INFO com.activiti.extension.bean.HelloWorldExecutionListener - [Process=140005][event=start][ExecutionListener=com.activiti.extension.bean.HelloWorldExecutionListener@25c1060a][ActivityId=startEvent]
09:10:02,994 [http-nio-8080-exec-5] INFO com.activiti.extension.bean.HelloWorldExecutionListener - Initiator of the process has user ID = 1
09:10:02,994 [http-nio-8080-exec-5] INFO com.activiti.extension.bean.HelloWorldExecutionListener - --- Process variables:
09:10:02,994 [http-nio-8080-exec-5] INFO com.activiti.extension.bean.HelloWorldExecutionListener - [greeting1Proc = Hello World!]
09:10:02,994 [http-nio-8080-exec-5] INFO com.activiti.extension.bean.HelloWorldExecutionListener - [greeting1ProcLocal = Hello World Local!]
09:10:02,994 [http-nio-8080-exec-5] INFO com.activiti.extension.bean.HelloWorldExecutionListener - [initiator = 1]
Using Process Variables in a Task Listener
When it comes to using process variables in a task listener we have to take into account a new scope. The user task is created in a sub-scope to the process instance. So if we got process variables, will they get propagated to the task scope, yes they will, automatically.
Take the following task listener implementation:
public void notify(DelegateTask task) {
  DelegateExecution execution = task.getExecution();

  logger.info("[Process=" + execution.getProcessInstanceId() +
              "][event=" + task.getEventName() +
              "][TaskListener=" + this +
              "][ActivityId=" + execution.getCurrentActivityId() +
              "][TaskAssignee=" + task.getAssignee() +
              "][TaskForm=" + task.getFormKey() + "]");

  String initiator = (String)execution.getVariable("initiator");
  logger.info("Initiator of the process has user ID = " + initiator);

  execution.setVariable("greeting2Proc", "Hello World!");
  execution.setVariableLocal("greeting2ProcLocal", "Hello World Local!");
  task.setVariable("greetingTask", "Hello World!");
  task.setVariableLocal("greetingTaskLocal", "Hello World Local!");

  logger.info("--- Process variables:");
  Map<String, Object> procVars = execution.getVariables();
  for (Map.Entry<String, Object> procVar : procVars.entrySet()) {
      logger.info("   [" + procVar.getKey() + " = " + procVar.getValue() + "]");
  }

  logger.info("--- Task variables:");
  Map<String, Object> taskVars = task.getVariables();
  for (Map.Entry<String, Object> taskVar : taskVars.entrySet()) {
      logger.info("   [" + taskVar.getKey() + " = " + taskVar.getValue() + "]");
  }
}
This will print a log looking something like this for the user task assignment event:
09:10:03,006 [http-nio-8080-exec-5] INFO com.activiti.extension.bean.HelloWorldTaskListener - [Process=140005][event=assignment][TaskListener=com.activiti.extension.bean.HelloWorldTaskListener@62afbe29][ActivityId=userTask1][TaskAssignee=1][TaskForm=null]
09:10:03,006 [http-nio-8080-exec-5] INFO com.activiti.extension.bean.HelloWorldTaskListener - Initiator of the process has user ID = 1
09:10:03,008 [http-nio-8080-exec-5] INFO com.activiti.extension.bean.HelloWorldTaskListener - --- Process variables:
09:10:03,008 [http-nio-8080-exec-5] INFO com.activiti.extension.bean.HelloWorldTaskListener - [greeting1Proc = Hello World!]
09:10:03,008 [http-nio-8080-exec-5] INFO com.activiti.extension.bean.HelloWorldTaskListener - [greeting1ProcLocal = Hello World Local!]
09:10:03,008 [http-nio-8080-exec-5] INFO com.activiti.extension.bean.HelloWorldTaskListener - [greeting2Proc = Hello World!]
09:10:03,008 [http-nio-8080-exec-5] INFO com.activiti.extension.bean.HelloWorldTaskListener - [initiator = 1]
09:10:03,008 [http-nio-8080-exec-5] INFO com.activiti.extension.bean.HelloWorldTaskListener - [greetingTask = Hello World!]
09:10:03,008 [http-nio-8080-exec-5] INFO com.activiti.extension.bean.HelloWorldTaskListener - [greeting2ProcLocal = Hello World Local!]
09:10:03,008 [http-nio-8080-exec-5] INFO com.activiti.extension.bean.HelloWorldTaskListener - --- Task variables:
09:10:03,008 [http-nio-8080-exec-5] INFO com.activiti.extension.bean.HelloWorldTaskListener - [greeting1Proc = Hello World!]
09:10:03,008 [http-nio-8080-exec-5] INFO com.activiti.extension.bean.HelloWorldTaskListener - [greeting1ProcLocal = Hello World Local!]
09:10:03,008 [http-nio-8080-exec-5] INFO com.activiti.extension.bean.HelloWorldTaskListener - [greeting2Proc = Hello World!]
09:10:03,008 [http-nio-8080-exec-5] INFO com.activiti.extension.bean.HelloWorldTaskListener - [greetingTaskLocal = Hello World Local!]
09:10:03,008 [http-nio-8080-exec-5] INFO com.activiti.extension.bean.HelloWorldTaskListener - [initiator = 1]
09:10:03,008 [http-nio-8080-exec-5] INFO com.activiti.extension.bean.HelloWorldTaskListener - [greetingTask = Hello World!]
09:10:03,008 [http-nio-8080-exec-5] INFO com.activiti.extension.bean.HelloWorldTaskListener - [greeting2ProcLocal = Hello World Local!]
Let’s start with process scoped variables, we can see that we got all the variables we set available in the process scope, including variables such as greeting1Proc that has been set by previous execution listeners and variables such as greetingTask that has been set in task scope. However, there is one variable missing, the greetingTaskLocal. This is because the task instance is created in a sub-scope to the process scope, and when you use task.setVariableLocal("greetingTaskLocal", "Hello World Local!"), it will set this variable only in the task scope. A local task variable will not be propagated to the process scope and it will be gone when the task instance is deleted.
Now let’s see what variables we got available in the task scope, the “task variables”. We can see that we got all the process scoped variables (i.e. greeting1Proc, greeting2Proc, greeting1Local, and greeting2Local) as they are automatically propagated through to the task scope when the task instance is created. Besides the greetingTask variable we can also see the local task variable greetingTaskLocal.
Now let’s see what process variables will be available when we get to the script task. Let’s complete the user task and we should then see the following variables when we enter the start event for the script task:
09:30:21,630 [http-nio-8080-exec-1] INFO com.activiti.extension.bean.HelloWorldExecutionListener - [Process=140005][event=start][ExecutionListener=com.activiti.extension.bean.HelloWorldExecutionListener@5b12a6e][ActivityId=scriptTask]
09:30:21,630 [http-nio-8080-exec-1] INFO com.activiti.extension.bean.HelloWorldExecutionListener - Initiator of the process has user ID = 1
09:30:21,633 [http-nio-8080-exec-1] INFO com.activiti.extension.bean.HelloWorldExecutionListener - - Process variables:
09:30:21,633 [http-nio-8080-exec-1] INFO com.activiti.extension.bean.HelloWorldExecutionListener - [greeting1Proc = Hello World!]
09:30:21,633 [http-nio-8080-exec-1] INFO com.activiti.extension.bean.HelloWorldExecutionListener - [greeting1Local = Hello World Local!]
09:30:21,633 [http-nio-8080-exec-1] INFO com.activiti.extension.bean.HelloWorldExecutionListener - [greeting2Proc = Hello World!]
09:30:21,633 [http-nio-8080-exec-1] INFO com.activiti.extension.bean.HelloWorldExecutionListener - [initiator = 1]
09:30:21,633 [http-nio-8080-exec-1] INFO com.activiti.extension.bean.HelloWorldExecutionListener - [greetingTask = Hello World!]
09:30:21,633 [http-nio-8080-exec-1] INFO com.activiti.extension.bean.HelloWorldExecutionListener - [greeting2ProcLocal = Hello World Local!]
We can see that we got pretty much all variables we have set available, the only one that is not available any more is the greetingTaskLocal as it was set locally in the user task scope. The reason we can see the greetingTask variable here is that when it was set in the task scope with task.setVariable, this method will actually navigate up the scope hierarchy until it reaches a root scope and set it there, or overwrite any local variable with the same name on the way.
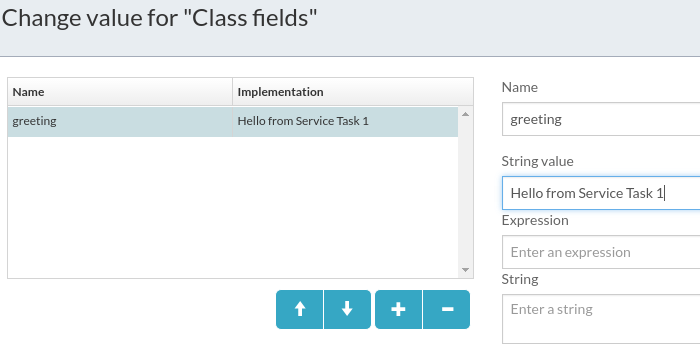
Using Field Injection in a Listener
This works in the same way as for service task POJO Java Delegates. See docs.
Making the Listener a Spring Bean
This works in the same way as for service task Spring Bean Java Delegates. See docs.
A “springified” execution listener looks like this:
package com.activiti.extension.bean;

import org.activiti.engine.delegate.DelegateExecution;
import org.activiti.engine.delegate.ExecutionListener;
import org.slf4j.Logger;
import org.slf4j.LoggerFactory;
import org.springframework.stereotype.Component;

import java.util.Map;

@Component("helloWorldExecutionListener")
public class HelloWorldSpringExecutionListener implements ExecutionListener {
  private static Logger logger = LoggerFactory.getLogger(HelloWorldSpringExecutionListener.class);

  @Override
  public void notify(DelegateExecution execution) throws Exception {
      logger.info("[Process=" + execution.getProcessInstanceId() +
                  "][event=" + execution.getEventName() +
                  "][ExecutionListener=" + this +
                  "][ActivityId=" + execution.getCurrentActivityId() + "]");
  }
}
And it is used as in the following example:
And the BPMN 2.0 XML for this will look like:
<sequenceFlow id="transitionStart2UserTask" sourceRef="startEvent" targetRef="userTask1">
  <extensionElements>
      <activiti:executionListener
         event="take"
         delegateExpression="${helloWorldExecutionListener}"/>
  </extensionElements>
</sequenceFlow>
And in a similar way we can easily turn a task listener into a Spring bean:
package com.activiti.extension.bean;

import org.activiti.engine.delegate.DelegateExecution;
import org.activiti.engine.delegate.DelegateTask;
import org.activiti.engine.delegate.TaskListener;
import org.slf4j.Logger;
import org.slf4j.LoggerFactory;
import org.springframework.stereotype.Component;

import java.util.Map;

@Component("helloWorldTaskListener")
public class HelloWorldSpringTaskListener implements TaskListener {
  private static Logger logger = LoggerFactory.getLogger(HelloWorldSpringTaskListener.class);

  @Override
  public void notify(DelegateTask task) {
      DelegateExecution execution = task.getExecution();

      logger.info("[Process=" + execution.getProcessInstanceId() +
                  "][event=" + task.getEventName() +
                  "][TaskListener=" + this +
                  "][ActivityId=" + execution.getCurrentActivityId() +
                  "][TaskAssignee=" + task.getAssignee() +
                  "][TaskForm=" + task.getFormKey() + "]");
  }
}
Note. as mentioned before, these classes need to be located in the com.activiti.extension.bean package to be picked up by Activiti bean scanning.
And it is used as in the following example, click on the User task and then on the task listeners property:
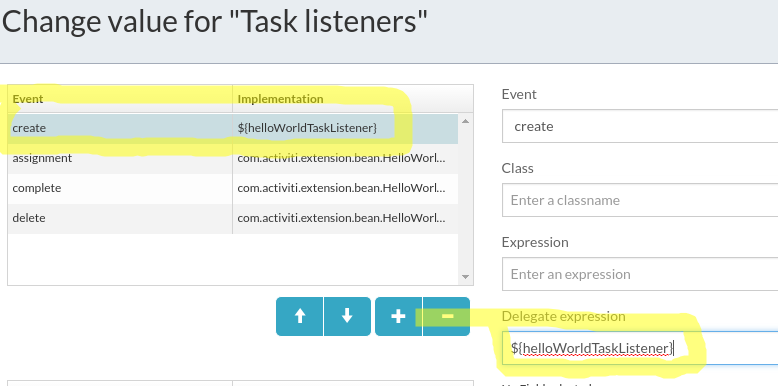
And the BPMN 2.0 XML for this will look like:
<userTask id="userTask1" name="User Task 1" activiti:assignee="$INITIATOR">
  <extensionElements>
      <activiti:executionListener event="start"
          class="com.activiti.extension.bean.HelloWorldExecutionListener"/>
      <activiti:executionListener event="end"
          class="com.activiti.extension.bean.HelloWorldExecutionListener"/>

      <activiti:taskListener event="create"
          delegateExpression="${helloWorldTaskListener}"/>

      <activiti:taskListener event="assignment"
          class="com.activiti.extension.bean.HelloWorldTaskListener"/>
      <activiti:taskListener event="complete"
          class="com.activiti.extension.bean.HelloWorldTaskListener"/>
      <activiti:taskListener event="delete"
          class="com.activiti.extension.bean.HelloWorldTaskListener"/>
  </extensionElements>
</userTask>
If we were to change all our listeners that we have configured for the process into Spring bean based ones. Then we would have logs looking like this. Starting process one, not completing user task 1:
10:37:09,980 [http-nio-8080-exec-8] INFO com.activiti.extension.bean.HelloWorldSpringExecutionListener - [Process=142551][event=start][ExecutionListener=com.activiti.extension.bean.HelloWorldSpringExecutionListener@2a72c0a6][ActivityId=startEvent]
10:37:09,981 [http-nio-8080-exec-8] INFO com.activiti.extension.bean.HelloWorldSpringExecutionListener - [Process=142551][event=take][ExecutionListener=com.activiti.extension.bean.HelloWorldSpringExecutionListener@2a72c0a6][ActivityId=startEvent]
10:37:09,981 [http-nio-8080-exec-8] INFO com.activiti.extension.bean.HelloWorldSpringExecutionListener - [Process=142551][event=start][ExecutionListener=com.activiti.extension.bean.HelloWorldSpringExecutionListener@2a72c0a6][ActivityId=userTask1]
10:37:09,982 [http-nio-8080-exec-8] INFO com.activiti.extension.bean.HelloWorldSpringTaskListener - [Process=142551][event=assignment][TaskListener=com.activiti.extension.bean.HelloWorldSpringTaskListener@6da401df][ActivityId=userTask1][TaskAssignee=1][TaskForm=null]
10:37:09,988 [http-nio-8080-exec-8] INFO com.activiti.extension.bean.HelloWorldSpringTaskListener - [Process=142551][event=create][TaskListener=com.activiti.extension.bean.HelloWorldSpringTaskListener@6da401df][ActivityId=userTask1][TaskAssignee=1][TaskForm=null]
If we start a second process instance and stop before completing User task 1:
10:40:14,691 [http-nio-8080-exec-5] INFO com.activiti.extension.bean.HelloWorldSpringExecutionListener - [Process=142557][event=start][ExecutionListener=com.activiti.extension.bean.HelloWorldSpringExecutionListener@2a72c0a6][ActivityId=startEvent]
10:40:14,692 [http-nio-8080-exec-5] INFO com.activiti.extension.bean.HelloWorldSpringExecutionListener - [Process=142557][event=take][ExecutionListener=com.activiti.extension.bean.HelloWorldSpringExecutionListener@2a72c0a6][ActivityId=startEvent]
10:40:14,692 [http-nio-8080-exec-5] INFO com.activiti.extension.bean.HelloWorldSpringExecutionListener - [Process=142557][event=start][ExecutionListener=com.activiti.extension.bean.HelloWorldSpringExecutionListener@2a72c0a6][ActivityId=userTask1]
10:40:14,693 [http-nio-8080-exec-5] INFO com.activiti.extension.bean.HelloWorldSpringTaskListener - [Process=142557][event=assignment][TaskListener=com.activiti.extension.bean.HelloWorldSpringTaskListener@6da401df][ActivityId=userTask1][TaskAssignee=1][TaskForm=null]
10:40:14,693 [http-nio-8080-exec-5] INFO com.activiti.extension.bean.HelloWorldSpringTaskListener - [Process=142557][event=create][TaskListener=com.activiti.extension.bean.HelloWorldSpringTaskListener@6da401df][ActivityId=userTask1][TaskAssignee=1][TaskForm=null]
So there is a significant difference here to if we use POJO listeners, with Spring bean listeners we will have just one bean instance per listener implementation shared between all process instances.
Making the Listener implementation a Spring Bean method
This works in the same way as for service task Spring Bean Methods. See docs.
Having a listener implemented as a Spring bean method looks like this (there is no difference between execution and task listener method implementations, unless you want to pass in an execution or task context):
package com.activiti.extension.bean.service;
import org.activiti.engine.delegate.DelegateExecution;
import org.activiti.engine.delegate.DelegateTask;
import org.slf4j.Logger;
import org.slf4j.LoggerFactory;
import org.springframework.stereotype.Service;
@Service
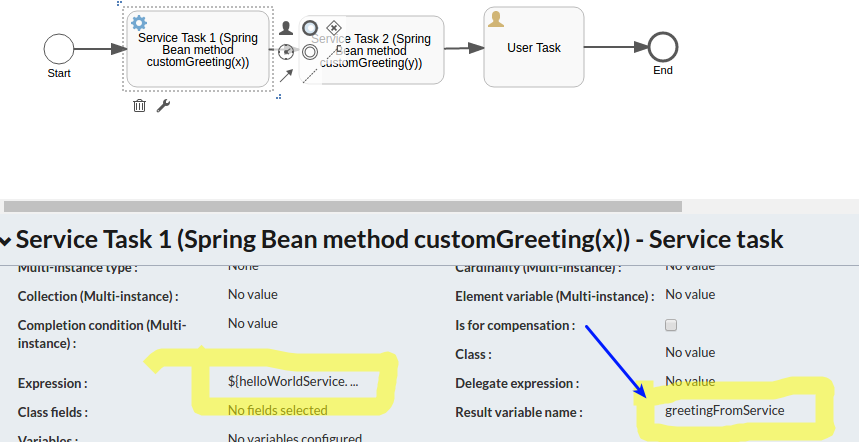
public class HelloWorldService {
private static Logger logger = LoggerFactory.getLogger(HelloWorldService.class);
public String greeting() {
return "Hello World from Service!";
}
public String customGreetingFromExecListener(
DelegateExecution execution,
String text) {
logger.info("[Process=" + execution.getProcessInstanceId() +
"][Java Delegate=" + this + "]");
logger.info("Hello World: " + text);
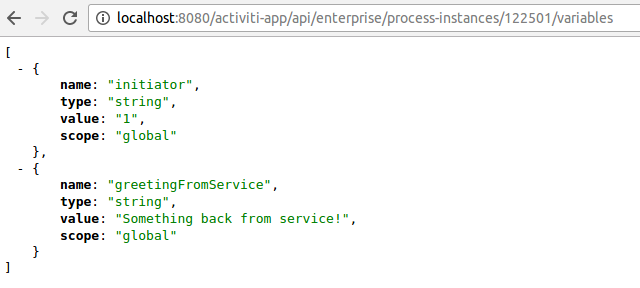
return "Something back from service!";
}
public String customGreetingFromTaskListener(
DelegateTask task,
String text) {
logger.info("[Process=" + task.getExecution().getProcessInstanceId() +
"][Java Delegate=" + this + "]");
logger.info("Hello World: " + text);
return "Something back from service!";
}
}
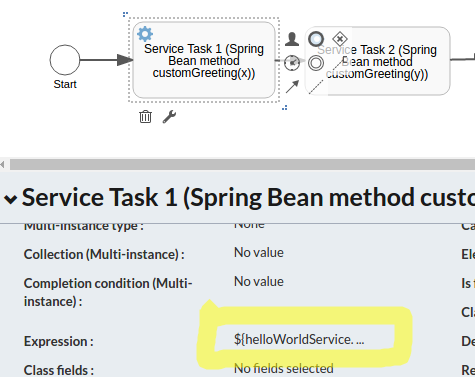
And it is used as in the following BPMN 2.0 XML sample:
<process id="TestingListeners" name="Testing Listeners" isExecutable="true">
<extensionElements>
<activiti:executionListener
event="start"
expression="${helloWorldService.customGreetingFromExecListener(
execution, "Hello-start")}"/>
<activiti:executionListener
event="end"
expression="${helloWorldService.customGreetingFromExecListener(
execution, "Hello-end")}"/>
</extensionElements>
<startEvent id="startEvent" name="Start Event"></startEvent>
<userTask id="userTask1" name="User Task 1" activiti:assignee="$INITIATOR">
<extensionElements>
<activiti:executionListener event="start"
delegateExpression="${helloWorldExecutionListener}"/>
<activiti:executionListener event="end"
delegateExpression="${helloWorldExecutionListener}"/>
<activiti:taskListener
event="create"
expression="${helloWorldService.customGreetingFromTaskListener(
task, "Hello-task-create")}"/>
<activiti:taskListener
event="assignment"
expression="${helloWorldService.customGreetingFromTaskListener(
task, "Hello-task-assignment")}"/>
<activiti:taskListener event="complete"
delegateExpression="${helloWorldTaskListener}"/>
<activiti:taskListener event="delete"
delegateExpression="${helloWorldTaskListener}"/>
</extensionElements>
</userTask>
We can see here that some of the execution listeners and some of the task listeners have been changed to use the new Spring Bean method implementations. Let’s see what that looks like when we run the process.
Starting process one, not completing user task 1:
11:12:47,495 [http-nio-8080-exec-9] INFO com.activiti.extension.bean.service.HelloWorldService - [Process=145020][Java Delegate=com.activiti.extension.bean.service.HelloWorldService@41c60c23]
11:12:47,495 [http-nio-8080-exec-9] INFO com.activiti.extension.bean.service.HelloWorldService - Hello World: Hello-start
11:12:47,498 [http-nio-8080-exec-9] INFO com.activiti.extension.bean.HelloWorldSpringExecutionListener - [Process=145020][event=take][ExecutionListener=com.activiti.extension.bean.HelloWorldSpringExecutionListener@7076b9d][ActivityId=startEvent]
11:12:47,500 [http-nio-8080-exec-9] INFO com.activiti.extension.bean.HelloWorldSpringExecutionListener - [Process=145020][event=start][ExecutionListener=com.activiti.extension.bean.HelloWorldSpringExecutionListener@7076b9d][ActivityId=userTask1]
11:12:47,502 [http-nio-8080-exec-9] INFO com.activiti.extension.bean.service.HelloWorldService - [Process=145020][Java Delegate=com.activiti.extension.bean.service.HelloWorldService@41c60c23]
11:12:47,502 [http-nio-8080-exec-9] INFO com.activiti.extension.bean.service.HelloWorldService - Hello World: Hello-task-assignment
11:12:47,504 [http-nio-8080-exec-9] INFO com.activiti.extension.bean.service.HelloWorldService - [Process=145020][Java Delegate=com.activiti.extension.bean.service.HelloWorldService@41c60c23]
11:12:47,504 [http-nio-8080-exec-9] INFO com.activiti.extension.bean.service.HelloWorldService - Hello World: Hello-task-create
As we can see, same Spring Bean instance are used for all calls. If we start a second process instance and stop before completing User task 1:
11:14:52,185 [http-nio-8080-exec-1] INFO com.activiti.extension.bean.service.HelloWorldService - [Process=145026][Java Delegate=com.activiti.extension.bean.service.HelloWorldService@41c60c23]
11:14:52,186 [http-nio-8080-exec-1] INFO com.activiti.extension.bean.service.HelloWorldService - Hello World: Hello-start
11:14:52,186 [http-nio-8080-exec-1] INFO com.activiti.extension.bean.HelloWorldSpringExecutionListener - [Process=145026][event=take][ExecutionListener=com.activiti.extension.bean.HelloWorldSpringExecutionListener@7076b9d][ActivityId=startEvent]
11:14:52,187 [http-nio-8080-exec-1] INFO com.activiti.extension.bean.HelloWorldSpringExecutionListener - [Process=145026][event=start][ExecutionListener=com.activiti.extension.bean.HelloWorldSpringExecutionListener@7076b9d][ActivityId=userTask1]
11:14:52,189 [http-nio-8080-exec-1] INFO com.activiti.extension.bean.service.HelloWorldService - [Process=145026][Java Delegate=com.activiti.extension.bean.service.HelloWorldService@41c60c23]
11:14:52,189 [http-nio-8080-exec-1] INFO com.activiti.extension.bean.service.HelloWorldService - Hello World: Hello-task-assignment
11:14:52,189 [http-nio-8080-exec-1] INFO com.activiti.extension.bean.service.HelloWorldService - [Process=145026][Java Delegate=com.activiti.extension.bean.service.HelloWorldService@41c60c23]
11:14:52,189 [http-nio-8080-exec-1] INFO com.activiti.extension.bean.service.HelloWorldService - Hello World: Hello-task-create
So here is also a difference from Spring Bean implemented listeners, when we use expressions to call Spring Bean methods we will always just have one Spring Bean instance shared both inside and between process instances. This is okay when using the method approach (or expression approach as it is also referred to) as all context is passed in via parameters, which makes it thread safe.
Listening to login and logout events
There are special interfaces you can implement to listen to login and logout operations. For login events implement the LoginListener interface as follows:
package com.activiti.extension.bean;
import com.activiti.api.security.LoginListener;
import com.activiti.domain.idm.User;
import org.springframework.stereotype.Component;
@Component
public class LoginListenerImpl implements LoginListener {
@Override
public void onLogin(User user) {
}
}
And for logout events implement the LogoutListener as follows:
package com.activiti.extension.bean;
import com.activiti.api.security.LogoutListener;
import com.activiti.domain.idm.User;
import org.springframework.stereotype.Component;
@Component
public class LogoutListenerImpl implements LogoutListener {
@Override
public void onLogout(User user) {
}
}
Note that these classes need to be Spring beans and they need to be located in the com.activiti.extension.bean package to be picked up as such.
Listening to any event
In some cases we might just want to listen to all the events generated by the Activiti workflow engine. And maybe offload them to an external system for further processing. This can be done by implementing the RuntimeEventListener interface as follows:
package com.activiti.extension.bean;
import com.activiti.service.runtime.events.RuntimeEventListener;
import org.activiti.engine.delegate.event.ActivitiEvent;
import org.springframework.stereotype.Component;
@Component
public class RuntimeEventListenerImpl implements RuntimeEventListener {
@Override
public boolean isEnabled() {
return true;
}
@Override
public void onEvent(ActivitiEvent activitiEvent) {
}
@Override
public boolean isFailOnException() {
return false;
}
}
Note that this class need to be a Spring bean and it need to be located in the com.activiti.extension.bean package to be picked up as such.
Implementing Script backed Listeners
In some cases it could be useful to be able to implement a listener quickly without having to restart the server. This can be achieved with Script Listeners.
Coding the Scripts
This section goes through how to implement both an execution listener as a script and a task listener as a script.
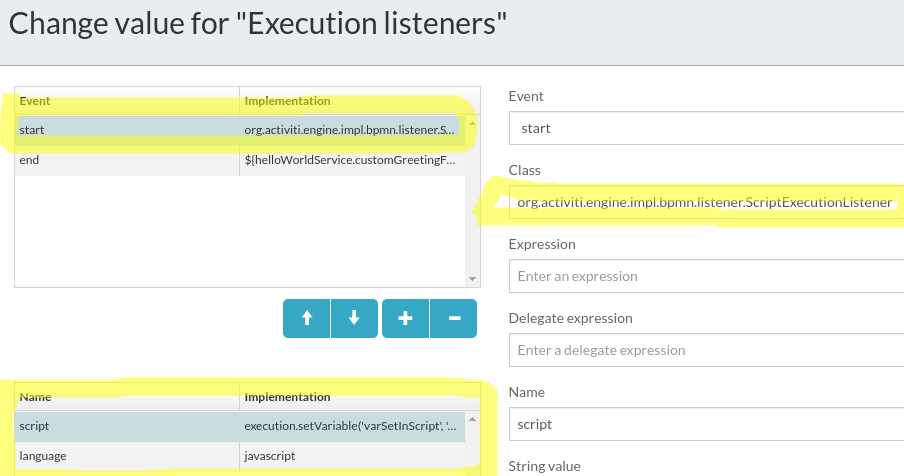
Implementing an Execution Listener as a Script
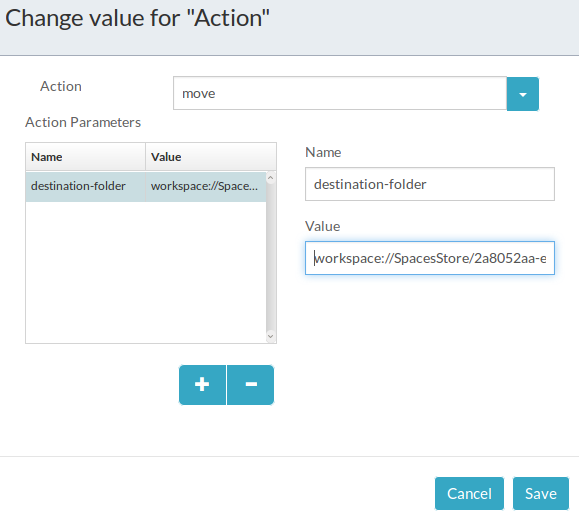
To set up a script execution listener we use the out-of-the-box execution listener class called org.activiti.engine.impl.bpmn.listener.ScriptExecutionListener. We set two fields for it where the first field is called language, which specifies in what scripting language the script is written in. And the second field is called script and contains the actual code.
The following is an example of how to configure a script based execution listener for the process start event:
The resulting BPMN 2.0 XML looks like this:
<extensionElements>
<activiti:executionListener
event="start" class="org.activiti.engine.impl.bpmn.listener.ScriptExecutionListener">
<activiti:field name="script">
<activiti:string><![CDATA[execution.setVariable('varSetInScript', 'val1');]]></activiti:string>
</activiti:field>
<activiti:field name="language">
<activiti:string><![CDATA[javascript]]></activiti:string>
</activiti:field>
</activiti:executionListener>
<activiti:executionListener
event="end"
expression="${helloWorldService.customGreetingFromExecListener(execution, "Hello-end")}"/>
</extensionElements>
This script execution listener just sets a process variable called varSetInScript to val1.
Implementing a Task Listener as a Script
To set up a script task listener we use the out-of-the-box task listener class called org.activiti.engine.impl.bpmn.listener.ScriptTaskListener. We set two fields for it where the first field is called language, which specifies in what scripting language the script is written in. And the second field is called script and contains the actual code.
The following is an example of how to configure a script based task listener for the task create event:
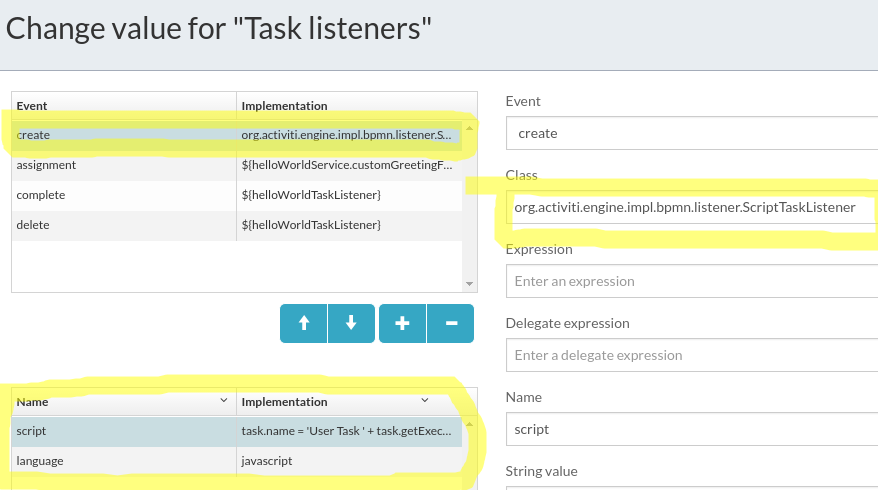
The resulting BPMN 2.0 XML looks like this:
<userTask id="userTask1" name="User Task 1" activiti:assignee="$INITIATOR">
<extensionElements>
<activiti:executionListener event="start" delegateExpression="${helloWorldExecutionListener}"/>
<activiti:executionListener event="end" delegateExpression="${helloWorldExecutionListener}"/>
<activiti:taskListener event="create" class="org.activiti.engine.impl.bpmn.listener.ScriptTaskListener">
<activiti:field name="script">
<activiti:string><![CDATA[task.name = 'User Task ' + task.getExecution().getVariable('varSetInScript');]]></activiti:string>
</activiti:field>
<activiti:field name="language">
<activiti:string><![CDATA[javascript]]></activiti:string>
</activiti:field>
</activiti:taskListener>
<activiti:taskListener event="assignment" expression="${helloWorldService.customGreetingFromTaskListener(task, "Hello-task-assignment")}"/>
<activiti:taskListener event="complete" delegateExpression="${helloWorldTaskListener}"/>
<activiti:taskListener event="delete" delegateExpression="${helloWorldTaskListener}"/>
</extensionElements>
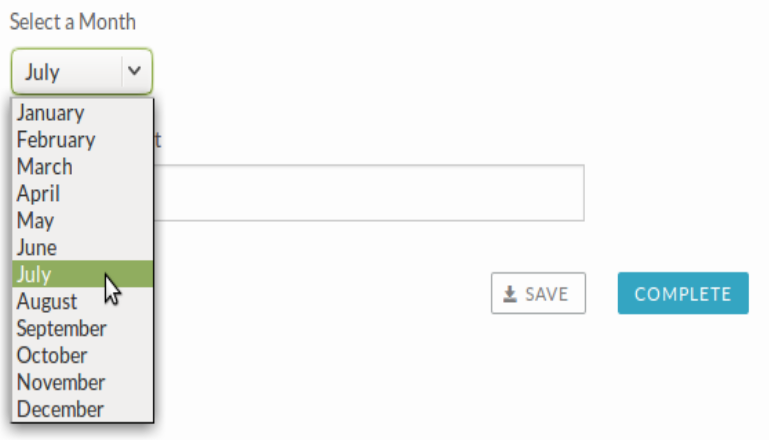
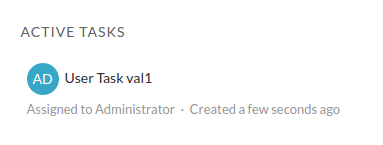
The script task listener just takes the varSetInScript variable value and then uses it as part of the task name.
Running it should give a User Task 1 with a name as follows:
Should we use Script or Java based Listeners?
The following list some of the pros and cons with Java backed and Script backed listeners.
Java
Pros: Easy to debug, easy to test, most likely faster, easier to reuse code, code completion, secure, you can change them for an active process instance
Cons: More involved to get going, you need an extension project. Need to stop the server to install a new version, unless using something like JRebel
Scripting
Pros: Very easy to get going with it and you don’t have to leave the BPMN Editor, no other tools required, no server restarts required
Cons: Changes to script cannot be used by active process instances, can be a security risk (however, just recently there have been the release of so called secure script listeners that can be used to handle certain security risks), harder to debug problems, more error prone as you see error first during runtime, not easy to reuse code, not easy to create tests