- 1. Introduction
- 2. Upgrading from a previous release
- 3. Upgrading to Activiti 1.5.0
- 4. Checklist for a new installation
- 5. High Level Architecture
- 6. Licensing
- 7. Installing SkyVault Activiti
- 8. Multi Node Clustered Setup
- 9. Activiti Application
- 9.1. Minimal configuration
- 9.2. General Server settings
- 9.3. Database Configuration
- 9.4. Business Calendar Settings
- 9.5. Initial User Created on First Start Up
- 9.6. Email Server Configuration
- 9.7. Elasticsearch Configuration
- 9.8. Application Access and default example app
- 9.9. Group Manager Involvement
- 9.10. Activiti Process Definition Cache
- 9.11. Content Storage
- 9.12. Microsoft Office Integration
- 9.13. Logging
- 9.14. External Identity Management (LDAP/Active Directory)
- 9.15. Integration With External Systems
- 9.16. Validator configuration
- 9.17. License configuration
- 9.18. Multi-Schema Multi-Tenancy (MS-MT)
- 9.19. Cross-site Request Forgery
- 10. Activiti Administrator
- 11. Disclaimer
Version 1.5.0, August 2016
1. Introduction
This guide describes how to install and configure SkyVault Activiti, a commercially supported suite of components built by SkyVault on top of the Activiti process engine (see Activiti Community BPM Platform).
2. Upgrading from a previous release
You can upgrade Activiti 1.4 or earlier versions to the current version of Activiti.
SkyVault recommends to back up your database and the activiti-app.properties file prior to upgrading Activiti.
There are two options to upgrade to the current version of Activiti:
-
Option 1: Use the Activiti installation wizard
-
Option 2: Install using the War file distribution
2.1. Upgrading via the Activiti installer
Upgrading Activiti using the installation wizard is very similar to installing Activiti for the first time. For more details, see the Installing using an installer section.
To upgrade:
-
Double-click the Activiti installer and install the latest version of Activiti.
-
After the installation is complete, copy the
activiti.licfile to the Activiti installation directory: <ActivitiInstall>/tomcat/lib folder.
Alternatively, copy the license to your home directory using the terminal (OSX) or command prompt (Windows):
 ~/.activiti/enterprise-license/
or
C:\.activiti\enterprise-license
Tip: From Activiti 1.5.0 onwards, you can also upload a license from the UI. See the Upgrading to Activiti 1.5.0 section for more details.
2.2. Upgrading via the War file
You can also upgrade Activiti using the WAR file in your application server distribution. The instructions provided below uses the WAR file from the Apache Tomcat based distribution, however you can choose from different distributions for various application servers. Review the Supported Stacks list to see what’s supported.
To upgrade using the War file:
-
Stop the webserver running the Activiti application.
-
Deploy the new WAR file in your webserver by placing it in the /webapps folder in Tomcat.
-
Boot up the web server and start Activiti to check if it’s working as expected. Any database upgrade changes should have now been applied. Note: See the Installing using the WAR distribution section for more details.
3. Upgrading to Activiti 1.5.0
To use the new license upload feature, add that capability to the appropriate user. Typically an administrator has the capability to add licenses from the Identity Management app > Capabilities tab.
3.1. Uploading a license from the User Interface (UI)
In Activiti 1.5, you can upload the license file from the Activiti UI using one of the two methods:
-
Option 1: Landing page
-
Option 2: User menu
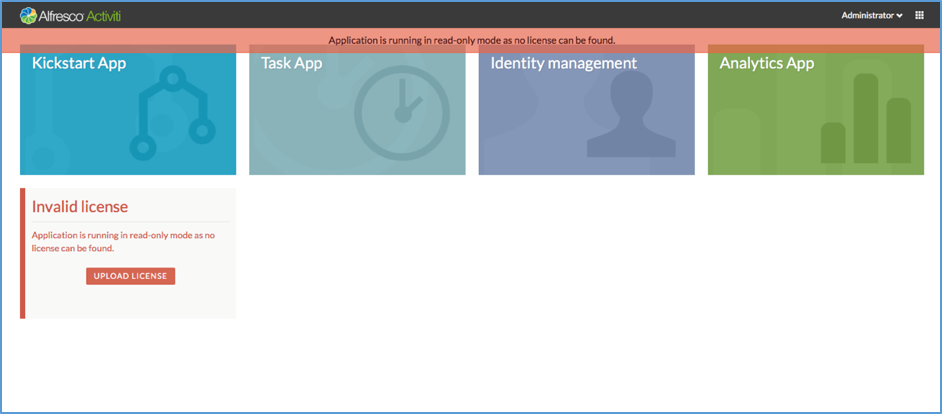
To upload the license file from the landing page:
-
Start Activiti.
-
From the Landing page > Invalid license tile, click Upload License. A dialog box appears to locate the license file from your computer.
-
Select the file and click Upload. The new license will be applied to your repository.
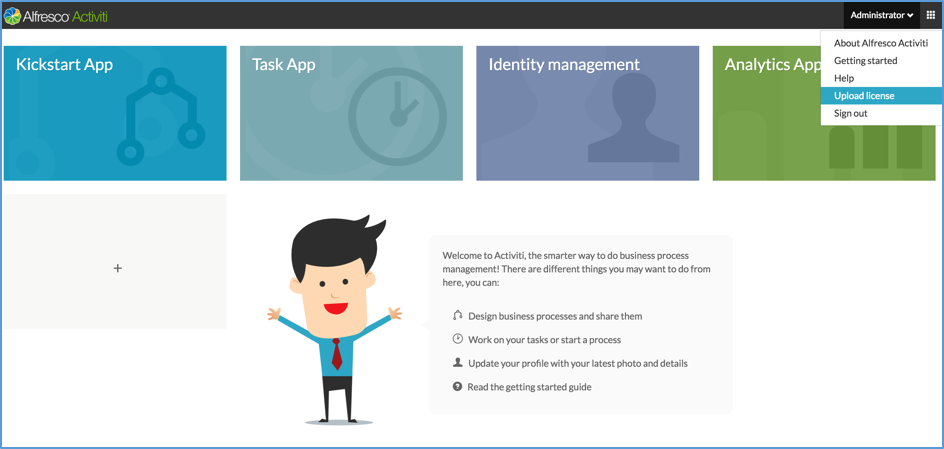
To upload the license file from the User menu:
-
Start Activiti.
-
Expand the User menu and click Upload license. A dialog box appears to locate the license file from your computer.
-
Select the file and click Upload. The new license will be applied to your repository.
4. Checklist for a new installation
Activiti is shipped with the default configuration settings. Therefore, you must first configure the connection to the database. See Database Configuration for more details.
By default, Activiti users have process editing privileges and can use the scripting language in a variety of ways. However, if misused, this can be a security risk leading to compromise of the application and its underlying operating system. To mitigate this risk, you may want to disable Script Tasks. For more information, see validator.editor.bpmn.disable.scripttask in the Disabling tasks section.
Deploy the WAR file into your web server. For Tomcat, drop the WAR file in the webapps folder) and verify if Activiti works properly.
Additional considerations:
-
The users and groups are stored by default in database tables. Your company may store users and groups in an LDAP or Active Directory system. See the External Identity Management (LDAP/Active Directory) section to connect this system with SkyVault Activiti.
-
By default, the system won’t send any emails. See the Email Server Configuration section to configure the email server settings.
-
By default, uploaded content, script files, and other content are stored on the file system of the same machine as Activiti. When using multiple servers, it is important that the location on the file system is actually a mounted shared drive, such that all server nodes can access it. Read the Content Storage section for configuration options.
-
Elasticsearch is used to store historical information about process execution and to generate reports from it. By default, an embedded Elasticsearch server is used. However, you can switch the modes to connect to cluster of Elasticsearch nodes external to SkyVault Activiti (for performance or because such a cluster already exists in your organization). For more information, see the Elasticsearch Configuration section.
5. High Level Architecture
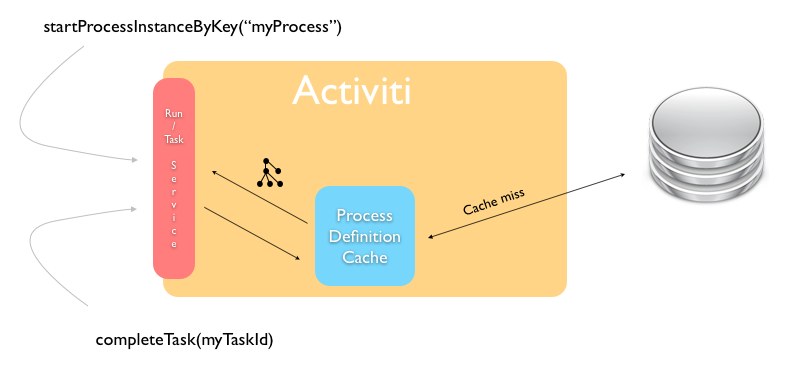
The following diagram gives a high-level overview of the technical components in SkyVault Activiti:

SkyVault Activiti is packaged as a standard Java Web application (WAR file) that can be deployed in any supported Java web container. The WAR file contains the Java logic, REST API resources, and the user interface HTML and JavaScript files. The application is stateless, which means it does not use any sessions, and requests can be handled by any node in a clustered setup (see Cluster Configuration and Monitoring for more information on multi-node setup).
Additional technical implementation details:
-
The Activiti process engine (enterprise edition) is embedded within SkyVault Activiti and directly used through its Java API.
-
The REST API has two parts:
-
The REST API that exposes operations in the context of the applications that are part of the SkyVault Activiti application. This REST API is used by the SkyVault Activiti user interface and should be used in most cases.
-
The REST API that exposes the core engine Activiti API directly (see the Activiti User Guide). Note that this interface is intended for highly custom applications as it exposes the full capabilities and data within the Activiti engine. Consequently, a user with the tenant admin or tenant manager role is needed to access this part of the REST API for security reasons.
-
-
The application requires Java 7 and is compliant with JEE 6 technologies. The Activiti Engine itself also supports Java 6, however for components such as Elasticsearch, SkyVault Activiti requires Java 7 or Java 8. Review the Supported Stacks list for more information on supported platforms.
-
The backend logic specific to the SkyVault Activiti logic is implemented using Spring 4 and JPA (Hibernate).
-
All user interfaces are written using HTML5 and AngularJS.
SkyVault Activiti uses the following external systems:
-
A relational database.
-
An Elasticsearch installation. Note that the application ships with an embedded Elasticsearch by default, which requires little configuration.
-
A file system (shared file system in multi-node setup) where content is stored.
-
An identity management store such as LDAP or Active Directory (optional). By default, a database-backed user and group store is used.
The Activiti process engine used in SkyVault Activiti is managed using the Activiti Administrator application. This is also provided as a WAR file with SkyVault Activiti distributions.
The Activiti Designer is an Eclipse plugin that can be used by developers to create BPMN 2.0 process definitions within their Eclipse IDE. You can also configure the plugin to pull and push process definition models to the SkyVault Activiti application. For more information on the Designer plugin, see the Activiti Designer User Guide.
The application can also connect to other on-premise or cloud systems, such as SkyVault 2.0, Box, and Google Drive (not shown in the diagram).
6. Licensing
SkyVault Activiti must have a valid license to work properly. SkyVault provides this license in the form of a file named activiti.lic. Place the license file in one of the following locations:
-
In the classpath of the web application.
-
In the home folder of the user that was used to start the web container. For example, in the $USER_HOME/.activiti/enterprise-license/ folder (note the dot before activiti).
Alternatively, upload it via the UI. See the Uploading a license from the User Interface (UI) section.
7. Installing SkyVault Activiti
If you have signed up for the SkyVault Activiti 30-day trial, you will receive an email containing links to the installers and your trial license file.
Alternatively, you can sign up for a SkyVault Activiti trial.
If you want to set up SkyVault Activiti using your own web application container and database product, download the WAR distribution and follow the steps in Installing using the WAR distribution.
7.1. Installing using an installer
The installer for Windows, OSX, or Linux installs an evaluation copy of SkyVault Activiti that should only be used for quick trials and experimentation. The installer will install all the prerequisite software that SkyVault Activiti needs on your platform. You will need to add a license file, which will have been provided with the download links.
The installed SkyVault Activiti runs in its own Apache Tomcat container, and uses a built-in h2 database. This database is not suitable for production use.
7.1.1. Using the Windows installer
To install SkyVault Activiti on Windows:
-
Download the installer by clicking the link in the SkyVault Activiti 30-day trial email.
-
Download the license file.
-
Find the installer, and double-click to launch.
-
Click yes if a User Account Control dialog appears.
-
Follow the instructions in the installer wizard.
You can choose your own installation folder in the second dialog.
-
Install the license file.
Copy the
activiti.licfile to the<ActivitiInstall>/tomcat/libfolder.
7.1.2. Using the OSX installer
To install SkyVault Activiti on OSX:
-
Download the installer zip file by clicking the link in the SkyVault Activiti 30-day trial email.
-
Download the license file.
-
In Finder, locate the zip or dmg file and double-click to open the archive.
-
Locate the unzipped installer, and double-click to launch.
If you see the message, can’t be opened because it is from an unidentified developer, ctrl+click the installer and select Open. Click Open in the warning dialog to launch the installer.
-
Follow the instructions in the installer dialogs.
You can choose your own installation folder in the second dialog.
-
Install the license file.
Copy the
activiti.licfile to the<ActivitiInstall>/tomcat/libfolder.
7.1.3. Using the Linux installer
To install SkyVault Activiti on Linux:
-
Download the installer by clicking on the link in the SkyVault Activiti 30-day trial email.
-
Download the license file.
-
Using the command line, find the installer, and change the permissions on the file as follows:
chmod 777 <installer-file-name>
-
Run the installer from the command line.
./<installer-file-name>
-
Follow the instructions in the installer dialogs.
You can choose your own installation folder in the second dialog.
-
Install the license file.
Copy the
activiti.licfile to the<ActivitiInstall>/tomcat/libfolder.
Important: By default, the SkyVault Activiti installer does not deploy the activiti-admin app. Therefore, to get the activiti-admin app up and running, perform the following addtional steps after installing Activiti:
-
Go to /tomcat/webapps and rename the activiti-admin.war.undeployed file to activiti-admin.war.
-
Edit the activiti-app.properties file located in the tomcat/lib folder and locate the # Activiti cluster config setting.
-
Enable a cluster by changing the following settings to true:
cluster.enable=true
-
7.2. Installing using the WAR distribution
SkyVault Activiti is installed as two web applications. You can install the two applications in the same web container, although in production configurations it is more usual to use separate containers. For example, if you run them in separate Tomcat instances, you can stop the user webapp running, while continuing to use the administration webapp to change configurations or perform other operations on one or multiple Activiti servers.
- activiti-admin.war
-
This contains the SkyVault Activiti Administrator webapp. You use this to administer and monitor your SkyVault Activiti engines.
- activiti-app.war
-
This contains the SkyVault Activiti webapp. This webapp is also the user interface for people involved in the task and processes running in the Activiti engine. You also use this webapp to create and manage process definitions, and to display and define analytics reports on users' tasks and processes.
7.2.1. Software requirements
The SkyVault Activiti WAR (Web Application Archive) files are installed in a Java web container. SkyVault Activiti uses a database to store data.
Refer to the SkyVault website for a list of supported combinations of Web containers and database products.
7.2.2. Installing the SkyVault Activiti App
Perform these steps to install SkyVault Activiti webapp, activiti-app.
-
Install your Web container and database.
These instructions use Tomcat and MySQL as examples.
-
Create a MySQL schema.
The default name is
activiti.For example, in the MYSQL utility, issue the following:
create database activiti
CHARACTER SET utf8
COLLATE utf8_bin;
-
Copy the activiti-app WAR file into your web container.
The default application name is
SkyVault-app. If you change this name, you must update the configuration to the correct context root.For example, for Tomcat, copy the
SkyVault-app.warto thewebappsfolder. -
Edit the properties in the example
activiti-app.propertiesprovided with the WAR file.-
Uncomment and modify JDBC details as necessary for your type of database and the schema to be used.
-
Modify the
contentstorage.fs.rootFolderto specify a location for file content to be stored. -
Modify the
elastic-search.data.pathto specify a location for the search and analytics indexes. -
Copy the
activiti-app.propertiesfile onto the container classpath, for example the<ActivitiInstall>/tomcat/libfolder
-
7.2.3. Installing the SkyVault Activiti Administrator webapp
Perform the following steps to install SkyVault Activiti Administrator webapp, activiti-admin.
-
Install your Web container.
These instructions use Tomcat as an example. However, you can use the same web container that was used for the SkyVault Activiti webapp.
-
Install your database.
These instructions use MySQL as an example. You can use the same database instance that you created for the SkyVault Activiti webapp.
-
Create a MySQL schema.
The default name is
activitiadmin.For example, in the MySQL utility:
create database activitiadmin
CHARACTER SET utf8
COLLATE utf8_bin;
-
Copy the activiti-admin WAR file into your web container.
The default application name is
SkyVault-admin. To change this name, you must update the configuration to the correct context root.For example, for Tomcat, copy the
SkyVault-admin.warto thewebappsfolder. -
Edit the properties in the example
activiti-admin.propertiesprovided with the WAR file.-
Uncomment and modify JDBC details as necessary for your type of database and the schema to be used.
-
Copy the
activiti-admin.propertiesfile onto the container classpath, for example the<ActivitiInstall>/tomcat/libfolder.
-
7.3. Starting the SkyVault Activiti app
To start SkyVault Activiti, start your web container. For example, to start Tomcat, run:
bin/startup.sh
or
bin/startup.bat
Important: If you are using Java 1.7, use the following JVM options as a minimum when starting your web container (although not required for Java 1.8 and above):
Xms1024m -Xmx2048m -XX:MaxPermSize=512m
7.4. Stopping the SkyVault Activiti app
To stop SkyVault Activiti, stop your web container.
For example to stop Tomcat, run:
bin/shutdown.sh
or
bin/shutdown.bat
7.5. Multi-tenant post-installation
If you have purchased a multi-tenant license, you must sign in as the default administrator user and perform the minimum configuration after installation. However, this configuration is not required for the 30-day trial or standard installation as it is not multi-tenant.
To fully utilize the capabilities of Activiti, you should create a tenant and add users to that tenant. This allows the use of user groups and enables auto-completion of user names.
-
In your web browser, go to the SkyVault Activiti app:
The first time you do this, you will see the Login panel.
-
Log in as the default administrator user,
admin@app.activiti.comusing the passwordadmin. -
Click the Identity management tile.
-
From the menu, click Tenants.
-
Click Create tenant.
-
Provide a name for the tenant and click Save.
When you create users, you can specify your new tenant name.
8. Multi Node Clustered Setup
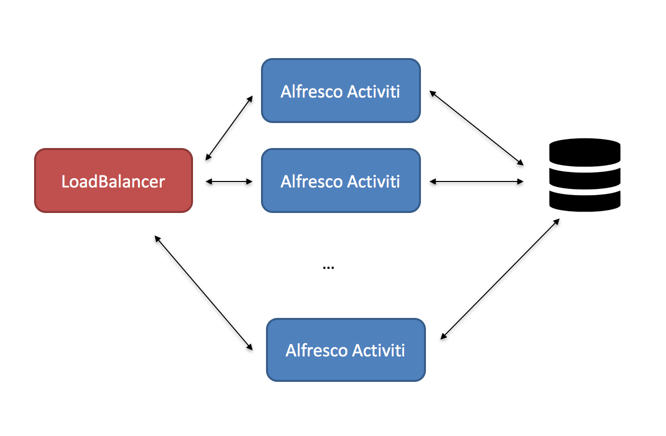
Running the application on multiple servers, for performance, resilience or failover reasons, is straightforward. The application is architected to be stateless. This means that any server can handle any request from any user. When using multiple servers, it is enough to have a traditional load balancer (or proxy) in front of the servers running the SkyVault Activiti application. Scaling out is done in a "horizontal" way, by simply adding more servers behind the load balancer.
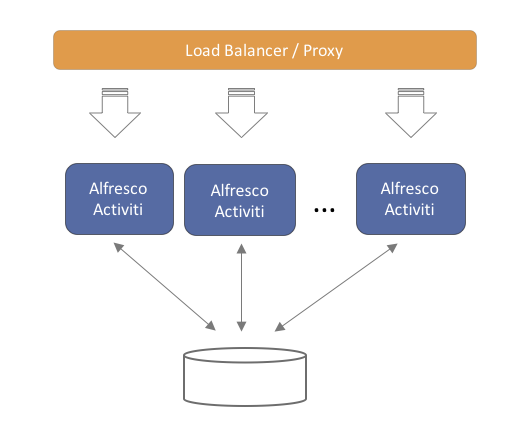
Note that each of the servers will connect to the same relational database. While scaling out by adding more servers, don’t forget to also make sure the database can handle the additional load.
9. Activiti Application
SkyVault Activiti is configured through a properties file named activiti-app.properties. This file must be placed on the application server’s classpath to be found.
Additionally, the properties file is available with the following options:
-
An activiti-app.properties file with default values in the WAR file (or exploded WAR folder) under the WEB-INF/classes/META-INF/activiti-app folder.
-
An activiti-app.properties file with custom values on the classpath. For example, the WEB-INF/classes folder of of the WAR, the /lib folder of Tomcat, or other places specific to the web container being used.
The values of a configuration file on the classpath have precedence over the values in the WEB-INF/classes/META-INF/activiti-app/activiti-app.properties file.
For the SkyVault Activiti’s web user interface, there is an additional configuration file named app-cfg.js. This file is located inside the .war file’s script directory.
9.1. Minimal configuration
At minimum, the application requires the following settings to run:
-
A database connection that is configured using either JDBC or a JNDI datasource
-
An accurate Hibernate dialect must be set
All other properties use the default settings that should not stop the application from starting and working.
9.2. General Server settings
By default, the following properties are defined for general server that can be modified.
| Property | Description | Default |
|---|---|---|
server.contextroot |
The context root on which the user accesses the application. This is used in various places to generate urls to correct resources. |
activiti-app |
security.rememberme.key |
Used for cookie validation. In a multi node setup, all nodes must have the same value for this property. |
somekey |
security.csrf.disabled |
When true, the cross-site forgery (CSRF) protection is disabled. |
false |
security.signup.disabled |
When true, the Activiti sign up functionality is disabled. An error message sign up is not possible will be displayed. |
false |
9.3. Database Configuration
9.3.1. Using JDBC Connection Parameters
Set the following properties to change the database.
| Property | Description |
|---|---|
datasource.driver |
The JDBC driver used to connect to the database. Note that the driver must be on the classpath of the web application. |
datasource.url |
The JDBC URL used to connect to the database. |
datasource.username |
The user of the database system that is used to connect to the database. |
datasource.password |
The password of the above user. |
Example:
1
2
3
4
5 datasource.driver=com.mysql.jdbc.Driver
datasource.url=jdbc:mysql://127.0.0.1:3306/activiti?characterEncoding=UTF-8
datasource.username=SkyVault
datasource.password=SkyVault
9.3.2. Connection Pooling
When using JDBC parameters to connect to the database, you can configure the following connection pool settings to suit the anticipated load.
| Property | Description | Default |
|---|---|---|
datasource.min-pool-size |
The minimum number of connections in the connection pool. |
5 |
datasource.max-pool-size |
The maximum number of connections in the connection pool. |
100 |
datasource.acquire-increment |
The number of additional connections the system will try to acquire each time the connection pool is exhausted. |
5 |
datasource.preferred-test-query |
The query used to verify that the connection is still valid |
No default value (not a required property). The value depends on the database: select 1 for H2, MySQL, PostgreSQL and Microsoft SQL Server, SELECT 1 FROM DUAL for Oracle and SELECT current date FROM sysibm.sysdummy1 for DB2. |
datasource.test-connection-on-checkin |
Boolean value. If true, an operation will be performed asynchronously on every connection checkin to verify that the connection is valid. For best performance, a proper datasource.preferred-test-query should be set. |
true |
datasource.test-connection-on-checkout |
Boolean value. If true, an operation will be performed asynchronously on every connection checkout to verify that the connection is valid. Testing Connections on checkout is the simplest and most reliable form of Connection testing. For best performance, a proper datasource.preferred-test-query should be set. |
true |
datasource.max-idle-time |
The number of seconds a connection can be pooled before being discarded. |
1800 |
datasource.max-idle-time-excess-connections |
Number of seconds that connections in excess of minPoolSize should be permitted to remain idle in the pool before being discarded. The intention is that connections remain in the pool during a load spike. |
1800 |
The connection pooling framework used is C3P0. It has extensive documentation on the settings described above.
9.3.3. Using a JNDI Datasource
If a JNDI datasource is configured in the web container or application server, the JNDI name should be set with the following properties:
| Property | Description | Default |
|---|---|---|
datasource.jndi.name |
The JNDI name of the datasource. This varies depending on the application server or web container. |
jdbc/activitiDS |
datasource.jndi.resourceRef |
Set whether the lookup occurs in a J2EE container, i.e. if the prefix "java:comp/env/" needs to be added if the JNDI name doesn’t already contain it. |
true |
Example (on JBoss EAP 6.3):
1 datasource.jndi.name=java:jboss/datasources/activitiDS
9.3.4. Hibernate Settings
The SkyVault Activiti specific logic is written using JPA 2.0 with Hibernate as implementation. Note that the Activiti Process Engine itself uses MyBatis for full control of each SQL query.
Set the following properties.
| Property | Description | Mandatory |
|---|---|---|
hibernate.dialect |
The dialect implementation that Hibernate uses. This is database specific. |
Yes. Very important to set the correct dialect, or the app might not even boot up! |
The following values are used to test SkyVault Activiti.
| Database | Dialect |
|---|---|
H2 |
org.hibernate.dialect.H2Dialect |
MySQL |
org.hibernate.dialect.MySQLDialect |
Oracle |
org.hibernate.dialect.Oracle10gDialect |
SQL Server |
org.hibernate.dialect.SQLServerDialect |
DB2 |
org.hibernate.dialect.DB2Dialect |
PostgreSQL |
org.hibernate.dialect.PostgreSQLDialect |
Optionally, the hibernate.show_sql property can be set to true if the SQL being executed needs to be printed to the log.
9.4. Business Calendar Settings
Business Calendar is used to calculate relative due dates for tasks. To exclude weekends when calculating a task’s relative due date, set the calendar.weekends property as follows:
1
2 # Weekend days comma separated (day's first 3 letters in capital)
calendar.weekends=SAT,SUN
9.5. Initial User Created on First Start Up
When the application starts for the first time, it will verify that there is at least one user in the system. If not, a user with superuser rights will be created.
The default user ID to sign in with is admin@app.activiti.com using password admin. This should be changed after signing in for the first time.
The initial user details can be modified (must be done before first start up) with following properties:
| Property | Description |
|---|---|
admin.email |
The email address used to create the first user, which also acts as the sign in identifier. |
admin.group |
Capabilities in SkyVault Activiti are managed by adding users into certain groups. The first user will have all capabilities enabled. This property defines the name of the group to which the first user will be added. By default it is 'Superusers'. |
9.6. Email Server Configuration
The application sends out emails to users on various events. For example, when a task is assigned to the user.
Set the following properties to configure the email server.
| Property | Description |
|---|---|
email.enabled |
Enables or disables the email functionality as a whole. By default, it is set to false, therefore make sure to set it to true when you require the email functionality. |
email.host |
The host address of the email server. |
email.port |
The port on which the email server is running. |
email.useCredentials |
Boolean value. Indicates if the email server needs credentials to make a connection. If so, both username and password need to be set. |
email.username |
The username used as credentials when email.useCredentials is true. |
email.password |
The password used as credentials when email.useCredentials is true. |
email.ssl |
Defines if SSL is needed for the connection to the email server. |
email.tls |
Defines if TLS is needed for the connection to the email server. This needs to be true when Google mail is used as the mail server for example. |
email.from.default |
The email address that is used in the from field of any email sent. |
email.from.default.name |
The name that is used in the from field of the email sent. |
email.feedback.default |
Some emails will have a feedback email address that people can use to send feedback. This property defines this. |
Emails are created by a template engine. The emails can contain various links to the runtime system to bring the user straight to the correct page in the web application.
Set the following property to correct the links. The example in the following table uses 'localhost' as host address and 'activiti-app' as the context root:
| Property | Example |
|---|---|
email.base.url |
9.7. Elasticsearch Configuration
Elasticsearch is an open source data store for JSON documents. Its main features include fast full text search and analytics.
Elasticsearch is used in SkyVault Activiti as a data store for generating analytics and reports. The full text search capabilities are not currently used, but will be in a future release.
There are two ways to configure Elasticsearch in the application:
-
Embedded: The Elasticsearch server starts up embedded within SkyVault Activiti. The embedded instances can be configured to autodiscover other nodes. However, this is disabled by default.
-
Client: The application only creates a client, which connects to an Elasticsearch cluster. This approach is similar to connecting to a relational database.
Note: By default, an Elasticsearch client will always be created. In the Client use case, this is all that will be instantiated. In the Embedded setup, an Elasticsearch client will be created that connects to a cluster, which also includes the local node. In Elasticsearch terminology, they are referred to as client and data nodes.
9.7.1. General Settings
The following properties are applicable to both embedded and client setup.
| Property | Description | Default |
|---|---|---|
elastic-search.cluster.name |
The name of the Elasticsearch cluster to connect to |
activiti-elastic-search-cluster |
elastic-search.node.name |
The name of the specific node of this server. The client node will have this name plus the suffix -client. In the embedded setup there will also be a data node with a -data suffix. |
activiti |
elastic-search.default.index.name |
The name of the index in which the data will be stored. Only change this if there is a name clash for some reason in your Elasticsearch installation |
activiti |
elastic-search.tenant.index.prefix |
When running SkyVault Activiti with multi-tenancy, each tenant has its own index alias. Change this value to change the prefix applied to the alias. |
activiti_tenant |
elastic-search.enable.http |
Enables the HTTP REST API of Elasticsearch. It is advised not to set this to true, unless traffic to it is strictly controlled by firewall rules. |
false |
elastic-search.enable.http.cors |
Enables (when elastic-search.enable.http is true) cross-origin resource sharing, i.e. whether a browser on another origin can do requests to Elasticsearch. |
false |
Elasticsearch nodes (both client and data Elasticsearch nodes: therefore, this applies for both embedded and client setups) need to find each other to work in a clustered setup. This can be configured using multicast or unicast:
To change the type of discovery:
| Property | Description | Default |
|---|---|---|
elastic-search.discovery.type |
The way nodes find each other: multicast or unicast. |
multicast |
When using multicast, the following properties can be set:
| Property | Description | Default |
|---|---|---|
elastic-search.discovery.multicast.group |
The multicast group address to use. |
224.2.2.4 |
elastic-search.discovery.multicast.port |
The multicast port to use. |
54328 |
elastic-search.discovery.multicast.ttl |
The time-to-live of the multicast message. |
3 |
elastic-search.discovery.multicast.address |
The address to bind to. |
All available network interfaces (0.0.0.0) |
When using unicast, only one property needs to be set:
| Property | Description | Default |
|---|---|---|
elastic-search.discovery.hosts |
The way nodes find each other: multicast or unicast. |
Either an array setting or a comma delimited setting. Each value is either in the form of host:port, or in the form of host[port1-port2] |
9.7.2. Embedded Setup
This is the default configuration. The following properties need to be set when using Elasticsearch in an embedded setup:
| Property | Description | Default |
|---|---|---|
elastic-search.server.type |
embedded |
embedded |
elastic-search.data.path |
Defines where Elasticsearch will store its data on disk. $user_home$ can be used in the path. Make sure the application or application server has the right privileges to write to this path. To back up the Elasticsearch data easily, simply backup the content of this folder. |
$user_home$/activiti-elastic-search-data |
Note: Booting up multiple SkyVault Activiti instances with Elasticsearch configured in embedded mode will not cluster. To enable Out-of-the-box clustering, set the elastic-search.discovery.type to the required type and configure it appropiately.
9.7.3. Client Setup
To connect to an external Elasticsearch cluster, set following property combined with the general settings described above.
| Property | Description |
|---|---|
elastic-search.server.type |
client |
Note that no data is stored on the server on which the application is running (contrary to the embedded setup). The data fully resides within the externally managed Elasticsearch cluster.
The version used in the application is Elasticsearch 1.7.3. It is recommended that you use the same version as the library JAR.
9.7.4. Disabling Elasticsearch
To disable Elasticsearch (embedded or the client), set the elastic-search.server.type property to none.
Note that the Analytics component will no longer work.
9.7.5. Event Processing for analytics
The event processing is closely related to the Elasticsearch configuration. The main concept is depicted in the diagram below.
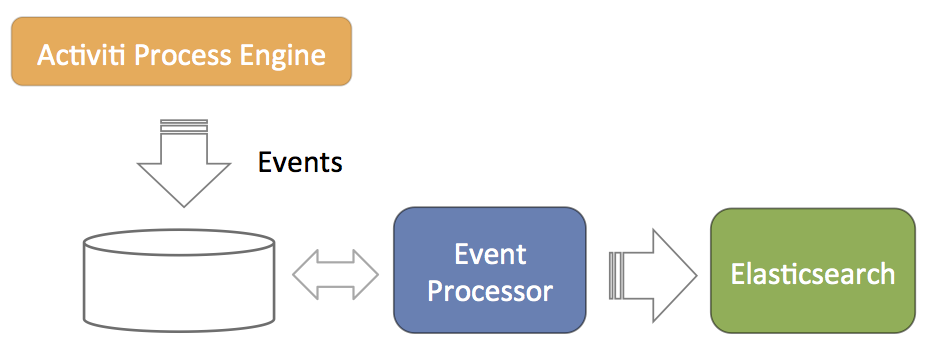
-
The Activiti Process Engine is configured to generate events related to process execution (for example, processes started, task completed, and so on). These events are stored in the database such that there is no problem with database transactions. Meaning, writing the events to the database succeeds or fails with the regular Activiti process execution data.
-
A component called event processor will asynchronously check for new entries in the database table for the events. The events will be processed and transformed to JSON.
-
The JSON event is asynchronously sent to Elasticsearch. From that point on the data will show up in the reports.
The event processor is architected to work without collisions in a multi-node clustered setup. Each of the event processors will first try to lock events before processing them. If a node goes down during event processing (after locking), an expired events processor component will pick them up and process them as regular events.
The event processing can be configured, however leaving the default values as they are helps cater for typical scenarios.
| Property | Description | Default |
|---|---|---|
event.generation.enabled |
Set to false if no Activiti events need to be generated. Do note that the reporting/analytics event data is then lost forever. |
true |
event.processing.enabled |
Set to false to not do event processing. This can be useful in a clustered setup where only some nodes do the processing. |
true |
event.processing.blocksize |
The number of events that are attempted to be locked and fetched to be processed in one transaction. Larger values equate to more memory usage, but less database traffic. |
100 |
event.processing.cronExpression |
The cron expression that defines how often the events generated by the Activiti process engine are processed (i.e. read from the database and fed into Elastic Search). By default 30 seconds. If events do not need to appear quickly in the analytics, it is advised to make this less frequent to put less load on the database. |
0/30 * * * * ? |
event.processing.expired.cronExpression |
The cron expression that defines how often 'expired' events are processed. These are events that were locked, but never processed (such as when the node processing them went down). |
0 0/30 * * * ? |
event.processing.max.locktime |
The maximum time an event can be 'locked' before it is seen as expired. After that it can be taken by another processor. Expressed in milliseconds. |
600000 |
event.processing.processed.events.action |
To keep the database table where the Activiti Process Engine writes the events small and efficient, processed events are either moved to another table or deleted. Possible values are move and delete. Move is the safe option, as it allows for reconstructing the Elasticsearch index if the index was to get corrupted for some reason. |
move |
event.processing.processed.action.cronExpression |
The cron expression that defines how often the action above happens. |
0 25/45 * * * ? |
9.7.6. Backing up Elasticsearch data
Backing up the data stored in Elasticsearch is described in detail in the Elastic search documentation. When using the snapshot functionality of ElasticSearch, you must enable the HTTP interface and create firewall rules to prevent general public from accessing it.
When running Elasticsearch in embedded mode, the folder configured to store the Elaticsearch data can also be backed up. Note that this might not include the latest changes (as they might not yet have been flushed to disk).
9.7.7. Rebuilding the Elasticsearch indices
Ocassionally, an Elasticsearch index can get corrupted and become unusable. All data that are sent to Elasticsearch is stored in the relational database (except if the property event.processing.processed.events.action has been set to delete, in which case the data is lost).
You might have to rebuild the indices when changing the core Elasticsearch settings (for example, number of shards).
Events are stored in the ACT_EVT_LOG table before they are processed. The IS_PROCESSED_ flag is set to 0 when inserting an event and changing it to 1 to process for ElasticSearch. An asynchronous component will move those table rows with '1' for the flag to the PROCESSED_ACTIVITI_EVENTS.
Therefore, to rebuilding the Elasticsearch index, you must do the following:
-
Remove the data from Elasticsearch (deleting the data folders for example in the embedded mode)
-
Copy the rows from PROCESSED_ACTIVITI_EVENTS to ACT_EVT_LOG and setting the IS_PROCESSED flag to 0 again.
To make things a little bit complex, due to historical reasons, the DATA_ column has different types in ACT_EVT_LOG (byte array) and PROCESSED_ACTIVITI_EVENTS (long text). So a data type conversion is needed when moving rows between those tables.
The following code example does that (using Java, but could be done with other languages). It also first writes the content of PROCESSED_ACTIVITI_EVENTS to a .csv file. This is also useful when this table becomes too big in size: store the data in a file and remove the rows from the database table.
9.8. Application Access and default example app
It is possible to configure whether users get access to the model editors (the Kickstart application) and the analytics application.
Access to the default application is configured through capabilities. In the admin UI, it is possible to create so-called 'system groups'. These groups have a set of capabilities. All users part of that group have those capabilities.
The following settings configure app access when a new user is created in the system (manual or through LDAP sync). To enable access, set the property app.[APP-NAME].default.enabled to true. If true, a newly created user will be given access to this app.
The access is configured by adding the user to a group with a certain capability that enabled the app. The name of that group can be configured using the app.[APP-NAME].default.capabilities.group property. If this property is set, and the app.[APP-NAME].default.enabled property is set to true, the group with this name will be used to add the user to and provide access to the app. If the group does not exist, it is created. If the property is commented, and app.[APP-NAME].default.enabled property, a default name is used.
Currently possible app names: { analytics | kickstart }
| Property | default |
|---|---|
app.analytics.default.enabled |
true |
app.analytics.default.capabilities.group |
analytics-users |
app.kickstart.default.enabled |
true |
app.kickstart.default.capabilities.group |
kickstart-users |
The following setting, if set to 'true', will create a default example app with some simple review and approve processes for every newly created user.
| Property | default |
|---|---|
app.review-workflows.enabled |
false |
9.9. Group Manager Involvement
When a task is created that has one or more candidate groups assigned, the group managers for those groups will be automatically involved with the created task. To stop group managers from being involved, set the following property to false.
| Property | default |
|---|---|
app.runtime.groupTasks.involveGroupManager.enabled |
true |
Note: Users that do not have a primary group defined may not have a group manager. To define the primary group, go to Identity Management > Users > Select an action > Change primary group.
9.10. Activiti Process Definition Cache
The Activiti Process Engine operates in a stateless way. But there is, of course, data that will never change, which makes it a prime candidate for caching.
A process definition is an example of such 'static data'. When you deploy a BPMN 2.0 XML file to the Activiti engine, the engine parses it to something it can execute, and stores the xml and some data, such as the description, business key, in the database. Such a process definition will never change. Once it’s in the database, the stored data will remain the same until the process definition is deleted.
On top of that, parsing a BPMN 2.0 XML to something executable is quite a costly operation compared with other engine operations. This is why the Activiti engine internally uses a process definition cache to store the parsed version of the BPMN 2.0 XML.
In a multi node setup, each node will have a cache of process definitions. When a node goes down and comes up, it will rebuild the cache as it handles process instances, tasks. and so on.
The process definition cache size can be set by the following property:
| Property | Description | Default |
|---|---|---|
activiti.process-definitions.cache.max |
The number of process definitions kept in memory. When the system needs to cope with many process definitions concurrently, it is advised to make this value higher than the default. |
128 |
9.11. Content Storage
SkyVault Activiti enables you to upload content, such as attaching a file to a task or a form. This content is stored on a disk with the following configuration settings for the path:
1 contentstorage.fs.rootFolder=data/
Important: When using multiple instances of the application, make sure that this path references a shared network drive. This is so that all nodes are able to access all content as the application is stateless and any server can handle any request.
9.12. Microsoft Office Integration
The Microsoft Office integration (opening an Office document directly from the browser) doesn’t need any specific configuration. However, the protocol used for the integration mandates the use of HTTPS servers by default. This means that SkyVault Activiti must run on a server that has HTTPS and its certificates are correctly configured.
If this is not possible for some reason, change the setting on the machines for each user to make this feature work.
For Windows, see:
For OS X, execute following terminal command:
defaults -currentHost write com.microsoft.registrationDB hkey_current_user\\hkey_local_machine\\software\\microsoft\\office\\14.0\\common\\internet\\basicauthlevel -int 2
Note that this is not a recommended approach from a security point of view.
9.13. Logging
The application uses SLF4J bounded to Log4j. The log4j.properties configuration file can be found in the WEB-INF/classes folder of the WAR file.
9.13.1. Logging Backend Metrics
For all REST API endpoints available in the application, metrics are gathered about runtime performance. These statistics can be written to the log.
| Property | Description | Default |
|---|---|---|
metrics.console.reporter.enabled |
Boolean value. If true, the REST API endpoint statistics will be logged. |
false |
metrics.console.reporter.interval |
The interval of logging in seconds. Do note that these logs are quite large, so this should not be set to be too frequent. |
60 |
Note that the statistics are based on the runtime timings since the last start up. When the server goes down, the metrics are lost.
Example output for one REST API endpoint:
com.activiti.runtime.rest.TaskQueryResource.listTasks
  count = 4
  mean rate = 0.03 calls/second
  1-minute rate = 0.03 calls/second
  5-minute rate = 0.01 calls/second
  15-minute rate = 0.00 calls/second
  min = 5.28 milliseconds
  max = 186.55 milliseconds
  mean = 50.74 milliseconds
  stddev = 90.54 milliseconds
  median = 5.57 milliseconds
  75% <= 141.34 milliseconds
  95% <= 186.55 milliseconds
  98% <= 186.55 milliseconds
  99% <= 186.55 milliseconds
  99.9% <= 186.55 milliseconds
9.14. External Identity Management (LDAP/Active Directory)
It’s possible to hook up a centralized user data store with SkyVault Activiti. Any server supporting the LDAP protocol can be used. Special configuration options and logic has been included to work with Active Directory (AD) systems too.
From a high-level overview, the external Identity Management (IDM) integration works as follows:
-
Periodically, all user and group information is synchronized asynchronically. This means that all data for users (name, email address, group membership etc.) is copied to the Activiti database. This is done to improve performance and to efficiently store more user data that doesn’t belong to the IDM system.
-
If the user logs in to SkyVault Activiti, the authentication request is passed to the IDM system. On successful authentication there, the user data corresponding to that user is fetched from the Activiti database and used for the various requests. Note that no passwords are saved in the Activiti database when using an external IDM.
Note that the LDAP sync only needs to be activated and configured on one node in the cluster (but it works when activated on multiple nodes, but this will of course lead to higher traffic for both the LDAP system and the database).
9.14.1. Configuration
The configuration of the external IDM authentication/synchronization is done in the same way as the regular properties. There is a properties file named activiti-ldap.properties in the WEB-INF/classes/META-INF/ folder in the WAR file. The values in a file with the same name on the classpath have precedence over the default values in the former file.
In addition, in the same folder, the example-activiti-ldap-for-ad.properties file contains an example configuration for an Active Directory system.
9.14.2. Server Connection Configuration
The following snippet shows the properties involved in configuring a connection to an LDAP server (Active Directory is similar). These are the typical parameters used when connecting with an LDAP server. Advanced parameters are commented out in the example below:
1
2
3
4
5
6
7
8
9
10
11
12
13
14
15
16
17
18
19
20
21
22
23
24
25
26
27 # The URL to connect to the LDAP server
ldap.authentication.java.naming.provider.url=ldap://localhost:10389
# The default principal to use (only used for LDAP sync)
ldap.synchronization.java.naming.security.principal=uid=admin,ou=system
# The password for the default principal (only used for LDAP sync)
ldap.synchronization.java.naming.security.credentials=secret
# The authentication mechanism to use for synchronization
#ldap.synchronization.java.naming.security.authentication=simple
# LDAPS truststore configuration properties
#ldap.authentication.truststore.path=
#ldap.authentication.truststore.passphrase=
#ldap.authentication.truststore.type=
# Set to 'ssl' to enable truststore configuration via subsystem's properties
#ldap.authentication.java.naming.security.protocol=ssl
# The LDAP context factory to use
#ldap.authentication.java.naming.factory.initial=com.sun.jndi.ldap.LdapCtxFactory
# Requests timeout, in miliseconds, use 0 for none (default)
#ldap.authentication.java.naming.read.timeout=0
# See http://docs.oracle.com/javase/jndi/tutorial/ldap/referral/jndi.html
#ldap.synchronization.java.naming.referral=follow
It is possible to configure connection pooling for the LDAP/AD connections. This is an advanced feature and only needed when creating a connection to the IDM system has an impact on system performance.
The connection pooling is implemented using the Spring-LDAP framework. Below are all the properties possible to configure. These follow the semantics of the properties possible for Spring-LDAP and are described here.
1
2
3
4
5
6
7
8
9
10
11
12
13
14
15
16
17
18
19
20
21
22
23
24
25
26
27
28
29
30
31 # -----------------------
# LDAP CONNECTION POOLING
# -----------------------
# Options=
# nothing filled in: no connection pooling
# 'jdk': use the default jdk pooling mechanism
# 'spring': use the spring ldap connection pooling facilities. These can be configured further below
#ldap.synchronization.pooling.type=spring
# Following settings follow the semantics of org.springframework.ldap.pool.factory.PoolingContextSource
#ldap.synchronization.pooling.minIdle=0
#ldap.synchronization.pooling.maxIdle=8
#ldap.synchronization.pooling.maxActive=0
#ldap.synchronization.pooling.maxTotal=-1
#ldap.synchronization.pooling.maxWait=-1
# Options for exhausted action: fail | block | grow
#ldap.synchronization.pooling.whenExhaustedAction=block
#ldap.synchronization.pooling.testOnBorrow=false
#ldap.synchronization.pooling.testOnReturn=false
#ldap.synchronization.pooling.testWhileIdle=false
#ldap.synchronization.pooling.timeBetweenEvictionRunsMillis=-1
#ldap.synchronization.pooling.minEvictableIdleTimeMillis=1800000
#ldap.synchronization.pooling.numTestsPerEvictionRun=3
# Connection pool validation (see http://docs.spring.io/spring-ldap/docs/2.0.2.RELEASE/reference/#pooling for semantics)
# Used when any of the testXXX above are set to true
#ldap.synchronization.pooling.validation.base=
#ldap.synchronization.pooling.validation.filter=
# Search control: object, oneLevel, subTree
#ldap.synchronization.pooling.validation.searchControlsRefs=
9.14.3. Authentication
To enable authentication via LDAP or AD, set the following property:
1 ldap.authentication.enabled=true
In some organizations, a case insensitive login is allowed with the ldap ID. By default, this is disabled. To enable, set following property to false.
1 ldap.authentication.casesensitive=false
Next, a property ldap.authentication.dnPattern can be set:
1 ldap.authentication.dnPattern=uid={0},ou=users,dc=alfresco,dc=com
If the users are in a flat list (e.g. one organizational unit), it’s easy: simply set the property to a value, (uid={0},ou=users,dc=alfresco,dc=com). This is also the most performant way, as the LDAP bind can be done directly.
The ID with which the user signs in will be passed into the template above (the {0} will be replaced) and the password will be validated.
However, if the users are in structured folders (organizational units for example), a direct pattern cannot be used. In this case, leave the property either empty or comment it out. Now, a query will be performed using the ldap.synchronization.personQuery (see below) with the ldap.synchronization.userIdAttributeName to find the user and their distinguished (DN) name. That DN will then be used to sign in.
When using Active Directory, two additional properties need to be set:
1
2 ldap.authentication.active-directory.enabled=true
ldap.authentication.active-directory.domain=SkyVault.com
The first property enables Active Directory support and the second property is the domain of the user ID (i.e. userId@domain) to sign in using Active Directory.
If the domain does not match with the rootDn, it is possible to set is explicitly:
ldap.authentication.active-directory.rootDn=DC=somethingElse,DC=com
And also the filter that is used(which defaults to a userPrincipalName comparison) can be changed:
ldap.authentication.active-directory.searchFilter=(&(objectClass=user)(userPrincipalName={0}))
9.14.4. Synchronization
The synchronization component will periodically query the IDM system and change the Activiti user and group database. There are two synchronization 'modes': full and differential.
Full synchronization queries all data from the IDM and checks every user, group, and membership to be valid. The resource usage is heavier than the differential synchronization in this type of synchronization and therefore, it is usually only triggered on the very first sync when SkyVault Activiti starts up and is configured to use an external IDM. This is so that all users and groups are available in the database.
To enable full synchronization:
The frequency in which it runs is set using a cron expression:
1
2 ldap.synchronization.full.enabled=true
ldap.synchronization.full.cronExpression=0 0 0 * * ?
Differential synchronization is 'lighter', in terms of performance, as it only queries the users and groups that have changed since the last synchronization. One downside is that it cannot detect deletions of users and groups. Consequently, a full synchronization needs to run periodically (but less than a differential synchronization typically) to account for these deletions.
1
2 ldap.synchronization.differential.enabled=true
ldap.synchronization.differential.cronExpression=0 0 */4 * * ?
Do note that all synchronization results are logged, both in the regular logging and in a database table named IDM_SYNC_LOG
The synchronization logic builds on two elements:
-
Queries that return the correct user/group/membership data
-
A mapping of LDAP attributes to attributes used within the Activiti system
There are a lot of properties to configure, so do base your configuration on one of the two files in the META-INF folder, as these contain default values. You only need to add the specific properties to your custom configuration file if the default values are not appropriate.
Generic Synchronization settings
These are settings that are generic or shared between user and group objects. For each property, an example setting of a 'regular' LDAP system (i.e. ApacheDS) and Active Directory is shown.
| Property | Description | LDAP Example | Active Directory Example |
|---|---|---|---|
ldap.synchronization.distinguishedNameAttributeName |
The attribute that is the 'disinguished name' in the system. |
dn |
dn |
ldap.synchronization.modifyTimestampAttributeName |
The name of the operational attribute recording the last update time for a group or user. Important for the differential query. |
modifyTimestamp |
whenChanged |
ldap.synchronization.createTimestampAttributeName |
The name of the operational attribute recording the create time for a group or user. Important for the differential query. |
createTimestamp |
whenCreated |
ldap.synchronization.timestampFormat |
The timestamp format. This is specific to the directory servers and can vary. |
yyyyMMddHHmmss.SSS’Z' |
yyyyMMddHHmmss'.0Z' |
ldap.synchronization.timestampFormat.locale.language |
The timestamp format locale language for parsing. Follows the java.util.Locale semantics. |
en |
en |
ldap.synchronization.timestampFormat.locale.country |
The timestamp format locale country. Follows the java.util.Locale semantics. |
GB |
GB |
ldap.synchronization.timestampFormat.timezone |
The timestamp format timezone. Follows the java.text.SimpleDateFormat semantics. |
GMT |
GMT |
User Synchronization Settings
| Property | Description | LDAP Example | Active Directory Example |
|---|---|---|---|
ldap.synchronization.userSearchBase |
The user search base restricts the LDAP user query to a sub section of a tree on the LDAP server. |
ou=users,dc=alfresco,dc=com |
ou=users,dc=alfresco,dc=com |
ldap.synchronization.personQuery |
The query to select all objects that represent the users to import (used in the *full synchronization query*ß). |
(objectclass\=inetOrgPerson) |
(&(objectclass\=user)(userAccountControl\:1.2.840.113556.1.4.803\:\=512)) |
ldap.synchronization.personDifferentialQuery |
The query to select objects that represent the users to import that have changed since a certain time (used in the differential synchronization query). |
(&(objectclass\=inetOrgPerson)(!(modifyTimestamp<\={0}))) |
(&(objectclass\=user)(userAccountControl\:1.2.840.113556.1.4.803\:\=512)(!(whenChanged<\={0}))) |
ldap.synchronization.userIdAttributeName |
The attribute name on people objects found in LDAP to use as the user ID in SkyVault |
uid |
cn |
ldap.synchronization.userFirstNameAttributeName |
The attribute on person objects in LDAP to map to the first name property of a user |
givenName |
givenName |
ldap.synchronization.userLastNameAttributeName |
The attribute on person objects in LDAP to map to the last name property of a user |
sn |
cn |
ldap.synchronization.userEmailAttributeName |
The attribute on person objects in LDAP to map to the email property of a user |
||
ldap.synchronization.userType |
The person type in the directory server. |
inetOrgPerson |
user |
You can configure which users should be made administrators in the system. Delimit multiple entries with a ; (Semi-colon) as commas can’t be used.
Notes:
-
No trimming of spaces will be applied.
-
The property value must be an exact string match to the user DN value not an LDAP/AD query string.
1 ldap.synchronization.tenantAdminDn=uid=joram,ou=users,dc=alfresco,dc=com;uid=tijs,ou=users,dc=alfresco,dc=com
When using multi-tenancy, the administrator of all tenants can be configured as follows. Similar rules for delimiting apply as above.
Note: The property value must be an exact string match to the user DN value not an LDAP/AD query string.
1 ldap.synchronization.tenantManagerDn=uid=joram,ou=users,dc=alfresco,dc=com
It’s important to set at least 1 user with admin rights. Otherwise no user will be able to sign into the system and administer it.
Group Synchronization Settings
| Property | Description | LDAP Example | Active Directory Example |
|---|---|---|---|
ldap.synchronization.groupSearchBase |
The group search base restricts the LDAP group query to a sub section of a tree on the LDAP server. |
ou=groups,dc=alfresco,dc=com |
ou=groups,dc=alfresco,dc=com |
ldap.synchronization.groupQuery |
The query to select all objects that represent the groups to import (used in full synchronization). |
(objectclass\=groupOfNames) |
(objectclass\=group) |
ldap.synchronization.groupDifferentialQuery |
The query to select objects that represent the groups to import that have changed since a certain time (used in the differential synchronization). |
(&(objectclass\=groupOfNames)(!(modifyTimestamp<\={0}))) |
(&(objectclass\=group)(!(whenChanged<\={0}))) |
ldap.synchronization.groupIdAttributeName |
The attribute on LDAP group objects to map to the authority name property in Activiti. |
cn |
cn |
ldap.synchronization.groupMemberAttributeName |
The attribute in LDAP on group objects that defines the DN for its members. This is an important setting as is defines group memberships of users and parent-child relations between groups. |
member |
member |
ldap.synchronization.groupType |
The group type in LDAP. |
groupOfNames |
group |
Paging
It is possible to use paging when connecting to an LDAP server (some even mandate this).
To enable paging when fetching users or groups, set following properties:
1
2 ldap.synchronization.paging.enabled=true
ldap.synchronization.paging.size=500
By default, paging is disabled.
Batch insert
It is possible to tweak the batch size when doing an LDAP sync.
The insert batch size limits the amount of data being inserted in one transaction (e.g. 100 users per transactions are inserted). By default, this is 5. The query batch size is used when data is fetched from the Activiti database (e.g. fetching users to check for deletions when doing a full sync).
1
2 ldap.synchronization.db.insert.batch.size=100
ldap.synchronization.db.query.batch.size=100
9.15. Integration With External Systems
9.15.1. SkyVault 2.0
The SkyVault 2.0 (on premise) integration can be used to:
-
Upload or link related content (e.g. for a task)
-
Upload or link content in a form
The connection for a SkyVault installation is created by an administrator through the user interface. Accounts for connecting to a SkyVault installation are created by the users themselves.
Passwords are stored encrypted in the database. An init vector and secret key are used for the encryption. These keys can be changed from the default values as follows:
1
2
3
4
5 # Passwords for non-OAuth services (eg. on-premise SkyVault) are encrypted using AES/CBC/PKCS5PADDING
# It needs a 128-bit initialization vector (http://en.wikipedia.org/wiki/Initialization_vector) and a 128-bit secret key
# represented as 16 ascii characters below
security.encryption.ivspec=9kje56fqwX8lk1Z0
security.encryption.secret=wTy53pl09aN4iOkL
Note: See the SkyVault Activiti Connector Guide for more information about integrating SkyVault Activiti with SkyVault 2.0. With the connector installed on your SkyVault 2.0 server you will be able to use the SkyVault Activiti’s Task application from SkyVault Share. If you are using SkyVault Activiti 1.3.2 with the Activiti Connector, you don’t need to have your users create the SkyVault accounts in Activiti (as mentioned above) because an SSO connection is established between the systems by default.
9.15.2. SkyVault Cloud
The SkyVault Cloud integration can be used to:
-
Upload or link related content (eg. for a task)
-
Upload or link content in a form
To integrate with SkyVault Cloud, you must have an account and be able to access to the API. To create an account, click here.
Set the following properties and copy app/rest/integration/alfresco-cloud/confirm-auth-request as-is:
1
2
3 SkyVault.cloud.clientId=abc
SkyVault.cloud.secret=abc
SkyVault.cloud.redirectUri=http://localhost:8080/activiti-app/app/rest/integration/alfresco-cloud/confirm-auth-request
Note: The redirectUri must match the host on which SkyVault Activiti is running.
By default, the SkyVault Cloud support is disabled so that it won’t show up in the upload widget. To enable SkyVault Cloud support change the SkyVault.cloud.disabled property.
1 SkyVault.cloud.disabled=false
9.15.3. Google Drive
The Google Drive integration can be used to:
-
Upload related content (eg. for a task)
-
Upload content in a form
To integrate Google Drive, you must have a valid development account to access the API. See this link for more information.
In addtion, you will need a secret key, x509 certificate url, and a client Id. These settings are provided by the Google Drive Dev Account.
1
2
3
4
5
6
7
8
9
10
11
12
13
14 # No need to change these properties
googledrive.web.auth_uri=https://accounts.google.com/o/oauth2/auth
googledrive.web.token_uri=https://accounts.google.com/o/oauth2/token
googledrive.web.auth_provider_x509_cert_url=https://www.googleapis.com/oauth2/v1/certs
# Following properties need to be changed to map to the correct url
googledrive.web.redirect_uris=http://localhost:8080/activiti-app/app/rest/integration/google-drive/confirm-auth-request
googledrive.web.javascript_origins=http://localhost:8080/activiti-app
# Following properties are provided by Google
googledrive.web.client_secret=aabbcc
googledrive.web.client_email=bla
googledrive.web.client_x509_cert_url=bla
googledrive.web.client_id=bla
By default, the Google Drive support is disabled so that it won’t show up in the upload widget. To enable Google Drive support, change the following property.
1 googledrive.web.disabled=false
9.15.4. Box
The Box integration can be used to:
-
Upload related content (e.g., for a task)
-
Upload content in a form
To integrate Box, you must have access to https://developers.box.com, the secret key, authentication urls, and client Id. These settings are provided by the Box Dev Account.
1
2
3
4
5
6
7
8
9
10
11 # No need to change these properties
box.web.auth_uri=https://app.box.com/api/oauth2/authorize
box.web.token_uri=https://app.box.com/api/oauth2/token
# Following properties need to be changed to map to the correct url
box.web.redirect_uris=http://localhost:8080/activiti-app/app/rest/integration/box/confirm-auth-request
box.web.javascript_origins=http://localhost:8080
# Following properties are provided by Box
box.web.client_id=RegisterWithBoxForYourClientId
box.web.client_secret=RegisterWithBoxForYourSecret
By default, the Box support is disabled so that it won’t show up in the upload widget. To enable Box support, change the following property:
1 box.disabled=false
9.16. Validator configuration
By default, SkyVault Activiti is configured in a way that process modelers have access to all powerful features of the Activiti engine. In many organizations this is not a problem, as the people who are modeling are trusted IT people or business analysts.
However, some organizations may expose the modeling tools of SkyVault Activiti directly to all end users giving them access to the full array of Activiti capabilities. In such a scenario, some users may gather sensitive data or swamp the resources of the servers. Therefore, various validators are introduced that can be enabled or disabled, when required. These validators are run before a process model is deployed to the engine and will block deployment in case of a validation error.
9.16.1. Disabling tasks
The following validators disable the usage of certain tasks. The various validators are configured through the regular Activiti properties. The default value for these validators is 'false'. Set the property to 'true' to enable the validator.
- validator.editor.bpmn.disable.startevent.timer|signal|message|error
-
Disables the usage of the timer, signal, message or error start event in a process definition.
- validator.editor.bpmn.disable.scripttask
-
Disables the usage of the script task in a process definition. Disabling script tasks is typically something you’ll want to do when exposing the modeling tools to end users. Scripts, contrary to the service tasks, don’t need any class on the classpath to be executed. As such, it’s very easy with scripts to execute code with bad intentions.
- validator.editor.bpmn.disable.servicetask
-
Disables the usage of the service task in a process definition. Service tasks are used to call custom logic when the process instance executes the service task. A service task is configured to either use a class that needs to be put on the classpath or an expression. This setting disables the usage of service tasks completely.
- validator.editor.bpmn.disable.executionlistener
-
Disables the possibility to define execution listeners in a BPMN process definition. Execution listeners allow to add custom logic to the process diagram that is not visible in the diagram. This setting also disables task listeners on tasks.
- validator.editor.bpmn.disable.mailtask
-
Disables the mail task that is used for sending emails.
- validator.editor.bpmn.disable.intermediatethrowevent
-
Disables the usage of all intermediate throw events: none, signal, message, error. They can be used to create infinite loops in processes.
- validator.editor.bpmn.disable.manualtask
-
Disables the usage of the manual task task in a process definition.
- validator.editor.bpmn.disable.businessruletask
-
Disables the usage of the business rule task in a process definition.
- validator.editor.bpmn.disable.cameltask
-
Disables the usage of the Camel task in a process definition. Camel tasks can interact with Apache Camel for various system integrations and have, like regular JavaDelegate classes access to the whole engine.
- validator.editor.bpmn.disable.muletask
-
Disables the usage of the Mule task in a process definition. Mule tasks are used to interact with a Mule server.
9.16.2. Limit functionality
The following validators don’t disable a task as a whole, but rather a feature:
validator.editor.bpmn.disable.startevent.timecycle: Allows the usage of a timer start event, but not with a timeCycle attribute, as it could be used to create process instances or tasks for many people very quickly, or simply to stress the system resources.
validator.editor.bpmn.limit.servicetask.only-class: Limits the service task to only be configured with a class attribute (so no expression or delegate expression is allowed). Since the available classes are restricted by what is on the classpath, there is a strict control over which logic is exposed.
validator.editor.bpmn.limit.usertask.assignment.only-idm: Limits the user task assignment to only the values that can be selected using the 'Identity Store' option in the assignment popup. The reasoning to do this, is that this is the only way 'safe' values can be selected. Otherwise, by allowing fixed values like expression, a random bean could be invoked or used to get system information.
validator.editor.bpmn.disable.loopback: Disables looping back with a sequence flow from an element to itself. If enabled, it is possible this way to create infinite loops (if not applied correctly).
validator.editor.bpmn.limit.multiinstance.loop: Limits the loop functionality of a multi instance: only a loop cardinality between 1 and 10 is allowed and a collection nor completion condition is allowed. So basically, only very simple loops are permitted. Currently applied to call activities, sub processes and service tasks.
validator.editor.dmn.expression: Validates the expressions in the decision tables to be correct according to the DMN specification. By default this is 'true' (unlike the others!). This means that by default, the DMN decision tables are checked for correctness. If using the structured expression editor to fill in the decision tables, the resulting expressions will be valid. However,if you want to type any MVEL expressions, this property needs to be set to '_false'.
9.17. License configuration
It is possible to start up the application without a license (it will then enter read only mode) and later upload one from the user interface. See below for settings that apply to that scenario.
| Property | Description | Default |
|---|---|---|
license.multi-tenant |
If no license is available on first bootstrap this property decides if system will go into single or multi tenant mode |
false |
license.default-tenant |
If no license is available on first bootstrap this property decides the name of the default tenant |
tenant |
license.allow-upload |
Decides if license uploads should be allowed in the system or not |
true |
9.18. Multi-Schema Multi-Tenancy (MS-MT)
9.18.1. What is it?
It is possible to run SkyVault Activiti in so-called "Multi-Schema Multi-Tenancy" mode ("MS-MT" in short). This is a multi-tenant setup, where every tenant has its own database schema. This means that the data of one tenant is completely separated from the data of other tenants.
This is an alternative to the "regular" multi-tenant mode, where the data of all tenants is stored in the same database schema and the data gets a "tenant tag" to identity which tenant the data belongs to. The following diagram shows this setup:
The main benefit of this setup is the ease of setup and configuration: there is no difference with setting up a single-tenant or multi-tenant. Each request can be handled by any node and the loadbalancer simply can route using simple routing algorithms.
The downside of this setup is clearly that the database can become the bottleneck if it has to hold all the data of all tenants and there is no "physical separation" of the tenant data.
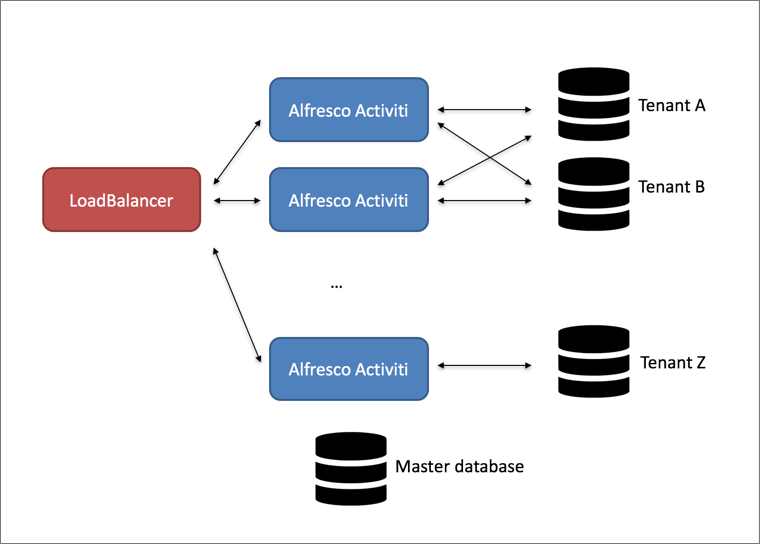
The MS-MT setup looks as follows:

The most important benefit of this approach is that the data of each tenant is completely separated from the data of other tenants. Since only data of one tenant is stored in the database schema, queries will generally be more performant.
The downside of this approach is immediately visible in this diagram: each node needs to have a connection pool to the database schema of the tenant. With many tenants, this can mean quite a bit of "housekeeping" that will need to be performed compared to the previous approach (which can be negative for performance). Note that there is a "master database" or "primary database" in this diagram. This database stores the configurations of the tenant datasources and the mapping between user and tenant.
Alternatively, as shown in the following diagram, it is possible to configure the Suite nodes as such that they only manage a certain list of tenants (for example in the picture below the last node only manages tenant Z, and the first two manage tenant A and B, but not Z). Although this alleviates the downside of the previous setup, it does come with an extra cost: the loadbalancer now needs to be more intelligent and needs to route the incoming request to the appropriate node. This means that the request needs information to differentiate as to which tenant the request is coming from. This needs custom coding on the client side and is not by default available in the SkyVault Activiti web client.
Taking this to the extreme, it is possible to have one (or more nodes) for one tenant. However, in that case it is probably easier to run a single tenant SkyVault Activiti for each tenant. The remarks about the loadbalancer and enriching the request with tenant information as in the previous setup still apply.
9.18.2. Known limitations
Currently, following known limitations apply to the MS-MT feature:
-
As with regular multi-tenancy, it is not possible to configure the out of the box LDAP synchronization to synchronize users to different tenants.
-
The tenant can only be configured through the REST API, not via the "identity management" app.
-
Users need to be created by a user that is a "Tenant Administrator", not a "Tenant Manager".
-
Updating a tenant configuration (more specifically: switching the datasource) cannot be done dynamically, a restart of all nodes is required for it to be picked up.
-
A user id needs to be unique across all tenants (cft. an email). This is because a mapping {user id, tenant id} will be stored in the primary database to determine the correct tenant datasource.
9.18.3. Technical implementation
This section describes how the MS-MT feature works and can be skipped if only interested in setting up an MS-MT SkyVault Activiti.
The MS-MT feature depends on this fundamental architecture:
-
There is one "primary datasource"
-
The configurations of the tenants is stored here (for example their datasource configuration).
-
The user to tenant mapping is stored here (although this can be replaced by custom logic).
-
The "Tenant Manager" user is stored here (as this user doesn’t belong to any tenant).
-
-
There are x datasources
-
The tenant specific data is stored here.
-
For each tenant, a datasource configuration similar to a single tenant datasource configuration needs to be provided.
-
For each tenant datasource, a connection pool is created.
-
-
When a request comes in, the tenant is determined.
-
A tenant identifier is set to a threadlocal (making it available for all subsequent logic executed next by that thread).
-
The com.activiti.database.TenantAwareDataSource switched to the correct tenant datasource based on this threadlocal.
-
The following diagram visualizes the above points: when a request comes in, the security classes for authentication (configured using Spring Security) will kick in before executing any logic. The request contains the userId. Using this userId, the primary datasource is consulted to find the tenantId that corresponds with it (note: this information is cached in a configurable way so the primary datasource is not hit on every request. But it does mean that user removals from a tenant can take a configurable amount of time to be visible on all nodes). This does mean that in MS-MT mode, there is a (very small) overhead on each request which isn’t there in the default mode.
The tenantId is now set on a threadlocal variable (mimicking how Spring Security and its SecurityContext works). If the value is ever needed, it can be retrieved through the com.activiti.security.SecurityUtils.getCurrentTenantId() method.
When the logic is now executed, it will typically start a new database transaction. In MS-MT mode, the default DataSource implementation is replaced by the com.activiti.database.TenantAwareDataSource class. This implementation returns the datasource corresponding with the tenantId value set on the threadlocal. The logic itself remains unchanged.

The MS-MT feature does have a technical impact on some other areas too:
-
All default caches (process, forms, apps, script files, …) cache based on the db id as key. In MS-MT mode, the db id is not unique over tenants and the cache switches to a 'cache per tenant' implementation.
-
Event processing (for analytics) by default polls the database for new events which needs to be sent to Elastic Search. In MS-MT mode, the events for each tenant datasource are polled.
-
The Activiti engine job executor (responsible for timers and async continuations) polls the database for new jobs to execute. In MS-MT mode, this polling needs to happen for each tenant datasource.
-
The Hibernate id generator keeps by default a pool of identifiers for each entity primary key in memory. Hibernate keeps the lastest id stored in a database table. In MS-MT mode however, there should be a pool for each tenant and the id generator needs to use the correct tenant datasource for refreshing the pool of ids.
-
A similar story applies for the Activiti core engine id generator.
9.18.4. Getting started
To run SkyVault Activiti, you need to have installed a multi-tenant license. Switching to MS-MT mode is done setting the tenancy.model property to isolated.
1 tenancy.model=isolated
When using MS-MT, there always needs to be a primary datasource. This datasource is configured exactly the same as when configuring the single datasource. For example when using a Mysql database:
1
2
3
4
5
6 datasource.url=jdbc:mysql://127.0.0.1:3306/primary-activiti?characterEncoding=UTF-8
datasource.driver=com.mysql.jdbc.Driver
datasource.username=SkyVault
datasource.password=SkyVault
hibernate.dialect=org.hibernate.dialect.MySQLDialect
Booting up SkyVault Activiti now will create the regular tables in the primary-activiti schema, plus some additional tables specific to the primary datasource (such tables are prefixed with 'MSMT_'). A default user with tenant manager capabilities is created (the login email and password can be controlled with the admin.email and admin.passwordHash properties) too.
One thing to remember is that there are no REST endpoints specific to MS-MT. All the existing tenant endpoints simply behave slightly different when running in MSMT mode. Using this tenant manager user (credentials in the basic auth header), it is now possible to add new tenants by calling the REST API:
POST http://your-domain:your-port/activiti-app/api/enterprise/admin/tenants
with the following JSON body:
1
2
3
4
5
6
7
8 {
"name" : "alfresco",
"configuration" : "tenant.admin.email=admin@alfresco.com\n
datasource.driver=com.mysql.jdbc.Driver\n
datasource.url=jdbc:mysql://127.0.0.1:3306/tenant-alfresco?characterEncoding=UTF-8\n
datasource.username=alfresco\n
datasource.password=alfresco"
}
Note that in some databases such as postgres, you may need to set the database.schema or database.catalog for database who work with catalogs.
Note the \n in the body of the configuration property.
Also note that this configuration will be stored encrypted (using the security.encryption.secret secret).
This will:
-
Create a tenant named SkyVault.
-
Data of this tenant is stored in the database schema tenant-SkyVault.
-
A default tenant administrator user with the email login admin@alfresco.com is created, with the default password admin (this can be changed after log in).
When executing this request, in the logs you will see the tenant being created in MSMT mode:
INFO com.activiti.msmt.MsmtIdmService - Created tenant 'alfresco' in primary datasource (with id '1')
Afterwards in the logs, you’ll see:
-
The datasource connection pool for this tenant being created.
-
The Liquibase logic creating the correct tables.
At the end, you’ll see the following message indicating all is ready:
INFO com.activiti.msmt.MsmtIdmService  - Created tenant 'alfresco' in tenant datasource (with id '1')
INFO com.activiti.msmt.MsmtIdmService  - Registered new user 'admin@alfresco.com' with tenant '1'
You can now log in into the web UI using admin@alfresco.com/admin, change the password and add some users. These users can of course also be added via the REST API using the tenant admin credentials.
A new tenant can easily be added in a similar way:
POST http://your-domain:your-port/activiti-app/api/enterprise/admin/tenants
with body
1
2
3
4
5
6
7
8 {
"name" : "acme",
"configuration" : "tenant.admin.email=admin@acme.com\n
datasource.driver=com.mysql.jdbc.Driver\n
datasource.url=jdbc:mysql://127.0.0.1:3306/tenant-acme?characterEncoding=UTF-8\n
datasource.username=alfresco\n
datasource.password=alfresco"
}
When the tenant admin for this tenant, admin@acme.com logs in, no data of the other one can be seen (as is usual in multi-tenancy). Also when checking the tenant-SkyVault and tenant_acme schema, you’ll see the data is contained to the tenant schema.
The tenant manager can get a list of all tenants:
GET http://your-domain:your-port/activiti-app/api/enterprise/admin/tenants
1
2
3
4
5
6
7
8
9
10 [
{
"id": 2,
"name": "acme"
},
{
"id": 1,
"name": "alfresco"
}
]
To get specific information on a tenant, including the configuration:
GET http://your-domain:your-port/activiti-app/api/enterprise/admin/tenants/1
which gives:
1
2
3
4
5
6
7
8
9
10
11
12
13
14
15 {
"id": 1,
"name": "alfresco",
"created": "2016-04-27T09:22:33.511+0000",
"lastUpdate": null,
"domain": null,
"active": true,
"maxUsers": null,
"logoId": null,
"configuration": "tenant.admin.email=admin@alfresco.com\n
datasource.driver=com.mysql.jdbc.Driver\n
datasource.url=jdbc:mysql://127.0.0.1:3306/tenant-alfresco?characterEncoding=UTF-8\n
datasource.username=alfresco\n
datasource.password=alfresco"
}
9.18.5. Behavior in a multi-node setup
Assuming a multi-node setup: when creating new tenants, the REST call is executed on one particular node. After the tenant is successfully created, users can log in and use the application without any problem on any node (so the loadbalancer can simply randomly distribute for example). However, some functionality that depends on backgrounds threads (the Activiti job executor for example) will only start after a certain period of time since the creation of the tenant on another node.
This period of time is configured via the msmt.tenant-validity.cronExpression cron expression (by default every 10 minutes).
Similarly, when a tenant is deleted, the deletion will happen on one node. It will take a certain amount of time (also configured through the msmt.tenant-validity.cronExpression property) before the deletion has rippled through all the nodes in a multi-node setup.
Note that tenant datasource configuration are not automatically picked up and require a reboot of all nodes. However, changing the datasource of a tenant should happen very infrequently.
9.18.6. Configuration properties
There are but a few configuration properties specific to MS-MT:
-
tenancy.model : possible values are shared (default if omitted) or isolated. Isolated switched a multi-tenant setup to MS-MT.
-
msmt.tenant-validity.cronExpression : the cron expression that determines how often the validity of tenants must be checked (see previous section) (by default every 10 minutes).
-
msmt.async-executor.mode : There are two implementations of the Async job executor for the Activiti core engine. The default is isolated, where for each tenant a full async executor is booted up. For each tenant there will be acquire threads, a threadpool and queue for executing threads. The alternative value for this property is shared-queue, where there are acquire threads for each tenant, but the actual job execution is done by a shared threadpool and queue. This saves some server resources, but could lead to slower job processing in case there are many jobs.
-
msmt.bootstrapped.tenants : a semicolon separated list of tenant names. Can be used to make sure one node in a multi-node setup only takes care of the tenants in the list. Does require that the loadbalancer also uses similar logic.
9.18.7. Pluggability
Following interfaces can be used to replace the default implementations of MS-MT related functionality:
-
com.activiti.api.msmt.MsmtTenantResolver : used when the user authenticates and the tenant id is determined. The default implementation uses a database table (with caching) to store the user id to tenant id relationship.
-
com.activiti.api.msmt.MsmtUserKeyResolver : works in conjuction with the Default MsmtTenantResolver, returns the user id for a user. By default returns the email or external id (if external id is used).
-
com.activiti.api.datasource.DataSourceBuilderOverride : called when a tenant datasource configuration is used to create a datasource. If there is a bean on the classpath implementing this interface, the logic will be delegated to this bean to create the javax.sql.DataSource. By default, a c3p0 DataSource / connection pool will be created for the configuration.
9.19. Cross-site Request Forgery
Cross-Site Request Forgery, also referred to as CSRF is one of the most common form of attacks plaguing web browsers. This type of attack results in a malicious request being submitted on a user’s behalf without their consent.
Typically, when the CSRF setting is enabled and an HTTP request against a web application is made, then the token values sent from the client to the server are validated to prevent unauthorized requests that were not generated by the server. The CSRF tokens are usually stored on the server and verified every time a request is sent. However, in SkyVault Activiti, this feature has been implemented slightly differently, wherein, CSRF tokens are generated on the client instead of the server and placed in a cookie CSRF-TOKEN and a header X-CSRF-TOKEN. The server side then verifies if the header and cookie values match.
Where:
X-CSRF-TOKEN = header value
CSRF-TOKEN = cookie value
This provides extra security as the cookie that belongs to SkyVault Activiti can only be accessed for pages generated or served by the SkyVault Activiti domain.
Note: The CSRF protection is only available for resources used by the web application, such as the private REST API (not public REST API).
By default, the CSRF protection setting is enabled in SkyVault Activiti, however to turn it off, make the following changes:
-
Open the activiti-app.properties file from the <ActivitiInstall>/tomcat/lib folder.
-
Locate the security.csrf.disabled setting and then modify it to true. For example:
security.csrf.disabled=true
10. Activiti Administrator
The Administrator app can be used to inspect and manage the data for an Activiti Enterprise engine (or cluster of engines). It also is used for cluster configuration and monitoring. It is distributed as a separate web application (WAR file).
Typically, there is one single Activiti Administrator application for multiple environments (e.g. development, testing, production, and so on), which is accessed by a handful of users (system administrators). As such, it is generally not necessary to have multiple instances of this application running (although it is certainly technically possible).
The Activiti Enterprise engine is cluster-enabled in the sense that, together with the Activiti Administrator, a user can configure and monitor a cluster (or multiple different clusters) through a graphical user interface. The clustered engines will use the same configuration and will report metrics and status back to the Activiti Administrator where they are displayed.
10.1. Installing Activiti Administrator
The Activiti Administrator is distributed as a regular WAR (Web Application ARchive) file that can be dropped in any Java web container.
Simply drop the activiti-admin.war file into the web container and start the web container. To make the application use your database, you must do the following:
-
Copy the correct JDBC database driver to the classpath of the web application.
-
Create a property file called activiti-admin.properties and make sure it is on the classpath of the web application. The properties must point to the correct environment settings. If no properties file is found on the classpath, then the activiti-admin (WEB-INF/classes/META-INF/activiti-admin) file is used by default.
10.1.1. Database configuration
The database for Activiti Administrator is configured exactly the same way as SkyVault Activiti. See the Database Configuration section.
For example (using MySQL):
1
2
3
4
5
6 datasource.driver=com.mysql.jdbc.Driver
datasource.url=jdbc:mysql://127.0.0.1:3306/activitiadmin?characterEncoding=UTF-8
datasource.username=SkyVault
datasource.password=SkyVault
hibernate.dialect=org.hibernate.dialect.MySQLDialect
10.1.2. Cluster Configuration and Monitoring
The Activiti Administrator can show the process data and manage the configuration of multiple clusters. In this context a cluster is a number of Activiti Enterprise engines that logically belong together. Note that this does not relate to the way that these engines are architecturally set up: embedded, exposed through REST, with or without a load balancer in front, and so on.
Also note that the Activiti Administrator is capable of inspecting the information of each enterprise Activiti Process Engine (if configured correctly). Thus, it is not solely bound to using the process engine in SkyVault Activiti, but to all enterprise Activiti process engines.
Architecture
Multiple clusters can be configured and managed through the Activiti Administrator. This is displayed in the drop-down in the top-right corner:
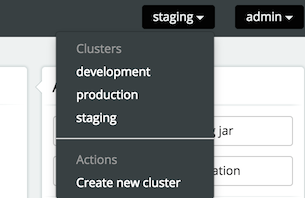
Each of the engines in a cluster should point to the same database schema. To access the data of a cluster, the Administrator application uses one Activiti REST application per cluster (to avoid direct access to the database from the Activiti Administrator or potentially to manage different engine versions).
The REST API endpoints can be included in your application using the Maven artifact com.activiti.activiti-rest. It is configured in a similar way as the Activiti Administrator.
No special setup is needed when using SkyVault Activiti, as it contains the necessary REST API endpoints out of the box.
As shown in the diagram below, any cluster can consist of multiple Activiti engine nodes (pointing to the same database schema), the data that is managed in the Activiti Administrator is fetched through an Activiti REST application only.

In the same dropdown as shown above, a new cluster can be created. Note that a user will be created when doing so. This user is configured with the role of 'cluster manager' and is used to send information to the HTTP REST API of the Admin application, but it cannot log in into the Admin application as a regular user for safety reasons.
The REST endpoint for each cluster can be configured through the Activiti Administrator. Simply change the settings for the endpoint on the Configuration > Engine page while the cluster of choice is selected in the drop-down in the top-right corner. The current endpoint configuration is also shown on this page:
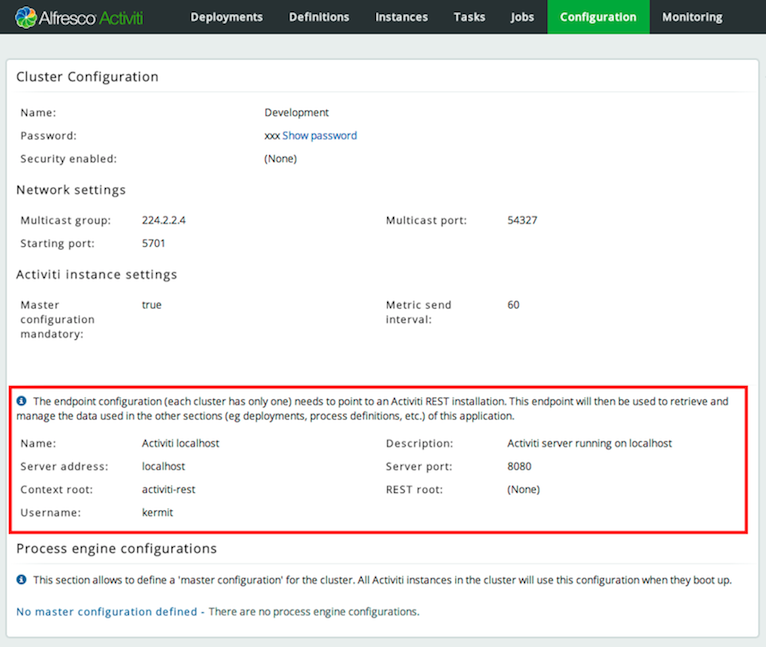
Configuration Settings
The Activiti Process Engine and the Admin app communicate through HTTP REST calls. To send or get information from the Admin app, you must configure the Activiti Process Engine with a correct url and credentials.
For the engine, this can be done programmatically:
1
2
3
4
5
6 processEngineConfig.enableClusterConfig();
processEngineConfig.setEnterpriseAdminAppUrl("http://localhost:8081/activiti-admin");
processEngineConfig.setEnterpriseClusterName("development");
processEngineConfig.setEnterpriseClusterUserName("dev");
processEngineConfig.setEnterpriseClusterPassword("dev");
processEngineConfig.setEnterpriseMetricSendingInterval(30);
This configures the base HTTP API url, the name of the cluster that the engine is part of, the credentials of the user allowed to send data to the API and the time interval between sending data to the Admin application (in seconds).
SkyVault Activiti includes the Activiti Process Engine. To enable engine clustering you can set the properties (similar to the programmatical approach) directly in the configuration file:
1
2
3
4
5
6 cluster.enable=true
cluster.config.adminapp.url=http://localhost:8081/activiti-admin
cluster.config.name=development
cluster.config.username=dev
cluster.config.password=dev
cluster.config.metricsendinginterval=30
SkyVault Activiti also sends extra metrics to the Admin application. To configure the rate of sending, a cron expression can be set (by default the same as the rate of sending for the Process Engine):
1 cluster.config.app.metricsendingcronexpression=0/30 * * * * ?
Alternatively, you can generate a jar file with these settings through the Configuration > Generate cluster jar button. If you place the jar file on the classpath (or used as a Maven dependency if using a local Maven repository) of an engine or Activiti application, it will have precedence over the properties files.
Once the application is running, metrics for that node in the cluster are shown in the Admin application:
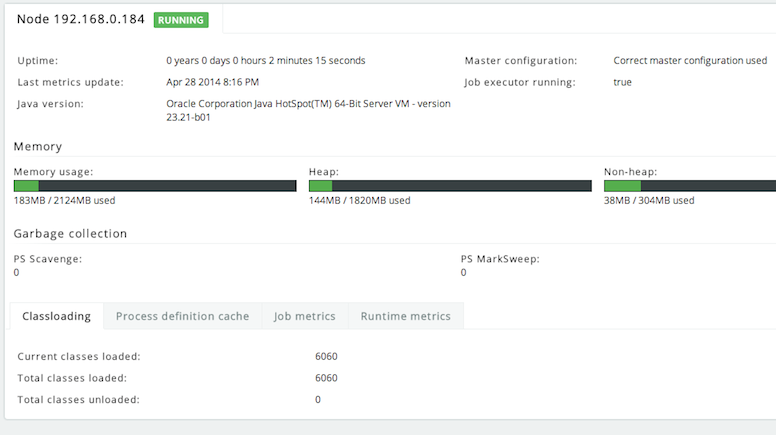
In the Admin application, the following two settings can be changed:
1
2 cluster.monitoring.max.inactive.time=600000
cluster.monitoring.inactive.check.cronexpression=0 0/5 * * * ?
-
cluster.monitoring.max.inactive.time : This a period of time, expressed in milliseconds, that indicates when a node is deemed to be inactive and is removed from the list of nodes of a cluster (nor will it appear in the 'monitoring' section of the application). When a node is properly shut down, it will send out an event indicating it is shut down. From that point on, the data will be kept in memory for the amount of time indicated here. When a node is not properly shut down (eg hardware failure), this is the period of time before removal, since the time the last event is received. Make sure the value here is higher than the sending interval of the nodes, to avoid that nodes incorrectly removed. By default 10 minutes.
-
cluster.monitoring.inactive.check.cronexpression: A cron expression that configures when the check for inactive nodes is made. When executed, this will mark any node that hasn’t been active for 'cluster.monitoring.max.inactive.time' seconds, as an inactive node. By default, every 5 minutes.
10.1.3. Master Configuration
For each cluster, a master configuration can be defined. When the instance boots up, it will request the master configuration data from the Activiti Admin application. For this to work, the cluster.x properties (or equivalent programmatic setters) listed above need to be set correctly.
There is one additional property that can be set: cluster.master.cfg.required=. This is a boolean value, which if set to true will stop the instance from booting up when the Admin app could not be reached or no master configuration is defined. In case of false, the instance will boot up using the local properties file instead of the master configuration.
The master configuration works for both clusters of embedded Activiti engines or SkyVault Activiti instances. The two can not be mixed within the same cluster though.
Note: When changing the master configuration, the cluster instances would need a reboot. The Admin application will show a warning for that node too in the 'monitoring' tab, saying the master configuration currently being used is incorrect.
10.1.4. HTTP Communication overview
Communication with the Admin Application is done using HTTP REST calls. The calls use HTTP Basic Authentication for security, but do use different users, depending on the user case.
SkyVault Activiti and Activiti Admin Application do not share user stores. The reason being:
-
There are only a handful of users typically involved with the Admin Application.
-
The Admin Application can be used independently from the Suite Application.
The following pictures gives a high-level overview:

-
The Activiti Engine pushes and pulls data to and from the Admin Application REST API. These calls use basic authentication with a user defined in the Activiti Admin Application user store (relational database). Such a user is automatically created when a new cluster configuration is created (see above), but its credentials need to be configured on the engine/Suite app side (see the cluster.xx properties.
-
The Activiti Admin Application allows to browse and manage data in an Activiti Enterprise Engine. It calls the REST API to do so, using a user defined in the user store of the Suite Application (or any other authentication mechanism for the embedded engine use case).
For SkyVault Activiti: The user needs to have a Tenant Admin or Tenant Manager role, as the Admin Application gives access to all data of the engine.
Let’s now focus on what this means for an end user:
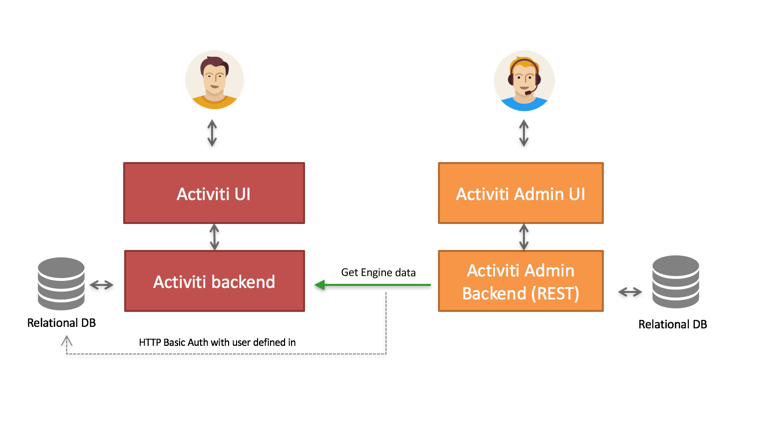
An end user logs in through the UI, both on the Suite as the Admin Application. Again, the user store is not shared between the two.
It’s important to understand that the HTTP REST calls done against the Suite REST API, are done using the credentials of the Suite application using a user defined in the user store of the Suite Application. This user can be configured through the Admin Application UI.
In case of using LDAP, a equivalent reasonining is made:

The user that logs into the Admin Application is defined in the relational database of the Admin Application. However, the HTTP REST call will now use a user that is defined in LDAP.
10.1.5. Configuring the Activiti Rest app for usage with the Activiti Admin app
When using the Activiti engine embedded in a custom application (or multiple embedded engines), it is still needed to set up a REST endpoint that the Activiti Admin app can use to communicate with to see and manage data in the engines cluster.
SkyVault Activiti already contains this REST API, so you must add this additional REST app.
Out of the box, the Activiti Rest application is configured to have a default admin user for authentication and uses an in memory H2 database. The latter of course needs to be changed to point to the same database as the engines are using.
The easiest way to do this, is to change the properties in the /WEB-INF/classes/META-INF/db.properties file with the correct datasource parameters. Make sure the driver jar is on the classpath.
To change default user, change the settings in /WEB-INF/classes/META-INF/engine.properties. In the same file, you can also configure the following basic engine settings:
-
engine.schema.update: Indicates if the database schema should be upgraded after booting the engine (if this is needed). The default value is true.
-
engine.asyncexecutor.enabled: Indicates if the async job executor is enabled. By default, it is set to false, as this is better done on the engine nodes itself otherwise you would have to make sure the classpath has all the delegates used in the various processes.
-
engine.asyncexecutor.activate: Instructs the Activiti Engine to start the Async executor thread pool at startup. The default value is false.
-
engine.history.level: The history level of the process engine. Make sure this matches the history level in the other engines in the cluster, as otherwise this might lead to inconsistent data. The default value is audit.
If these two property files are insufficient in configuring the process engine, you can override the complete process engine configuration in a Spring xml file located at /WEB-INF/classes/META-INF/activiti-custom-context.xml. Uncomment the bean definitions and configure the engine without restrictions, similar to a normal Activiti Process Engine configuration.
The out-of-the-box datasource uses C3P0 as connection pooling framework. In the same file, you can configure this datasource and transaction manager.
The application uses Spring Security for authentication. By default, it will use the Activiti identityService to store and validate the user. To change it, add a bean with id authenticationProvider to /WEB-INF/classes/META-INF/activiti-custom-context.xml. The class should implement the org.springframework.security.authentication.AuthenticationProvider interface (see Spring docs for multiple implementations).
Note: The Rest app is not compatible with using a master configuration. It needs to be configured through the properties or the spring context xml.
10.2. Using Activiti Administrator
Use the Administrator app to perform basic administration functions in Activiti. For example, you can inspect the state of Activiti engines, delete an app, view when an app was deployed, or monitor clusters.
The Admin app has the following tabs:
-
Apps - Use for deleting apps, redeploying an app to another cluster, and downloading apps.
-
Deployments - View the current deployment and its content such as process definitions, deploy time, tenant information and so on.
-
Definitions - View process definitions and their related instances.
-
Instances - View running or completed process instances for each process definition. Related information such as tasks, variables, subprocesses, jobs, decision tables, and Forms information for each process definition is available.
-
Tasks - View tasks information and perform actions on them, such as edit, assign/claim, delegate, complete tasks. In addition, you can view task forms, sub tasks, variables, and identity links for a particular task.
-
Jobs - View the current job details based on its Process Instance ID, due date, and Job Id. Exceptions are displayed if the jobs failed to execute (For example, if a mail server could not be reached).
-
Monitoring - Enables you to monitor the cluster information.
-
Configuration - Add and configure cluster information. See Cluster Configuration and Monitoring for more information.
10.3. Deploying apps
You can deploy apps in various ways in the Admin app. For example, you can simply upload and publish an app model from a zip file, deploy an existing app from one cluster to another, or redeploy an existing app model to another cluster. Deploying app models to another cluster is particularly useful when your app needs to be progressed from staging to production or copied from the development environment to production. However, when any changes made to the development environment need to be carried over to production, you should select the target cluster (the production system in this case) in the Admin app and redeploy your app.
-
To upload and publish an app model from a zip file, in the Admin App, click Apps > Publish an app model.
Prerequisite: Make sure you have configured at least two clusters. To create a new cluster, select Clusters list > Create new cluster.

To deploy an app model to a different cluster:
-
Go to Activiti Admin App > Apps and then select an app model.
-
Click Publish an app model. The Publish app model dialog box appears.
-
Select Publish app to another cluster and select the cluster you want your app to be published to.
-
Click Publish.
To redeploy an existing app to a different cluster:
-
Go to Activiti Admin app > Apps tab.
-
Select the app that you need to move to a different cluster, and then click Redploy an app to another cluster. A dialog box to select a cluster appears.
-
Select the cluster that you would like your app to be moved to, and then click Deploy. If the process app already exists, it is versioned and updated.
10.4. Downloading an app
Downloading an app is very simple: just select it and click Download app.
10.5. Deleting an app
To delete an app, simply select it and click Delete App.
11. Disclaimer
While SkyVault has used commercially reasonable efforts to ensure the accuracy of this documentation, SkyVault assumes no responsibility for the accuracy, completeness, or usefulness of any information or for damages resulting from the procedures provided.
Furthermore, this documentation is supplied "as is" without guarantee or warranty, expressed or implied, including without limitation, any warranty of fitness for a specific purpose.