- 1. Introduction
- 2. High Level Architecture
- 3. Embed the Activiti app in another application
- 4. Start and task form customisation
- 5. Custom form fields
- 6. Document Templates
- 7. Custom Logic
- 8. Cookie configuration
- 9. REST API
- 9.1. Authentication
- 9.2. Activiti Engine REST API
- 9.3. SkyVault Activiti BPM Suite API
- 9.3.1. Server Information
- 9.3.2. Profile
- 9.3.3. Runtime Apps
- 9.3.4. App Definitions List
- 9.3.5. App Import And Export
- 9.3.6. App Publish and Deploy
- 9.3.7. Process Definition Models List
- 9.3.8. Model Details and History
- 9.3.9. BPMN 2.0 Import and Export
- 9.3.10. Process Definitions
- 9.3.11. Start Form
- 9.3.12. Start Process Instance
- 9.3.13. Process Instance List
- 9.3.14. Get Process Instance Details
- 9.3.15. Delete a Process Instance
- 9.3.16. Task List
- 9.3.17. Task Details
- 9.3.18. Task Form
- 9.3.19. Completing a Task Form
- 9.3.20. Create a Standalone Task
- 9.3.21. Task Actions
- 9.3.22. User Task Filters
- 9.3.23. Comments
- 9.3.24. Checklists
- 9.3.25. User and Group lists
- 9.3.26. Thumbnails
- 9.3.27. Identity Management
Version 1.3.2, September 2015
1. Introduction
This guide describes how to develop extensions and customize SkyVault Activiti. We recommend you read the Administration Guide to make sure you have an understanding of how SkyVault Activiti can be installed and configured.
2. High Level Architecture
Following diagram gives a high level overview of the technical components in the Activiti BPM Suite:

The SkyVault Activiti BPM Suite is packaged as a regular Java Web application (WAR file) that is deployable on any supported Java web container. The WAR file contains both the Java logic, the REST API resources and the user interface html and javascript files. The application is stateless, which means it does not use any sessions, and requests can be handled by any node in a clustered setup (see later for more information on multi-node setup).
Some technical implementation details:
-
The Activiti process engine (enterprise edition) is embedded within the SkyVault Activiti BPM Suite and directly used through its Java API.
-
The REST API has two parts:
-
The REST API that exposes the Actviti API directly (see the Activiti User Guide) . Note that a user with a specific role (tenant admin or tenant manager) is needed to access this part of the REST API, for security reasons.
-
The REST API that exposes operations in the context of the applications which are part of the SkyVault Activiti BPM suite application. This REST API is used by the SkyVault Activiti BPM Suite user interface
-
-
The application requires Java 7 and is compliant with JEE 6 technologies. The Activiti Engine itself also supports Java 6, but due to components such as Elasticsearch, the SkyVault Activiti BPM Suite requires Java 7.
-
The backend logic specific to the SkyVault Activiti BPM Suite logic is implemented using Spring 4 and JPA (Hibernate).
-
All user interfaces are written using HTML5 and AngularJS
The SkyVault Activiti BPM Suite uses following external systems:
-
A relational database
-
An elasticsearch installation. Note that the application ships with an embedded elasticsearch by default which requires little configuration.
-
A file system (shared file system in multi-node setup) where content is stored
-
An identity manager store (LDAP or Active Directory) is optional. By default, a database-backed user and group store is used.
The Activiti process engine used within the SkyVault Activiti BPM Suite can be managed using the Activiti Administrator application. This is also provided as a WAR file with SkyVault Activiti BPM Suite distributions.
The Activiti Designer is an Eclipse plugin that can be used by developers to create BPMN 2.0 process definitions within their Eclipse IDE. It is possible to configure the plugin in such a way that it can pull and push process definitions model to the SkyVault Activiti BPM Suite application. For more information on the Designer plugin, see the Activiti Designer User Guide.
The application can also connect to a SkyVault 2.0 installation or to Google Drive (not shown on the diagram).
3. Embed the Activiti app in another application
The components of the Activiti app can be included in an existing / other application by referencing the correct Maven dependencies and by adding the necessary Spring configuration beans. To make it easy an example application has been created, named activiti-app-embedded-example. If you don’t have this example project as part of the Activiti app download, you can ask for a copy with your SkyVault account or sales representative. The Maven pom.xml file in this example project can be used to get an overview of all necessary Maven dependencies. The example project also contains the Spring configuration beans that are needed by the Activiti app components.
The src/main/webapp folder contains all the Javascript sources of the Activiti app in minified format. As a customer you can have access to the full Javascript source as well, but that’s provided in a separate bundle. If the context root of the application is changed be sure to change the URI configuration in the app-cfg.js file in the src/main/webapp/scripts folder.
4. Start and task form customisation
The start and task forms that are part of a task view can be customised for specific requirements. The following Javascript code example provides an overview of all the form and form field events that can be used to implement custom logic.
By default, a file name render-form-extensions.js in the workflow/extensions folder is present and loaded in the index.html file of the workflow folder. It has empty methods by default:
1
2
3
4
5
6
7
8
9
10
11
12
13
14
15
16
17
18
19
20
21
22
23
24
25
26
27
28
29
30
31
32
33
34
35
36
37
38
39
40
41
42
43
44
45
46
47
48
49
50
51
52
53
54
55
56
57
58
59
60
61
62
63
64
65
66
67
68
69
70
71
72
73
74
75
76
77
78
79
80
81
82
83
84
85
86
87
88
89
90
91
92
93
94
95
96
97
98
99
100
101
102
103
104
105
106
107
108
109
110
111
112
113
114
115
116
117
118
119
120
121
122
123
124
125
126
127
128
129
130
131
132
133
134
135
136
137
138
139
140
141
142
143
144
145 var SkyVault = SkyVault || {};
SkyVault.formExtensions = {
// This method is invoked when the form field have been rendered
formRendered:function(form, scope) {
},
// This method is invoked when input values change (ng-change function)
formFieldValueChanged:function(form, field, scope) {
},
// This method is invoked when an input field gets focus (focus event with ng-focus function)
formFieldFocus:function(form, field, scope) {
},
// This method is invoked when an input field has lost focus (blur event with ng-blur function)
formFieldBlur:function(form, field, scope) {
},
// This method is invoked when a person has been selected in the people picker
formFieldPersonSelected:function(form, field, scope) {
},
// This method is invoked when an email has been filled-in in the people picker
formFieldPersonEmailSelected:function(form, field, scope) {
},
// This method is invoked when a person has been removed in the people picker
formFieldPersonRemoved:function(form, field, scope) {
},
// This method is invoked when a group has been selected in the functional group picker
formFieldGroupSelected:function(form, field, scope) {
},
// This method is invoked when a group has been removed in the functional group picker
formFieldGroupRemoved:function(form, field, scope) {
},
// This method is invoked when content has been uploaded in the upload field
formFieldContentUploaded:function(form, field, scope) {
},
// This method is invoked when content has been removed in the upload field
formFieldContentRemoved:function(form, field, scope) {
},
// This method is invoked when the REST values or set in a dropdown, radio or typeahead field
formFieldRestValuesSet:function(form, field, scope) {
},
// This method is invoked when the complete or an outcome button has been clicked and before the task is completed.
formBeforeComplete:function(form, outcome, scope) {
},
// This method is invoked when input values change (ng-change function) in a dynamic table
formTableFieldValueChanged:function(form, field, columnDefinition, editRow, scope) {
},
// This method is invoked when an input field gets focus (focus event with ng-focus function) in a dynamic table
formTableFieldFocus:function(form, field, columnDefinition, editRow, scope) {
},
// This method is invoked when an input field has lost focus (blur event with ng-blur function) in a dynamic table
formTableFieldBlur:function(form, field, columnDefinition, editRow, scope) {
},
// This method is invoked when the REST values or set in a dropdown field in a dynamic table
formTableFieldRestValuesSet:function(form, field, columnDefinition, editRow, scope) {
},
// This method is invoked when the form fields have been rendered in the dynamic table popup
formTableRendered:function(form, field, columnDefinitions, editRow, scope) {
},
// This method is invoked when the complete button has been clicked and before the dynamic table popup is completed.
formTableBeforeComplete:function(form, field, editRow, scope) {
},
// This method is invoked when the cancel button has been clicked and before the dynamic table popup is cancelled.
formTableBeforeCancel:function(form, field, editRow, scope) {
},
// This method is invoked when input values change (ng-change function) and will disable the complete buttons when false (boolean) is returned.
formValidateFieldValueChanged:function(form, field, scope) {
},
// This method is invoked when the complete button has been clicked and will prevent the form completion when false (boolean) is returned.
formValidateBeforeSubmit:function(form, outcome, scope) {
},
// This method is invoked when input values change (ng-change function) in a dynamic table and will disable the save button when false (boolean) is returned.
formTableValidateFieldValueChanged:function(form, field, columnDefinition, editRow, scope) {
},
// This method is invoked when the complete button has been clicked and before the dynamic table popup is completed and prevent the form completion
// when false (boolean) is returned.
formTableValidateBeforeComplete:function(form, field, editRow, scope) {
},
// This method is invoked when a task is completed successfully
taskCompleted:function(taskId, form, scope) {
},
// This method is invoked when a task is completed unsuccessfully
taskCompletedError:function(taskId, errorResponse, form, scope) {
},
// This method is invoked when a task is saved successfully
taskSaved:function(taskId, form, scope) {
},
// This method is invoked when a task is saved unsuccessfully
taskSavedError:function(taskId, errorResponse, form, scope) {
}
};
This file can be changed to add custom logic. Alternatively, it is of course possible to add new javascript files and reference them in the index.html file. Do take those files in account when upgrading to newer versions of the application.
In every event method the full form variable is passed as a parameter. This form variable contains the form identifier and name, but also the full set of form fields with type and other configuration information.
In addition the changed field is passed when applicable and the Angular scope of the form renderer is also included. This is a regular Angular directive (i.e. isolated) scope, with all methods available.
For example, to get the current user:
1
2
3
4 formRendered:function(form, scope) {
var currentUser = scope.$root.account;
console.log(currentUser);
}
5. Custom form fields
Custom form field types can be added through custom form stencils. A form stencil is based on the default form stencil and can have default form field types removed, reordered, tweaked (changing the name, icon, etc.) or have new form field types.
Form stencils are defined in the Stencils section of the Kickstart App. A new form field type consists of the following:
-
An html template that is rendered when drag and dropping from the palette on the form canvas is the form builder.
-
An html template that is rendered when the form is displayed at runtime.
-
An optional custom AngularJS controller in case custom logic needs to be applied to the form field.
-
An optional list of third party scripts that are needed when working with the form field at runtime.
5.1. Example 1: Static image
This is a very basic example of a custom form field type that simply displays a static image.
Create a new form stencil in the Kickstart App and click the Add new item link.
The Form runtime template (the html used when the form is rendered at runtime) and the Form editor template (the html used in the form builder) is the same here:
1 <img src="http://activiti.org/images/activiti_logo.png"></img>
5.2. Example 2: Dynamic image
Create another new item for the form stencil. This time, we’ll create a configurable image. So unlike the static image of the previous example, here the user building the form will be able to select the image that will be displayed.
The Form runtime template needs to show the image that the form builder has selected. We’ll assume we have set a property url (see later on). Note how we’re using ng-src here (see AngularJs docs on ng-src) to have a dynamic image:
1 <img ng-src="{{field.params.customProperties.url}}"></img>
Note the syntax field.params.customProperties to get access to the non-default properties of the the form field.
The Form editor template simply needs to be a generic depiction of an image or even simpler like here, just a bit of text
1 <i>The custom image here</i>
Don’t forget to add a property url to this stencil item with the name url and type text.
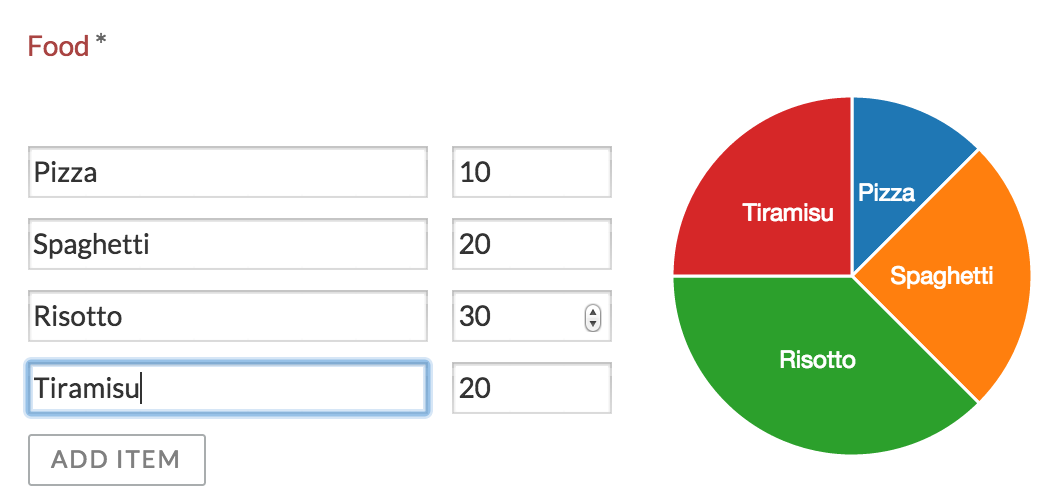
5.3. Example 3: Dynamic pie chart
This example is more advanced then the previous two: here, we’ll have a simple list of number fields with a button at the bottom to add a new line item, while generating a pie chart on the right.
We’ll use the 'Epoch' library as an example here. Download the following files from its Github site:
Create a new form stencil item and name it "Chart". Scroll down towards the Script library imports section, and upload these two libraries. At runtime, these third party libraries will be included when the form is rendered.
Note: the order in which the third party libraries are defined is important. Since the Epoch library depends on d3, d3 needs to be first in the table and epoch second (as that is the order in which they are loaded at runtime).
The Form editor template is the easy part. We could just use an image of a pie chart here.
1 <img src="url_to_pie_chart_image.png"></img>
Let’s first define the controller for this form field type. The controller is an AngularJs controller, that will do mainly three things:
-
Keep a model of the line items
-
Implement a callback for the button that can be clicked
-
Store the value of the form field in the proper format of Activiti
1
2
3
4
5
6
7
8
9
10
11
12
13
14
15
16
17
18
19
20
21
22
23
24
25
26
27
28
29
30
31
32
33
34
35
36
37
38
39
40
41
42
43
44
45
46
47
48
49
50
51
52
53
54
55
56
57
58
59
60
61
62
63
64
65
66
67
68
69
70
71
72
73
74
75
76
77
78
79
80
81
82
83
84
85
86
87
88
89
90
91 angular.module('activitiApp')
.controller('MyController', ['$rootScope', '$scope', function ($rootScope, $scope) {
console.log('MyController instantiated');
// Items are empty on initialisation
$scope.items = [];
// The variable to store the piechart data (non angular)
var pieChart;
// Epoch can't use the Angular model, so we need to clean it
// (remove hashkey etc, specific to Angular)
var cleanItems = function(items) {
var cleanedItems = [];
items.forEach(function(item) {
cleanedItems.push( { label: item.label, value: item.value} );
});
return cleanedItems;
};
// Callback for the button
$scope.addItem = function() {
// Update the model
$scope.items.push({ label: 'label ' + ($scope.items.length + 1), value: 0 });
// Update the values for the pie chart
// Note: Epoch is not an angular lib so doesn't use the model directly
if (pieChart === undefined) {
pieChart = jQuery('.activiti-chart-' + $scope.field.id).epoch({
type: 'pie',
data: cleanItems($scope.items)
});
console.log('PieChart created');
} else {
$scope.refreshChart();
}
};
// Callback when model value changes
$scope.refreshChart = function() {
pieChart.update(cleanItems($scope.items));
console.log('PieChart updated');
};
// Register this controller to listen to the form extensions methods
$scope.registerCustomFieldListener(this);
// Deregister on form destroy
$scope.$on("$destroy", function handleDestroyEvent() {
console.log("destroy event");
$scope.removeCustomFieldListener(this);
});
// Setting the value before completing the task so it's properly stored
this.formBeforeComplete = function(form, outcome, scope) {
console.log('Before form complete');
$scope.field.value = JSON.stringify(cleanItems($scope.items));
};
// Needed when the completed form is rendered
this.formRendered = function(form, scope) {
console.log(form);
form.fields.forEach(function(field) {
if (field.type === 'readonly'
&& $scope.field.id == field.id
&& field.value
&& field.value.length > 0) {
$scope.items = JSON.parse(field.value);
$scope.isDisabled = true;
pieChart = jQuery('.activiti-chart-' + $scope.field.id).epoch({
type: 'pie',
data: cleanItems($scope.items)
});
}
});
};
}]);
The Form runtime template needs to reference this controller, use the model and link the callback for the button:
1
2
3
4
5
6
7
8
9
10
11
12
13
14
15
16
17 <link rel="stylesheet" type="text/css" href="https://cdnjs.cloudflare.com/ajax/libs/epoch/0.6.0/epoch.min.css">
<div ng-controller="MyController" style="float:left;margin: 35px 20px 0 0;">
<div ng-repeat="item in items">
<input type="text" ng-model="item.label" style="width:200px; margin: 0 10px 10px 0;" ng-change="refreshChart()">
<input type="number" ng-model="item.value" style="width: 80px; margin-bottom: 10px;" ng-change="refreshChart()">
</div>
<div>
<button class="btn btn-default btn-sm" ng-click="addItem()" ng-disabled="isDisabled">
Add item
</button>
</div>
</div>
<div class="epoch category10" ng-class="'activiti-chart-' + field.id" style="display:inline-block;width: 200px; height: 200px;"></div>
<div class="clearfix"></div>
At runtime, the following will be rendered:
6. Document Templates
The document generation task/step uses a document template to generate a PDF or Microsoft Word document, based on a Word document template (.docx) where process variables can be injected.
Such a document template can be
-
Tenant wide: everybody can use the template in their processes. Useful for 'company' templates
-
Process model specific: the template is uploaded whilst modeling the process model, and is bound to the lifeycle of the process model
When exporting an App model, process model document templates will be included (and will also be uploaded again on import). Tenant document templates are not exported, but matched on the document template name (names are unique for tenant document templates).
In the .docx template, process variables can be inject using following syntax:
<<[myVariable]>>
This way of injecting variables is the easiest, but does not do any null checks (an exception will happen at runtime if null). A more advanced version looks like:
<<[variables.get("myVariable")]>>
If this variable is null, a default value will be injected instead. A default value can be provided too:
<<[variables.get("myVariable", "myDefaultValue")]>>
Note: certain form field types (like the dropdown field type) have an id and label value. The id is the technical value, used by service tasks, etc, and will be injected by default. If you want the label value to show up in the generated document (like regular people usually do), use myVariable_LABEL.
Under the hood the document generation is done using the Aspose library. More information about the template syntax and possibilities can be found in the Aspose documentation.
The audit log is also generated the same way. This is a snippet from the template, showing some more advanced constructs:
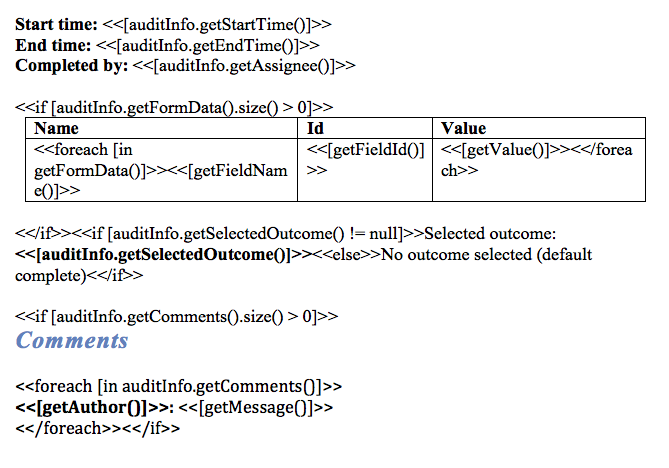
It is also possible to have custom Spring bean that processes the process variables just before rendering the document.
7. Custom Logic
Custom logic in a business process is often implemented using a JavaDelegate implementation or a Spring bean. Please see the Activiti Engine User Guide (http://activiti.org/userguide/index.html) for more information on this topic.
To build against a specific version of the SkyVault Activiti BPM Suite, add following dependency to your Maven pom.xml file:
1
2
3
4
5
6
7 <dependencies>
<dependency>
<groupId>com.activiti</groupId>
<artifactId>activiti-app-logic</artifactId>
<version>${suite.version}</version>
</dependency>
</dependencies>
7.1. Java Delegates
The simplest option is to create a class that implements the org.activiti.engine.delegate.JavaDelegate interface, like this:
1
2
3
4
5
6
7
8
9
10
11
12
13 package my.company;
import org.activiti.engine.delegate.DelegateExecution;
import org.activiti.engine.delegate.JavaDelegate;
public class MyJavaDelegate implements JavaDelegate {
public void execute(DelegateExecution execution) throws Exception {
System.out.println("Hello from the class delegate");
execution.setVariable("var1", "Hello from the class delegate");
}
}
Build a jar with this class, and add it to the classpath. In the Service task configuration, set the 'class' property to using the fully qualified classname (in this case my.company.MyJavaDelegate).
7.2. Spring Beans
Another option is to use a Spring bean. It is possible to use a delegateExpression on a service task that resolves at runtime to an instance of org.activiti.engine.delegate.JavaDelegate. Alternatively, and probably more useful, is to use a general Spring bean. The application automatically scans all beans in the com.activiti.extension.bean package. For example:
1
2
3
4
5
6
7
8
9
10
11
12
13
14
15 package com.activiti.extension.bean;
import org.activiti.engine.impl.pvm.delegate.ActivityExecution;
import org.springframework.stereotype.Component;
@Component("helloWorldBean")
public class HelloWorldBean {
public void sayHello(ActivityExecution execution) {
System.out.println("Hello from " + this);
execution.setVariable("var3", " from the bean");
}
}
Build a jar with this class, and add it to the classpath. To use this bean in a service task, set the expression property to ${helloWorldBean.sayHello(execution)}.
It is possible to define custom configuration classes (using the Spring Java Config approach) if this is needed (for example when sharing dependencies between delegate beans, complex bean setup, etc.). The application automatically scans for configuration classes in the package com.activiti.extension.conf; package. For example:
1
2
3
4
5
6
7
8
9
10
11
12
13
14 package com.activiti.extension.conf;
import org.springframework.context.annotation.Bean;
import org.springframework.context.annotation.Configuration;
@Configuration
public class CustomConfiguration {
@Bean
public SomeBean someBean() {
return new SomeBean();
}
}
Which can be injected in the bean that will be called in a service task:
1
2
3
4
5
6
7
8
9
10
11
12
13
14
15
16
17
18 package com.activiti.extension.bean;
import org.springframework.beans.factory.annotation.Autowired;
import org.springframework.stereotype.Component;
import com.activiti.extension.conf.SomeBean;
@Component("helloWorldBeanWithInjection")
public class HelloWorldBeanWithInjection {
@Autowired
private SomeBean someBean;
public void sayHello() {
System.out.println(someBean.getValue());
}
}
To get the current user, it is possible to use the com.activiti.common.security.SecurityUtils helper class.
7.3. Default Spring Beans
The following beans are available out of the box in the Activiti BPM Suite:
7.3.1. Audit Log Bean ("auditLogBean")
The auditLogBean can be used to generate audit logs in .pdf format for a process instance or a task. The log will be saved as a field value to the process (and the task if a task audit log is generated).
The following code can be used in the expression of a service task to generate a process instance audit log named 'My first process instance audit log'. The third argument determines if the current date shall be appended to the file name. The pdf will be associated with the process field 'myFieldName'.
${auditLogBean.generateProcessInstancePdf(execution, 'My first process instance audit log', true, 'myFieldName')}
To create a task audit log named 'My first task audit log' add the following expression to the "complete" event in a task listener. Again the third argument determines if the current date shall be appended to the file name. The pdf will be associated with the field 'myFieldName'.
${auditLogBean.generateTaskPdf(task, 'My first task audit log', true, 'myFieldName')}
It is also possible to view the audit logs from within the My Tasks app by clicking the "Audit Log" link when viewing the details of a completed process or task. When doing so the following 2 rest calls are made.
Process instance audit log:
GET app/rest/process-instances/{process-instance-id}/audit
Task audit log:
GET app/rest/tasks/{task-id}/audit
7.3.2. Document Merge Bean ("documentMergeBean")
The documentMergeBean can be used to merge the content of multiple documents (files of type .doc or .docx) from a process into a single document which will be become the value of a provided process variable. The filename of the new document will be set to the filename of the first field in the list followed by the string "_merged" and the suffix from the same field.
In the following example the content of 'myFirstField' and 'mySecondField' will be merged into a new document with the field id set to 'myFirstField' and the filename set to: "<filename-from-myFirstField>_merged.<filenameSuffix-from-myFirstFields>". The new document will become the value of a process variable named 'myProcessVariable'.
${documentMergeBean.mergeDocuments('myFirstField,mySecondField', 'myProcessVariable', execution)}
7.3.3. Email Bean ("emailBean")
The emailBean can be used to retrieve the email of the current user or the process initiatior.
To get the email of the current user use the following expression where 123 is the userId:
${emailBean.getEmail(123)}
To get the email of the process initiatior use the following expression:
${emailBean.getProcessInitiator(execution)}
7.3.4. User Info Bean ("userInfoBean")
The userInfoBean makes it possible to get access to general information about a user or just the email of a user.
To get general information about a user (the data that can be found in com.activiti.domain.idm.User) use the following expression where userId is the database id of the user and can be supplied either as a Long or a String.
${userInfoBean.getUser(123)}
To get the email of a user use the following expression where 123 is the database id of the user and can be supplied either as a Long or a String.
${userInfoBean.getEmail(123)}
7.4. Hook points
A hook point is a place where custom logic can be added. Typically this is done by implementing a certain interface and putting the class implementing the interface on the classpath where it can be found by the classpath component scanning (package com.activiti.extension.bean for example)..
7.4.1. Login/LogoutListener
interface: com.activiti.api.security.LoginListener and com.activiti.api.security.LogoutListener
Maven module: activiti-app-logic
An implementation of this class will get a callback when a user logs in or logs out.
Example:
1
2
3
4
5
6
7
8
9
10
11
12
13
14 package com.activiti.extension.bean;
@Component
public class MyLoginListener implements LoginListener {
private static final Logger logger = LoggerFactory.getLogger(GfkLoginListener.class);
public void onLogin(User user) {
logger.info("User " + user.getFullName() + " has logged in");
}
}
7.4.2. Process engine configuration configurer
interface: com.activiti.api.engine.ProcessEngineConfigurationConfigurer
Maven module: activiti-app-logic
An implementation of this class will get called when the Activiti process engine configuration is initialized, but before the process engine is built. This allows for customization to the process engine configuration.
Example:
1
2
3
4
5
6
7
8 @Component
public class MyProcessEngineCfgConfigurer implements ProcessEngineConfigurationConfigurer {
public void processEngineConfigurationInitialized( SpringProcessEngineConfiguration springProcessEngineConfiguration) {
... // Tweaking the process engine configuration
}
}
7.4.3. Document generation variables processing
interface: com.activiti.api.docgen.TemplateVariableProcessor
Maven module: activiti-app-logic
This is the context of the 'document generation' task (generating a document based on a MS Word docx template).
An implementation of this class will get called before the variable is passed to the template processor, making it possible to change the value that will be used in the template where the variable name is used.
Example:
1
2
3
4
5
6
7
8 @Component
public class MyTemplateVariableProcessor implements TemplateVariableProcessor {
public Object process(org.activiti.engine.delegate.DelegateExecution execution, String variableName, Object value) {
return value.toString() + "___" + "HELLO_WORLD";
}
}
This example implementation very simplistically adds "HELLO_WORLD" to all variable usages in the template. Of course, smarter implementations based on process definition lookup, etc. are possible.
7.5. Custom Rest endpoints
It’s possible to add custom REST endpoints to the BPM Suite, both in the regular REST API (used by the BPM Suite html/javascript UI) and the public API (using basic authentication instead of cookies).
The REST API in the SkyVault Activiti BPM Suite is built using Spring MVC. Please check the Spring MVC documentation on how to create new Java beans to implement REST endpoints.
To build against the REST logic of the SkyVault Activiti BPM Suite and its specific dependencies, add following dependency to your Maven pom.xml file:
1
2
3
4
5
6
7 <dependencies>
<dependency>
<groupId>com.activiti</groupId>
<artifactId>activiti-app-rest</artifactId>
<version>${suite.version}</version>
</dependency>
</dependencies>
The bean needs to be in the com.activiti.extension.rest package to be found!
A very simple example is shown below. Here, the Activiti TaskService is injected and a custom response is fabricated. Of course, this logic can be anything.
1
2
3
4
5
6
7
8
9
10
11
12
13
14
15
16
17
18
19
20
21
22
23
24
25
26
27
28
29
30
31
32
33
34
35
36
37
38
39
40 package com.activiti.extension.rest;
import com.activiti.domain.idm.User;
import com.activiti.security.SecurityUtils;
import org.activiti.engine.TaskService;
import org.springframework.beans.factory.annotation.Autowired;
import org.springframework.web.bind.annotation.RequestMapping;
import org.springframework.web.bind.annotation.RequestMethod;
import org.springframework.web.bind.annotation.RestController;
@RestController
@RequestMapping("/rest/my-rest-endpoint")
public class MyRestEndpoint {
@Autowired
private TaskService taskService;
@RequestMapping(method = RequestMethod.GET, produces = "application/json")
public MyRestEndpointResponse executeCustonLogic() {
User currentUser = SecurityUtils.getCurrentUserObject();
long taskCount = taskService.createTaskQuery().taskAssignee(String.valueOf(currentUser.getId())).count();
MyRestEndpointResponse myRestEndpointResponse = new MyRestEndpointResponse();
myRestEndpointResponse.setFullName(currentUser.getFullName());
myRestEndpointResponse.setTaskCount(taskCount);
return myRestEndpointResponse;
}
private static final class MyRestEndpointResponse {
private String fullName;
private long taskCount;
// Getters and setters
}
}
Create a jar containing this class, and add it to the SkyVault Activiti BPM Suite classpath.
A class like this in the com.activiti.extension.rest package will be added to the rest endpoints for the application (e.g. for use in the UI), which use the cookie approach to determine the user. The url will be mapped under /app. So, if logged in into the UI of the BPM Suite, one could go to http://localhost:8080/activiti-app/app/rest/my-rest-endpoint and see the result of the custom rest endpoint:
{"fullName":" Administrator","taskCount":8}
To add a custom REST endpoint to the public REST API, protected by basic authentication, a similar class should be placed in the com.activiti.extension.api package:
1
2
3
4
5
6
7
8
9
10
11
12
13
14
15
16
17
18
19
20
21
22
23
24
25
26
27
28
29
30
31
32
33
34
35
36
37
38
39
40 package com.activiti.extension.api;
import com.activiti.domain.idm.User;
import com.activiti.security.SecurityUtils;
import org.activiti.engine.TaskService;
import org.springframework.beans.factory.annotation.Autowired;
import org.springframework.web.bind.annotation.RequestMapping;
import org.springframework.web.bind.annotation.RequestMethod;
import org.springframework.web.bind.annotation.RestController;
@RestController
@RequestMapping("/my-api-endpoint")
public class MyApiEndpoint {
@Autowired
private TaskService taskService;
@RequestMapping(method = RequestMethod.GET, produces = "application/json")
public MyRestEndpointResponse executeCustonLogic() {
User currentUser = SecurityUtils.getCurrentUserObject();
long taskCount = taskService.createTaskQuery().taskAssignee(String.valueOf(currentUser.getId())).count();
MyRestEndpointResponse myRestEndpointResponse = new MyRestEndpointResponse();
myRestEndpointResponse.setFullName(currentUser.getFullName());
myRestEndpointResponse.setTaskCount(taskCount);
return myRestEndpointResponse;
}
private static final class MyRestEndpointResponse {
private String fullName;
private long taskCount;
// Getters and setters
}
}
Which can be accessed like the regular API:
> curl -u admin@app.activiti.com:password http://localhost:8080/activiti-app/api/my-api-endpoint

> {"fullName":" Administrator","taskCount":8}
Note: due to classloading, it is currently not possible to put jars with these custom rest endpoints in the global or common classpath (for example tomcat/lib for Tomcat). They should be put in the web application classpath (for example WEB-INF/lib).
8. Cookie configuration
The SkyVault Activiti BPM Suite uses an HTTP cookie to store a user session. Multiple cookies per uses (for different browsers or devices) are possible. The application uses a database table to store the cookie values (called tokens internally), to allow a shared persistent session store in a multi-node setup.
It’s possible to change the settings regarding cookies:
| Property | description | default |
|---|---|---|
security.cookie.max-age |
The maximum age of a cookie, expressed in seconds. The max-age determines the period in which the browser will send the cookie with the requests. |
2678400 (31 days) |
security.cookie.refresh-age |
To avoid that a users is suddenly logged out when using the application when reaching the max-age above, tokens are refreshed after this period (expressed in seconds). Refreshing means a new token will be created and a new cookie will be returned which the browser will use for subsequent requests. Setting the refresh-age low, will result in many new database rows when the user is using the application. |
86400 (1 day) |
By default, cookies will have the secure flag set, when the request being made is HTTPS. If you only want to use the remember-me cookie over HTTPS (i.e. make the secure flag mandatory), set the following property to true:
| Property | default |
|---|---|
security.cookie.always-secure |
false |
To avoid that the persistent token table gets too full, a background job periodically removes obsolete cookie token values. Possible settings:
| Property | description | default |
|---|---|---|
security.cookie.database-removal.max-age |
The maximum age an entry in the database needs to have to be removed. |
Falls back to the security.cookie.max-age setting if not found. This effectively means that cookies which are no longer valid could be removed immediately from the database table. |
security.cookie.database-removal.cronExpression |
The cron expression determining when the obsolete database table entries for the cookie values will checked for removal. |
0 0 1 * * ? (01:00 at night) |
9. REST API
The SkyVault Activiti BPM Suite comes with a REST API. It includes both an Enterprise equivalent of the Activiti Open Source REST API exposing the generic Activiti Engine operations, and a dedicated set op REST API endpoints specific for the functionality in the SkyVault Activiti BPM Suite.
Note that there is also an 'internal' REST API, which are the REST endpoints used by the Javascript UI. It is advised not to use this API, these REST API urls and way of using it will change and evolve with the product and are unsupported. The supported API is stable. Also, the internal REST API uses a different authentication mechanism tailored towards web browser usage.
9.1. Authentication
The REST API uses Basic Authentication for user authentication. This means that every request needs to have the Authorization header appropriately set.
9.2. Activiti Engine REST API
The Activiti Engine REST API is a supported equivalent of the Activiti Open Source API. This means that all operations described in the Activiti User Guide are available as documented there, except for REST endpoints that are not relevant for the enterprise product (e.g. forms, as they are implemented differently).
This REST API is available on <your-server-and-context-root>/api/
For example: fetching process definitions is described in the Activiti User Guide as an HTTP GET on repository/process-definitions. This maps to <your-server-and-context-root>/api/repository/process-definitions.
Important: requests on this REST API can only be done using a user that is a tenant admin (responsible for one tenant) or a tenant manager (responsble for many tenants). This matches the Actviti Engine (Java) Api, which is agnostic of user permissions. This means that when calling any of the operations, the tenant identifier must always be provided in the url, even if the system does not have multi tenancy (there will always be one tenant in that case).
9.3. SkyVault Activiti BPM Suite API
This REST API exposes data and operations which are specific to the SkyVault Activiti BPM Suite. In contrast to the Activiti Engine REST API it can be called using any user. The following sections describe the various REST API endpoints.
9.3.1. Server Information
To retrieve information about the Activiti BPM Suite version:
GET api/enterprise/app-version
Response:
1
2
3
4
5
6
7 {
"edition": "SkyVault Activiti Enterprise BPM Suite",
"majorVersion": "1",
"revisionVersion": "0",
"minorVersion": "2",
"type": "bpmSuite",
}
9.3.2. Profile
This operation returns account information for the current user. This is useful to get the name, email, the groups that the user is part of, the user picture, etc.
GET api/enterprise/profile
Response:
1
2
3
4
5
6
7
8
9
10
11
12
13
14
15
16
17
18
19
20
21
22
23
24
25
26
27
28
29
30
31
32
33
34
35
36
37
38
39
40
41
42
43
44
45
46
47
48
49
50
51
52
53
54
55
56
57
58
59
60
61 {
"tenantId": 1,
"firstName": "John",
"password": null,
"type": "enterprise",
"company": null,
"externalId": null,
"capabilities": null,
"tenantPictureId": null,
"created": "2015-01-08T13:22:36.198+0000",
"pictureId": null,
"latestSyncTimeStamp": null,
"tenantName": "test",
"lastName": "Doe",
"id": 1000,
"lastUpdate": "2015-01-08T13:34:22.273+0000",
"email": "johndoe@alfresco.com",
"status": "active",
"fullname": "John Doe",
"groups": [
{
"capabilities": null,
"name": "analytics-users",
"tenantId": 1,
"users": null,
"id": 1,
"groups": null,
"externalId": null,
"status": "active",
"lastSyncTimeStamp": null,
"type": 0,
"parentGroupId": null
},
{
"capabilities": null,
"name": "Engineering",
"tenantId": 1,
"users": null,
"id": 2000,
"groups": null,
"externalId": null,
"status": "active",
"lastSyncTimeStamp": null,
"type": 1,
"parentGroupId": null
},
{
"capabilities": null,
"name": "Marketing",
"tenantId": 1,
"users": null,
"id": 2001,
"groups": null,
"externalId": null,
"status": "active",
"lastSyncTimeStamp": null,
"type": 1,
"parentGroupId": null
}
]
}
To update user information (first name, last name or email):
POST api/enterprise/profile
The body of the request needs to be a json looking like
1
2
3
4
5
6 {
"firstName" : "John",
"lastName" : "Doe",
"email" : "john@alfresco.com",
"company" : "Alfresco"
}
To get the user picture, use following REST call:
GET api/enterprise/profile-picture
To change this picture, do an HTTP POST to the same url, with the picture as multipart file in the body.
Finally, to change the password:
POST api/enterprise/profile-password
with a json body that looks like
1
2
3
4 {
"oldPassword" : "12345",
"newPassword" : "6789"
}
9.3.3. Runtime Apps
When a user logs in into the SkyVault Activiti BPM Suite, the landing page is displayed containing all the apps that the user is allowed to see and use.
The corresponding REST API request to get this information is
GET api/enterprise/runtime-app-definitions
Response:
1
2
3
4
5
6
7
8
9
10
11
12
13
14
15
16
17
18
19
20
21
22
23
24
25
26
27
28
29
30
31
32
33
34 {
"size": 3,
"total": 3,
"data": [
{
"deploymentId": "26",
"name": "HR processes",
"icon": "glyphicon-cloud",
"description": null,
"theme": "theme-6",
"modelId": 4,
"id": 1
},
{
"deploymentId": "2501",
"name": "Sales onboarding",
"icon": "glyphicon-asterisk",
"description": "",
"theme": "theme-1",
"modelId": 1002,
"id": 1000
},
{
"deploymentId": "5001",
"name": "Engineering app",
"icon": "glyphicon-asterisk",
"description": "",
"theme": "theme-1",
"modelId": 2001,
"id": 2000
}
],
"start": 0
}
The id and modelId property of the apps are important here, as they are used in various operations described below.
9.3.4. App Definitions List
To retrieve the app definitions (note that this means all app definitions, not only those deployed at runtime):
GET api/enterprise/models?filter=myApps&modelType=3&sort=modifiedDesc
The request parameters
-
filter : can be myApps, sharedWithMe, sharedWithOthers or favorite
-
modelType : must be 3 for app definition models
-
sort : modifiedDesc, modifiedAsc, nameAsc or nameDesc (default modifiedDesc)
9.3.5. App Import And Export
It is possible to export app definitions and import them again. From the REST API point of view, this is useful to bootstrap an environment (for users or continous integration).
To export an app definition, you need the modelId from a runtime app or the id of an app definition model, and call
GET api/enterprise/app-definitions/{modelId}/export
This will return a zip file containing the app definition model and all related models (process definitions and forms).
To import an app again, post the zip file as multipart file to
POST api/enterprise/app-definitions/import
To import an app to an existing app definition to create a new version instead of importing a new app definition, post the zip file as multipart file to
POST api/enterprise/app-definitions/{modelId}/import
9.3.6. App Publish and Deploy
Before an app model can be used, it need to be published. This can be done through following call:
POST api/enterprise/app-definitions/{modelId}/publish
A JSON body is required for the call. You can either use an empty one or one looking like
1
2
3
4 {
"comment": "",
"force": false
}
At this point, the user can add it to his/her landing page, by deploying the published app:
POST api/enterprise/runtime-app-definitions
with in the body one property appDefinitions which is an array of ids looking like
1
2
3 {
"appDefinitions" : [{"id" : 1}, {"id" : 2}]
}
9.3.7. Process Definition Models List
To retrieve a list of process definition models:
GET api/enterprise/models?filter=myprocesses&modelType=0&sort=modifiedDesc
The request parameters
-
filter : can be myprocesses, sharedWithMe, sharedWithOthers or favorite
-
modelType : must be 0 for process definition models
-
sort : modifiedDesc, modifiedAsc, nameAsc or nameDesc (default modifiedDesc)
9.3.8. Model Details and History
Both app definition and process definition models are versioned.
To retrieve details about a particular model:
GET api/enterprise/models/{modelId}
Example response:
1
2
3
4
5
6
7
8
9
10
11
12
13
14
15
16
17
18 {
"createdBy": 1,
"lastUpdatedBy": 1,
"lastUpdatedByFullName": " Administrator",
"name": "aad",
"id": 2002,
"referenceId": null,
"favorite": false,
"modelType": 0,
"comment": "",
"version": 3,
"lastUpdated": "2015-01-10T16:24:27.893+0000",
"stencilSet": 0,
"description": "",
"createdByFullName": " Administrator",
"permission": "write",
"latestVersion": true
}
The response shows the current version of the model.
To retrieve a thumbnail of the model:
GET api/enterprise/models/{modelId}/thumbnail
To get the version information for a model:
GET api/enterprise/models/{modelId}/history
Example response:
1
2
3
4
5
6
7
8
9
10
11
12
13
14
15
16
17
18
19
20
21
22
23
24
25
26
27
28
29
30
31
32
33
34
35
36
37
38
39
40
41
42
43 {
"size": 2,
"total": 2,
"data": [
{
"createdBy": 1,
"lastUpdatedBy": 1,
"lastUpdatedByFullName": " Administrator",
"name": "aad",
"id": 3000,
"referenceId": null,
"favorite": null,
"modelType": 0,
"comment": "",
"version": 2,
"lastUpdated": "2015-01-10T16:15:50.579+0000",
"stencilSet": 0,
"description": "",
"createdByFullName": " Administrator",
"permission": null,
"latestVersion": false
},
{
"createdBy": 1,
"lastUpdatedBy": 1,
"lastUpdatedByFullName": " Administrator",
"name": "aad",
"id": 2000,
"referenceId": null,
"favorite": null,
"modelType": 0,
"comment": null,
"version": 1,
"lastUpdated": "2015-01-10T16:07:41.831+0000",
"stencilSet": 0,
"description": "",
"createdByFullName": " Administrator",
"permission": null,
"latestVersion": false
}
],
"start": 0
}
To get a particular older version:
GET api/enterprise/models/{modelId}/history/{modelHistoryId}
9.3.9. BPMN 2.0 Import and Export
To export a process definition model to a BPMN 2.0 xml file:
GET api/enterprise/models/{processModelId}/bpmn20
For a previous version of the model:
GET api/enterprise/models/{processModelId}/history/{processModelHistoryId}/bpmn20
To import a BPMN 2.0 xml file:
POST api/enterprise/process-models/import
With the BPMN 2.0 xml file in the body as a multipart file.
9.3.10. Process Definitions
Get a list of process definitions (visible within the tenant of the user):
GET api/enterprise/process-definitions
Example response:
1
2
3
4
5
6
7
8
9
10
11
12
13
14
15
16
17
18
19 {
"size": 5,
"total": 5,
"data": [
{
"id": "demoprocess:1:7504",
"name": "Demo process",
"description": null,
"key": "demoprocess",
"category": "http://www.activiti.org/test",
"version": 1,
"deploymentId": "7501",
"tenantId": "tenant_1",
"hasStartForm": true
},
...
],
"start": 0
}
Following parameters are possible
-
latest: a boolean value, indicating that only the latest versions of process definitions must be returned
-
appDefinitionId: when provided, only return process definitions belonging to a certain app
9.3.11. Start Form
When a process definitions has a start form (hasStartForm is true in the call above), the start form can be retrieved as follows:
GET api/enterprise/process-definitions/{process-definition-id}/start-form
Example response:
1
2
3
4
5
6
7
8
9
10
11
12
13
14
15
16
17
18
19
20
21
22
23
24
25
26
27
28
29
30
31
32
33
34
35
36
37
38
39
40
41
42
43
44
45
46
47
48
49
50
51
52
53
54
55
56
57
58
59
60
61
62
63
64
65
66
67
68
69
70
71
72
73
74
75
76
77
78
79
80
81
82
83
84
85
86
87
88
89
90
91
92
93
94
95
96
97
98
99
100
101
102
103
104
105
106
107 {
"processDefinitionId": "p1:2:2504",
"processDefinitionName": "p1",
"processDefinitionKey": "p1",
"fields": [
{
"fieldType": "ContainerRepresentation",
"id": "container1",
"name": null,
"type": "container",
"value": null,
"required": false,
"readOnly": false,
"overrideId": false,
"placeholder": null,
"optionType": null,
"hasEmptyValue": null,
"options": null,
"restUrl": null,
"restIdProperty": null,
"restLabelProperty": null,
"layout": null,
"sizeX": 0,
"sizeY": 0,
"row": 0,
"col": 0,
"visibilityCondition": null,
"fields": {
"1": [
{
"fieldType": "FormFieldRepresentation",
"id": "label1",
"name": "Label1",
"type": "text",
"value": null,
"required": false,
"readOnly": false,
"overrideId": false,
"placeholder": null,
"optionType": null,
"hasEmptyValue": null,
"options": null,
"restUrl": null,
"restIdProperty": null,
"restLabelProperty": null,
"layout": {
"row": 0,
"column": 0,
"colspan": 1
},
"sizeX": 1,
"sizeY": 1,
"row": 0,
"col": 0,
"visibilityCondition": null
}
],
"2": [ ]
}
},
{
"fieldType": "DynamicTableRepresentation",
"id": "label21",
"name": "Label 21",
"type": "dynamic-table",
"value": null,
"required": false,
"readOnly": false,
"overrideId": false,
"placeholder": null,
"optionType": null,
"hasEmptyValue": null,
"options": null,
"restUrl": null,
"restIdProperty": null,
"restLabelProperty": null,
"layout": {
"row": 10,
"column": 0,
"colspan": 2
},
"sizeX": 2,
"sizeY": 2,
"row": 10,
"col": 0,
"visibilityCondition": null,
"columnDefinitions": [
{
"id": "p2",
"name": "c2",
"type": "String",
"value": null,
"optionType": null,
"options": null,
"restUrl": null,
"restIdProperty": null,
"restLabelProperty": null,
"required": true,
"editable": true,
"sortable": true,
"visible": true
}
]
}
],
"outcomes": [ ]
}
Note: to retrieve field values (eg. the typeahead field), following REST endpoint can be used:
GET api/enterprise/process-definitions/{processDefinitionId}/start-form-values/{field}
This returns a list of form values.
9.3.12. Start Process Instance
POST api/enterprise/process-instances
with a json body that contains following properties:
-
processDefinitionId : the process definition id
-
name: the name to give to the created process instance
-
values: this is a json object with the the form field id - formd field values. The id of the form field is retrieved from the start form call (see above).
-
outcome: if the start form has outcomes, this is one of those values
The response will contain the process instance details (including the id).
Once started, the completed form can be fetched using
GET /enterprise/process-instances/{processInstanceId}/start-form
9.3.13. Process Instance List
To get the list of process instances:
POST api/enterprise/process-instances/query
with a json body containing the query parameters. Following parameters are possible:
-
processDefinitionId
-
appDefinitionId
-
state (possible values are running, completed and all
-
sort (possible values are created-desc, created-asc, ended-desc, ended-asc)
-
page (for paging, default 0)
-
size (for paging, default 25)
Example response:
1
2
3
4
5
6
7
8
9 {
"size": 6,
"total": 6,
"start": 0,
"data":[
{"id": "2511", "name": "Test step - January 8th 2015", "businessKey": null, "processDefinitionId": "teststep:3:29",…},
...
]
}
9.3.14. Get Process Instance Details
GET api/enterprise/process-instances/{processInstanceId}
9.3.15. Delete a Process Instance
DELETE api/enterprise/process-instances/{processInstanceId}
9.3.16. Task List
POST api/enterprise/tasks/query
with a json body containing the query parameters. Following parameters are possible
-
appDefinitionId
-
processInstanceId
-
processDefinitionId
-
text (the task name will be filtered with this, using like semantics : %text%)
-
assignment
-
assignee : where the current user is the assignee
-
candidate: where the current user is a task candidate
-
group_x: where the task is assigned to a group where the current user is a member of. The groups can be fetched through the profile REST endpoint
-
no value: where the current user is involved
-
-
state (completed or active)
-
sort (possible values are created-desc, created-asc, due-desc, due-asc)
-
page (for paging, default 0)
-
size (for paging, default 25)
Example response:
1
2
3
4
5
6
7
8
9
10
11
12
13
14
15
16
17
18
19
20
21
22
23
24
25
26
27
28
29 {
"size": 6,
"total": 6,
"start": 0,
"data":[
{
"id": "2524",
"name": "Task",
"description": null,
"category": null,
"assignee":{"id": 1, "firstName": null, "lastName": "Administrator", "email": "admin@app.activiti.com"…},
"created": "2015-01-08T10:58:37.193+0000",
"dueDate": null,
"endDate": null,
"duration": null,
"priority": 50,
"processInstanceId": "2511",
"processDefinitionId": "teststep:3:29",
"processDefinitionName": "Test step",
"processDefinitionDescription": null,
"processDefinitionKey": "teststep",
"processDefinitionCategory": "http://www.activiti.org/test",
"processDefinitionVersion": 3,
"processDefinitionDeploymentId": "26",
"formKey": "5"
}
,...
]
}
9.3.17. Task Details
GET api/enterprise/tasks/{taskId}
Response is similar to the list response.
9.3.18. Task Form
GET api/enterprise/task-forms/{taskId}
The response is similar to the response from the start form (see above).
Form field values that are populated through a REST backend, can be retrieved using
GET api/enterprise/task-forms/{taskId}/form-values/{field}
Which returns a list of form field values
9.3.19. Completing a Task Form
POST api/enterprise/task-forms/{taskId}
with a json body that contains
-
values: this is a json object with the the form field id - formd field values. The id of the form field is retrieved from the start form call (see above).
-
outcome: if the start form has outcomes, this is one of those values
9.3.20. Create a Standalone Task
To create a task (for the user in the authentication credentials) that is not associated with a process instance:
POST api/enterprise/tasks
with a json body that contains following properties:
-
name
-
description
9.3.21. Task Actions
To update the details of a task:
PUT api/enterprise/task/{taskId}
with a json body that can contain name, description and dueDate (ISO 8601 string)
For example:
Example response:
1
2
3
4
5 {
"name" : "name-updated",
"description" : "description-updated",
"dueDate" : "2015-01-11T22:59:59.000Z"
}
To complete a task (standalone or without a task form) (note: no json body needed!) :
PUT api/enterprise/tasks/{taskId}/action/complete
To claim a task (in case the task is assigned to a group):
PUT api/enterprise/tasks/{taskId}/action/claim
No json body needed. The task will be claimed by the user in the authentication credentials.
To assign a task to a user:
PUT api/enterprise/tasks/{taskId}/action/assign
with a json body that contains the assignee property which has as value the id of a user.
To involve a user with a task:
PUT api/enterprise/tasks/{taskId}/action/involve
with a json body that contains the userId property which has as value the id of a user.
To remove an involved user from a task:
PUT api/enterprise/tasks/{taskId}/action/remove-involved
with a json body that contains the userId property which has as value the id of a user.
To attach a form to a task:
PUT api/enterprise/tasks/{taskId}/action/attach-form
with a json body that contains the formId property which has as value the id of a form.
To attach a form to a task:
DELETE api/enterprise/tasks/{taskId}/action/remove-form
9.3.22. User Task Filters
Custom task queries can be saved as a user task filter. To get the list of task filters for the authenticated user:
GET api/enterprise/filters/tasks
with an option request parameter appId to limit the results to a specific app.
To get a specific user task filter:
GET api/enterprise/filters/tasks/{userFilterId}
To create a new user task filter:
POST api/enterprise/filters/tasks
with a json body that contains following properties:
-
name : name of the filter
-
appId : app id where the filter can be used
-
icon : path of the icon image
-
filter
-
sort : created-desc, created-asc, due-desc or due-asc
-
state : open, completed
-
assignment : involved, assignee or candidate
-
To update a user task filter:
PUT api/enterprise/filters/tasks/{userFilterId}
with a json body that contains following properties:
-
name : name of the filter
-
appId : app id where the filter can be used
-
icon : path of the icon image
-
filter
-
sort : created-desc, created-asc, due-desc or due-asc
-
state : open, completed
-
assignment : involved, assignee or candidate
-
To delete a user task filter:
DELETE api/enterprise/filters/tasks/{userFilterId}
To order the list of user task filters:
PUT api/enterprise/filters/tasks
with a json body that contains following properties:
-
order : array of user task filter ids
-
appId : app id
To get a list of user process instance filters
GET api/enterprise/filters/processes
with an option request parameter appId to limit the results to a specific app.
To get a specific user process instance task filter
GET api/enterprise/filters/processes/{userFilterId}
To create a user process instance task filter
PUT api/enterprise/filters/processes
with a json body that contains following properties:
-
name : name of the filter
-
appId : app id where the filter can be used
-
icon : path of the icon image
-
filter
-
sort : created-desc, created-asc
-
state : running, completed or all
-
To update a user process instance task filter
PUT api/enterprise/filters/processes/{userFilterId}
with a json body that contains following properties:
-
name : name of the filter
-
appId : app id where the filter can be used
-
icon : path of the icon image
-
filter
-
sort : created-desc, created-asc
-
state : running, completed or all
-
To delete a user process instance task filter
DELETE api/enterprise/filters/processes/{userFilterId}
9.3.23. Comments
Comments can be added to a process instance or a task. To get the list of comments:
GET api/enterprise/process-instances/{processInstanceId}/comments
GET api/enterprise/tasks/{taskId}/comments
To create a comments:
POST api/enterprise/process-instances/{processInstanceId}/comments
POST api/enterprise/tasks/{taskId}/comments
with in the json body one property called message, with a value that is the comment text.
9.3.24. Checklists
Checklists can be added to a task. To get a checklist:
GET api/enterprise/tasks/{taskId}/checklist
To create a checklist:
POST api/enterprise/tasks/{taskId}/checklist
Example request body:
1
2
3
4
5
6
7
8
9
10
11
12
13
14
15
16
17
18
19
20 {
"name": "Task",
"description": null,
"category": null,
"assignee":{"id": 1, "firstName": null, "lastName": "Administrator", "email": "admin@app.activiti.com"…},
"created": "2015-01-08T10:58:37.193+0000",
"dueDate": null,
"endDate": null,
"duration": null,
"priority": 50,
"processInstanceId": "2511",
"processDefinitionId": "teststep:3:29",
"processDefinitionName": "Test step",
"processDefinitionDescription": null,
"processDefinitionKey": "teststep",
"processDefinitionCategory": "http://www.activiti.org/test",
"processDefinitionVersion": 3,
"processDefinitionDeploymentId": "26",
"formKey": "5"
}
To change the order of the items on a checklist:
PUT api/enterprise/tasks/{taskId}/checklist
with a json body that contains an ordered list of checklist items ids:
-
order : array of checklist item ids
9.3.25. User and Group lists
A common use case is that a user wants to select another user (eg. when assigning a task) or group.
Users can be retrieved with
GET api/enterprise/users
with following parameters
-
filter: to filter on the user first and last name
-
email: to retrieve users by email
-
externalId: to retieve users using the external id (set by the LDAP sync, if used)
-
excludeTaskId: filters out users already part of this task
-
excludeProcessId: filters out users already part of this process instance
Example response:
1
2
3
4
5
6
7
8
9
10
11
12
13
14
15
16
17
18
19 {
"size": 2,
"total": 2,
"start": 0,
"data": [
{
"id": 1,
"firstName": null,
"lastName": "Administrator",
"email": "admin@app.activiti.com"
},
{
"id": 1000,
"firstName": "John",
"lastName": "Doe",
"email": "johndoe@alfresco.com"
}
]
}
To retrieve a picture of a user:
GET api/enterprise/users/{userId}/picture
Groups can be retrieved with
GET api/enterprise/groups
with optional parameter filter that filters on group name.
Example response:
1
2
3
4
5
6
7
8
9
10
11
12
13
14
15
16
17 {
"size": 2,
"total": 2,
"data": [
{
"externalId": null,
"name": "Engineering",
"id": 2000
},
{
"externalId": null,
"name": "Marketing",
"id": 2001
}
],
"start": 0
}
Get the users for a given group:
GET api/enterprise/groups/{groupId}/users
Example response:
1
2
3
4
5
6
7
8
9
10
11
12
13
14
15
16
17
18
19
20
21
22
23
24
25 {
"size": 3,
"total": 3,
"data": [
{
"email": "john@alfresco.com",
"lastName": "Test",
"firstName": "John",
"id": 10
},
{
"email": "mary@alfresco.com",
"lastName": "Test",
"firstName": "Mary",
"id": 8
},
{
"email": "patrick@alfresco.com",
"lastName": "Test",
"firstName": "Patrick",
"id": 9
}
],
"start": 0
}
with a json body that contains following properties:
-
order : array of user task filter ids ==== Content
Content (documents and other files) can be attached to process instances and tasks.
To retrieve which content is attached to a process instance:
GET api/enterprise/process-instances/{processInstanceId}/content
likewise, for a task:
GET api/enterprise/tasks/{taskId}/content
Example response:
1
2
3
4
5
6
7
8
9
10
11
12
13
14
15
16
17
18
19
20
21
22
23
24
25
26 {
"size": 5,
"total": 5,
"start": 0,
"data": [
{
"id": 4000,
"name": "tasks.PNG",
"created": "2015-01-01T01:01:01.000+0000",
"createdBy": {
"id": 1,
"firstName": "null",
"lastName": "Admin",
"email": "admin@app.activiti.com",
"pictureId": 5
},
"contentAvailable": true,
"link": false,
"mimeType": "image/png",
"simpleType": "image",
"previewStatus": "queued",
"thumbnailStatus": "queued"
}
,...
]
}
To get content metadata:
GET api/enterprise/content/{contentId}
To delete content:
DELETE api/enterprise/content/{contentId}
To get the actual bytes for content:
GET api/enterprise/content/{contentId}/raw
To upload content to a process instance:
POST api/enterprise/process-instances/{processInstanceId}/raw-content
where the body contains a multipart file.
To upload content to a task:
POST api/enterprise/process-instances/{taskId}/raw-content
where the body contains a multipart file.
To relate content (eg from SkyVault) to a process instance:
POST api/enterprise/process-instances/{processInstanceId}/content
where the json body contains following properties:
-
name
-
link (boolean)
-
source
-
sourceId
-
mimeType
-
linkUrl
Example body (from SkyVault OnPremise):
1
2
3
4
5
6
7 {
"name":"Image.png",
"link":true,
"source":"alfresco-1",
"sourceId":"30358280-88de-436e-9d4d-8baa9dc44f17@swsdp",
"mimeType":"image/png"
}
To upload content for a task:
POST api/enterprise/process-instances/{taskId}/content
where the json body contains following properties:
-
name
-
link (boolean)
-
source
-
sourceId
-
mimeType
-
linkUrl
In case of a start form with content fields, there is no task or process instance to related to. Following REST endpoints can be used:
POST api/enterprise/content/raw
9.3.26. Thumbnails
To retrieve the thumbnail of a certain piece of content:
GET api/enterprise/content/{contentId}/rendition/thumbnail
9.3.27. Identity Management
These are operations to manage tenants, groups and users. This is useful for example to bootstrap environments with the correct identity data.
Tenants
Following REST endpoints are only available for users that are either a tenand admin or a tenant manager. The tenant capability also depends for some operations on the type of license (multi-tenant license or not).
Get all tenants (tenant manager only):
GET api/enterprise/admin/tenants
Create a new tenant (tenant manager only):
POST api/enterprise/admin/tenants
the json body of this post contains two properties: name and active (boolean).
Update a tenant:
PUT api/enterprise/admin/tenants/{tenantId}
the json body of this post contains two properties: name and active (boolean).
Get tenant details:
GET api/enterprise/admin/tenants/{tenantId}
Delete a tenant
DELETE api/enterprise/admin/tenants/{tenantId}
Get tenant events:
GET api/enterprise/admin/tenants/{tenantId}/events
Get tenant logo:
GET api/enterprise/admin/tenants/{tenantId}/logo
Change tenant logo:
POST api/enterprise/admin/tenants/{tenantId}/logo
where the body is a multi part file.
Users
Following REST endpoints are only available for users that are either a tenand admin or a tenant manager.
Get a list of users:
GET api/enterprise/admin/users
with parameters
-
filter : name filter
-
status : possible values are pending, inactive, active, deleted
-
sort : possible values are createdAsc, createdDesc, emailAsc or emailDesc (default createdAsc)
-
page : for paging.
-
size : for paging
Create a new user
POST api/enterprise/admin/users
with a json body that needs to have following properties:
-
email
-
firstName
-
lastName
-
password
-
status (possible values are pending, inactive, active, deleted)
-
type (enterprise or trial. Best to set this to enterprise)
-
tenantId
Update user details:
PUT api/enterprise/admin/users/{userId}
with a json body containing email, firstName and lastName
Update user password:
PUT api/enterprise/admin/users
with a json body like
1
2
3
4 {
"users" : [1098, 2045, 3049]
"password" : "123"
}
Note that the users property is an array of user ids. This allows for bulk changes.
Update user status:
PUT api/enterprise/admin/users
with a json body like
1
2
3
4 {
"users" : [1098, 2045, 3049]
"status" : "inactive"
}
Note that the users property is an array of user ids. This allows for bulk changes.
Update user tenant id (only possible for _tenant manager):
PUT api/enterprise/admin/users
with a json body like
1
2
3
4 {
"users" : [1098, 2045, 3049]
"tenantId" : 1073
}
Note that the users property is an array of user ids. This allows for bulk changes.
Groups
Following REST endpoints are only available for users that are either a tenand admin or a tenant manager.
Internally, there are two types of groups: * functional groups: these map to organisational units * system groups: these are used to give users capabilities (a capability is assigned to a group, and every member gets the capability)
Get all groups:
GET api/enterprise/admin/groups
Optional parameters: * tenantId : only relevant for tenant manager user * functional (boolean): only return functional groups if true
Get group details:
GET api/enterprise/admin/groups/{groupId}
Example response:
1
2
3
4
5
6
7
8
9
10
11
12
13
14
15
16
17
18
19
20
21
22
23
24
25
26
27
28
29
30
31
32
33
34
35
36
37
38
39
40
41
42
43
44
45
46
47
48
49
50
51
52
53
54
55
56
57 {
"capabilities": [{
"name": "access-reports",
"id": 1
}],
"name": "analytics-users",
"tenantId": 1,
"users": [
{
"tenantId": 1,
"firstName": null,
"password": null,
"type": "enterprise",
"company": null,
"externalId": null,
"capabilities": null,
"tenantPictureId": null,
"created": "2015-01-08T08:30:25.164+0000",
"pictureId": null,
"latestSyncTimeStamp": null,
"tenantName": null,
"lastName": "Administrator",
"id": 1,
"lastUpdate": "2015-01-08T08:30:25.164+0000",
"email": "admin@app.activiti.com",
"fullname": " Administrator",
"groups": null
},
{
"tenantId": 1,
"firstName": "John",
"password": null,
"type": "enterprise",
"company": null,
"externalId": null,
"capabilities": null,
"tenantPictureId": null,
"created": "2015-01-08T13:22:36.198+0000",
"pictureId": null,
"latestSyncTimeStamp": null,
"tenantName": null,
"lastName": "Doe",
"id": 1000,
"lastUpdate": "2015-01-08T13:34:22.273+0000",
"email": "johndoe@alfresco.com",
"fullname": "John Doe",
"groups": null
}
],
"id": 1,
"groups": [],
"externalId": null,
"status": "active",
"lastSyncTimeStamp": null,
"type": 0,
"parentGroupId": null
}
Optional request arameter includeAllUsers (boolean value, by default true) to avoid getting all the users at once (not ideal if there are many users).
In that case, the following call can be used:
1 GET api/enterprise/admin/groups/{groupId}/users?page=2&pageSize=20
Create new group:
POST api/enterprise/admin/groups
where the json body contains following properties:
-
name
-
tenantId
-
type (0 for system group, 1 for functional group)
-
parentGroupId (only possible for functional groups. System groups can’t be nested)
Update a group:
PUT api/enterprise/admin/groups/{groupId}
Only the name property can be in the json body.
Delete a group:
DELETE api/enterprise/admin/groups/{groupId}
Add a user to a group:
POST api/enterprise/admin/groups/{groupId}/members/{userId}
Delete a user from a group:
DELETE api/enterprise/admin/groups/{groupId}/members/{userId}
Get the list of possible capabilities for a system group:
GET api/enterprise/admin/groups/{groupId}/potential-capabilities
Add a capability from previous list to the group:
POST api/enterprise/admin/groups/{groupId}/capabilities
where the json body contains one property capabilities that is an array of strings.
Remove a capability from a group:
DELETE api/enterprise/admin/groups/{groupId}/capabilities/{groupCapabilityId}
Alfreco repositories
A tenant administrator can configure one or more SkyVault repositories to use when working with content. To retrieve the SkyVault repositories configured for the tenant of the user used to do the request:
GET api/enterprise/profile/accounts/SkyVault
which returns something like:
1
2
3
4
5
6
7
8
9
10
11
12
13
14
15
16
17
18
19
20
21
22
23
24
25
26
27
28
29 {
"size": 2,
"total": 2,
"data": [
{
"name": "TS",
"tenantId": 1,
"id": 1,
"accountUsername": "jbarrez",
"created": "2015-03-26T14:24:35.506+0000",
"shareUrl": "http://ts.alfresco.com/share",
"lastUpdated": "2015-03-26T15:37:21.174+0000",
"repositoryUrl": "http://ts.alfresco.com/alfresco",
"alfrescoTenantId": ""
},
{
"name": "TsTest",
"tenantId": 1,
"id": 1000,
"accountUsername": "jbarrez",
"created": "2015-03-26T15:37:36.448+0000",
"shareUrl": "http://tstest.alfresco.com/share",
"lastUpdated": "2015-03-26T15:37:36.448+0000",
"repositoryUrl": "http://tstest.alfresco.com/alfresco",
"alfrescoTenantId": ""
}
],
"start": 0
}