- 1. Introduction
- 2. The SkyVault Activiti app
- 2.1. Kickstart app
- 2.2. Task app
- 2.3. Profile management
- 2.4. Identity management
- 2.5. Analytics app
- 2.6. Step editor
- 2.7. BPMN editor
- 2.8. Form editor
- 2.9. Creating your first process
- 2.10. Creating your first app
- 2.11. Starting your first process
- 2.12. Creating a single task
- 3. The SkyVault Activiti Share connector
- 4. BPMN 2.0 Introduction
- 5. BPMN 2.0 Constructs
- 5.1. Events
- 5.2. Sequence flow
- 5.3. Gateways
- 5.4. Tasks
- 5.4.1. User task
- 5.4.2. Script task
- 5.4.3. Service task
- 5.4.4. Web service task
- 5.4.5. Business rule task
- 5.4.6. Mail task
- 5.4.7. Mule task
- 5.4.8. Camel task
- 5.4.9. Manual task
- 5.4.10. Receive task
- 5.4.11. Shell task
- 5.4.12. Execution listener
- 5.4.13. Task listener
- 5.4.14. Multi-instance
- 5.4.15. Compensation handlers
- 5.5. Sub-Processes and Call Activities
- 5.6. Transactions and Concurrency
- 5.7. Process initiation authorization
- 5.8. Data objects
- 5.9. Custom extensions
- 6. Disclaimer
Version 1.3.2, September 2015
1. Introduction
Activiti is a BPM platform that you can run on-premise or host on a private or public cloud, single or multi-tenant.
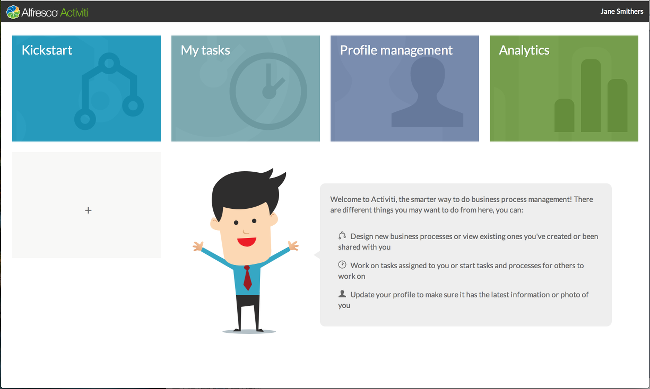
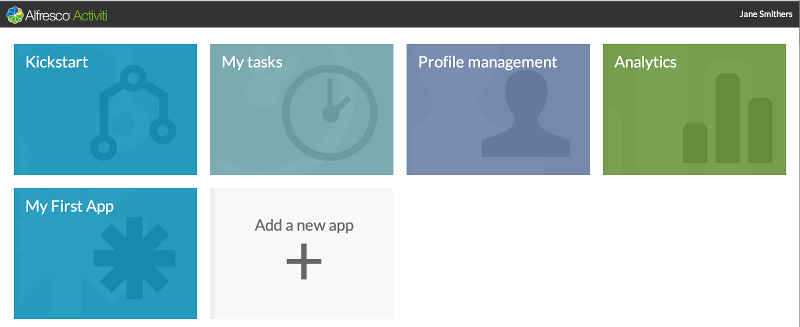
Once you have registered and signed in for the first time, you’ll see your Landing Page with some helpful hints from James.
1.1. Personal profile
The first thing you might want to do is add a photo to your profile, so click on the Profile management tile.
On the Personal page you can edit your details, such as your name, change your password, and also view your group membership and capabilities.

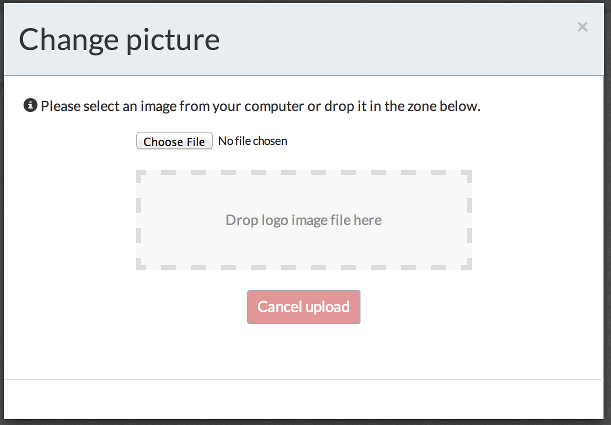
To add your photo, click on the image to the left of your name and upload a photo to use.

1.2. Navgation
You can click on the SkyVault Activiti logo at any time to return to your Landing Page, so now you’ve got your photo uploaded, let’s return there.
The Kickstart tile takes you to the process design tools, while the My Tasks tile takes you to your task inbox or queue. The Analytics tile takes you to a set or reports on process performance. Depending on the capabilities of your account you may not get access to Kickstart or Analytics.
If you have administrator capabilities, then the Profile management tile will show as the Identity management tile, giving access to your profile page as well as to user, group and capability management pages for your tenant or the whole system.
1.3. Kickstart for Process Design
Click on the Kickstart tile and you will be taken to the set of tools you can use to design business processes. There are several main pages within Kickstart: - Process a library of processes created by the Visual or Step Editors - Forms a library of forms that can be referenced from process models - Apps a library of Process App that define packages of process models - Stencils a library of process palette definitions that can be used by the process editors
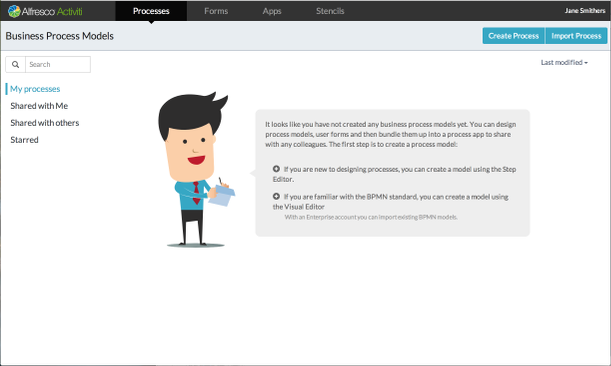
You will land on the Process page by default and have the option of creating a new process or editing an existing process model. If your account has the capability, you can also import existing models defined in the BPMN 2.0 standard format. Let’s start by creating a process model using the Step Editor. You can do this by clicking on the hint given by James, or by clicking the Create Process button. You will be presented with a dialog that allows you to give a name and description to the model, as well as specify which editor to use and which stencil. Give your process a name and click the Create new process button in the dialog. You will then be taken to the Step Editor.
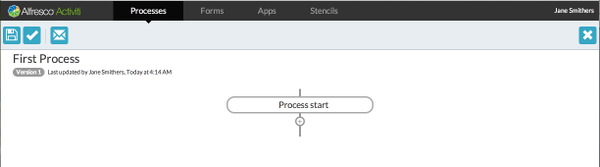
The Step Editor allows you to define a business process through a sequence of steps. There a number of Steps provided by default, but this can depend on the Stencil that you selected for editing the process model.
We’re going to begin by setting the process to start by the user completing a form. Click on the Process start box and it will expand to allow you to choose to start by filling a form.
If you already had some forms in your Forms library you could pick one, otherwise click the Create form button.
You will now be taken to the Form Editor. Any form you create this way will not be generally available in your Forms library as it was created as part of this process model. If you wish to create a form you can reuse in other process models, you can do this from the main Forms page. As we’re happy for this form to be just used by this process, we’ll continue defining the form from the Step Editor. The Form Editor has two main tabs: one for the layout of form fields, the other to define the outcome buttons for the form.
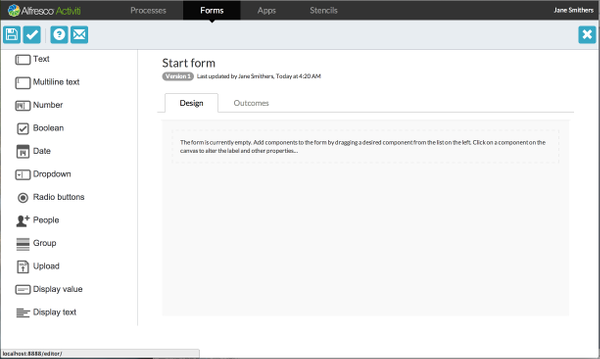
To design the form layout you can drag and drop the desired types of field from the palette on the left side. For each field dropped in the Design area, you can hover over it to either select the pencil icon to edit the field’s properties or to remove the field from the form. Depending on the type of field you will have different options. Most fields allow you to give a display label, which can be used later in the process design to reference a value entered into a field by a user in a running process. You can also define if the field is required to be filled before the form can be completed. For now, just give labels for the fields.
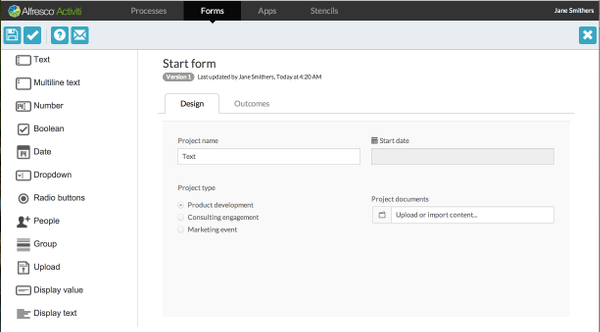
When you’ve finished designing the form, click the Save button at the top left and you will be returned to the Step Editor. By clicking on the + icon at the bottom of the Process start box you can add the first step in your process. The steps available to you are defined by the Stencil you created the model with. In the default stencil there is a Human step that can be used to assign a task to a user. Select the Human step and fill in a name within the step box just created.
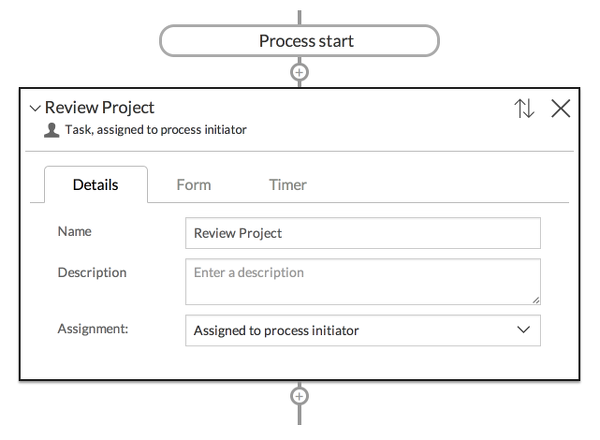
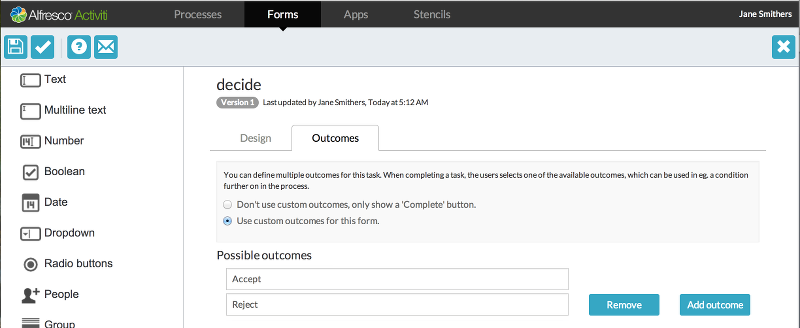
You can also choose who this task should be assigned to, including the person who initiated the process; a single user; a set of candidate users; or depending on your type of account, a group of users. When a task is assigned to a group or a list of candidate users, all of those users can see the task in their task list, but need to claim it in order to complete the task. For this process, we’re going to keep all tasks assigned to the process initiator so you can run the process and have the tasks assigned to yourself to keep things simple. On the Form tab, choose to create a new form, add a multiline text field and name it Review comment. Then select the Outcomes tab, choose the option for custom outcomes and add two outcomes: Accept and Reject, then save the form, returning to the Step Editor.
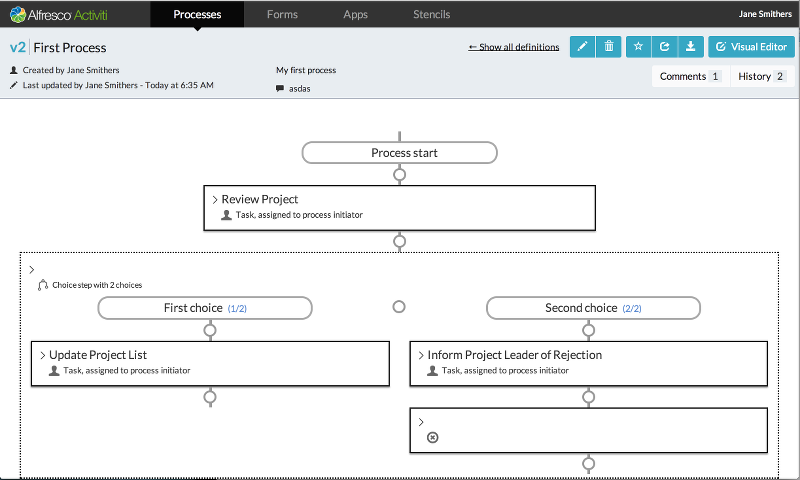
For the next step we are going to do different things depending on the outcome selected. To do this, add a Choice step by clicking the + icon below the Review Project step.
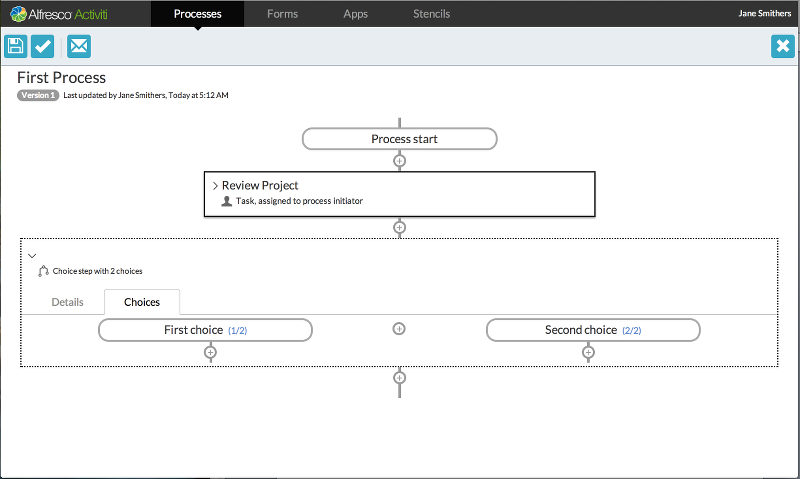
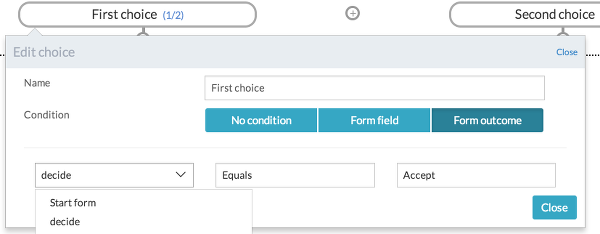
You can add more than two choices by clicking on the + icon in the middle of the Choice step, but we only need two based on the outcomes we have. To set the condition for following a choice, click on the choice box and a popup dialog allows you to select the condition based on existing form fields or outcomes. In this case we’re going to set the First choice to a form outcome, so select that button in the dialog. You can now select the review form from the list of those already added to the process and then select it to be Equal to Accept.
Similarly, we can set the condition on the Second choice to be equal to Reject. You can change the name for each choice so it is more meaningful if you wish. We can now add a task to be done if a project review is accepted by clicking the + under the First choice box.
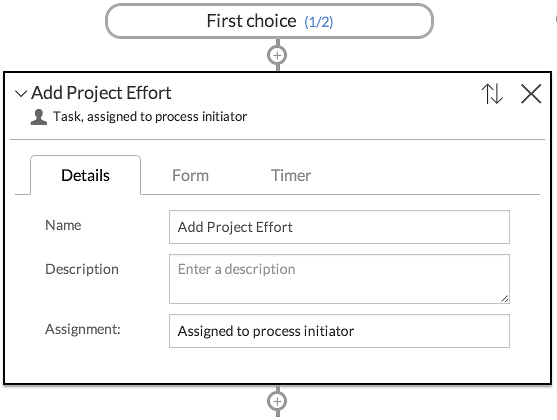
We’re going to add a simple human task with a name of Update Project List. Under the Second choice box we’ll add a human task with a name Inform Project Leader of Rejection. We now want the process to stop if the rejection task has completed, so add a Stop step on to the bottom of this task..
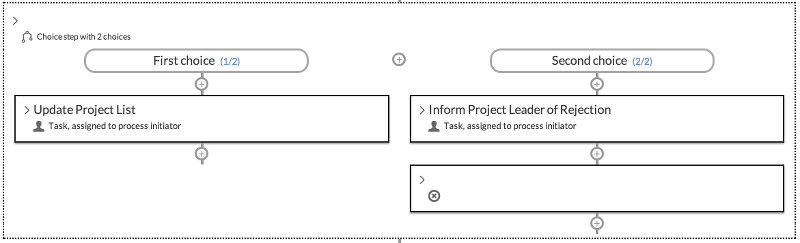
We can continue to add steps to the First choice, or in this case continue to add them after the complete Choice step by clicking the + at the very bottom. We’ll just add a Human task with the name Show Project Details.
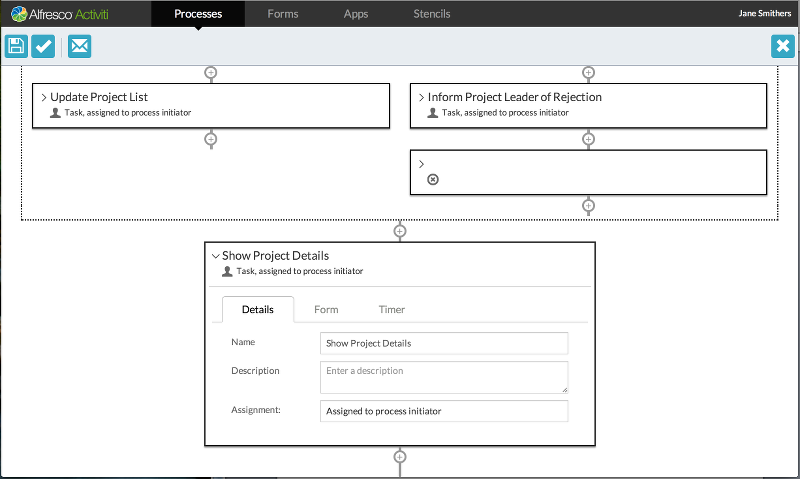
On the Form tab for this task, create a new form. Drag a Display text field on and enter the text message to display. The text can contain references to values added by a user in previous forms. There is a helper dropdown that you can select from to insert the given reference at the cursor position in the text.
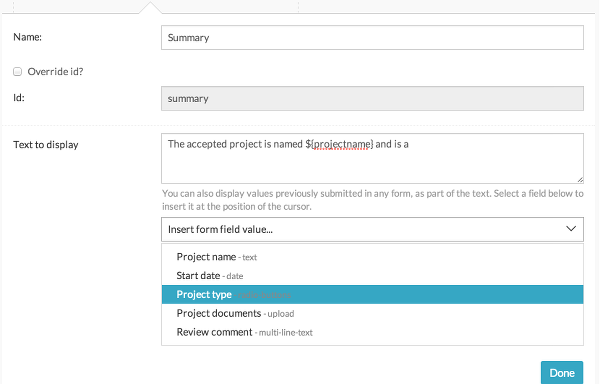
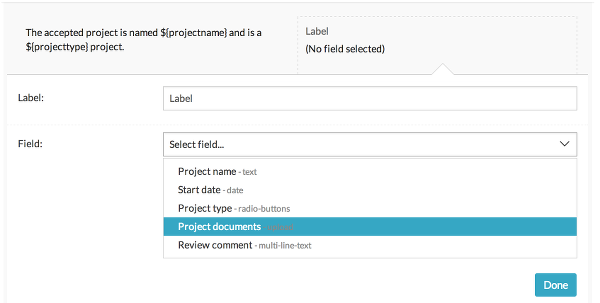
Add some text as shown. Then drag on a Display value field, setting it to display the project files by selecting the appropriate field from the list.
Now save the form, return to the Step Editor and save the process model you’ve just designed. All your processes are listed with a thumbnail of the process. You can edit a process from the list by clicking the Visual Edit button in the top right corner of the thumbnail. You can see additional information about a model by clicking on the thumbnail itself or the Show Details button in the top right corner of the thumbnail. This takes you to the Details page for the process model. Here, you can see a read-only preview of the model as well as some actions you can perform on it.
When you edit and save a model you can choose for the changes to be saved as a new version. Previous versions can be accessed from the History popup, as can any commentary from the Comments popup, where you can add further comments. The other action buttons are fairly self-explanatory, including deleting, starring (favorites), sharing or downloading the model. Now we have a process defined, we can create a process app using the Apps page. A process app is simply a collection of processes that you want to group together to make available to yourself or other users you share it with. On the Apps page, click the Create app definition button, then choose an icon and theme for the app’s tile. You can have an app without any process definitions linked to it, which lets you create a custom simple task list. We’re going to use the process we’ve just defined, so click the Edit included models button and add the model.
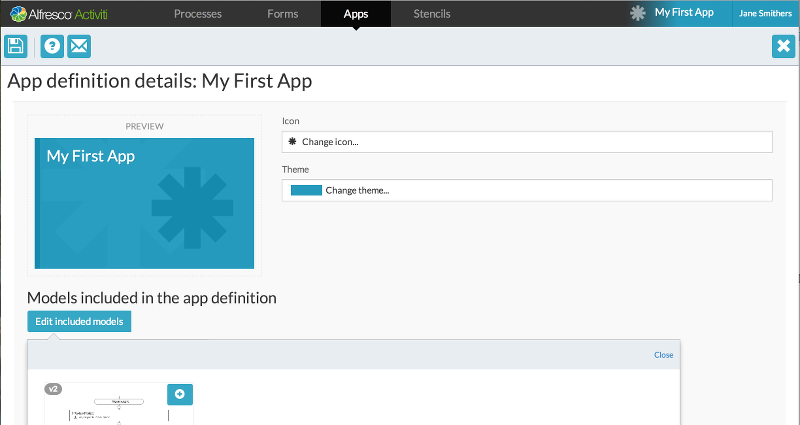
Save the app, selecting the option to publish the app in the Save dialog, then you will be returned to the Apps list view. You can do similar actions on an app in its Details page as for all models, such as deleting and sharing. An additional action is available here to Publish the app definition, without needing to use the save dialog. Publishing an app makes it available to everyone you’ve shared it with to add to their landing page. Let’s add it to our landing page so we can see our process in action. On your Landing Page, click on the tile with the + to get the Add app dialog. Choose the apps you wish to add and click the Deploy button. A new tile will be added to your landing page.
##Using My Tasks and Process Apps
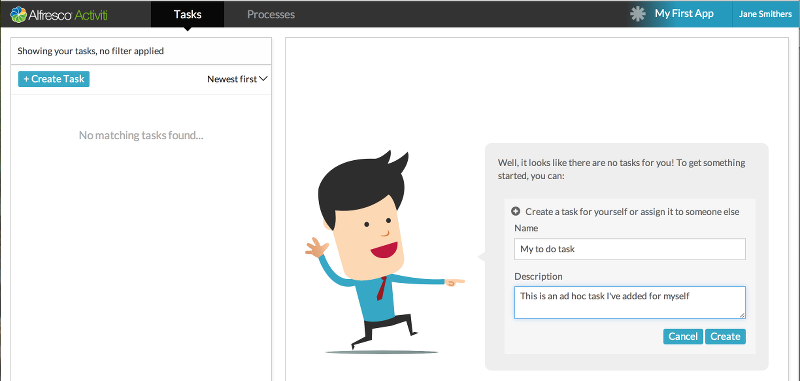
Click on the new tile and you will be taken to its Task page. This will only show you tasks created within this app or as part of the processes from the app. Click on the hint from James to create a task and fill in some text.
You will now have a task in your task list. You can complete a task by clicking the Complete button and it will disappear from your task list – but don’t do that yet! We can do a variety of things with a task, such as give it a due date or assign it to someone else. James also has some hints on adding reference documents, comments or even involving other people.
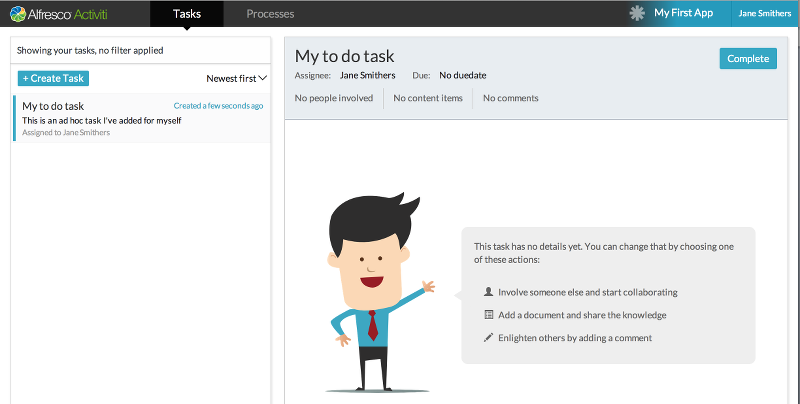
When you involve someone else with a task, it will appear in their task list. They then will be able to help you with the task, adding comments, documents, or even involving further people. However, only the person who is assigned the task can actually complete it. Below, we’ve added a document, a comment and involved a person.

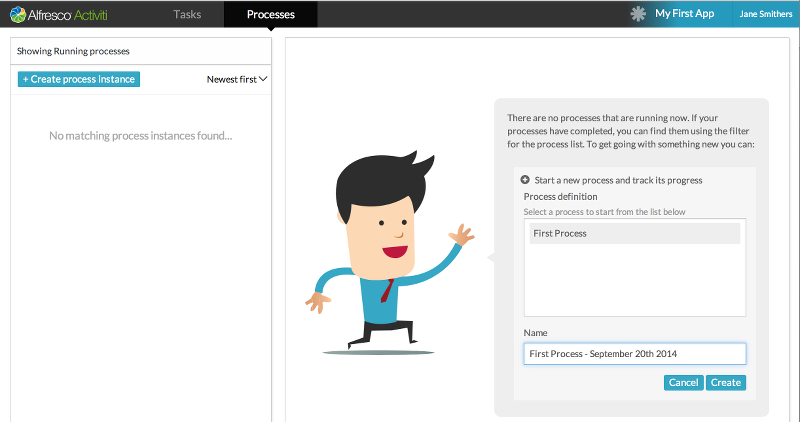
You can click the Complete button now. If you wish to view that task again, you can select the filter area above the task list and set the State to be Completed. You can also filter the task list based on the process related to tasks, by the task containing given text in its name, or based on who the task is assigned to. By default you will see all the tasks you are involved with, but you can change that to be only tasks directly assigned to you, or tasks where you are listed as a candidate or you’re the member of a group. Groups are only available for certain kinds of user account. And now we’re going to start the process we designed earlier. You can click on the hint from James on the Tasks page or the Process page. A list of available process will be displayed, which in our case will be only one. Select it and modify the name given to this instance of the process; by default it has the date added to the end of the process name.
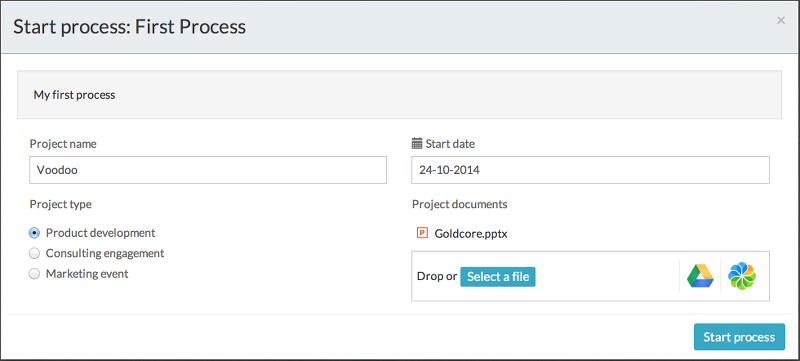
When you click the Start button, the initial form we designed pops up. Fill in the details, adding any documents, and click the Start process button.
You will then be returned to the Process page, showing the newly started process in your process list.
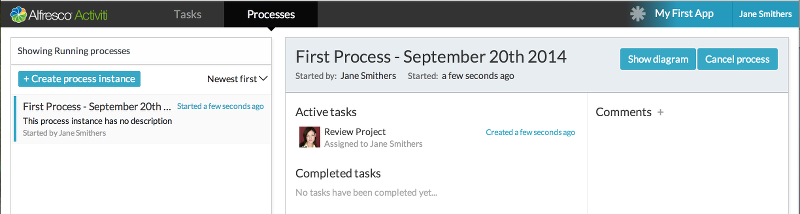
You can always view a process to see what the current and completed tasks are, as well as add comments that will be available for anyone involved in the process at any stage. If you go to our Task page now, you will see the first step in the process that was a task to review the project and accept or reject it. The task was assigned to you because it was set to the process initiator, and you started the process.
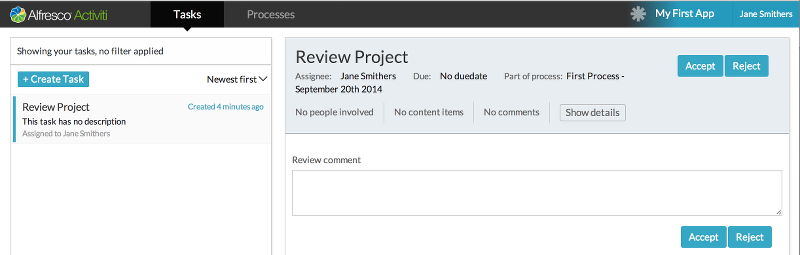
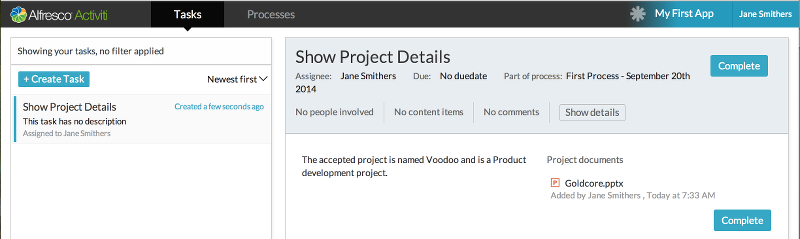
Before you fill in the review summary and choose accept or reject, you can still add people, documents and comments by clicking on the Show details button in the task header area. You can get back to the form from there by clicking the Show form button. If you click the Accept button, the Review Project task will disappear, but a new task, Update Project List, will appear. This is because it is the step defined if the choice was to accept the project. You can just click the Complete button to move to the next step, which was a task that shows the details of the accepted project.
When you complete this task, your task list will be empty, as will your process list. If you prefer to see all your tasks and processes in one place rather than through different process apps, you can use the My Tasks tile to get your complete task and process lists. ##Process Analytics and Performance Reports
1.4. Analytics
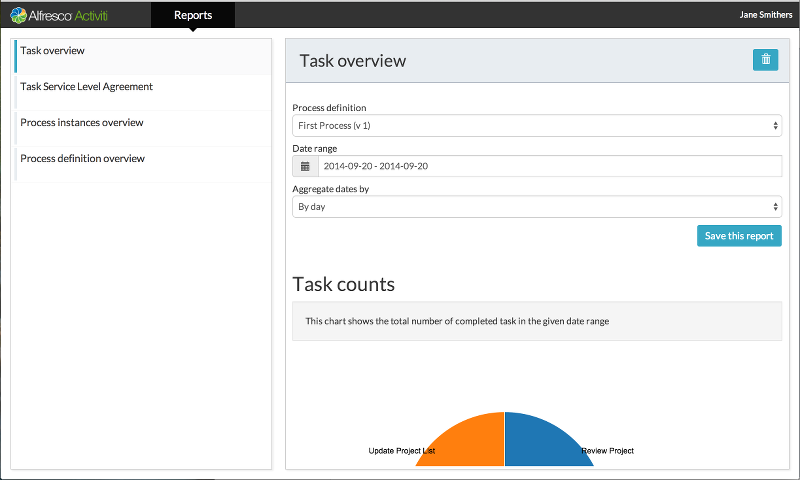
Once you have run a few processes a number of times you can see some reports about your processes, provided you have an account with the Analytics capability. Click on the Analytics tile to go to the Reports page, and if you have not done so yet, click to add the standard reports. Once they have been added, you can select a report from the reports list and set the parameters you desire. The data, if available, will be presented in graph and tabular form, depending on the report selected. We’ll leave you to explore the reports and data available.
1.5. Summary
We’ve taken a very quick tour through some of the features of SkyVault Activiti to give you an idea of what’s possible and how it generally works. We haven’t explored the Visual Editor, which offers a rich process design tool for creating BPMN 2.0 standard models. We haven’t explored how to define a Stencil and use it to extend the features available to the process designer in the Visual or Step Editors. There’s always more you can learn to do with SkyVault Activiti!
2. The SkyVault Activiti app
The SkyVault Activiti app is your user interface to Activiti. When you first logon to the app you will see your landing page.
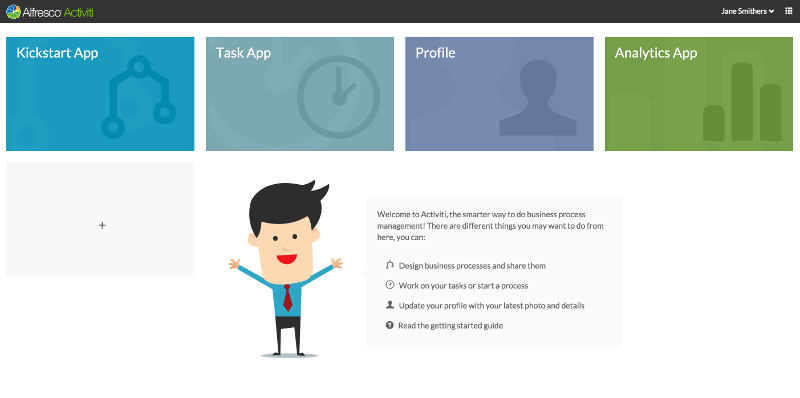
Each tile gives you tools for distinct sets of tasks
You can get back to your landing page at any time by clicking on the SkyVault Activiti logo in the top left of the page.
Your landing page is dynamic, and new tiles will appear when you create new process apps in the Kickstart App and deploy them in the Task app.
Below the tiles James appears to help you with a list of shortcuts for tasks you might want to do next. He appears in many places in the app to guide you, in particular when you haven’t worked with the tasks in the page. Here he gives shortcuts to help you design and share business processes, work with your tasks and processes, updating your profile, and a link to the getting started guide. The getting started guide is a tutorial embedded in the product that will help you learn the basics of working with SkyVault Activiti.
|
If you are an administrator, your landing page is slightly different. In place of the Profile management tile is a more powerful set of tools shown as the Identity management tile. |
In the top right corner of all pages you will see the app navigator . Click on this to use useful 1-click shortcuts to various parts of the app. You can navigate instantly to all your process models, tasks, and processes; or quickly start any process; or show the tasks and processes for a published and deployed app; or view and change your profile. As you deploy process apps, the app navigator will show new shortcuts for those process apps.
2.1. Kickstart app
From here, you can create process models, forms and app definitions, and share your models and definitions with others.
The Kickstart panel displays four tiles for working with processes, forms, apps, and stencils.
|
If you haven’t created any processes yet, then James will appear with shortcuts to let you create a process. You can use the simple ?, or the more powerful ?. If you are unfamiliar with the BPMN 2.0 Business Process Model language, then the Step Editor is for you. If you want to create complex processes and know BPMN 2.0, then the BPMN Editor will let you use the full power of the language. |
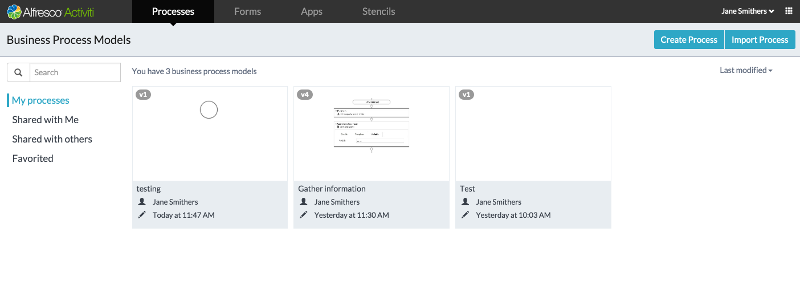
The Process panel provides tools for creating new processes, modifying existing processes, and importing processes from outside SkyVault Activiti. As you create processes, they appear as tiles on the page. A drop-down on the top right lets you change the default displayed order of Last modified to Oldest first, Name order, or reverse name order.
Controls on the left of the screen let you filter the list of displayed processes. You can view all your processes, or just those shared by others with you, or those you have shared with others, or just those you have favorited.
If you have many processes listed you may want to use the search box to find your processes
If your processes require human input then you will need forms to gather it.
|
If you haven’t created any forms yet, then the tab will show one button, Create a new form now!. |
The Forms panel provides tools for creating new forms, and modifying existing forms. As you create forms, they appear as tiles on the page. A drop-down on the top right lets you change the default displayed order of Last modified to Oldest first, Name order, or reverse name order.
Controls on the left of the screen let you filter the list of displayed forms. You can view all your forms, or just those shared by others with you, or those you have shared with others, or just those you have favorited.
If you have many forms listed you may want to use the search box to find your forms
You create an app to group one or more of your processes, so you manipulate them as one unit. You can make an app available for use to yourself, and you can share it with others. An app can contain no processes at all, this allows you to create simple task list.
The Apps panel provides tools for creating new apps, modifying existing apps, and importing apps from outside SkyVault Activiti. As you create apps, they appear as tiles on the page. A drop-down on the top right lets you change the default displayed order of Last modified to Oldest first, Name order, or reverse name order.
Controls on the left of the screen let you filter the list of displayed apps. You can view all your apps, or just those shared by others with you, or those you have shared with others, or just those you have favorited.
If you have many apps listed you may want to use the search box to find your apps
A stencil is a customized process palette that can be used by the step editor, the BPMN editor, and the forms editor. When you create a process or a form, you can specify a specific stencil or use the default for the editor you are using.
|
If you haven’t created any stencils yet, then the tab will show one button, Create a new stencil now!. |
The Stencils panel provides tools for creating new stencils, and modifying existing stencils. As you create stencils, they appear as tiles on the page. A drop-down on the top right lets you change the default displayed order of Last modified to Oldest first, Name order, or reverse name order.
Controls on the left of the screen let you filter the list of displayed stencils. You can view all your stencils, or just those shared by others with you, or those you have shared with others, or just those you have favorited.
If you have many stencils listed you may want to use the search box to find your forms
2.1.1. Kickstart editor
When you click on any process definition, reusable form, app definition or stencil in the four Kickstart tabs, you open the Kickstart editor. The Kickstart editor lets you work with the item itself, rather than its contents. You can copy it, comment on it, delete it, favorite it, share it with others, and export it. You can also open the corresponding editor to make changes to the content, and perform actions specific to the item type. For example, you can publish an app definition.
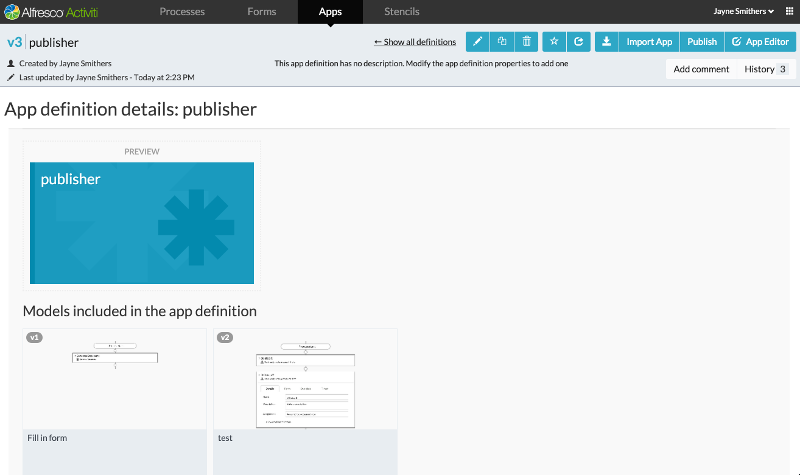
In the above example, the Kickstart editor is open on an app definition called publisher. The editor always shows item details in the top panel and a set of buttons in the top right. The right-most button opens the editor corresponding to the item displayed. So in this example, the right-most button opens the app editor. If a process definition created using the step editor is opened in the Kickstart editor, then the right-most button would open the step editor.
2.2. Task app
Provides access your task list and lets you work on tasks assigned to you from any process app. This is also where to start new processes and tasks.
The Task app menu bar has two tabs for working with tasks and processes, and a Start button, which is a shortcut to start a process using a published process definition..
|
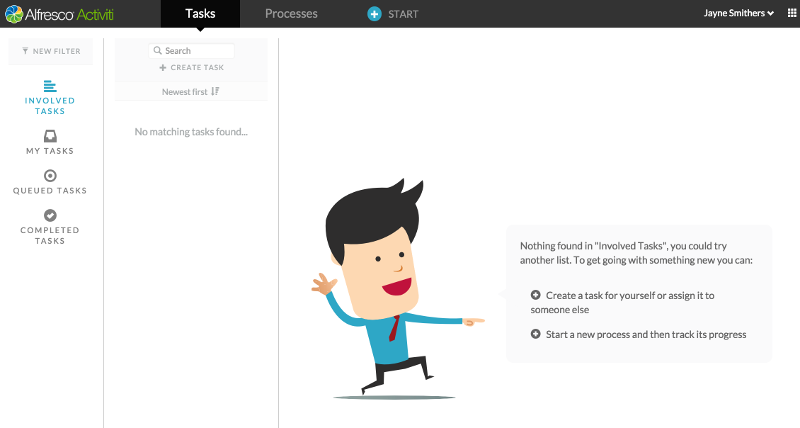
If you haven’t created any tasks for yourself, and there are no tasks for you from current processes or from other users, then James will appear with shortcuts to help you create a task or start a published process. |
The Tasks tab is organized into three columns.
The left hand column lets you filter the list of displayed tasks. There are four pre-defined filters and a New Filter control which lets you define and name your own filters. Any filters you create are appended to the list of displayed filters.
The middle column provides tools for creating new tasks, and lists the tasks included by the currently active filter. A drop-down above the list of tasks lets you change the default displayed order of Newest first to Oldest first, Due last order, or Due first order.
When you click on a task in the middle column, the right hand column displays the selected task details, ands provides tools for completing open tasks and for viewing the audit log of a completed task.
When you create a new filter, you can filter by task name, the state of the task, by process definition, and by assignment. You can also change the default sort order.
- Process definition
-
You choose a currently running process name, and display only those tasks that are associated with that process.
- State
-
You display open or completed tasks. The default is to display only open tasks.
- Assignment
-
You can choose to display on tasks in which you are involved, or just tasks that have been assigned to you, or just tasks where you are one of several candidates.
- Sort
-
You can sort the task list by Newest first, Oldest first, Due last, or Due first.
- Task name
-
You can enter a string to search for matching task names.
|
If you have no running processes, then James will appear with a shortcut to let you start an existing process and track its progress. |
The Processes tab is organized into three columns.
The left hand column lets you filter the list of displayed processes. There are three pre-defined filters and a New Filter control which lets you define and name your own filters. Any filters you create are appended to the list of displayed filters.
The middle column provides tools for starting a new process from a list of published process definitions, and lists the process instances included by the currently active filter. A drop-down above the list of tasks lets you change the default displayed order of Newest first to Oldest first. If the displayed list includes completed processes, then you can also show those Completed most recently and Completed least recently.
When you click on a process definition in the middle column, the right hand column displays the selected process details. All the tasks in the process are displayed. If the process is running, you will see the active tasks displayed first. You can show the diagram for the selected process, and you can cancel a running process.
When you create a new filter, you can filter by process definition, the state of the process, and by process name. You can also change the default sort order.
- Process definition
-
You choose a published process definition name, and display only those running processes that are associated with that process definition.
- Process state
-
You display running or completed processes. The default is to display only running processes.
- Sort
-
You can sort the process list by Newest first or Oldest first.
- Process name
-
You can enter a string to search for matching process names.
2.3. Profile management
You will see this tile if you are a user. Here you can manage your own personal information.
2.4. Identity management
You will see this tile if you are an administrator. Here you can manage your own personal information and, as you have administration rights, you can manage users and groups in your organization, and tenants in your SkyVault Activiti engine.
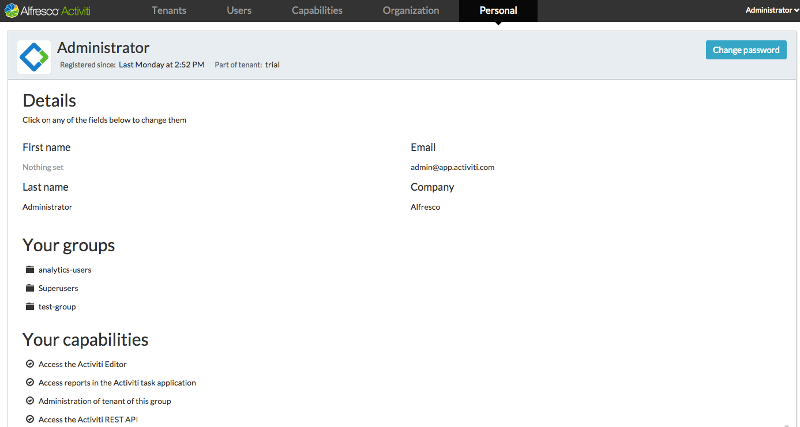
The Identity management page presents five tabs for managing tenants, users, capabilities, organization and personal information. The default tab displayed is for personal information.
|
The trial version of SkyVault Activiti has only one named tenant, trial. |
The Tenants panel provides tools for creating new tenants, and modifying existing tenants.
You will see the details of the currently selected tenant. You can and edit the name of the current tenant, and add SkyVault repositories to it. A log of management events is displayed for the tenant.
The Users panel provides tools for managing users. On the right-hand side is a list of current users. You can select from the list of users and use the Select an action control to change the details, status, account type and password.
On the left-hand side you can create a new user, or filter the list of current user by status, account type, email or name, or company.
The Capabilities panel provides tools for managing the capabilities groups of users have in this tenant. There are four capabilities an administrator can grant to a group:
-
Administration of tenant of this group gives full administration rights for the current tenant to the selected group.
-
Access Analytics app gives access to reports in the Activiti analytics app.
-
Access Kickstart app gives access to Kicstart app which allows the user to design and publish process definitions.
-
Access the Activiti REST API
You create and delete capabilities groups, add and remove users to and from a group, and add and remove capabilities to and from all users in a group.
You can create functional groups that reflect the structure of your organization using the Organization panel. You can add and remove users to and from a group, and create subgroups within a group.
|
When you remove a group, it will be deactivated, until all its tasks are complete. To remove the group completely, click the remove button a second time. When you remove a group, this will remove all its sub groups too. |
Personal.
2.5. Analytics app
Use this tile to generate reports of performance and throughput statistics for your processes.
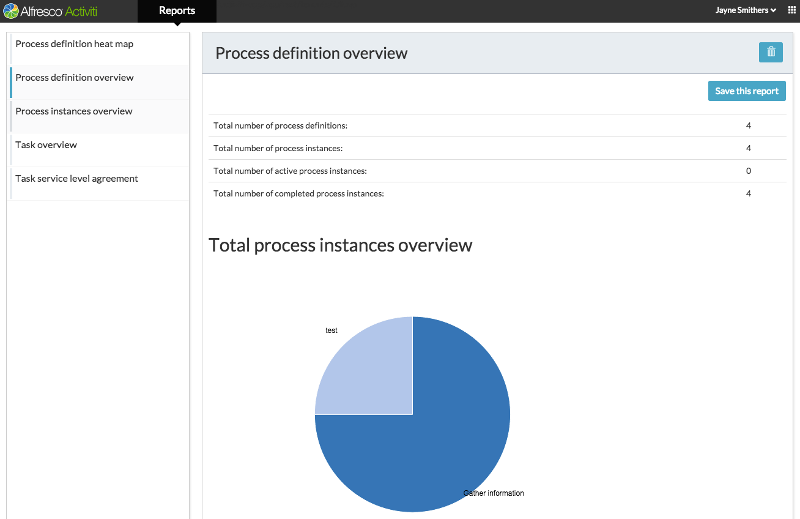
You can create new reports by modifying the parameter settings of an existing report and saving it with a new name. The new report will appear in the list of reports on the left-hand side of the page.
2.6. Step editor
The Step Editor guides you through creating a business process through a sequence of simple steps. The processes you create using the step editor do not exploit the full power of BPMN 2.0 like those created by the BPMN editor, but you can use it to design both simple and quite complex process models, without knowledge of BPMN 2.0
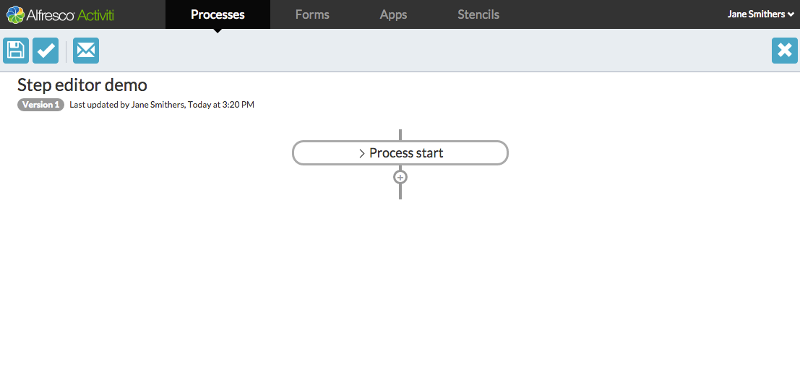
The editor has a menu bar with buttons to save your model, validate that the model is a complete BPMN 2,0 model definition, provide feedback to the SkyVault Activiti team, and to close the editor.
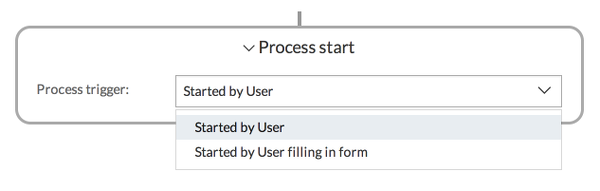
When you open the step editor on a new process definition, you can see the first step, the Process start step is already added to the process diagram for you. When you mouse-over a step, the stop becomes click-able. Click on it, and the details of the step are displayed and can be edited. This design principle is reflected throughout the SkyVault Activiti app. You can mouse-over and click text areas to modify their content, and variables to change their values. So for the Process start step, you can click on the single Process trigger variable and choose the trigger type:
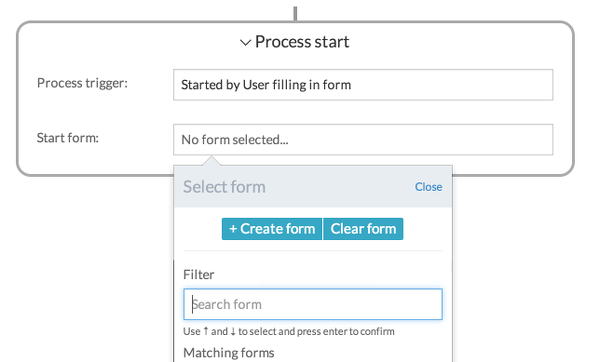
The editor will guide you in creating your process. For example, when a form is required, it will present you with a list of existing forms and provide you with a button to create a new form. So for example if you choose the Started by User filling in form option for the Process trigger variable in the Process start step, you would see the following dialog:
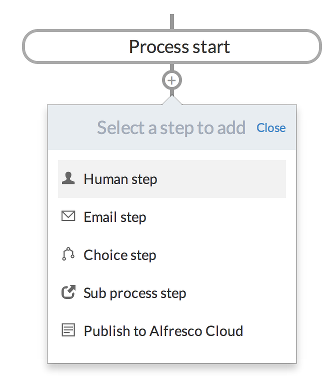
Below the last step in a sequence, there is a + icon. Click on this to add a step to your process.
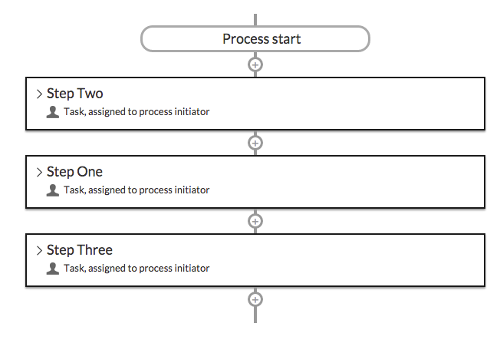
You can move steps around in your process Click in the top-right of the step and the step will be outlined in green, and the + icons will change to green discs.
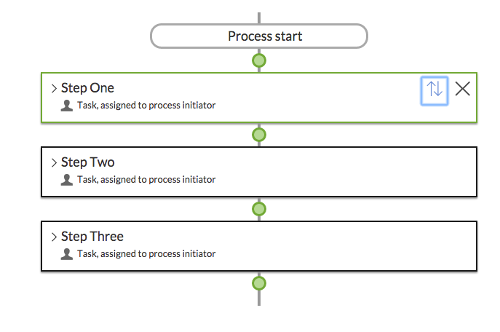
Click the green disk at which you want your highlighted step to move, and the step is moved to that position in the flow:
In addition to the Process start step, there are five types of step you can add to your process.
2.6.1. Human step
A human step is a task to be completed by a user. You choose who to assign the task to, you can provide a form for that user to complete, you can define a due date for the task, and set a timer which, if it is triggered will allow Activiti to take some action related to the task, such as reassign it to another user.
The human step dialog contains four tabs that let you fully define the task.
Name and Description are simple text fields that help you and others to identify the task in your task list. Assignment lets you choose who is assigned to complete this step:
- Assigned to process initiator
-
this is the user who starts the process, which could be you, or a user you have shared the process definition with. The process initiator is the default assignee.
- Assigned to single user
-
If you choose this option. a second Assignee field is displayed to allow you to search for single user or select someone using an email address. If that person is not currently a SkyVault Activiti user, they will receive an invite. A checkbox allows you specify whether or not the process initiator can complete the task too. This is checked by default.
- Candidate users
-
If you choose this option. a second Candidates field is displayed to allow you add one or more candidates. You can add SkyVault Activiti users or select someone using an email address. If that person is not currently a SkyVault Activiti user, they will receive an invite. Any one of the selected candidates is eligible to complete the task. A checkbox allows you specify whether or not the process initiator can complete the task too. This is checked by default.
- Candidate groups
-
If you choose this option. a second Groups field is displayed to allow you add one or more groups of SkyVault Activiti users. Any user in the selected groups is eligible to complete the task. A checkbox allows you specify whether or not the process initiator can complete the task too. This is checked by default.
You can select a form to display when the task runs. You can choose an existing form, or create a new one. Forms that you create here while designing your process definition are accessible to steps in this process definition only. Forms that you have designed in the Forms tab of the SkyVault Activiti app are reusable by any process definition owned by someone you have shared the form with. Both types of form are listed in the chooser dialog. You can filter the available list of forms by entering text in the Filter box.
If you specify a Due date, then the time remaining until that date will be displayed in the task details when the process is running. If the task is not completed in that time, then the amount of time since the due date is displayed. You have three options for setting a due date:
- No due date for this task
-
this is the default.
- Fixed duration after creation
-
specifies a Due date in years, months, days, hours, minutes and seconds after the task is started
- Based on field
-
you choose a date field from a list of those available in forms in this process definition. You can add or subtract a specified amount of time in years, months, days, hours, minutes and seconds from the value of the chosen date field to create a Due date.
Timer is similar to Due date, except you specify a time after which some action will be performed on the task by Activiti. You have three options for setting a timer:
- No timer for this task
-
this is the default.
- Fixed duration after creation
-
specifies a timer in years, months, days, hours, minutes and seconds after the task is started
- Based on field
-
you choose a date field from a list of those available in forms in this process definition. You can add or subtract a specified amount of time in years, months, days, hours, minutes and seconds from the value of the chosen date field to create a Timer.
You also specify an action for the task to be taken when the timer completes:
- No action
-
this is the default.
- Reassign task
-
You specify another assignee in exactly the same way as you specify the original assignee on the Details tab. When the timer completes, the task is assigned to the specified user, candidates users, or candidate groups.
- Keep task
-
When you specify Keep task, a new Timer date reached substep appears inside the current step with the + icon underneath it. You can add one or more subtasks inside this step by clicking this icon. When the timer completes, the task remains active, and the first substep becomes active too. The process continues running substeps as each substep is completed. Note that when you specify substeps here, the list of steps available now includes a Goto step. This allows you to choose one of the main process steps to run after this one.
- End task
-
When you specify End task, a new Timer date reached substep appears inside the current step with the + icon underneath it. You can add one or more subtasks inside this step by clicking this icon. When the timer completes, the task ends, and the first substep becomes active. The process continues running substeps as each substep is completed. Note that when you specify substeps here, the list of steps available now includes a Goto step. This allows you to choose one of the main process steps to run after this one.
- End the process
-
When the timer completes, all active tasks in the process are canceled and the process ends.
2.6.2. Email step
When an email step starts in a running process, it sends an email with a fixed text body and a fixed title to a single or multiple recipients.
The email step dialog contains two tabs that let you fully define the task.
Name and Description are simple text fields that help you and others to identify the task in your task list.
Recipient type lets you choose who receives the email defined in this step:
- Process initiator recipient
-
the user who starts the process is the sole recipient of the email. This is the default.
- Single user recipient
-
If you choose this option. a Recipient field is displayed to allow you to search for single user or select someone using an email address.
- Multiple user recipients
-
If you choose this option. a second Recipients field is displayed to allow you add one or more users. You can add SkyVault Activiti users or select someone using an email address.
2.6.3. Choice step
A choice step lets your process start one of two or more sequences of substeps, based on conditions.
The choice step dialog contains two tabs that let you fully define the task.
Name and Description are simple text fields that help you and others to identify the task in your task list.
When you select the Choices tab on a new choice step it shows two choice boxes. You can use the + icon between them to add more choices. When you click on a choice box you can edit the choice to give it a name and a condition. The condition can be one of the following:
- No condition
-
This choice runs its substeps if none of the other choices conditions are met. Note that only one of the choices in a choice step can specify this condition for the model to validate. This is the default.
- Form field
-
This choice runs its substeps if the value of a field in a form satisfies a conditional statement. If you click this option, three fields are presented. +
-
You select a field in a form used in this process definition.
-
You choose an operator from Equals, Not equals, Less than, Greater than
-
You specify a value. + For example you could select a radio button field named directionfrom a form, choose the Equals operator, and type the value
Left.
-
- Form outcome
-
This choice runs its substeps if the outcome of a form that matches the one specified for the choice is selected by the person assigned the task. If you click this option, three fields are presented. +
-
You select an outcome of a form used in this process definition.
-
You choose an operator from Equals, Not equals, Less than, Greater than
-
You select a value of the outcome from a list. + For example you could select an outcome named directionfrom a form, choose the Equals operator, and choose the value
Turn leftfrom the drop-down list.
-
There a two steps that you can at the end of a substep sequence in a choice step that change the flow of control in the process:
End process Step
You use an end process step to stop the process within a choice step in your process definition. It is available only when defining a substep within a choice step. Since this is a terminal step, no + icon appears after the step.
The End process step dialog contains one tab that lets you fully define the task.
Name and Description are simple text fields that help you and others to identify the task in your task list.
Goto step
You use a goto step to run a named step within your process definition. It is available only when defining a substep within a choice step. Like the End process step, this is a terminal step no + icon appears after the step. .
The Goto step dialog one tab to lets you fully define the task.
Name and Description are simple text fields that help you and others to identify the task in your task list.
Goto step lets you choose a step in this process definition to go to next.
The process definition illustrated models driving a car. If you turn left, then you continue your journey. As long as you continue turning left, your journey continues. If you turn right, you drive a short distance to your final destination. The goto step provides two ways of managing the flow of control in a process:
-
You can implement repetition, as illustrated here.
-
You can move the flow of tasks to another step in the current process.
2.6.4. Sub process Step
A sub process step lets you create a step that itself contains a sequence of steps that constitute a complete process definition. When saved, this definition is added to the list of substeps available to your main process definition. This gives you a method of managing complex processes by refining repeated sequences of steps into a sub step. This can make your process definition easier to comprehend visually.
The sub step step dialog contains one tab that lets you fully define the task.
Name and Description are simple text fields that help you and others to identify the task in your task list.
Sub process lets you choose a sub process that you have already defined in this process definition, or you can create a new sub process that is reusable in this process definition.
|
If you want to create a new sub process, you will need to save the current process definition before you open the new sub process. |
2.6.5. Publish to SkyVault
This step allows you to write a document or all documents uploaded in your process to a SkyVault repository. This can be a SkyVault 2.0 on-premise repository, or SkyVault in the Cloud.
|
A user with administration privileges will need to add accounts for the SkyVault repositories that you can publish to. An administrator can add SkyVault repositories on the Tenant page of the ? tab in Kickstart. The list of repositories you can publish to is then shown on your Personal Info page. If you click on a repository, an account to access the repository is added for you. |
The Publish to SkyVault step dialog contains three tabs that let you fully define the task.
Name and Description are simple text fields that help you and others to identify the task in your task list.
- Publish all content loaded in process
-
this is the default. All files that have been uploaded in an upload field in a form before this step are published to the specified location in the repository
- Publish content uploaded in field
-
If you select this option a second field Form field is displays a list of form fields from all the forms in your process. You can select one from the list.
- Destination
-
This is the folder in a SkyVault repository to which the selected content will be published. Click Select Folder to display a dialog that lets you choose a folder from the available SkyVault repositories defined in your SkyVault Activiti app. Once you have selected a folder, the Repository details and folder path are displayed in this field.
- Subfolder
-
If you check create or reuse subfolder , a second field Based on field is displays a list of fields from all the forms in your process. You can select one from the list. A folder with a name based on the content of the selected field will be created or reused within the specified destination folder to publish the content selected. + If you do not select this option, all the items of content will be published directly to the specified destination folder.
2.6.6. REST call
This step allows you make an arbitrary Activiti REST API call to any Activiti endpoint defined by an administrator on your Activiti server. You can supply parameters to the call directly in the URL or from process variables in forms, and you can extract properties from the JSON response into process variables for use in your process definition.
|
A user with administration privileges will need to add endpoints for the Activiti servers that you can makes calls to, and Username and Password pairs that are permitted for basic authentication. An administrator can add Activiti endpoints and authentications on the Tenant page of the ? tab in Kickstart. |
The Activiti REST APIs are described ?. The REST call step dialog contains four tabs that let you fully define the call.
Name and Description are simple text fields that help you and others to identify the task in your task list.
You define the URL for your REST API call in this tab.
- HTTP Method
-
This is the method associated with the API call. The default is GET, but you must select between GET, POST, PUT, and DELETE based on the documentation for your chosen API call. The example shown in the screenshot, is using the ? REST API call, which is documented as a GET call.
- Base endpoint
-
You select one from a list of endpoints that have been defined by your administrator. In the example the endpoint for the local Activiti server REST API, http://localhost:8080/activiti-app/, has been chosen.
- Rest URL
-
Copy the URL fragment from your selected REST API call. In this example we are using ?.
- Form Field
-
You can insert values previously submitted in any form in your process definition, into the REST URL. You select from the list of available form fields. The value will be inserted at the position of the cursor in the Rest url field.
Some REST API calls require a JSON request body. You can add one or more JSON properties using this tab.
For each property you define the name, property type and value. The value can either be a fixed value, or you can select the value of a form field from a list of available form fields in your process definition.
REST API calls return a JSON response body. You can define one or more pairs JSON response properties and process variables. When the step completes, each process variable will contain the value of the returned response property. You can use those values later in your process. In this example, the returned JSON property edition will be contained in the process variable activitiedition which is a form field in a form used to display the edition string later in the process definition.
2.6.7. Generate document
This step lets you to generate a Microsoft Word or a PDF document from a template document written in Microsoft Word. The process step will substitute any templates you place in the template document with process and form variables. You can upload global template documents for use by all users, or upload personal template documents for your own use.
|
A user with administration privileges can upload global templates. An administrator can add templates on the Tenant page of the ? tab in the Kickstart app. |
The Generate Document step dialog contains three tabs that let you fully define the task.
Name and Description are simple text fields that help you and others to identify the task in your task list.
Output format choose the format that you want your generated document to be in, PDF or Word.
This tab let’s you choose from a list of company templates that an an
administrator has uploaded, or you can upload your own personal
template. In the above example, the offer.docx company template has
been chosen.
You can also filter the list of company templates with a search string, and download any template to see what form and process variable substitutions are made in the template.
Variable lets you enter a name for your output document.
In this example, Example Corp’s human resources department has a process to send out offer letters. They use a template document that looks like this:
Note the format of the templates. For example, <<[name]>> is
substituted in the output document by the form variable name. Templates
are processed using the
LINQ
reporting engine, the programming guide in the link describes the
format of
the templates, and provide a set of
examples
to help you create your own templates.
Templates can be simple, like the <<[name]>> example, or you can use
expressions to build more complex templates. For example, look at the
following section of the template letter:
Your initial salary will be <<if [annualsalary > 30000]>>a generous
<<else>>a standard starting<</if>> $<<[annualsalary]>> per year
This template uses a conditional expression that tests the value of the
form variable annualsalary and outputs one of two different text
phrases, depending on that value.
This is the process definition that uses the template:
The user starts the process by filling in a form called starter. The
form contains four fields, a text field with the ID name, a set of radio
buttons with the ID department, and two number fields with the IDs
annualsalary and annualbonus. Once the user has filled the form, the
Generate Document step takes the offer.docx template described above
and generates a document with a name defined by value of the Variable
tab shown, offer-letter.docx.
If the user fills in the starter form like this:
When the user clicks Start Process, the Generate Document step is
executed and the offer-letter.docx document is generated, and looks
like this:
In this example the Generate Document step is the last step in the process definition, and you can view and download the generated document in the completed process display.
2.7. BPMN editor
With the BPMN editor you can create process definitions using the full power of BPMN 2.0. You build your process by dragging and dropping from a palette of grouped components to a canvas on which your process diagram is built.
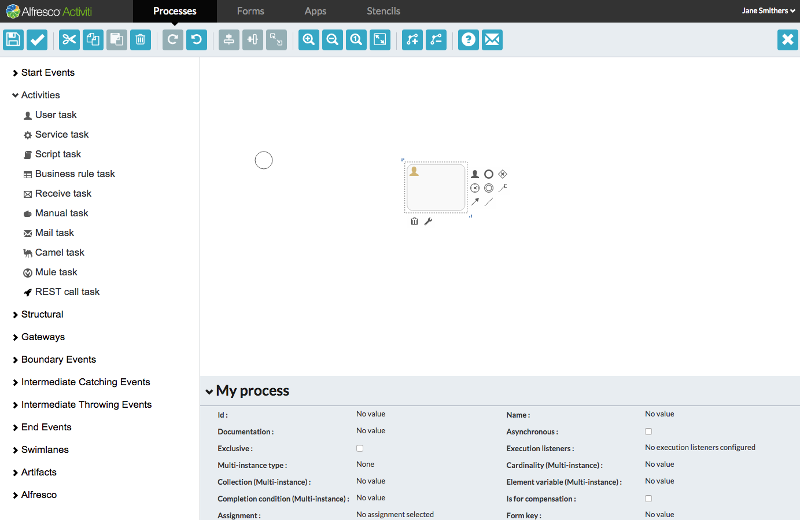
The BPMN editor is structured into several areas:
- The Palette
-
On the left side of BPMN editor is the palette, with consists of collapse-able groups of BPMN objects.
- The Canvas
-
On the left side of BPMN editor is the palette, with consists of collapse-able groups of BPMN objects.
- The properties sheet
-
Below the canvas is the properties sheet, which shows the properties of the selected BPMN object on the canvas, or if no BPMN object is selected, the properties of the process itself. You can click on any of the properties to modify its value. The property sheet is collapse-able to allow you more screen space to view your process diagram.
- The Toolbar
-
Above the canvas is the toolbar, with a set of grouped command icons. You can save and validate your model; delete selected elements in the diagram; cut, copy and paste selected elements; undo and redo the last action; zoom the process diagram; eliminate crossing connector lines by adding and removing bend-points; view the BPMN editor tour, and provide feedback to the SkyVault Activiti team.
When you first use the BPMN editor, a short guided tour runs showing you the components of the editor and running through the initial steps involved in creating a process definition. You can rerun the tour at any time by clicking the icon in the toolbar.
When you open the BPMN editor to create a new process definition, the canvas already contains a Start Event. Clicking on any event on the canvas frames the event icon with a dotted line and reveals a number of controls. For example, clicking on the initial start event reveals the following controls:
The controls blow icon allow you to delete the BPMN object, or change in to another object in the same group. For example, you can change a Start event to a Start timer event.. The controls to the right of the icon allow you to specify the next object type in the process. The list presented includes only those object types that are valid in the sequence after the current object. In addition, there are controls that allow you to create flows connecting other existing events in your diagrams, and to annotate the event.
There are two ways of adding BPMN objects to your process:
-
You can use the controls revealed when clicking on a current object icon. Using this method will create a valid connector between the current event icon and the new event icon.
-
You can drag and drop an object icon from the palette. In this case you add any flows to current event icons in the process yourself using the icon controls.
The following object groups are shown in a collapsible list in the Palette. The groups consist of all the objects available in the BPMN 2.0 specification, and some SkyVault Activiti extensions such as the Publish to SkyVault task.
2.7.1. Start events
A start event indicates where a process starts. You can define events that start on the arrival of a message, or start at specific time intervals, or start as a result of an error, or start as when a specific signal is raised, or start on no specific trigger.
In the XML representation, the type of start event is specified as a sub-element.
Start events are always catching: a start event waits until a specific trigger occurs.
None start event
A start event with an unspecified trigger. BPMN 2.0 refers to this as a none start event.
The BPMN engine cannot anticipate when the containing process instance must be started. You use the none start event when the process instance starts through an API call to one of the startProcessInstanceByXXX methods.
ProcessInstance processInstance = runtimeService.startProcessInstanceByXXX();
|
A sub-process always has a none start event. |
| Property | Description |
|---|---|
Id |
A unique identifier for this element instance |
Name |
A name for this element instance |
Documentation |
A description of this element instance |
Execution listeners |
Execution listeners configured for this element instance |
Process Initiator |
The initiator of this instance of the process definition |
Form key |
A key that provides a reference to a form |
Referenced form |
A form reference |
Form properties |
A form definition with a list of form properties |
Start timer event
A timer start event initiates a process instance at specific time. You can use it both for processes which must start only once and for processes that must start in repeated time intervals.
|
A sub-process cannot have a timer start event. |
A start timer event is scheduled as soon as a process is deployed – startProcessInstanceByXXX does not need to be called However, calling start process methods is not restricted and causes an additional start of the process at the time of the startProcessInstanceByXXX Invocation.
When a new version of a process with a start timer event is deployed, the job corresponding with the previous timer will be removed.
| Property | Description |
|---|---|
Id |
A unique identifier for this instance |
Name |
A name for this instance |
Documentation |
A description of this instance |
Execution listeners |
Execution listeners configured for this instance |
Time Cycle |
A timer cycle defined in
http://en.wikipedia.org/wiki/ISO_8601 format, for example: |
Time Date in ISO-8601 |
A point in time defined as a
http://en.wikipedia.org/wiki/ISO_8601 date, for example:
|
Time Duration |
A period of time defined as a
http://en.wikipedia.org/wiki/ISO_8601 duration, for example: |
Start signal event
A signal start event starts a process instance using a named signal. The signal is fired from a process instance using the intermediary signal throw event or through the API ` runtimService.signalEventReceivedXXX` methods. In both cases, any process definitions that have a signal start event with the same name are started. You can select a synchronous or asynchronous start of the process instances.
The signalName passed by the API is specified in the Signal reference
property.
| Property | Description |
|---|---|
Id |
A unique identifier for this instance |
Name |
A name for this instance |
Documentation |
A description of this instance |
Execution listeners |
Execution listeners configured for this instance |
Signal reference |
The name of the signal that initiates this event |
Start message event
A message start event starts a process instance using a named message. It allows you to select the specific start event from a set of alternative start events based on the message.
When you deploy a process definition with one or more message start events, consider the following points:
-
The name of the message start event must be unique across the whole process definition. SkyVault Activiti will throw an exception on deployment of a process definition with two or more message start events that reference the same message or with two or more message start events that reference messages with the same name.
-
The name of the message start event must be unique across all deployed process definitions. SkyVault Activiti will throw an exception on deployment of a process definition with one or more message start events that reference a message with the same name as a message start event already deployed in a different process definition.
-
When a new version of a process definition is deployed, the message subscriptions of the previous version are canceled. This is also true for message events that are not present in the new version.
| Property | Description |
|---|---|
Id |
A unique identifier for this instance |
Name |
A name for this instance |
Documentation |
A description of this instance |
Execution listeners |
Execution listeners configured for this instance |
Message reference |
The name of the message that initiates this event |
Start error event
An error start event triggers an event Sub-Process. An error start event cannot be used for starting a process instance.
An error start event is always interrupting.
| Property | Description |
|---|---|
Id |
A unique identifier for this instance |
Name |
A name for this instance |
Documentation |
A description of this instance |
Execution listeners |
Execution listeners configured for this instance |
Error reference |
The name of the error that initiates this event |
2.7.2. Activities
An activity describes a single item of work to be performed in a process. SkyVault Activity provides some Activity types that are additional to those described in the BPMN 2.0 specification.
User task
You use a user task to model work to be done by a human actor. When process execution arrives at a user task in the process definition, it creates a new task in the task list of the assignee or assignees defined in the task.
| Property | Description |
|---|---|
Id |
A unique identifier for this element instance |
Name |
A name for this element instance |
Documentation |
A description of this element instance |
Asynchronous |
Define this task as asynchronous |
Exclusive |
Define this task as exclusive |
Execution listeners |
Execution listeners configured for this instance. An execution listener lets you execute Java code or evaluate an expression when an event occurs during process execution. For more information, see ?. |
Multi-Instance type |
Determines if this task is performed multiple times and how. For more information on multi-instance, see ?. The possible values are:
|
Cardinality (Multi-instance) |
The number of times the task is to be performed. |
Collection (Multi-instance) |
The name of a process variable which is a collection. For each item in the collection, an instance of this task will be created. |
Element variable (Multi-instance) |
A process variable name which will contain the current value of the collection in each task instance. |
Completion condition (Multi-instance) |
A multi-instance activity normally ends when all instances end. You can specify an expression here to be evaluated each time an instance ends. If the expression evaluates to true, all remaining instances are destroyed and the multi-instance activity ends. |
Is for compensation |
If this activity is used for compensating the effects of another activity, you can declare it to be a compensation handler. For more information on compensation handlers see ?. |
Service task
You use a service task to invoke an external Java class.
| Property | Description |
|---|---|
Id |
A unique identifier for this element instance |
Name |
A name for this element instance |
Documentation |
A description of this element instance |
Asynchronous |
Define this task as asynchronous |
Exclusive |
Define this task as exclusive |
Execution listeners |
Execution listeners configured for this instance. An execution listener lets you execute Java code or evaluate an expression when an event occurs during process execution. For more information, see ?. |
Multi-Instance type |
Determines if this task is performed multiple times and how. For more information on multi-instance, see ?. The possible values are:
|
Cardinality (Multi-instance) |
The number of times the task is to be performed. |
Collection (Multi-instance) |
The name of a process variable which is a collection. For each item in the collection, an instance of this task will be created. |
Element variable (Multi-instance) |
A process variable name which will contain the current value of the collection in each task instance. |
Completion condition (Multi-instance) |
A multi-instance activity normally ends when all instances end. You can specify an expression here to be evaluated each time an instance ends. If the expression evaluates to true, all remaining instances are destroyed and the multi-instance activity ends. |
Is for compensation |
If this activity is used for compensating the effects of another activity, you can declare it to be a compensation handler. For more information on compensation handlers see ?. |
Class |
The name of the Java class that implements your service task.
Your class must implement |
Expression |
An expression which contains an invocation of a specific method in your service class. You can pass parameters to the method in the expression. |
Delegate expression |
An expression that resolves to an object which is
of a class that implements |
Class fields |
Field extensions for the service task |
Result variable name |
The name of a process variable in your process definition in which to store the result of this service task. |
Script task
A script task defines a JavaScript script or other script of a type included in JSR-223 to be run in your process definition.
| Property | Description |
|---|---|
Script format |
The JSR-223 name of the scripting engine your script is written for, for example; Ruby, Groovy, or Python. |
Script format |
The text of your script. |
Id |
A unique identifier for this element instance |
Name |
A name for this element instance |
Documentation |
A description of this element instance |
Asynchronous |
Define this task as asynchronous |
Exclusive |
Define this task as exclusive |
Execution listeners |
Execution listeners configured for this instance. An execution listener lets you execute Java code or evaluate an expression when an event occurs during process execution. For more information, see ?. |
Multi-Instance type |
Determines if this task is performed multiple times and how. For more information on multi-instance, see ?. The possible values are:
|
Cardinality (Multi-instance) |
The number of times the task is to be performed. |
Collection (Multi-instance) |
The name of a process variable which is a collection. For each item in the collection, an instance of this task will be created. |
Element variable (Multi-instance) |
A process variable name which will contain the current value of the collection in each task instance. |
Completion condition (Multi-instance) |
A multi-instance activity normally ends when all instances end. You can specify an expression here to be evaluated each time an instance ends. If the expression evaluates to true, all remaining instances are destroyed and the multi-instance activity ends. |
Is for compensation |
If this activity is used for compensating the effects of another activity, you can declare it to be a compensation handler. For more information on compensation handlers see ?. |
Script format |
The JSR-223 name of the scripting engine your script is written for, for example; Ruby, Groovy, or Python. |
Business rule task
A Business rule task synchronously executes one or more rules.
| Property | Description |
|---|---|
Id |
A unique identifier for this element instance |
Name |
A name for this element instance |
Documentation |
A description of this element instance |
Asynchronous |
Define this task as asynchronous |
Exclusive |
Define this task as exclusive |
Execution listeners |
Execution listeners configured for this instance. An execution listener lets you execute Java code or evaluate an expression when an event occurs during process execution. For more information, see ?. |
Multi-Instance type |
Determines if this task is performed multiple times and how. For more information on multi-instance, see ?. The possible values are:
|
Cardinality (Multi-instance) |
The number of times the task is to be performed. |
Collection (Multi-instance) |
The name of a process variable which is a collection. For each item in the collection, an instance of this task will be created. |
Element variable (Multi-instance) |
A process variable name which will contain the current value of the collection in each task instance. |
Completion condition (Multi-instance) |
A multi-instance activity normally ends when all instances end. You can specify an expression here to be evaluated each time an instance ends. If the expression evaluates to true, all remaining instances are destroyed and the multi-instance activity ends. |
Is for compensation |
If this activity is used for compensating the effects of another activity, you can declare it to be a compensation handler. For more information on compensation handlers see ?. |
Rules |
A comma-separated list of rules to include or exclude in this task. |
Input variables |
A comma-separated list of process variables to be used as input variables to your rules. |
Exclude |
If you check Exclude only rules that you have not specified in Rules will be executed. If the Exclude is unchecked, only the rules you have specified in Rules will be executed. |
Result variable |
The name of a process variable in your process
definition in which to store the result of this task. the result
variable is returned as a list of objects. If you do not specify a
result variable name, the default name
|
Receive task
A Receive Task waits for the arrival of a specific message.
Only Java semantics are implemented for this task. When process execution arrives at a receive task, the process state is committed to the persistence store. This means the process will stay in a wait state, until a specific message is received by the engine, which triggers the continuation of the process.
| Property | Description |
|---|---|
Id |
A unique identifier for this element instance |
Name |
A name for this element instance |
Documentation |
A description of this element instance |
Asynchronous |
Define this task as asynchronous |
Exclusive |
Define this task as exclusive |
Execution listeners |
Execution listeners configured for this instance. An execution listener lets you execute Java code or evaluate an expression when an event occurs during process execution. For more information, see ?. |
Multi-Instance type |
Determines if this task is performed multiple times and how. For more information on multi-instance, see ?. The possible values are:
|
Cardinality (Multi-instance) |
The number of times the task is to be performed. |
Collection (Multi-instance) |
The name of a process variable which is a collection. For each item in the collection, an instance of this task will be created. |
Element variable (Multi-instance) |
A process variable name which will contain the current value of the collection in each task instance. |
Completion condition (Multi-instance) |
A multi-instance activity normally ends when all instances end. You can specify an expression here to be evaluated each time an instance ends. If the expression evaluates to true, all remaining instances are destroyed and the multi-instance activity ends. |
Is for compensation |
If this activity is used for compensating the effects of another activity, you can declare it to be a compensation handler. For more information on compensation handlers see ?. |
Manual task
A Manual Task defines a task that is external to Activiti. You use it to model work done which the Activiti engine does not know of. A manual task is handled as a pass-through activity, the Activiti engine automatically continues the process from the instant process execution arrives at a manual task activity.
| Property | Description |
|---|---|
Id |
A unique identifier for this element instance |
Name |
A name for this element instance |
Documentation |
A description of this element instance |
Asynchronous |
Define this task as asynchronous |
Exclusive |
Define this task as exclusive |
Execution listeners |
Execution listeners configured for this instance. An execution listener lets you execute Java code or evaluate an expression when an event occurs during process execution. For more information, see ?. |
Multi-Instance type |
Determines if this task is performed multiple times and how. For more information on multi-instance, see ?. The possible values are:
|
Cardinality (Multi-instance) |
The number of times the task is to be performed. |
Collection (Multi-instance) |
The name of a process variable which is a collection. For each item in the collection, an instance of this task will be created. |
Element variable (Multi-instance) |
A process variable name which will contain the current value of the collection in each task instance. |
Completion condition (Multi-instance) |
A multi-instance activity normally ends when all instances end. You can specify an expression here to be evaluated each time an instance ends. If the expression evaluates to true, all remaining instances are destroyed and the multi-instance activity ends. |
Is for compensation |
If this activity is used for compensating the effects of another activity, you can declare it to be a compensation handler. For more information on compensation handlers see ?. |
Mail task
You can enhance your business process with this automatic mail service tasks that sends emails to one or more recipients. The task supports normal email features such as cc lists, bcc lists, and HTML content.
| Property | Description |
|---|---|
Id |
A unique identifier for this element instance |
Name |
A name for this element instance |
Documentation |
A description of this element instance |
Asynchronous |
Define this task as asynchronous |
Exclusive |
Define this task as exclusive |
Execution listeners |
Execution listeners configured for this instance. An execution listener lets you execute Java code or evaluate an expression when an event occurs during process execution. For more information, see ?. |
Multi-Instance type |
Determines if this task is performed multiple times and how. For more information on multi-instance, see ?. The possible values are:
|
Cardinality (Multi-instance) |
The number of times the task is to be performed. |
Collection (Multi-instance) |
The name of a process variable which is a collection. For each item in the collection, an instance of this task will be created. |
Element variable (Multi-instance) |
A process variable name which will contain the current value of the collection in each task instance. |
Completion condition (Multi-instance) |
A multi-instance activity normally ends when all instances end. You can specify an expression here to be evaluated each time an instance ends. If the expression evaluates to true, all remaining instances are destroyed and the multi-instance activity ends. |
Is for compensation |
If this activity is used for compensating the effects of another activity, you can declare it to be a compensation handler. For more information on compensation handlers see ?. |
To |
The recipient of the e-mail. You can specify multiple recipients in a comma-separated list. |
From |
The sender’s email address. If you do not specify this, the ? from address is used. |
Subject |
The subject of this email. |
Cc |
The cc list for this email. You can specify multiple recipients in a comma-separated list. |
Bcc |
The bcc list for this email. You can specify multiple recipients in a comma-separated list |
Text |
The text content of this email. You can specify this as well as HTML to support email clients that do not support rich content. The client will fall back to this text-only alternative. |
Html |
The HTML content of this email. |
Charset |
The charset for this email. |
Camel task
You use the Camel task to send messages to, and receive messages from, Apache Camel.
You can find more information on Apache Camel here.
| Property | Description |
|---|---|
Id |
A unique identifier for this element instance |
Name |
A name for this element instance |
Documentation |
A description of this element instance |
Asynchronous |
Define this task as asynchronous |
Exclusive |
Define this task as exclusive |
Execution listeners |
Execution listeners configured for this instance. An execution listener lets you execute Java code or evaluate an expression when an event occurs during process execution. For more information, see ?. |
Multi-Instance type |
Determines if this task is performed multiple times and how. For more information on multi-instance, see ?. The possible values are:
|
Cardinality (Multi-instance) |
The number of times the task is to be performed. |
Collection (Multi-instance) |
The name of a process variable which is a collection. For each item in the collection, an instance of this task will be created. |
Element variable (Multi-instance) |
A process variable name which will contain the current value of the collection in each task instance. |
Completion condition (Multi-instance) |
A multi-instance activity normally ends when all instances end. You can specify an expression here to be evaluated each time an instance ends. If the expression evaluates to true, all remaining instances are destroyed and the multi-instance activity ends. |
Is for compensation |
If this activity is used for compensating the effects of another activity, you can declare it to be a compensation handler. For more information on compensation handlers see ?. |
Camel context |
A camel context definition. If you do not specify a context, the default Camel context is used. |
Mule task
Lets you send messages to the Mule ESB (Enterprise Service Bus).
You can find more information on Mule ESB here.
| Property | Description |
|---|---|
Id |
A unique identifier for this element instance |
Name |
A name for this element instance |
Documentation |
A description of this element instance |
Asynchronous |
Define this task as asynchronous |
Exclusive |
Define this task as exclusive |
Execution listeners |
Execution listeners configured for this instance. An execution listener lets you execute Java code or evaluate an expression when an event occurs during process execution. For more information, see ?. |
Multi-Instance type |
Determines if this task is performed multiple times and how. For more information on multi-instance, see ?. The possible values are:
|
Cardinality (Multi-instance) |
The number of times the task is to be performed. |
Collection (Multi-instance) |
The name of a process variable which is a collection. For each item in the collection, an instance of this task will be created. |
Element variable (Multi-instance) |
A process variable name which will contain the current value of the collection in each task instance. |
Completion condition (Multi-instance) |
A multi-instance activity normally ends when all instances end. You can specify an expression here to be evaluated each time an instance ends. If the expression evaluates to true, all remaining instances are destroyed and the multi-instance activity ends. |
Is for compensation |
If this activity is used for compensating the effects of another activity, you can declare it to be a compensation handler. For more information on compensation handlers see ?. |
Endpoint url |
The Mule endpoint you want to send your message to. |
Language |
The language you want to use to evaluate the payloadExpression, for example juel. |
Payload expression |
An expression that is the message’s payload. |
Result variable |
The name of the variable to store the result of the invocation. |
2.7.3. Structural components
You use structural components to group multiple components in a sub process to reuse in a parent process definition, and to embed and call other process definitions from inside your own process.
Sub-process
A sub process is a single activity that contains activities, gateways, and events which form a process. A sub process is completely embedded inside a parent process.
You can use a sub process to create a new scope for events. Events that are thrown during execution of the sub process, can be caught by ? on the boundary of the sub process, creating a scope for that event limited to just the sub process.
Sub-processes in SkyVault Activiti must have the following characteristics:
-
A sub process has exactly one none start event. No other start event types are permitted. A sub process must have at least one end event.
-
Sequence flow can not cross sub process boundaries.
| Property | Description |
|---|---|
Id |
A unique identifier for this element instance |
Name |
A name for this element instance |
Documentation |
A description of this element instance |
Asynchronous |
Define this task as asynchronous |
Exclusive |
Define this task as exclusive |
Execution listeners |
Execution listeners configured for this instance. An execution listener lets you execute Java code or evaluate an expression when an event occurs during process execution. For more information, see ?. |
Multi-Instance type |
Determines if this task is performed multiple times and how. For more information on multi-instance, see ?. The possible values are:
|
Cardinality (Multi-instance) |
The number of times the task is to be performed. |
Collection (Multi-instance) |
The name of a process variable which is a collection. For each item in the collection, an instance of this task will be created. |
Element variable (Multi-instance) |
A process variable name which will contain the current value of the collection in each task instance. |
Completion condition (Multi-instance) |
A multi-instance activity normally ends when all instances end. You can specify an expression here to be evaluated each time an instance ends. If the expression evaluates to true, all remaining instances are destroyed and the multi-instance activity ends. |
Collapsed sub-process
You use a collapsed sub-process to add an existing process from your available process definitions as a sub-process to the process definition you are currently editing.
When you drag a collapsed sub-process from the pallette to your canvas, and click on the Referenced Subprocess property, you are presnted with a visual list of the process definitions you have access to. You can choose from the list, and the chosen process will be added to the current process definition. Note the the process chosen must have exactly one none start event, and no other start event type, and it must have at least one end event.
Note that when you click on the plus icon in a collapsed sub-process, the BPMN editor will open the referenced sub-process definition.
| Property | Description |
|---|---|
Id |
A unique identifier for this element instance |
Name |
A name for this element instance |
Documentation |
A description of this element instance |
Asynchronous |
Define this task as asynchronous |
Exclusive |
Define this task as exclusive |
Execution listeners |
Execution listeners configured for this instance. An execution listener lets you execute Java code or evaluate an expression when an event occurs during process execution. For more information, see ?. |
Referenced Subprocess |
The process definition this collapsed sub-process contains. |
Multi-Instance type |
Determines if this task is performed multiple times and how. For more information on multi-instance, see ?. The possible values are:
|
Cardinality (Multi-instance) |
The number of times the task is to be performed. |
Collection (Multi-instance) |
The name of a process variable which is a collection. For each item in the collection, an instance of this task will be created. |
Element variable (Multi-instance) |
A process variable name which will contain the current value of the collection in each task instance. |
Completion condition (Multi-instance) |
A multi-instance activity normally ends when all instances end. You can specify an expression here to be evaluated each time an instance ends. If the expression evaluates to true, all remaining instances are destroyed and the multi-instance activity ends. |
Event sub-process
An event sub-process is a sub-process that is triggered by an event. You can use an event sub-process in your main process, or in any sub-process.
The event sub-process start event defines the event to be handled by the sub-process, so the type of start event you use must have an event associated with it – none start events are not supported bt the event sub-processes. Your SkyVault Activiti event sub-process can be started by a start message event, or a start error event. The subscription to the start event is created when the scope, process instance or sub-process, hosting the event sub-process is created. The subscription is removed when the scope is destroyed.
a SkyVault Activiti event sub-process is interrupting. An interrupting sub-process cancels any executions in the current scope, and can only be triggered once for each activation of the scope hosting it.
Your event sub-process does not have any incoming or outgoing sequence flows. An event sub-process is triggered by an event, so there can be no incoming sequence flow. When a SkyVault Activiti event sub-process ends, the current scope also ends.
| Property | Description |
|---|---|
Id |
A unique identifier for this element instance |
Name |
A name for this element instance |
Documentation |
A description of this element instance |
Asynchronous |
Define this task as asynchronous |
Exclusive |
Define this task as exclusive |
Execution listeners |
Execution listeners configured for this instance. An execution listener lets you execute Java code or evaluate an expression when an event occurs during process execution. For more information, see ?. |
2.7.4. Gateways
You use gateways to control the flow of execution in your process.
In order to explain how Sequence Flows are used within a Process, BPMN 2.0 uses the concept of a token. Tokens traverse sequence flows and pass through the elements in the process. The token is a theoretical concept used to explain the behavior of Process elements by describing how they interact with a token as it “traverses” the structure of the Process. SkyVault Activiti, and any other BPMN engine does not define a token, but this documentation uses the concept.
Gateways are used to control how how tokens flow through sequence flows as they converge and diverge in a Process. As the term “gateway” suggests, there is a gating mechanism that either allows or prevents passage of a token through the Gateway. As tokens arrive at a Gateway, they can be merged together on input and/or split apart on output from the Gateway.
Gateways, like Activities, are capable of consuming or generating additional control tokens, to control the execution semantics of the Process. Gateways do not represent ‘work’ being done and they are considered to have zero effect on the cost or time of the Process being executed.
A gateway is displayed as a diamond, with an icon inside. The icon shows the type of gateway.
Exclusive gateway
You use an exclusive gateway model a decision in your process.When execution arrives at an exclusive gateway, the outgoing sequence flows are evaluated in the order in which they are defined. The first sequence flow whose condition evaluates to true, or which does not have a condition set, is selected and the process continues.
Note that if no sequence flow can be selected, an exception will be thrown.
| Property | Description |
|---|---|
Id |
A unique identifier for this element instance |
Name |
A name for this element instance |
Documentation |
A description of this element instance |
Asynchronous |
Define this task as asynchronous |
Exclusive |
Define this task as exclusive |
Flow order |
Select the order in which the sequence flow conditions are evaluated. If there are more than one orderings possible, then clicking on this field will give you a list of sequence flow conditions which you can sort. |
Parallel gateway
You use a parallel gateway to model concurrency in a process. It allows you to fork multiple outgoing paths of execution or join multiple incoming paths of execution.
In a fork, all outgoing sequence flows are followed in parallel, which creates one concurrent execution for each sequence flow.
In a join, all concurrent executions arriving at the parallel gateway wait at the gateway until an execution has arrived for every incoming sequence flow. Then the process continues past the joining gateway.
A single parallel gateway can both fork and join, if there are multiple incoming and outgoing sequence flow. The gateway will first join all incoming sequence flows, before splitting into multiple concurrent paths of executions.
Unlike other gateways, the parallel gateway does not evaluate conditions. Any conditions defined on the sequence flow connected with the parallel gateway are ignored.
| Property | Description |
|---|---|
Id |
A unique identifier for this element instance |
Name |
A name for this element instance |
Documentation |
A description of this element instance |
Asynchronous |
Define this task as asynchronous |
Exclusive |
Define this task as exclusive |
Flow order |
Select the order in which the sequence flow conditions are evaluated. If there are more than one orderings possible, then clicking on this field will give you a list of sequence flow conditions which you can sort. |
Inclusive gateway
You use an inclusive to join and fork multiple sequence flows based on conditions.
Like an exclusive gateway you can define conditions on outgoing sequence flows and the inclusive gateway will evaluate them, but an inclusive gateway can take more than one sequence flow, like the parallel gateway.
In a fork, all outgoing sequence flow conditions are evaluated. Every sequence flow with a condition that evaluates to true, is followed in parallel, creating one concurrent execution for each sequence flow.
In a join, all concurrent executions arriving at the inclusive gateway wait at the gateway until an execution has arrived for each of the incoming sequence flows that have a process token. The inclusive gateway will only wait for the incoming sequence flows that will be executed. After the join, the process continues past the joining inclusive gateway.
Note that an inclusive gateway can have both fork and join behavior, in which case there are multiple incoming and outgoing sequence flows for the same inclusive gateway. The gateway will join all incoming sequence flows that have a process token, before splitting into multiple concurrent paths of executions for the outgoing sequence flows that have a condition that evaluates to true.
In the above example, after the process is started, two tasks will be created only if the process variables paymentReceived is false and shipOrder is true. If only one of these process variables evaluates to true, then only one task will be created. If no condition evaluates to true an exception is thrown. You can prevent the exception by specifying a default outgoing sequence flow.
| Property | Description |
|---|---|
Id |
A unique identifier for this element instance |
Name |
A name for this element instance |
Documentation |
A description of this element instance |
Asynchronous |
Define this task as asynchronous |
Exclusive |
Define this task as exclusive |
Flow order |
Select the order in which the sequence flow conditions are evaluated. If there are more than one orderings possible, then clicking on this field will give you a list of sequence flow conditions which you can sort. |
Event gateway
You use an event gateway to take a decision based on events.
Each outgoing sequence flow of the event gateway must be connected to an intermediate catching event. When process execution reaches an event gateway execution is suspended, and for each outgoing sequence flow, an event subscription is created.
Outgoing sequence flows connect to an event gateway are never "executed", but they do allow the process engine to determine which events an execution arriving at an Event-based Gateway needs to subscribe to. The following restrictions apply to event gateways:
-
The gateway must have two or more outgoing sequence flows.
-
An Event-based Gateway can only be followed by intermediate catching events. Receive tasks after an event gateway are not supported by Activiti.
-
An intermediate catching event connected to an event gateway must have a single incoming sequence flow.
| Property | Description |
|---|---|
Id |
A unique identifier for this element instance |
Name |
A name for this element instance |
Documentation |
A description of this element instance |
Asynchronous |
Define this task as asynchronous |
Exclusive |
Define this task as exclusive |
Flow order |
Select the order in which the sequence flow conditions are evaluated. If there are more than one orderings possible, then clicking on this field will give you a list of sequence flow conditions which you can sort. |
2.7.5. Boundary events
You use boundary events to handle an event associated with an activity. A boundary event is always attached to an activity.
While the activity the boundary event is attached to is is running, the boundary event is listening for a certain type of trigger. When the event is caught, the activity is interrupted and the sequence flow going out of the event is followed.
A boundary event is displayed as an circled icon which is always attached to the rounded rectangle representing the associated activity.
2.7.6. Intermediate catching events
You use an intermediate catching event to indicate where something happens between the start and end of a Process. It can affect the flow of the Process, but will not start, or directly end, the Process.
Here are some examples of situations where you might want to use an intermediate catching event:
-
You want to show where Messages are expected in your process
-
You want to show that a delay is expected within the Process
An intermediate event is displayed as two concentric circles containing an icon. The icon shows the type of intermediate event.
2.7.7. Intermediate throwing events
You use an intermediate throwing event to indicate where something happens between the start and end of a Process. It can affect the flow of the Process, but will not start, or directly end, the Process.
An example of a situation where you might want to use an intermediate throwing event is where you need to disrupt the normal flow by throwing a signal.
An intermediate event is displayed as two concentric circles which may contain an icon. If present, the icon shows the type of intermediate event. A throwing none event contains no icon.
2.7.8. End events
You use an end event to signify the end of a process or sub-process, or the end of a path in a process or sub-process.
An end event is displayed as thick black circle which may contain an icon. If present, the icon shows the type of end event. A none end event has no icon.
None end event
A none end event ends the current path of execution.
| Property | Description |
|---|---|
Id |
A unique identifier for this element instance |
Name |
A name for this element instance |
Documentation |
A description of this element instance |
Execution listeners |
Execution listeners configured for this instance. An execution listener lets you execute Java code or evaluate an expression when an event occurs during process execution. For more information, see ?. |
Error end event
You use the end error event to throw an error and end the current path of execution.
The error can be caught by an intermediate boundary error event that matches the error. If no matching boundary error event is found, an exception will be thrown.
| Property | Description |
|---|---|
Id |
A unique identifier for this element instance |
Name |
A name for this element instance |
Documentation |
A description of this element instance |
Execution listeners |
Execution listeners configured for this instance. An execution listener lets you execute Java code or evaluate an expression when an event occurs during process execution. For more information, see ?. |
Error reference |
The error name. This is used to find a matching catching boundary error event. If the name does not match any defined error, then the error is used as the error code in the thrown exception. |
2.7.9. Swimlanes
You use swimlanes to display activities in your process divided by business function or participant group. A process definition can have one swimlane diagram containing one pool, which in turn contains one or more lanes. The pool represents the whole process, and each lane corresponds to a business function or participant group.
For example the process of selling a book consists of several activities; Ordering a book, processing the order, shipping the book, and reading the book, but the activities are performed by participants in different groups; by the customer, by the sales department, and by the warehouse or store. The following process definition has one pool called Sell a book with three lanes, Customer, Sales, and Store. The process sequence flow moves between lanes in the pool as the order progresses.
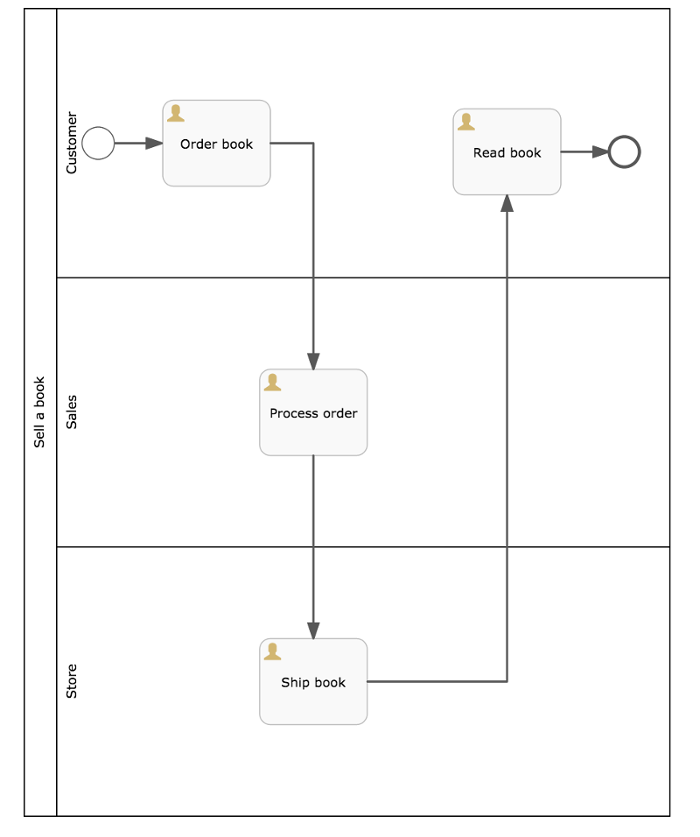
When you drag a pool to your process diagram it creates an unnamed pool containing one unnamed lane. You can add lanes by dragging a lane icon from the pallette to the canvas. When you mouse-over the name box of the pool, the whole pool border turns green, indicating the lane will be added to the pool when you release the mouse button.
2.7.10. Artifacts
You use artifacts to provide additional information about the Process. The BPMN editor supports the text annotation artifact which associates additional text to an element in your process, or to the process itself. The text does not influence the execution of a process, it is provided by the process designer to give information to the user of the process.
Text annotation.
You can set the following properties in the property sheet:
| Property | Description |
|---|---|
Id |
A unique identifier for this element instance |
Name |
A name for this element instance |
Documentation |
A description of this element instance |
Text |
The text you want to display in your annotation |
2.8. Form editor
The form editor provides a powerful drag and drop interface to let you design forms from a rich set of controls. You can define form outcomes and create forms with multiple tabs. Individual controls and whole tabs can be made visible depending on the value of other form fields and process variables. You can design your form with groups of controls in varying numbers of columns.
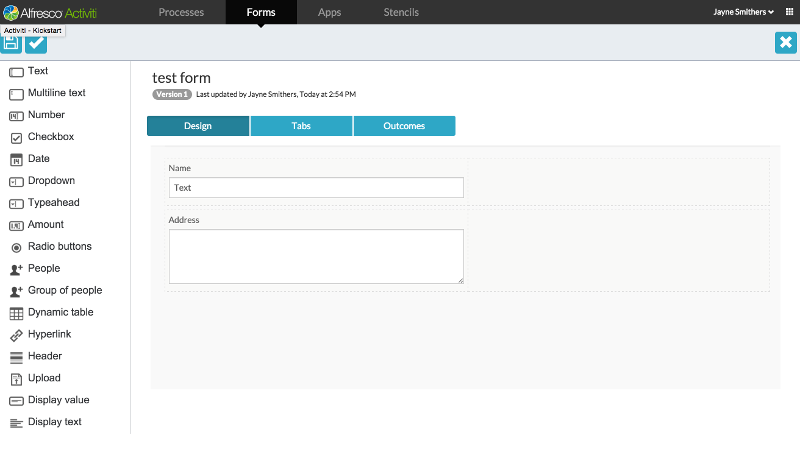
In the example above, the form editor is open on an form containing two controls, a text box, and a multiline text box.
2.9. Creating your first process
You create a SkyVault Activiti process model to represent a series of tasks in your business process. This tutorial guides you through creating a simple process model.
The process you are modeling here is a simplified business project lifecycle. Each project has a name, a type, a due date and some documents associated with it. Each project is started, and then reviewed to determine if it should be accepted on to the project list, or rejected.
-
From your landing page, click the Kickstart app tile.
-
Click the Create Process Button.
The Create a new business process model dialog is displayed.
-
Give your new process model a name.
For example,
First Process. -
In the Editor type drop-down, choose the Step editor
-
Click Create new model.
The Step editor is displayed.
The first step, Process start, is already added to your process. You are going to set the process to start by having the user complete a form.
-
Click on the Process start step.
It expands to allow you to change the step.
If you have some forms in your Forms library, they will be listed here, and you can pick one, but in this tutorial we will create a new form.
-
Click on the Start form box.
-
Click Create form.
The Create a new form> dialog is displayed. The form you create now is part if this process model and is not available in your forms library for use in other process models. If you want to create a form you can reuse in other process models you can do so from the Forms page.
-
Give the new form a name.
In this tutorial use the name
Start form. -
Click Create new form.
The Form Editor is displayed. You design the form by dragging and dropping the types of field from the palette on the left-hand side of the Form Editor. You can hover over each field in the Design area, and either select the pencil icon to edit the field’s properties, or to remove the field from the form. For each type of field you different options. Most fields allow you to give a display label, which is used later in the process design to reference a value entered into a field by a user in a running process. You can also define if the field is required to be filled before the form can be completed. In this tutorial, you just give labels to the fields.
-
Drag and drop the required fields from the pallette to the canvas on the right-hand side.
From the screen shot you can see your form has four fields. .. A Text field for the project name. .. A Date field for the project’s start date. .. A group of three Radio buttons to select the project type. .. An Attach control to allow the user to store project documents.
-
Click the Save button at the top-left of the editor to save your form.
You are back in the Step editor.
-
Clicking the + icon below the Process start box to add the first step in your process.
You need to add a Human step that can be used to assign a task to a user.
-
Select the Human step and fill in a name in the step box just created.
For this tutorial, use the name
Review projectThe Human step allows you to select who the task should be assigned to. You can assignthe person who initiated the process, a single named user, a set of candidate users, or depending on the type of your account, a group of users. When a task is assigned to a group or a list of candidate users, all of those users can see the task in their task list, and will need to claim it in order to complete the task. For this tutorial, you will assign all tasks to the process initiator, that’s you, so you can run the process and see the tasks yourself.
-
You need to create a form to allow review comments before we create the next step in the process.
-
On the Form tab for the Review project step, create a new form called
decide. -
Add a Multiline text field and name it
Review comment. -
Select the Outcomes tab and choose the Use custom outcomes for this form option, and add two outcomes:
AcceptandReject. -
Save the form, and return to the step editor.
-
-
Add a Choice step by clicking the + icon below the Review Project step.
This step allows you to take a different action depending on the outcome selected in the associated form.
You can add more choices by clicking on the + icon in the middle of the Choice step. For this tutorial, we only need two based on your accept and reject outcomes..
-
Click on the First choice box. A dialog allows you to select a condition based on existing form fields or outcomes. For this tutorial, set the First choice to a Form outcome. Choose the
decideform from the drop-down list of those already added to the process, and then select it to be Equals, to the value Accept. -
Click on the Second choice box, and repeat the last step, this time choosing the value Reject.
-
You need to add a task to be done if a project review is accepted.
-
Under the First choice click the + icon.
-
Add a Human step with the name
Update project list.
-
-
You need to add a task to be done if a project review is rejected.
-
Under the Second choice click the + icon.
-
Add a Human step with the name
Inform project leader of rejection. -
Since the process should stop after rejection, add a End process step under the
Inform project leader of rejectionstep.
-
-
Add a final step after the accept/reject choice step to display the project details by clicking the + icon at the bottom of the step diagram..
-
Add a Human step with the name
Show Project Details. -
On the Form tab for this step, create a new form. Drag a Display text field to the canvas, and enter a text message to display.
The text can contain references to values in forms in the process. There is a helper drop-down list from which a form field reference. It is inserted at the current cursor position in the text.
-
Save the form.
The step editor is displayed.
-
-
Save your completed process model.
Your process is listed in the Process tab as a thumbnail of the process. You can edit any process from the list by clicking the Visual Editor button in the top right corner of the thumbnail. You can see additional information about a model by clicking on the thumbnail itself or the Show Details button in the top right corner of the thumbnail. This takes you to the Details page for the process model. Here, you can see a read-only preview of the model and the actions you can perform on it.
Now you have created a process, you need to ? so you can publish and deploy your process model.
2.10. Creating your first app
You create a SkyVault Activiti process app to group together a number of processes to make them available to yourself or other users. An app is the vehicle for handling a group of published processes and deploying them to a SkyVault Activiti engine. This tutorial leads you through the steps required to create and use an app containing a single process.
This tutorial uses the process model created in the ? tutorial.
-
From the Kickstart App, click on the Apps tab click the Create App button
The Create a new app definition dialog is displayed.
-
Choose a name for your app and click Create a new app definition.
Use the name
My First Appfor this tutorial. -
Choose an icon and theme for your new app’s tile.
-
Click the Edit included models button and add the published model from the ?.
-
Save the app, selecting the checkbox to publish the app in the Save app definition dialog.
Publishing an app makes it available to everyone you’ve shared it with.
-
You can now add the app as a tile on your landing page.
-
On the Landing Page, click on the last tile labelled + to display the >Add a new app dialog.
-
Choose your My Firsp App from the list of published apps and click the Deploy button.
A new app tile is added to your landing page.
-
Your app is now deployed and ready to be used.
2.11. Starting your first process
You start a process from the Processes tab of the Task app page. In this tutorial you are going to start the and monitor the process you designed in a previous tutorial. A process must be added to an app and that app must be deployed in order for the process to be started.
This tutorial uses the process model created in the ? tutorial, and the corresponding app created and deployed in the ? tutorial.
-
On the Processes tab of the Task App page click the START PROCESS button
The form you created in the ? tutorial is displayed.
-
Fill in the details on the form, and add any documents you need, and click the Start process button.
You are back on the Processes page, which shows your started process in your process list.
On the Process page you can view any running process and see the current and completed tasks. You can also add comments that are available for anyone involved in the process.
-
Now that you have started the process, you want to complete the tasks you defined in it. Go to the Tasks tab.
You see the first step in the process. It is the task to review the project, and accept or reject it. Remember that when you created step you specified the task should be assigned to the process initiator. Since you started the process, you are the process initiator so this task is assigned to you.
-
Click on the Show details button.
At this stage you can add people, documents and comments to the task.
-
Click on the Show form button to return to the form.
-
Click the Accept button.
The Review Project task is complete and a new task, Update Project List is displayed. This is the step you defined if the user choice was to accept the project.
-
Click the Complete button to go to the next step.
The task that shows the details of the accepted project is displayed.
-
Click the Complete button to dismiss the details.
You have completed all the tasks in the process and there are no tasks displayed for you in the Tasks tab, and if you click on the Processes tab, you see there are no running processes.
You have started your first process, performed the tasks assigned to you in that process, and so completed the process.
2.12. Creating a single task
As you have seen from other tutorials, processes are made up of individual tasks. You can also create a single task for yourself or others and assign it for completion. This tutorial guides you through the steps for creating and completing a single task.
In this tutorial you will add a single task Brush teeth and complete
the task yourself.
-
On the Tasks tab of the Task app page click the CREATE TASK button
The New task dialog appears.
-
Give your new task a name, and optionally a description, and click Create.
Your new task appears in the task list, and the task details are displayed in the right-hand panel.
Now you have created a task you can alter the details such as the assignee and the Due date, involve others in the task, add a document and add comments to be shared with other collaborators in the task. For this simple task of
Brushing teeth, you are just going to add a due date oftoday. -
Click on Due date.
A date chooser drops down.
-
Click Due today.
The Due date now has a timer displayed showing the number of hours before the end of the day. Many fields displayed in the Activiti app can accept user input when you click on them. The Assignee field the task is another example.
-
When you’ve brushed your teeth, click Complete in the task details area.
The task is removed from the open task list.
-
By default, your task list displays only open tasks. That is why you no longer see the task you just completed. You can see your completed tasks clicking the COMPLETED TASKS filter in the right-most column of the Tasks tab.
You have created and completed your first single task and used some of the filtering capabilities of the Task app.
3. The SkyVault Activiti Share connector
The Share connector lets you to start and run Activiti processes and tasks in a SkyVault Share environment. You can create process definitions in SkyVault Activiti, and deploy them to Share using a special predefined SkyVault Share app. Installing the Share connector changes the standard SkyVault workflow and task management to use the Activiti processes and tasks by default, but the standard Share workflow capabilities are still available.
Once you have installed the Activiti Share connector on a SkyVault system, you have the following new features available:
-
The Activiti Review Process app provided with the Share connector includes four pre-defined process definitions: Ad hoc Task, Group ad hoc task, Review and Approve - Group, and Review and Approve - Single person. These four processes are already deployed to SkyVault Share. When you start a workflow in SkyVault you can choose any of the four pre-defined processes.
-
The Activiti user interface for working with processes and tasks is embedded in the Share user interface.
-
When you select people and documents in a workflow, the native SkyVault Share choosers are used.
-
In SkyVault Share you can add a new My Activiti Tasks dashlet to your home dashboard. This dashlet shows tasks created using the Activiti Share connector. You can filter the tasks shown by: Active Tasks, Completed Tasks, Tasks Due Today, Tasks Assigned to Me, Unassigned (Pooled Tasks), and Overdue Tasks.
-
When you start a workflow on a document in Share or from the My Activiti Tasks dashlet, you are creating Activiti workflows and not the standard internal SkyVault workflows.
-
The original SkyVault My Tasks dashlet is still available, so you can still see the old internal workflows and receive new site invitations.
-
The original SkyVault My Tasks page can be accessed by clicking Internal Tasks on the new Activiti My Tasks page, so you can still work with old, internal tasks
-
. The original My Workflows page can be accessed by clicking Internal Workflow on the new Activiti Processes page, so you can still work with old, internal workflows. The Workflows panel on the Document details page will list both internal and external workflows.
-
The Workflows panel on the Document details page lists both internal and external workflows.
3.1. Using the Share connector demo
Follow these steps to start creating and running processes inside SkyVault Share.
|
Note that LDAP demo server installed with the demo includes four fixed users. The password for each user is password. The four users are set up so you can try out various group and user scenarios.
|
-
Go to the installed SkyVault Share system at http://localhost:8090/share and login with the userid admin and the password password.
The current Activiti Share connector installs a demo LDAP system which provides several fixed userid/password pairs. The admin user id gives you the correct permissions to start tasks and processes on SkyVault Share, and to create and deploy processes and apps on the embedded SkyVault Activiti app.
-
On your personal dashboard, click the cogwheel in the top-right and add the My Activiti Tasks dashlet.
This dashlet is now displayed as well as the original My Tasks dashlet. You use the new dashlet to control Activiti processes and tasks inside SkyVault Share.
-
Go to the Activiti app at http://localhost:8080/activiti-app/, and login with the userid admin and the password password.
In the embedded Activiti app, you can create process definitions and deploy them to SkyVault Share.
3.1.1. Starting a workflow on a file
In your site’s document library, you can start a workflow on one or more files. In this tutorial you start a workflow, using one of the pre-defined Activiti processes, on two files.
The tutorial assumes you have your own site and added some files and folders to it.
-
Find the file or files you want to start the workflow on and click Selected Items > Start Workflow in the menu bar.
The Start Workflow page opens.
-
Select the Ad hoc Task predefined process from the list of processes
The start form for the process is displayed.
Note that the two files selected are already shown in the upload field of the form. When you start a workflow on a file or files, the selected content items are always associated with the first upload field in the process definition.
-
Fill in the start form, assigning the process to yourself, and click Start process
The process is started, and the first task is showed as active.
You have started an Activiti process on selected files in a SkyVault site.
3.1.2. Starting a workflow in SkyVault Share
This tutorial leads you though the steps required to run your first Activiti process as a workflow from the SkyVault Share from the My Activiti Tasks dashlet.
All process definitions that you deploy to Apps in SkyVault Activiti are available to you in SkyVault Share. This tutorial assumes you have deployed the First process workflow using the ? tutorial. If you havn’t done so already, follow that tutorial now to deploy the workflow.
-
Go to your SkyVault Share dashboard, http://localhost:8090/share.
You run an Activiti process in SkyVault Share as a workflow.
-
In your My Activiti Tasks dashlet click Start workflow.
The Start workflow dialog is displayed.
Note that the alphabetical list of processs definitions includes your First Process.
-
Select your First Process.
The workflow is started and the page now shows the form for the start task in this workflow, just like it does in the Activiti app.
-
Fill in the form
Note that when you click the Select a file button for the Project files the file chooser dialog is for SkyVault Share to allow you to select files from your SkyVault respository.
-
Click Start process to start the workflow.
The My Workflow page now displays the active and completed tasks in your workflow.
-
Click the Review project task.
The My tasks page is displayed.
-
Add a review comment and click Accept to continue with the next step in the workflow, and continue until you have completed all tasks in the workflow.
You have run an Actviti process definition as a workflow in SkyVault Share. Note on the menu bar that you can get to the My tasks and My workflows pages from the Tasks menu, and you can go to the associated SkyVault Activiti for this SkyVault Share site.
4. BPMN 2.0 Introduction
Business Process Model and Notation (BPMN) 2.0 is a standard for specifying business processes as a graphical model in a process diagram. BPMN 2.0 supports business process management for both technical and business users. It provides an intuitive notation, and yet is rich enough to represent complex processes.
The BPMN 2.0 specification defines a mapping between the graphics of the notation and the underlying XML model. The notation is readily understandable by all business stakeholders. Stakeholders include the business analysts who create and refine processes, the technical developers responsible for implementing those processes, business managers who manage and monitor processes.
4.1. Defining a process
You can define a simple process using a text editor. The file must have
the suffix .bpmn20.xml or .bpmn to allow the Activiti engine to
recognize the file for deployment.
Create a new XML file ( right-click on any project and select New→Other→XML-XML File ) and give it a name.
Make sure that the file ends with .bpmn20.xml or .bpmn, since otherwise the engine won’t pick up this file for deployment.
The root element of the BPMN 2.0 schema is the definitions element.
Within this element, multiple process definitions can be defined
(although we advise to have only one process definition in each file,
since this simplifies maintenance later in the development process). An
empty process definition looks as listed below. Note that the minimal
definitions element only needs the xmlns and targetNamespace
declaration. The targetNamespace can be anything, and is useful for
categorizing process definitions.
<definitions
  xmlns="http://www.omg.org/spec/BPMN/20100524/MODEL"
  xmlns:activiti="http://activiti.org/bpmn"
  targetNamespace="Examples">

  <process id="myProcess" name="My First Process">..
  </process>

</definitions>
Optionally you can also add the online schema location of the BPMN 2.0 XML schema, as an alternative to the XML catalog configuration in Eclipse.
xmlns:xsi="http://www.w3.org/2001/XMLSchema-instance"
xsi:schemaLocation="http://www.omg.org/spec/BPMN/20100524/MODEL
                    http://www.omg.org/spec/BPMN/2.0/20100501/BPMN20.xsd
The process element has two attributes:
-
id: this attribute is required and maps to the key property of an Activiti
ProcessDefinitionobject. Thisidcan then be used to start a new process instance of the process definition, through thestartProcessInstanceByKeymethod on theRuntimeService. This method will always take the latest deployed version of the process definition.ProcessInstance processInstance = runtimeService.startProcessInstanceByKey("myProcess");Important to note here is that this is not the same as calling the
startProcessInstanceByIdmethod. This method expects the String id that was generated at deploy time by the Activiti engine, and can be retrieved by calling theprocessDefinition.getId()method. The format of the generated id is 'key:version', and the length is constrained to 64 characters. If you get anActivitiExceptionstating that the generated id is too long, limit the text in the key field of the process. -
name: this attribute is optional and maps to the name property of a
ProcessDefinition. The engine itself doesn’t use this property, so it can be used for displaying a more human-friendly name in a user interface, for example.
4.2. Getting started: a 10 minute tutorial
This tutorial defines a simple business process, and introduces the basic concepts of Activiti, and the Activiti API.
This tutorial assumes that you have the ?, and that you are using a
standalone H2 server. Edit db.properties and set the
jdbc.url=jdbc:h2:tcp://localhost/activiti, and then run the standalone
server according to
H2’s
documentation.
The goal of this tutorial is to learn about Activiti and some basic BPMN 2.0 concepts. The end result will be a simple Java SE program that deploys a process definition, and interacts with this process through the Activiti engine API.
A company, BPMCorp, needs a financial report written every month for its shareholders. This is the responsibility of the accountancy department. When the report is finished, one of the members of the upper management needs to approve the document before it is sent to all the shareholders.
The business process as described above can be graphically visualized using the ?. However, for this tutorial you type the XML yourself. The graphical BPMN 2.0 notation of the process looks like this: What we see is a ? the circle on the left, followed by two ?: Write monthly financial report and Verify monthly financial report. Finally, there is a ?, the circle with thick border on the right.
The XML version of this business process, FinancialReportProcess.bpmn20.xml, looks as shown below.
You can see the main elements of the process. Click on the links to see the detailed section for that BPMN 2.0 construct:
-
? gives you detail on the entry point to your process.
-
The ? declarations are the human tasks of the process. Note that the first task is assigned to the accountancy group, while the second task is assigned to the management group. See ? for more information on how users and groups can be assigned to user tasks.
-
The process ends when the ? is reached.\
-
The elements are connected with each other through ?. The sequence flows have a
sourceandtarget, defining the direction of the sequence flow.
<definitions id="definitions"
  targetNamespace="http://activiti.org/bpmn20"
  xmlns:activiti="http://activiti.org/bpmn"
  xmlns="http://www.omg.org/spec/BPMN/20100524/MODEL">

    <process id="financialReport" name="Monthly financial report reminder process">

      <startEvent id="theStart" />

      <sequenceFlow id='flow1' sourceRef='theStart' targetRef='writeReportTask' />

      <userTask id="writeReportTask" name="Write monthly financial report" >
        <documentation>
          Write monthly financial report for publication to shareholders.
        </documentation>
        <potentialOwner>
          <resourceAssignmentExpression>
            <formalExpression>accountancy</formalExpression>
          </resourceAssignmentExpression>
        </potentialOwner>
      </userTask>

      <sequenceFlow id='flow2' sourceRef='writeReportTask' targetRef='verifyReportTask' />

      <userTask id="verifyReportTask" name="Verify monthly financial report" >
        <documentation>
          Verify monthly financial report composed by the accountancy department.
          This financial report is going to be sent to all the company shareholders.
        </documentation>
        <potentialOwner>
          <resourceAssignmentExpression>
            <formalExpression>management</formalExpression>
          </resourceAssignmentExpression>
        </potentialOwner>
      </userTask>

      <sequenceFlow id='flow3' sourceRef='verifyReportTask' targetRef='theEnd' />

      <endEvent id="theEnd" />

    </process>

</definitions>
We have now created the process definition of our business process.
From such a process definition, you can create process instances. In this case, one process instance would match with the creation and verification of a single financial report for a particular month. All the process instances share the same process definition.
To be able to create process instances from a given process definition, we must first deploy this process definition. Deploying a process definition means two things:
-
The process definition is stored in the persistent datastore that is configured for your Activiti engine. So by deploying the business process, you ensure that the engine will discover the process definition after an engine reboot.
-
The BPMN 2.0 process file will be parsed to an in-memory object model that can be accessed through the Activiti API.
More information on deployment can be found ?.
As described in that topic, deployment can happen in several ways. One way is through the API as follows. Note that all interaction with the Activiti engine happens through its services.
Deployment deployment = repositoryService.createDeployment().addClasspathResource("FinancialReportProcess.bpmn20.xml").deploy();
Now you can start a new process instance using the id we defined in
the process definition (see process element in the XML file). Note that
this id in Activiti terminology is called the key.
ProcessInstance processInstance = runtimeService.startProcessInstanceByKey("financialReport");
This will create a process instance that will first go through the start event. After the start event, it follows all the outgoing sequence flows (only one in this case) and the first task ('write monthly financial report') is reached. The Activiti engine will now store a task in the persistent database. At this point, the user or group assignments attached to the task are resolved and also stored in the database. It is important to note that the Activiti engine will continue process execution steps until it reaches a wait state, such as the user task. At such a wait state, the current state of the process instance is stored in the database. It remains in that state until a user decides to complete their task. At that point, the engine will continue until it reaches a new wait state or the end of the process. When the engine reboots or crashes in the meantime, the state of the process is safe and well in the database.
After the task is created, the startProcessInstanceByKey method will
return since the user task activity is a wait state. In this case, the
task is assigned to a group, which means that every member of the group
is a candidate to perform the task.
We can now throw this all together and create a simple Java program.
Create a new Eclipse project and add the Activiti jars and dependencies
to its classpath (these can be found in the libs folder of the Activiti
distribution). Before you can call the Activiti services, we must first
construct a ProcessEngine that gives us access to the services. Here
we use the 'standalone' configuration, which constructs a
ProcessEngine that uses the database also used in the demo setup.
You can download the process definition XML here. This file contains the XML as shown above, but also contains the necessary BPMN diagram interchange information to visualize the process in the Activiti tools.
public static void main(String[] args) {

  // Create Activiti process engine
  ProcessEngine processEngine = ProcessEngineConfiguration.createStandaloneProcessEngineConfiguration().buildProcessEngine();

  // Get Activiti services
  RepositoryService repositoryService = processEngine.getRepositoryService();
  RuntimeService runtimeService = processEngine.getRuntimeService();

  // Deploy the process definition
  repositoryService.createDeployment().addClasspathResource("FinancialReportProcess.bpmn20.xml").deploy();

  // Start a process instance
  runtimeService.startProcessInstanceByKey("financialReport");
}
You can now retrieve this task through the TaskService by adding the
following logic:
List<Task> tasks = taskService.createTaskQuery().taskCandidateUser("kermit").list();
Note that the user passed to this operation must be a member of the accountancy group, since that was declared in the process definition:
<potentialOwner>
  <resourceAssignmentExpression>
    <formalExpression>accountancy</formalExpression>
  </resourceAssignmentExpression>
</potentialOwner>
You could also use the task query API to get the same results using the name of the group. You can now add the following logic to your code:
TaskService taskService = processEngine.getTaskService();
List<Task> tasks = taskService.createTaskQuery().taskCandidateGroup("accountancy").list();
Since the ProcessEngine is configured to use the same database as the
demo setup is using, you can now log into
Activiti Explorer. By default,
no user is in the accountancy group. Login with kermit/kermit, click
Groups and then "Create group". Then click Users and add the group to
fozzie. Now login with fozzie/fozzie, and we will find that you can
start the business process after selecting the Processes page and
clicking on the 'Start Process' link in the 'Actions' column
corresponding to the 'Monthly financial report' process. As explained,
the process will execute up to the first user task. Since you are logged
in as kermit, you can see that there is a new candidate task available
for kermit after you have started a process instance. Select the Tasks
page to view this new task. Note that even if the process was started by
someone else, the task would still be visible as a candidate task to
everyone in the accountancy group.
An accountant now needs to claim the task.
By claiming the task, the specific user will become the assignee of the task and the task will disappear from every task list of the other members of the accountancy group. Claiming a task is programmatically done as follows:
taskService.claim(task.getId(), "fozzie");
The task is now in the personal task list of the one that claimed the task.
List<Task> tasks = taskService.createTaskQuery().taskAssignee("fozzie").list();
In the Activiti Explorer UI, clicking the claim button will call the same operation. The task will now move to the personal task list of the logged on user. You also see that the assignee of the task changed to the current logged in user.
The accountant can now start working on the financial report.
Once the report is finished, he can complete the task, which means that all work for that task is done.
taskService.complete(task.getId());
For the Activiti engine, this is an external signal that the process instance execution must be continued. The task itself is removed from the runtime data. The single outgoing transition out of the task is followed, moving the execution to the second task ( 'verification of the report' ). The same mechanism as described for the first task will now be used to assign the second task, with the small difference that the task will be assigned to the management group.
In the demo setup, completing the task is done by clicking the complete button in the task list. Since Fozzie isn’t an accountant, we need to log out of the Activiti Explorer and login in as kermit (who is a manager). The second task is now visible in the unassigned task lists.
The verification task can be retrieved and claimed in exactly the same way as before. Completing this second task will move process execution to the end event, which finishes the process instance. The process instance and all related runtime execution data are removed from the datastore.
When you log into Activiti Explorer you can verify this, since no records will be found in the table where the process executions are stored.
Programmatically, you can also verify that the process is ended using
the historyService
HistoryService historyService = processEngine.getHistoryService();
HistoricProcessInstance historicProcessInstance =
historyService.createHistoricProcessInstanceQuery().processInstanceId(procId).singleResult();
System.out.println("Process instance end time: " + historicProcessInstance.getEndTime());
Combine all the snippets from previous sections, and you should have something like this (this code takes in account that you probably will have started a few process instances through the Activiti Explorer UI.
As such, it always retrieves a list of tasks instead of one task, so it always works):
public class TenMinuteTutorial {

  public static void main(String[] args) {

    // Create Activiti process engine
    ProcessEngine processEngine = ProcessEngineConfiguration.createStandaloneProcessEngineConfiguration().buildProcessEngine();

    // Get Activiti services
    RepositoryService repositoryService = processEngine.getRepositoryService();
    RuntimeService runtimeService = processEngine.getRuntimeService();

    // Deploy the process definition
    repositoryService.createDeployment().addClasspathResource("FinancialReportProcess.bpmn20.xml").deploy();

    // Start a process instance
    String procId = runtimeService.startProcessInstanceByKey("financialReport").getId();

    // Get the first task
    TaskService taskService = processEngine.getTaskService();
    List<Task> tasks = taskService.createTaskQuery().taskCandidateGroup("accountancy").list();
    for (Task task : tasks) {
      System.out.println("Following task is available for accountancy group: " + task.getName());

      // claim it
      taskService.claim(task.getId(), "fozzie");
    }

    // Verify Fozzie can now retrieve the task
    tasks = taskService.createTaskQuery().taskAssignee("fozzie").list();
    for (Task task : tasks) {
      System.out.println("Task for fozzie: " + task.getName());

      // Complete the task
      taskService.complete(task.getId());
    }

    System.out.println("Number of tasks for fozzie: "
            + taskService.createTaskQuery().taskAssignee("fozzie").count());

    // Retrieve and claim the second task
    tasks = taskService.createTaskQuery().taskCandidateGroup("management").list();
    for (Task task : tasks) {
      System.out.println("Following task is available for management group: " + task.getName());
      taskService.claim(task.getId(), "kermit");
    }

    // Completing the second task ends the process
    for (Task task : tasks) {
      taskService.complete(task.getId());
    }

    // verify that the process is actually finished
    HistoryService historyService = processEngine.getHistoryService();
    HistoricProcessInstance historicProcessInstance =
      historyService.createHistoricProcessInstanceQuery().processInstanceId(procId).singleResult();
    System.out.println("Process instance end time: " + historicProcessInstance.getEndTime());
  }

}
This code is also available as a unit test shipped with the examples. You can see how to unit test your processes in the ?.
As you gain familiarity with the BPMN 2.0 constructs available in Activiti, you can enhance your business process by :
-
Defining gateways that act as decisions. For example, a manager could reject the financial report which would recreate the task for the accountant.
-
Declaring and using variables, so that you can store or reference the report so that it can be displayed in the form.
-
Defining a service task at the end of the process that sends the report to each shareholder.
5. BPMN 2.0 Constructs
Here are the BPMN 2.0 constructs supported by Activiti, as well as Activiti’s 'custom extensions to the BPMN 2.0 standard.
5.1. Events
Events are used to model something that happens during the lifetime process. Events are always visualized as a circle. In BPMN 2.0, there exist two main event categories: catching and throwing event.
-
Catching: when process execution arrives in the event, it will wait for a trigger to happen. The type of trigger is defined by the inner icon or the type declaration in the XML. Catching events are visually differentiated from a throwing event by the inner icon that is not filled (i.e. it is white).
-
Throwing: when process execution arrives in the event, a trigger is fired. The type of trigger is defined by the inner icon or the type declaration in the XML. Throwing events are visually differentiated from a catching event by the inner icon that is filled with black.
5.1.1. Event definitions
Event definitions define the semantics of an event.
Without an event definition, an event "does nothing special". For instance a start event without and event definition does not specify what exactly starts the process. If we add an event definition to the start event (like for instance a timer event definition) we declare what "type" of event starts the process (in the case of a timer event definition the fact that a certain point in time is reached).
Timer event definitions
Timer events are events which are triggered by defined timer.
They can be used as ?, ? or ?
Timer definition must have exactly one element from the following:
-
timeDate. This format specifies fixed date in ISO 8601 format, when trigger will be fired. Example:
<timerEventDefinition> <timeDate>2011-03-11T12:13:14</timeDate> </timerEventDefinition> -
timeDuration. To specify how long the timer should run before it is fired, a timeDuration can be specified as sub-element of timerEventDefinition. The format used is the ISO 8601 format (as required by the BPMN 2.0 specification). Example (interval lasting 10 days):
<timerEventDefinition> <timeDuration>P10D</timeDuration> </timerEventDefinition> -
timeCycle. Specifies repeating interval, which can be useful for starting process periodically, or for sending multiple reminders for overdue user task. Time cycle element can be in two formats. First is the format of recurring time duration, as specified by ISO 8601 standard. Example (3 repeating intervals, each lasting 10 hours):
<timerEventDefinition>
    <timeCycle>R3/PT10H</timeCycle>
</timerEventDefinition>
Additionally, you can specify time cycle using cron expressions, example below shows trigger firing every 5 minutes, starting at full hour:
0 0/5 * * * ?
Please see tutorial for using cron expressions.
The first symbol denotes seconds, not minutes as in normal Unix cron.
The recurring time duration is better suited for handling relative timers, which are calculated with respect to some particular point in time (e.g. time when user task was started), while cron expressions can handle absolute timers - which is particularly useful for ?.
You can use expressions for the timer event definitions, by doing so you can influence the timer definition based on process variables. The process variables must contain the ISO 8601 (or cron for cycle type) string for appropriate timer type.
  <boundaryEvent id="escalationTimer" cancelActivity="true" attachedToRef="firstLineSupport">
     <timerEventDefinition>
      <timeDuration>${duration}</timeDuration>
    </timerEventDefinition>
  </boundaryEvent>
|
timers are only fired when the job executor is enabled (i.e.
jobExecutorActivate must be set to |
Error event definitions
Important note: a BPMN error is NOT the same as a Java exception.
In fact, the two have nothing in common. BPMN error events are a way of modeling business exceptions. Java exceptions are handled in ?.
<endEvent id="myErrorEndEvent">
  <errorEventDefinition errorRef="myError" />
</endEvent>
Signal event definitions
Signal events are events which reference a named signal. A signal is an event of global scope (broadcast semantics) and is delivered to all active handlers.
A signal event definition is declared using the signalEventDefinition
element. The attribute signalRef references a signal element
declared as a child element of the definitions root element. The
following is an excerpt of a process where a signal event is thrown and
caught by intermediate events.
<definitions... >
    <!-- declaration of the signal -->
    <signal id="alertSignal" name="alert" />

    <process id="catchSignal">
        <intermediateThrowEvent id="throwSignalEvent" name="Alert">
            <!-- signal event definition -->
            <signalEventDefinition signalRef="alertSignal" />
        </intermediateThrowEvent>...
        <intermediateCatchEvent id="catchSignalEvent" name="On Alert">
            <!-- signal event definition -->
            <signalEventDefinition signalRef="alertSignal" />
        </intermediateCatchEvent>...
    </process>
</definitions>
The signalEventDefinition s reference the same signal element.
A signal can either be thrown by a process instance using aBPMNconstruct or programmatically using java API.
The following methods on the org.activiti.engine.RuntimeService can be
used to throw a signal programmatically:
RuntimeService.signalEventReceived(String signalName);
RuntimeService.signalEventReceived(String signalName, String executionId);
The difference between signalEventReceived(String signalName); and
signalEventReceived(String signalName, String executionId); is that
the first method throws the signal globally to all subscribed handlers
(broadcast semantics) and the second method delivers the signal to a
specific execution only.
A signal event can be caught by an intermediate catch signal event or a signal boundary event.
You can query for all executions which have subscribed to a specific signal event:
List<Execution> executions = runtimeService.createExecutionQuery().signalEventSubscriptionName("alert").list();
We could then use the
signalEventReceived(String signalName, String executionId) method to
deliver the signal to these executions.
By default, signals are broadcast process engine wide. This means that you can throw a signal event in a process instance, and other process instances with different process definitions can react on the occurrence of this event.
However, sometimes you want to react to a signal event only within the same process instance. A use case for example is a synchronization mechanism in the process instance, if two or more activities are mutually exclusive.
To restrict the scope of the signal event, add the (non-BPMN 2.0 standard!) scope attribute to the signal event definition:
<signal id="alertSignal" name="alert" activiti:scope="processInstance"/>
The default value for this is attribute is "global".
The following is an example of two separate processes communicating using signals. The first process is started if an insurance policy is updated or changed. After the changes have been reviewed by a human participant, a signal event is thrown, signaling that a policy has changed:
This event can now be caught by all process instances which are interested. The following is an example of a process subscribing to the event.
|
A signal event is broadcast to all active handlers. This means in the case of the example given above, that all instances of the process catching the signal would receive the event. In this case this is what we want. However, there are also situations where the broadcast behavior is unintended. Consider the following process: |
The pattern described in the process above is not supported by Activiti. The idea is that the error thrown while performing the "do something" task is caught by the boundary error event and would be propagated to the parallel path of execution using the signal throw event and then interrupt the "do something in parallel" task. So far Activiti would perform as expected. The signal would be propagated to the catching boundary event and interrupt the task. However, due to the broadcast semantics of the signal, it would also be propagated to all other process instances which have subscribed to the signal event. In this case, this might not be what we want.
|
A signal event is broadcast to all process instances. If you need to
deliver a signal to a specific process instance only, perform
correlation manually and use
|
Message event definitions
Message events are events which reference a named message. A message has a name and a payload. Unlike a signal, a message event is always directed at a single receiver.
A message event definition is declared using the
messageEventDefinition element. The attribute messageRef references
a message element declared as a child element of the definitions
root element. The following is an excerpt of a process where two message
events is declared and referenced by a start event and an intermediate
catching message event.
<definitions id="definitions"
  xmlns="http://www.omg.org/spec/BPMN/20100524/MODEL"
  xmlns:activiti="http://activiti.org/bpmn"
  targetNamespace="Examples"
  xmlns:tns="Examples">

  <message id="newInvoice" name="newInvoiceMessage" />
  <message id="payment" name="paymentMessage" />

  <process id="invoiceProcess">

    <startEvent id="messageStart" >
        <messageEventDefinition messageRef="newInvoice" />
    </startEvent>...
    <intermediateCatchEvent id="paymentEvt" >
        <messageEventDefinition messageRef="payment" />
    </intermediateCatchEvent>...
  </process>

</definitions>
As an embeddable process engine, Activiti is not concerned with actually receiving a message.
This would be environment dependent and entail platform-specific activities like connecting to a JMS (Java Messaging Service) Queue/Topic or processing a Webservice or REST request. The reception of messages is therefore something you have to implement as part of the application or infrastructure into which the process engine is embedded.
After you have received a message inside your application, you must decide what to do with it. If the message should trigger the start of a new process instance, choose between the following methods offered by the runtime service:
         ProcessInstance startProcessInstanceByMessage(String messageName); ProcessInstance
         startProcessInstanceByMessage(String messageName, Map<String, Object> processVariables); ProcessInstance
         startProcessInstanceByMessage(String messageName, String businessKey, Map<String, Object> processVariables);
These methods allow starting a process instance using the referenced message.
If the message must be received by an existing process instance, you first have to correlate the message to a specific process instance (see next section) and then trigger the continuation of the wating execution. The runtime service offers the following methods for triggering an execution based on a message event subscription:
  void messageEventReceived(String messageName, String executionId); void messageEventReceived(String
            messageName, String executionId, HashMap<String, Object> processVariables);
In the case of a message start event, the message event subscription is associated with a particular process definition.
-
Such message subscriptions can be queried using a
ProcessDefinitionQuery:ProcessDefinition processDefinition = repositoryService.createProcessDefinitionQuery().messageEventSubscription("newCallCenterBooking").singleResult();</codeblock> Since there can only be one process definition for a specific message subscription, the query always returns zero or one results. If a process definition is updated, only the newest version of the process definition has a subscription to the message event. </p> </li><li> <p> In the case of an intermediate catch message event, the message event subscription is associated with a particular execution. Such message event subscriptions can be queried using a <codeph>ExecutionQuery</codeph>: <codeblock><![CDATA[Execution execution = runtimeService.createExecutionQuery().messageEventSubscriptionName("paymentReceived").variableValueEquals("orderId", message.getOrderId()).singleResult();Such queries are called correlation queries and usually require knowledge about the processes (in this case that there will be at most one process instance for a given orderId).
The following is an example of a process which can be started using two different messages:
This is useful if the process needs alternative ways to react to different start events but eventually continues in a uniform way.
5.1.2. Start events
A start event indicates where a process starts. You can define events that start on the arrival of a message, or start at specific time intervals, or start as a result of an error, or start as when a specific signal is raised, or start on no specific trigger.
In the XML representation, the type of start event is specified as a sub-element.
Start events are always catching: a start event waits until a specific trigger occurs.
You can specify the following Activiti-specific properties:
-
initiator: identifies the variable name in which the authenticated user id will be stored when the process is started. Example:
<startEvent id="request" activiti:initiator="initiator" />
The authenticated user must be set with the method
IdentityService.setAuthenticatedUserId(String)in a try-finally block like this:try { identityService.setAuthenticatedUserId("bono"); runtimeService.startProcessInstanceByKey("someProcessKey"); } finally { identityService.setAuthenticatedUserId(null); }This code is baked into the Activiti Explorer application. So it works in combination with ?
None start event
A start event with an unspecified trigger. BPMN 2.0 refers to this as a none start event.
The BPMN engine cannot anticipate when the containing process instance must be started. You use the none start event when the process instance starts through an API call to one of the startProcessInstanceByXXX methods.
ProcessInstance processInstance = runtimeService.startProcessInstanceByXXX();
|
A sub-process always has a none start event. |
Graphical notation.
formKey: references to a form template that users have to fill in when starting a new process instance.
More information can be found in ? Example:
<startEvent id="request" activiti:formKey="org/activiti/examples/taskforms/request.form" />
Timer start event
A timer start event initiates a process instance at specific time. You can use it both for processes which must start only once and for processes that must start in repeated time intervals.
|
A sub-process cannot have a timer start event. |
A start timer event is scheduled as soon as a process is deployed – startProcessInstanceByXXX does not need to be called However, calling start process methods is not restricted and causes an additional start of the process at the time of the startProcessInstanceByXXX Invocation.
When a new version of a process with a start timer event is deployed, the job corresponding with the previous timer will be removed.
Graphical notation.
The XML representation of a timer start event is the normal start event declaration, with timer definition sub-element.
Please refer to ? for configuration details. for details on configuration details.
Example: process will start 4 times, in 5 minute intervals, starting on 11th march 2011, 12:13
        <startEvent id="theStart">
            <timerEventDefinition>
                <timeCycle>R4/2011-03-11T12:13/PT5M</timeCycle>
            </timerEventDefinition>
        </startEvent>
Example: process will start once, on selected date
        <startEvent id="theStart">
            <timerEventDefinition>
                <timeDate>2011-03-11T12:13:14</timeDate>
            </timerEventDefinition>
        </startEvent>
Message start event
A message start event starts a process instance using a named message. It allows you to select the specific start event from a set of alternative start events based on the message.
When you deploy a process definition with one or more message start events, consider the following points:
-
The name of the message start event must be unique across the whole process definition. SkyVault Activiti will throw an exception on deployment of a process definition with two or more message start events that reference the same message or with two or more message start events that reference messages with the same name.
-
The name of the message start event must be unique across all deployed process definitions. SkyVault Activiti will throw an exception on deployment of a process definition with one or more message start events that reference a message with the same name as a message start event already deployed in a different process definition.
-
When a new version of a process definition is deployed, the message subscriptions of the previous version are canceled. This is also true for message events that are not present in the new version.
When starting a process instance, a message start event can be triggered
using the following methods on the RuntimeService:
ProcessInstance startProcessInstanceByMessage(String messageName);
ProcessInstance startProcessInstanceByMessage(String messageName, Map<String, Object> processVariables);
ProcessInstance startProcessInstanceByMessage(String messageName, String businessKey, Map<String, Object< processVariables);
The messageName is the name given in the name attribute of the
message element referenced by the messageRef attribute of the
messageEventDefinition. The following considerations apply when
starting a process instance:
-
Message start events are only supported on top-level processes. Message start events are not supported on embedded sub processes.
-
If a process definition has multiple message start events,
runtimeService.startProcessInstanceByMessage(…)allows to select the appropriate start event. -
If a process definition has multiple message start events and a single none start event,
runtimeService.startProcessInstanceByKey(…)andruntimeService.startProcessInstanceById(…)starts a process instance using the none start event. -
If a process definition has multiple message start events and no none start event,
runtimeService.startProcessInstanceByKey(…)andruntimeService.startProcessInstanceById(…)throw an exception. -
If a process definition has a single message start event,
runtimeService.startProcessInstanceByKey(…)andruntimeService.startProcessInstanceById(…)start a new process instance using the message start event. -
If a process is started from a call activity, message start event(s) are only supported if
-
in addition to the message start event(s), the process has a single none start event
-
the process has a single message start event and no other start events.
-
Graphical notation.
The XML representation of a message start event is the normal start event declaration with a messageEventDefinition child-element:
<definitions id="definitions"
  xmlns="http://www.omg.org/spec/BPMN/20100524/MODEL"
  xmlns:activiti="http://activiti.org/bpmn"
  targetNamespace="Examples"
  xmlns:tns="Examples">

  <message id="newInvoice" name="newInvoiceMessage" />

  <process id="invoiceProcess">

    <startEvent id="messageStart" >
        <messageEventDefinition messageRef="tns:newInvoice" />
    </startEvent>...
  </process>

</definitions>
Signal start event
A signal start event starts a process instance using a named signal. The signal is fired from a process instance using the intermediary signal throw event or through the API ` runtimService.signalEventReceivedXXX` methods. In both cases, any process definitions that have a signal start event with the same name are started. You can select a synchronous or asynchronous start of the process instances.
The signalName passed in the API is the name given in the name
attribute of the signal element referenced by the signalRef
attribute of the signalEventDefinition .
Graphical notation.
The XML representation of a message start event is the normal start event declaration with a messageEventDefinition child-element:
    <signal id="theSignal" name="The Signal" />

    <process id="processWithSignalStart1">
        <startEvent id="theStart">
          <signalEventDefinition id="theSignalEventDefinition" signalRef="theSignal"  />
        </startEvent>
        <sequenceFlow id="flow1" sourceRef="theStart" targetRef="theTask" />
        <userTask id="theTask" name="Task in process A" />
        <sequenceFlow id="flow2" sourceRef="theTask" targetRef="theEnd" />
        <endEvent id="theEnd" />
    </process>
Error start event
An error start event triggers an event Sub-Process. An error start event cannot be used for starting a process instance.
An error start event is always interrupting.
Graphical notation.
The XML representation of an error start event is the normal start event declaration with an errorEventDefinition child-element:
<startEvent id="messageStart" >
    <errorEventDefinition errorRef="someError" />
</startEvent>
5.1.3. End events
You use an end event to signify the end of a process or sub-process, or the end of a path in a process or sub-process.
An end event is displayed as thick black circle which may contain an icon. If present, the icon shows the type of end event. A none end event has no icon.
An end event is always throwing. This means that when process execution arrives in the end event, a result is thrown. In the XML representation, the type is given by the declaration of a sub-element.
None end event
A none end event ends the current path of execution.
Graphical notation.
Error end event
You use the end error event to throw an error and end the current path of execution.
The error can be caught by an intermediate boundary error event that matches the error. If no matching boundary error event is found, an exception will be thrown.
Graphical notation.
And error end event is represented as an end event, with a errorEventDefinition child element.
<endEvent id="myErrorEndEvent">
  <errorEventDefinition errorRef="myError" />
</endEvent>
The errorRef attribute can reference an error element that is defined outside the process:
<error id="myError" errorCode="123" />
...
<process id="myProcess">
...
The errorCode is used to find a matching catching boundary error event. If the errorRef does not match any defined error, then the errorRef is used as the errorCode. This is an Activiti-specific shortcut.
The following snippets are equivalent in function.
<error id="myError" errorCode="error123" />
...
<process id="myProcess">
...
  <endEvent id="myErrorEndEvent">
    <errorEventDefinition errorRef="myError" />
  </endEvent>
is equivalent with
<endEvent id="myErrorEndEvent">
  <errorEventDefinition errorRef="error123" />
</endEvent>
Cancel end event
The cancel end event can only be used in combination with aBPMNtransaction sub-process. When the cancel end event is reached, a cancel event is thrown which must be caught by a cancel boundary event. The cancel boundary event then cancels the transaction and triggers compensation.
A cancel end event visualized as a typical end event (circle with thick outline), with the cancel icon inside.
The cancel icon is completely black, to indicate the throwing semantics.
A cancel end event is represented as an end event, with a cancelEventDefinition child element.
<endEvent id="myCancelEndEvent">
  <cancelEventDefinition />
</endEvent>
5.1.4. Boundary events
You use boundary events to handle an event associated with an activity. A boundary event is always attached to an activity.
When you drag a boundary event icon from the pallette on to the canvas and you mouse-over an activity, the Activiti symbol with turn green, indicating the boundary event will be attached to this activity when you release the mouse button.
While the activity the boundary event is attached to is is running, the boundary event is listening for a certain type of trigger. When the event is caught, the activity is interrupted and the sequence flow going out of the event is followed.
A boundary event is displayed as an circled icon which is always attached to the rounded rectangle representing the associated activity.
All boundary events are defined in the same way:
 <boundaryEvent id="myBoundaryEvent" attachedToRef="theActivity"> <XXXEventDefinition/>
            </boundaryEvent>
A boundary event is defined with
-
A unique identifier (process-wide)
-
A reference to the activity to which the event is attached through the attachedToRef attribute. Note that a boundary event is defined on the same level as the activities to which they are attached (i.e. no inclusion of the boundary event inside the activity).
-
An XML sub-element of the form XXXEventDefinition, for example TimerEventDefinition or ErrorEventDefinition, defining the type of the boundary event. See the specific boundary event types for more details.
There is a known issue regarding concurrency when using boundary events of any type.
You can not have multiple outgoing sequence flow attached to a boundary event (see issue ACT-47 ). A solution to this problem is to use one outgoing sequence flow that goes to a parallel gateway.
Timer boundary event
A timer boundary event acts as a stopwatch and alarm clock.
When an execution arrives in the activity where the boundary event is attached to, a timer is started. When the timer fires (e.g. after a specified interval), the activity is interrupted and the sequence flow going out of the timer boundary event are followed.
A timer boundary event is visualized as a typical boundary event (i.e. circle on the border), with the timer icon on the inside.
A timer boundary event is defined as a ?. The specific type sub-element is in this case a timerEventDefinition element.
<boundaryEvent id="escalationTimer" cancelActivity="true" attachedToRef="firstLineSupport">
   <timerEventDefinition>
    <timeDuration>PT4H</timeDuration>
  </timerEventDefinition>
</boundaryEvent>
Please refer to ? for details on timer configuration.
In the graphical representation, the line of the circle is dotted as you can see in this example above: A typical use case is sending an escalation email additionally but not interrupt the normal process flow.
Since BPMn 2.0 there is the difference between the interrupting and non interrupting timer event. The interrupting is the default. The non-interrupting leads to the original activity is not interrupted but the activity stays there. Instead an additional executions is created and send over the outgoing transition of the event. In the XML representation, the cancelActivity attribute is set to false:
<boundaryEvent id="escalationTimer" cancelActivity="false" attachedToRef="firstLineSupport"/>
|
boundary timer events are only fired when the job executor is enabled
(i.e. jobExecutorActivate must be set to |
Error boundary event
An intermediate catching error on the boundary of an activity, or boundary error event for short, catches errors that are thrown within the scope of the activity on which it is defined.
Defining a boundary error event makes most sense on an ?, or a ?, as a sub-process creates a scope for all activities inside the sub-process. Errors are thrown by ?. Such an error will propagate its parent scopes upwards until a scope is found on which a boundary error event is defined that matches the error event definition.
When an error event is caught, the activity on which the boundary event is defined is destroyed, along with all current executions in it, for example; concurrent activities and nested subprocesses. Process execution continues following the outgoing sequence flow of the boundary event.
A boundary error event is visualized as a typical intermediate event (Circle with smaller circle inside) on the boundary, with the error icon inside.
The error icon is white, to indicate the catch semantics.
A boundary error event is defined as a typical ?:
 <boundaryEvent id="catchError" attachedToRef="mySubProcess"> <errorEventDefinition
            errorRef="myError"/> </boundaryEvent>
As with the ?, the errorRef references an error defined outside the process element:
<error id="myError" errorCode="123" /> ... <process id="myProcess"> ...
The errorCode is used to match the errors that are caught:
-
If errorRef is omitted, the boundary error event will catch any error event, regardless of the errorCode of the error.
-
In case an errorRef is provided and it references an existing error, the boundary event will only catch errors with the same error code.
-
In case an errorRef is provided, but no error is defined in the BPMN 2.0 file, then the errorRef is used as errorCode (similar for with error end events).
Following example process shows how an error end event can be used.
When the 'Review profitability' user task is completed by stating that not enough information is provided, an error is thrown. When this error is caught on the boundary of the sub-process, all active activities within the 'Review sales lead' sub-process are destroyed (even if 'Review customer rating' was not yet completed), and the 'Provide additional details' user task is created.
This process is shipped as example in the demo setup. The process XML and unit test can be found in the org.activiti.examples.bpmn.event.error package.
Signal boundary event
An attached intermediate catching ? on the boundary of an activity, or boundary signal event for short, catches signals with the same signal name as the referenced signal definition.
|
Unlike other events such as the boundary error event, a boundary signal event does not only catch signal events thrown from the scope it is attached to. A signal event has global scope, or broadcast semantics, which means that the signal can be thrown from anywhere, even from a different process instance. |
|
Unlike other events such as an error event, a signal is not consumed if it is caught. If you have two active signal boundary events catching the same signal event, both boundary events are triggered, even if they are part of different process instances. |
A boundary signal event is visualized as a typical intermediate event (Circle with smaller circle inside) on the boundary, with the signal icon inside.
The signal icon is white (unfilled), to indicate the catch semantics.
\
A boundary signal event is defined as a typical ?:
 <boundaryEvent id="boundary" attachedToRef="task" cancelActivity="true"> <signalEventDefinition
            signalRef="alertSignal"/> </boundaryEvent>
See section on ?.
Message boundary event
An attached intermediate catching ? on the boundary of an activity, or boundary message event for short, catches messages with the same message name as the referenced message definition.
A boundary message event is visualized as a typical intermediate event (Circle with smaller circle inside) on the boundary, with the message icon inside.
The message icon is white (unfilled), to indicate the catch semantics. Note that boundary message event can be both interrupting (right hand side) and non interrupting (left hand side).
A boundary message event is defined as a typical ?:
 <boundaryEvent id="boundary" attachedToRef="task" cancelActivity="true"> <messageEventDefinition
            messageRef="newCustomerMessage"/> </boundaryEvent>
See section on ?.
Cancel boundary event
An attached intermediate catching cancel on the boundary of a transaction sub-process, or boundary cancel event for short, is triggered when a transaction is cancelled.
When the cancel boundary event is triggered, it first interrupts all executions active in the current scope. Next, it starts compensation of all active compensation boundary events in the scope of the transaction. Compensation is performed synchronously, i.e. the boundary event waits before compensation is completed before leaving the transaction. When compensation is completed, the transaction sub-process is left using the sequence flow(s) running out of the cancel boundary event.
|
Only a single cancel boundary event is allowed for a transaction sub-process. |
|
If the transaction sub-process hosts nested subprocesses, compensation is only triggered for subprocesses that have completed successfully. |
|
If a cancel boundary event is placed on a transaction sub-process with multi instance characteristics, if one instance triggers cancellation, the boundary event cancels all instances. |
A cancel boundary event is visualized as a typical intermediate event (Circle with smaller circle inside) on the boundary, with the cancel icon inside.
The cancel icon is white (unfilled), to indicate the catching semantics.
A cancel boundary event is defined as a typical ?:
 <boundaryEvent id="boundary" attachedToRef="transaction" > <cancelEventDefinition />
            </boundaryEvent>
Since the cancel boundary event is always interrupting, the
cancelActivity attribute is not required.
Compensation boundary event
An attached intermediate catching compensation on the boundary of an activity or compensation boundary event for short, can be used to attach a compensation handler to an activity.
The compensation boundary event must reference a single compensation handler using a directed association.
A compensation boundary event has a different activation policy from other boundary events. Other boundary events like for instance the signal boundary event are activated when the activity they are attached to is started. When the activity is left, they are deactivated and the corresponding event subscription is cancelled. The compensation boundary event is different. The compensation boundary event is activated when the activity it is attached to completes successfully. At this point, the corresponding subscription to the compensation events is created. The subscription is removed either when a compensation event is triggered or when the corresponding process instance ends. From this, it follows:
-
When compensation is triggered, the compensation handler associated with the compensation boundary event is invoked the same number of times the activity it is attached to completed successfully.
-
If a compensation boundary event is attached to an activity with multiple instance characteristics, a compensation event subscription is created for each instance.
-
If a compensation boundary event is attached to an activity which is contained inside a loop, a compensation event subscription is created for each time the activity is executed.
-
If the process instance ends, the subscriptions to compensation events are cancelled.
|
the compensation boundary event is not supported on embedded subprocesses. |
A compensation boundary event is visualized as a typical intermediate event (Circle with smaller circle inside) on the boundary, with the compensation icon inside.
The compensation icon is white (unfilled), to indicate the catching semantics. In addition to a compensation boundary event, the following figure shows a compensation handler associated with the boundary event using a unidirectional association:
A compensation boundary event is defined as a typical ?:
 <boundaryEvent id="compensateBookHotelEvt" attachedToRef="bookHotel" > <compensateEventDefinition
            /> </boundaryEvent> <association associationDirection="One" id="a1" sourceRef="compensateBookHotelEvt"
            targetRef="undoBookHotel" /> <serviceTask id="undoBookHotel" isForCompensation="true" activiti:class="..." />
Since the compensation boundary event is activated after the activity
has completed successfully, the cancelActivity attribute is not
supported.
5.1.5. Intermediate catching events
You use an intermediate catching event to indicate where something happens between the start and end of a Process. It can affect the flow of the Process, but will not start, or directly end, the Process.
Here are some examples of situations where you might want to use an intermediate catching event:
-
You want to show where Messages are expected in your process
-
You want to show that a delay is expected within the Process
An intermediate event is displayed as two concentric circles containing an icon. The icon shows the type of intermediate event.
All intermediate catching events events are defined like this:
<intermediateCatchEvent id="myIntermediateCatchEvent" >
      <XXXEventDefinition/>
</intermediateCatchEvent>
An intermediate catching event is defined with:
-
A process-wide unique identifier.
-
An XML sub-element of the form
XXXEventDefinition, for example,TimerEventDefinition. This defines the type of the intermediate catching event. See the specific catching event types for more details.
Timer intermediate catching event
A timer intermediate event acts as a stopwatch. When an execution arrives in catching event activity, a timer is started. When the timer fires (e.g. after a specified interval), the sequence flow going out of the timer intermediate event is followed.
A timer intermediate event is visualized as a intermediate catching event, with the timer icon on the inside.
A timer intermediate event is defined as a ?. The specific type sub-element is in this case a timerEventDefinition element.
        <intermediateCatchEvent id="timer">
            <timerEventDefinition>
                <timeDuration>PT5M</timeDuration>
            </timerEventDefinition>
        </intermediateCatchEvent>
See ? for configuration details.
Signal intermediate catching event
An intermediate catching signal event catches signals with the same signal name as the referenced signal definition.
|
Unlike other events like an error event, a signal is not consumed if it is caught. If you have two active signal boundary events catching the same signal event, both boundary events are triggered, event if they are part of different process instances. |
An intermediate signal catch event is visualized as a typical intermediate event (Circle with smaller circle inside), with the signal icon inside.
The signal icon is white (unfilled), to indicate the catch semantics.
A signal intermediate event is defined as a ?. The specific type sub-element is in this case a signalEventDefinition element.
<intermediateCatchEvent id="signal">
    <signalEventDefinition signalRef="newCustomerSignal" />
</intermediateCatchEvent>
See section on ?.
Message intermediate catching event
An intermediate catching message event catches messages with a specified name.
An intermediate catching message event is visualized as a typical intermediate event (Circle with smaller circle inside), with the message icon inside.
The message icon is white (unfilled), to indicate the catch semantics.
A message intermediate event is defined as a ?. The specific type sub-element is in this case a messageEventDefinition element.
<intermediateCatchEvent id="message">
    <messageEventDefinition signalRef="newCustomerMessage" />
</intermediateCatchEvent>
See ?.
5.1.6. Intermediate throwing events
You use an intermediate throwing event to indicate where something happens between the start and end of a Process. It can affect the flow of the Process, but will not start, or directly end, the Process.
An example of a situation where you might want to use an intermediate throwing event is where you need to disrupt the normal flow by throwing a signal.
An intermediate event is displayed as two concentric circles which may contain an icon. If present, the icon shows the type of intermediate event. A throwing none event contains no icon.
All intermediate throwing events events are defined like this:
<intermediateThrowEvent id="myIntermediateThrowEvent" >
      <XXXEventDefinition/>
</intermediateThrowEvent>
An intermediate throwing event is defined with:
-
A process-wide unique identifier.
-
An XML sub-element of the form
XXXEventDefinition, for example,TimerEventDefinition. This defines the type of the intermediate throwing event. See the specific throwing event types for more details.
Intermediate throwing none event
The following process diagram shows an example of an intermediate none event, which is often used to indicate some state achieved in the process.
This can be used as a hook to monitor key performance indicators, by adding an ?.
<intermediateThrowEvent id="noneEvent">
  <extensionElements>
    <activiti:executionListener class="org.activiti.engine.test.bpmn.event.IntermediateNoneEventTest$MyExecutionListener" event="start" />
  </extensionElements>
</intermediateThrowEvent>
There you can add some own code to maybe send some event to your BAM tool or DWH. The engine itself doesn’t do anything in that event, it just passes through.
Signal intermediate throwing event
An intermediate throwing signal event throws a signal event for a defined signal.
In Activiti, the signal is broadcast to all active handlers (i.e. all catching signal events). Signals can be published synchronous or asynchronous.
-
In the default configuration, the signal is delivered synchronously. This means that the throwing process instance waits until the signal is delivered to all catching process instances. The catching process instances are also notified in the same transaction as the throwing process instance, which means that if one of the notified instances produces a technical error (throws an exception), all involved instances fail.
-
A signal can also be delivered asynchronously. In that case it is determined which handlers are active at the time the throwing signal event is reached. For each active handler, an asynchronous notification message (Job) is stored and delivered by the JobExecutor.
An intermediate signal throw event is visualized as a typical intermediate event (Circle with smaller circle inside), with the signal icon inside.
The signal icon is black (filled), to indicate the throw semantics.
A signal intermediate event is defined as a ?. The specific type sub-element is in this case a signalEventDefinition element.
<intermediateThrowEvent id="signal">
    <signalEventDefinition signalRef="newCustomerSignal" />
</intermediateThrowEvent>
An asynchronous signal event would look like this:
<intermediateThrowEvent id="signal">
    <signalEventDefinition signalRef="newCustomerSignal" activiti:async="true" />
</intermediateThrowEvent>
See section on ?.
Compensation intermediate throwing event
An intermediate throwing compensation event can be used to trigger compensation.
Triggering compensation: Compensation can either be triggered for a designated activity or for the scope which hosts the compensation event. Compensation is performed through execution of the compensation handler associated with an activity.
-
When compensation is thrown for an activity, the associated compensation handler is executed the same number of times the activity competed successfully.
-
If compensation is thrown for the current scope, all activities withing the current scope are compensated, which includes activities on concurrent branches.
-
Compensation is triggered hierarchically: if an activity to be compensated is a sub-process, compensation is triggered for all activities contained in the sub-process. If the sub-process has nested activities, compensation is thrown recursively. However, compensation is not propagated to the "upper levels" of the process: if compensation is triggered within a sub-process, it is not propagated to activities outside of the sub-process scope. The bpmn specification states that compensation is triggered for activities at "the same level of sub-process".
-
In Activiti compensation is performed in reverse order of execution. This means that whichever activity completed last is compensated first, etc.
-
The intermediate throwing compensation event can be used to compensate transaction subprocesses which competed successfully.
|
If compensation is thrown within a scope which contains a sub-process and the sub-process contains activities with compensation handlers, compensation is only propagated to the sub-process if it has completed successfully when compensation is thrown. If some of the activities nested inside the sub-process have completed and have attached compensation handlers, the compensation handlers are not executed if the sub-process containing these activities is not completed yet. Consider the following example: In this process we have two concurrent executions, one executing the embedded sub-process and one executing the "charge credit card" activity. Lets assume both executions are started and the first concurrent execution is waiting for a user to complete the "review bookings" task. The second execution performs the "charge credit card" activity and an error is thrown, which causes the "cancel reservations" event to trigger compensation. At this point the parallel sub-process is not yet completed which means that the compensation event is not propagated to the sub-process and thus the "cancel hotel reservation" compensation handler is not executed. If the user task (and thus the embedded sub-process) completes before the "cancel reservations" is performed, compensation is propagated to the embedded sub-process. |
Process variables: When compensating an embedded sub-process, the execution used for executing the compensation handlers has access to the local process variables of the sub-process in the state they were in when the sub-process completed execution. To achieve this, a snapshot of the process variables associated with the scope execution (execution created for executing the sub-process) is taken. Form this, a couple of implications follow:
-
The compensation handler does not have access to variables added to concurrent executions created inside the sub-process scope.
-
Process variables associated with executions higher up in the hierarchy, (for instance process variables associated with the process instance execution are not contained in the snapshot: the compensation handler has access to these process variables in the state they are in when compensation is thrown.
-
A variable snapshot is only taken for embedded subprocesses, not for other activities.
Current limitations:
-
waitForCompletion="false"is currently unsupported. When compensation is triggered using the intermediate throwing compensation event, the event is only left, after compensation completed successfully. -
Compensation itself is currently performed by concurrent executions. The concurrent executions are started in reverse order in which the compensated activities completed. Future versions of activity might include an option to perform compensation sequentially.
-
Compensation is not propagated to sub process instances spawned by call activities.
An intermediate compensation throw event is visualized as a typical intermediate event (Circle with smaller circle inside), with the compensation icon inside.
The compensation icon is black (filled), to indicate the throw semantics.
A compensation intermediate event is defined as a ?. The specific type sub-element is in this case a compensateEventDefinition element.
<intermediateThrowEvent id="throwCompensation">
    <compensateEventDefinition />
</intermediateThrowEvent>
In addition, the optional argument activityRef can be used to trigger
compensation of a specific scope / activity:
<intermediateThrowEvent id="throwCompensation">
    <compensateEventDefinition activityRef="bookHotel" />
</intermediateThrowEvent>
5.2. Sequence flow
A sequence flow is the connector between two elements of a process. After an element is visited during process execution, all outgoing sequence flow will be followed. This means that the default nature of BPMN 2.0 is to be parallel: two outgoing sequence flow will create two separate, parallel paths of execution.
A sequence flow is visualized as an arrow going from the source element towards the target element.
The arrow always points towards the target.
Sequence flow need to have a process-unique id, and a reference to an existing source and target element.
<sequenceFlow id="flow1" sourceRef="theStart" targetRef="theTask" />
5.2.1. Conditional sequence flow
A sequence flow can have a condition defined on it.
When a BPMN 2.0 activity is left, the default behavior is to evaluate the conditions on the outgoing sequence flow. When a condition evaluates to true, that outgoing sequence flow is selected. When multiple sequence flow are selected that way, multiple executions will be generated and the process will be continued in a parallel way.
|
the above holds for BPMN 2.0 activities (and events), but not for gateways. Gateways will handle sequence flow with conditions in specific ways, depending on the gateway type. |
A conditional sequence flow is visualized as a regular sequence flow, with a small diamond at the beginning.
The condition expression is shown next to the sequence flow.
A conditional sequence flow is represented in XML as a regular sequence flow, containing a conditionExpression sub-element.
Note that only tFormalExpressions are supported, Omitting the xsi:type="" definition will default to this single supported type of expression.
<sequenceFlow id="flow" sourceRef="theStart" targetRef="theTask">
  <conditionExpression xsi:type="tFormalExpression">
    <![CDATA[${order.price > 100 && order.price < 250}]]>
         </conditionExpression>
         </sequenceFlow>
Currently conditionalExpressions can only be used with UEL, detailed info about these can be found in section ?. The expression used should resolve to a boolean value, otherwise an exception is thrown while evaluating the condition.
-
The example below references data of a process variable, in the typical JavaBean style through getters.
<conditionExpression xsi:type="tFormalExpression"> <![CDATA[${order.price > 100 && order.price < 250}]]> </conditionExpression> -
This example invokes a method that resolves to a boolean value.
<conditionExpression xsi:type="tFormalExpression">
  <![CDATA[${order.isStandardOrder()}]]>
                  </conditionExpression>
The Activiti distribution contains the following example process using value and method expressions (see org.activiti.examples.bpmn.expression):
5.2.2. Default sequence flow
All BPMN 2.0 tasks and gateways can have a default sequence flow. This sequence flow is only selected as the outgoing sequence flow for that activity if and only if none of the other sequence flow could be selected. Conditions on a default sequence flow are always ignored.
A default sequence flow is visualized as a regular sequence flow, with a 'slash' marker at the beginning.
A default sequence flow for a certain activity is defined by the default attribute on that activity.
The following XML snippet shows for example an exclusive gateway that has as default sequence flow flow 2. Only when conditionA and conditionB both evaluate to false, will it be chosen as outgoing sequence flow for the gateway.
<exclusiveGateway id="exclusiveGw" name="Exclusive Gateway" default="flow2" />
<sequenceFlow id="flow1" sourceRef="exclusiveGw" targetRef="task1">
  <conditionExpression xsi:type="tFormalExpression">${conditionA}</conditionExpression>
</sequenceFlow>
<sequenceFlow id="flow2" sourceRef="exclusiveGw" targetRef="task2"/>
<sequenceFlow id="flow3" sourceRef="exclusiveGw" targetRef="task3">
  <conditionExpression xsi:type="tFormalExpression">${conditionB}</conditionExpression>
</sequenceFlow>
Which corresponds with the following graphical representation:
5.3. Gateways
You use gateways to control the flow of execution in your process.
In order to explain how Sequence Flows are used within a Process, BPMN 2.0 uses the concept of a token. Tokens traverse sequence flows and pass through the elements in the process. The token is a theoretical concept used to explain the behavior of Process elements by describing how they interact with a token as it “traverses” the structure of the Process. SkyVault Activiti, and any other BPMN engine does not define a token, but this documentation uses the concept.
Gateways are used to control how how tokens flow through sequence flows as they converge and diverge in a Process. As the term “gateway” suggests, there is a gating mechanism that either allows or prevents passage of a token through the Gateway. As tokens arrive at a Gateway, they can be merged together on input and/or split apart on output from the Gateway.
Gateways, like Activities, are capable of consuming or generating additional control tokens, to control the execution semantics of the Process. Gateways do not represent ‘work’ being done and they are considered to have zero effect on the cost or time of the Process being executed.
A gateway is displayed as a diamond, with an icon inside. The icon shows the type of gateway.
5.3.1. Exclusive gateway
You use an exclusive gateway model a decision in your process.When execution arrives at an exclusive gateway, the outgoing sequence flows are evaluated in the order in which they are defined. The first sequence flow whose condition evaluates to true, or which does not have a condition set, is selected and the process continues.
Note that if no sequence flow can be selected, an exception will be thrown.
Graphical notation.
The exclusive gateway is defined by the exclusiveGateway element, and condition expressions on the outgoing sequence flows.
See the section on ? to see which options are available for such expressions.
The above model is represented in XML as follows:
<exclusiveGateway id="exclusiveGw" name="Exclusive Gateway" />

<sequenceFlow id="flow2" sourceRef="exclusiveGw" targetRef="theTask1">
  <conditionExpression xsi:type="tFormalExpression">${input == 1}</conditionExpression>
</sequenceFlow>

<sequenceFlow id="flow3" sourceRef="exclusiveGw" targetRef="theTask2">
  <conditionExpression xsi:type="tFormalExpression">${input == 2}</conditionExpression>
</sequenceFlow>

<sequenceFlow id="flow4" sourceRef="exclusiveGw" targetRef="theTask3">
  <conditionExpression xsi:type="tFormalExpression">${input == 3}</conditionExpression>
</sequenceFlow>
5.3.2. Parallel gateway
You use a parallel gateway to model concurrency in a process. It allows you to fork multiple outgoing paths of execution or join multiple incoming paths of execution.
In a fork, all outgoing sequence flows are followed in parallel, which creates one concurrent execution for each sequence flow.
In a join, all concurrent executions arriving at the parallel gateway wait at the gateway until an execution has arrived for every incoming sequence flow. Then the process continues past the joining gateway.
A single parallel gateway can both fork and join, if there are multiple incoming and outgoing sequence flow. The gateway will first join all incoming sequence flows, before splitting into multiple concurrent paths of executions.
Unlike other gateways, the parallel gateway does not evaluate conditions. Any conditions defined on the sequence flow connected with the parallel gateway are ignored.
Graphical notation.
The following element defines a parallel gateway:
<parallelGateway id="myParallelGateway" />
The fork, join or both are defined by the sequence flows connected to the parallel gateway.
The model above is defined by the following XML:
    <startEvent id="theStart" />
    <sequenceFlow id="flow1" sourceRef="theStart" targetRef="fork" />

    <parallelGateway id="fork" />
    <sequenceFlow sourceRef="fork" targetRef="receivePayment" />
    <sequenceFlow sourceRef="fork" targetRef="shipOrder" />

    <userTask id="receivePayment" name="Receive Payment" />
    <sequenceFlow sourceRef="receivePayment" targetRef="join" />

    <userTask id="shipOrder" name="Ship Order" />
    <sequenceFlow sourceRef="shipOrder" targetRef="join" />

    <parallelGateway id="join" />
    <sequenceFlow sourceRef="join" targetRef="archiveOrder" />

    <userTask id="archiveOrder" name="Archive Order" />
    <sequenceFlow sourceRef="archiveOrder" targetRef="theEnd" />

    <endEvent id="theEnd" />
In the example, after the process is started, two tasks are created:
ProcessInstance pi = runtimeService.startProcessInstanceByKey("forkJoin");
TaskQuery query = taskService.createTaskQuery().processInstanceId(pi.getId()).orderByTaskName().asc();

List<Task> tasks = query.list();
assertEquals(2, tasks.size());

Task task1 = tasks.get(0);
assertEquals("Receive Payment", task1.getName());
Task task2 = tasks.get(1);
assertEquals("Ship Order", task2.getName());
When both these tasks are completed, the second parallel gateway will join the two executions. Since there is only one outgoing sequence flow, no concurrent paths of execution will be created, and only the Archive Order task will be active.
Note that a parallel gateway does not need to be balanced – the number of incoming and outgoing sequence flows does not need to match. A parallel gateway will wait for all incoming sequence flows and create a concurrent path of execution for each outgoing sequence flow. It is influenced by other constructs in the process model. For example, the following diagram is a valid BPMN 2.0 process model:
5.3.3. Inclusive gateway
You use an inclusive to join and fork multiple sequence flows based on conditions.
Like an exclusive gateway you can define conditions on outgoing sequence flows and the inclusive gateway will evaluate them, but an inclusive gateway can take more than one sequence flow, like the parallel gateway.
In a fork, all outgoing sequence flow conditions are evaluated. Every sequence flow with a condition that evaluates to true, is followed in parallel, creating one concurrent execution for each sequence flow.
In a join, all concurrent executions arriving at the inclusive gateway wait at the gateway until an execution has arrived for each of the incoming sequence flows that have a process token. The inclusive gateway will only wait for the incoming sequence flows that will be executed. After the join, the process continues past the joining inclusive gateway.
Note that an inclusive gateway can have both fork and join behavior, in which case there are multiple incoming and outgoing sequence flows for the same inclusive gateway. The gateway will join all incoming sequence flows that have a process token, before splitting into multiple concurrent paths of executions for the outgoing sequence flows that have a condition that evaluates to true.
Graphical notation.
The following element defines an inclusive gateway:
<inclusiveGateway id="myInclusiveGateway" />
The fork, join or both are defined by the sequence flows connected to the inclusive gateway.
The model above is defined by the following XML:
    <startEvent id="theStart" />
    <sequenceFlow id="flow1" sourceRef="theStart" targetRef="fork" />

    <inclusiveGateway id="fork" />
    <sequenceFlow sourceRef="fork" targetRef="receivePayment" >
    <conditionExpression xsi:type="tFormalExpression">${paymentReceived == false}</conditionExpression>
    </sequenceFlow>
    <sequenceFlow sourceRef="fork" targetRef="shipOrder" >
    <conditionExpression xsi:type="tFormalExpression">${shipOrder == true}</conditionExpression>
    </sequenceFlow>

    <userTask id="receivePayment" name="Receive Payment" />
    <sequenceFlow sourceRef="receivePayment" targetRef="join" />

    <userTask id="shipOrder" name="Ship Order" />
    <sequenceFlow sourceRef="shipOrder" targetRef="join" />

    <inclusiveGateway id="join" />
    <sequenceFlow sourceRef="join" targetRef="archiveOrder" />

    <userTask id="archiveOrder" name="Archive Order" />
    <sequenceFlow sourceRef="archiveOrder" targetRef="theEnd" />

    <endEvent id="theEnd" />
In the above example, after the process is started, two tasks will be created only if the process variables paymentReceived is false and shipOrder is true. If only one of these process variables evaluates to true, then only one task will be created. If no condition evaluates to true an exception is thrown. You can prevent the exception by specifying a default outgoing sequence flow.
In the following example one task will be created, the ship order task:
HashMap<String, Object> variableMap = new HashMap<String, Object>();
          variableMap.put("receivedPayment", true);
          variableMap.put("shipOrder", true);
          ProcessInstance pi = runtimeService.startProcessInstanceByKey("forkJoin");
TaskQuery query = taskService.createTaskQuery().processInstanceId(pi.getId()).orderByTaskName().asc();

List<Task> tasks = query.list();
assertEquals(1, tasks.size());

Task task = tasks.get(0);
assertEquals("Ship Order", task.getName());
When this task is completed, the second inclusive gateway will join the two executions and since there is only one outgoing sequence flow, no concurrent paths of execution will be created, and only the Archive Order task will be active.
Note that an inclusive gateway does not need to be 'balanced' (i.e. a matching number of incoming/outgoing sequence flow for corresponding inclusive gateways). An inclusive gateway will wait for all incoming sequence flow and create a concurrent path of execution for each outgoing sequence flow, not influenced by other constructs in the process model.
5.3.4. Event gateway
You use an event gateway to take a decision based on events.
Each outgoing sequence flow of the event gateway must be connected to an intermediate catching event. When process execution reaches an event gateway execution is suspended, and for each outgoing sequence flow, an event subscription is created.
Outgoing sequence flows connect to an event gateway are never "executed", but they do allow the process engine to determine which events an execution arriving at an Event-based Gateway needs to subscribe to. The following restrictions apply to event gateways:
-
The gateway must have two or more outgoing sequence flows.
-
An Event-based Gateway can only be followed by intermediate catching events. Receive tasks after an event gateway are not supported by Activiti.
-
An intermediate catching event connected to an event gateway must have a single incoming sequence flow.
Graphical notation.
The eventBasedGateway XML element used to define an event gateway.
<definitions id="definitions"
    xmlns="http://www.omg.org/spec/BPMN/20100524/MODEL"
    xmlns:activiti="http://activiti.org/bpmn"
    targetNamespace="Examples">

    <signal id="alertSignal" name="alert" />

    <process id="catchSignal">

        <startEvent id="start" />

        <sequenceFlow sourceRef="start" targetRef="gw1" />

        <eventBasedGateway id="gw1" />

        <sequenceFlow sourceRef="gw1" targetRef="signalEvent" />
        <sequenceFlow sourceRef="gw1" targetRef="timerEvent" />

        <intermediateCatchEvent id="signalEvent" name="Alert">
            <signalEventDefinition signalRef="alertSignal" />
        </intermediateCatchEvent>

        <intermediateCatchEvent id="timerEvent" name="Alert">
            <timerEventDefinition>
                <timeDuration>PT10M</timeDuration>
            </timerEventDefinition>
        </intermediateCatchEvent>

        <sequenceFlow sourceRef="timerEvent" targetRef="exGw1" />
        <sequenceFlow sourceRef="signalEvent" targetRef="task" />

        <userTask id="task" name="Handle alert"/>

        <exclusiveGateway id="exGw1" />

        <sequenceFlow sourceRef="task" targetRef="exGw1" />
        <sequenceFlow sourceRef="exGw1" targetRef="end" />

        <endEvent id="end" />
</process>
</definitions>
5.4. Tasks
A task is a single item of work to be performed.
5.4.1. User task
You use a user task to model work to be done by a human actor. When process execution arrives at a user task in the process definition, it creates a new task in the task list of the assignee or assignees defined in the task.
Graphical notation.
A user task is defined in XML as follows.
The id attribute is required, the name attribute is optional.
<userTask id="theTask" name="Important task" />
A user task can have also a description. In fact any BPMN 2.0 element can have a description. A description is defined by adding the documentation element.
<userTask id="theTask" name="Schedule meeting" >
  <documentation>
      Schedule an engineering meeting for next week with the new hire.
  </documentation>
The description text can be retrieved from the task in the standard Java way:
task.getDescription()
Each task has a field, indicating the due date of that task. The Query API can be used to query for tasks that are due on, before or after a certain date.
There is an activity extension which allows you to specify an expression
in your task-definition to set the initial due date of a task when it is
created. The expression should always resolve to a java.util.Date,
java.util.String (ISO8601 formatted), ISO8601 time-duration (for
example, PT50M) or null. For example, you could use a date that was
entered in a previous form in the process or calculated in a previous
Service Task. In case a time-duration is used, the due-date is
calculated based on the current time, incremented by the given period.
For example, when "PT30M" is used as dueDate, the task is due in thirty
minutes from now.
<userTask id="theTask" name="Important task" activiti:dueDate="${dateVariable}"/>
A user task can be directly assigned to a user.
This is done by defining a humanPerformer sub element. Such a humanPerformer definition needs a resourceAssignmentExpression that actually defines the user. Currently, only formalExpressions are supported.
<process ... >...

  <userTask id='theTask' name='important task' >
    <humanPerformer>
      <resourceAssignmentExpression>
        <formalExpression>kermit</formalExpression>
      </resourceAssignmentExpression>
    </humanPerformer>
  </userTask>
Only one user can be assigned as human performer to the task. In Activiti terminology, this user is called the assignee. Tasks that have an assignee are not visible in the task lists of other people and can be found in the so-called personal task list of the assignee instead.
Tasks directly assigned to users can be retrieved through the TaskService as follows:
List<Task> tasks = taskService.createTaskQuery().taskAssignee("kermit").list();
Tasks can also be placed in the candidate task list for people. You use the potentialOwner construct, its usage is similar to the humanPerformer construct. Do note that it is required to define for each element in the formal expression to specify if it is a user or a group (the engine cannot guess this).
<process ... >...

  <userTask id='theTask' name='important task' >
    <potentialOwner>
      <resourceAssignmentExpression>
        <formalExpression>user(kermit), group(management)</formalExpression>
      </resourceAssignmentExpression>
    </potentialOwner>
  </userTask>
Tasks defines with the potential owner construct, can be retrieved as follows (or a similar TaskQuery usage as for the tasks with an assignee):
List<Task> tasks = taskService.createTaskQuery().taskCandidateUser("kermit");
This will retrieve all tasks where kermit is a candidate user, i.e. the formal expression contains user(kermit). This will also retrieve all tasks that are assigned to a group where kermit is a member of (e.g. group(management), if kermit is a member of that group and the Activiti identity component is used). The groups of a user are resolved at runtime and these can be managed through the ?.
If no specifics are given whether the given text string is a user or group, the engine defaults to group. So the following would be the same as when group(accountancy) was declared.
<formalExpression>accountancy</formalExpression>
It is clear that user and group assignments are quite cumbersome for use cases where the assignment is not complex.
To avoid these complexities, you can use ? on the user task.
-
assignee attribute: this custom extension allows to directly assign a user task to a given user.
<userTask id="theTask" name="my task" activiti:assignee="kermit" />
This is exactly the same as using a humanPerformer construct as defined above.
-
candidateUsers attribute: this custom extension allows to make a user a candidate for a task.
<userTask id="theTask" name="my task" activiti:candidateUsers="kermit, gonzo" />
This is exactly the same as using a potentialOwner construct as defined above. Note that it is not required to use the user(kermit) declaration as is the case with the potential owner construct, since the attribute can only be used for users.
-
candidateGroups attribute: this custom extension allows to make a group a candidate for a task.
<userTask id="theTask" name="my task" activiti:candidateGroups="management, accountancy" />
This is exactly the same as using a potentialOwner construct as defined above. Note that it is not required to use the group(management) declaration as is the case with the potential owner construct, since the attribute can only be used for groups.
-
candidateUsers and candidateGroups can both be defined on the same user task.
Note: Although Activiti provides an identity management component, which is exposed through the ?, no check is done whether a provided user is known by the identity component. This allows Activiti to integrate with existing identity management solutions when it is embedded into an application.
The BPMN standard supports a single assigned user or humanPerformer or a set of users that form a potential pool of potentialOwners as defined in User assignment. In addition, Activiti defines extension attribute elements for the User Task that can represent the task assignee or candidate owner.
The supported Activiti identity link types are:
public class IdentityLinkType {
  /* Activiti native roles */
  public static final String ASSIGNEE = "assignee";
  public static final String CANDIDATE = "candidate";
  public static final String OWNER = "owner";
  public static final String STARTER = "starter";
  public static final String PARTICIPANT = "participant";
}
The BPMN standard and Activiti example authorization identities are user and group. As mentioned in the previous section, the Activiti identity management implementation is not intended for production use, but should be extended depending upon the supported authorization scheme.
If additional link types are required, custom resources can be defined as extension elements with the following syntax:
<userTask id="theTask" name="make profit">
  <extensionElements>
    <activiti:customResource activiti:name="businessAdministrator">
      <resourceAssignmentExpression>
        <formalExpression>user(kermit), group(management)</formalExpression>
      </resourceAssignmentExpression>
    </activiti:customResource>
  </extensionElements>
</userTask>
The custom link expressions are added to the TaskDefinition class:
  protected Map<String, Set<Expression>> customUserIdentityLinkExpressions =
      new HashMap<String, Set<Expression>>();
  protected Map<String, Set<Expression>> customGroupIdentityLinkExpressions =
      new HashMap<String, Set<Expression>>();

  public Map<String,
         Set<Expression>> getCustomUserIdentityLinkExpressions() {
    return customUserIdentityLinkExpressions;
  }

  public void addCustomUserIdentityLinkExpression(String identityLinkType,
                                                  Set<Expression> idList) {
    customUserIdentityLinkExpressions.put(identityLinkType, idList);
  }

  public Map<String,
         Set<Expression>> getCustomGroupIdentityLinkExpressions() {
    return customGroupIdentityLinkExpressions;
  }

  public void addCustomGroupIdentityLinkExpression(String identityLinkType,
                                                   Set<Expression> idList) {
    customGroupIdentityLinkExpressions.put(identityLinkType, idList);
  }
which are populated at runtime by the UserTaskActivityBehavior handleAssignments method.
Finally, the IdentityLinkType class must be extended to support the custom identity link types:
package com.yourco.engine.task;

public class IdentityLinkType
    extends org.activiti.engine.task.IdentityLinkType
{
    public static final String ADMINISTRATOR = "administrator";

    public static final String EXCLUDED_OWNER = "excludedOwner";
}
Here is an example db entry for a custom identity link type administrator with a single user ( gonzo ) and group ( engineering ) values.
A user task can be directly assigned to a user.
This is done by defining a humanPerformer sub element. Such a humanPerformer definition needs a resourceAssignmentExpression that actually defines the user. Currently, only formalExpressions are supported.
<process ... >...

  <userTask id='theTask' name='important task' >
    <humanPerformer>
      <resourceAssignmentExpression>
        <formalExpression>kermit</formalExpression>
      </resourceAssignmentExpression>
    </humanPerformer>
  </userTask>
Only one user can be assigned as human performer to the task. In Activiti terminology, this user is called the assignee. Tasks that have an assignee are not visible in the task lists of other people and can be found in the so-called personal task list of the assignee instead.
Tasks directly assigned to users can be retrieved through the TaskService as follows:
List<Task> tasks = taskService.createTaskQuery().taskAssignee("kermit").list();
Tasks can also be put in the so-called candidate task list of people. In that case, the potentialOwner construct must be used. The usage is similar to the humanPerformer construct. Do note that it is required to define for each element in the formal expression to specify if it is a user or a group (the engine cannot guess this).
<process ... >...

  <userTask id='theTask' name='important task' >
    <potentialOwner>
      <resourceAssignmentExpression>
        <formalExpression>user(kermit), group(management)</formalExpression>
      </resourceAssignmentExpression>
    </potentialOwner>
  </userTask>
Tasks defines with the potential owner construct, can be retrieved as follows (or a similar TaskQuery usage as for the tasks with an assignee):
List<Task> tasks = taskService.createTaskQuery().taskCandidateUser("kermit");
This will retrieve all tasks where kermit is a candidate user, i.e. the formal expression contains user(kermit). This will also retrieve all tasks that are assigned to a group where kermit is a member of (e.g. group(management), if kermit is a member of that group and the Activiti identity component is used). The groups of a user are resolved at runtime and these can be managed through the ?.
If no specifics are given whether the given text string is a user or group, the engine defaults to group. So the following would be the same as when group(accountancy) was declared.
<formalExpression>accountancy</formalExpression>
5.4.2. Script task
A script task defines a JavaScript script or other script of a type included in JSR-223 to be run in your process definition.
Graphical notation.
A script task is defined by specifying the script and the scriptFormat.
<scriptTask id="theScriptTask" name="Execute script" scriptFormat="groovy">
  <script>
    sum = 0
    for ( i in inputArray ) {
      sum += i
    }
  </script>
</scriptTask>
The value of the scriptFormat attribute must be a name that is compatible with the JSR-223 (scripting for the Java platform). By default JavaScript is included in every JDK and as such doesn’t need any additional jars. If you want to use another (JSR-223 compatible) scripting engine, you can add the corresponding jar to the classpath and use the appropriate name. For example, the Activiti unit tests often use Groovy because the syntax is pretty similar to that of Java.
|
The Groovy scripting engine is bundled with the groovy-all jar, so the following dependency must be added: <dependency>
<groupId>org.codehaus.groovy</groupId>
<artifactId>groovy-all</artifactId>
<version>2.x.x<version>
</dependency>
|
All process variables that are accessible through the execution that arrives in the script task, can be used within the script.
In the example, the script variable 'inputArray' is in fact a process variable (an array of integers).
<script>
    sum = 0
    for ( i in inputArray ) {
      sum += i
    }
</script>
You can also set process variables in a script, by calling
execution.setVariable("variableName", variableValue)
            `. By default, no variables are stored automatically. You
can automatically store any variable defined in the script, for example
sum in the example above, by setting the property `autoStoreVariables
on the scriptTask to true. However, the best practice is not to do
this and use an explicit execution.setVariable() call, as on some recent
versions of the JDK auto storing of variables does not work for some
scripting languages. See
this
link for more details.
<scriptTask id="script" scriptFormat="JavaScript" activiti:autoStoreVariables="false">
The default of this parameter is false, meaning that if the parameter
is omitted from the script task definition, all the declared variables
will only exist during the duration of the script.
This example shows how to set a variable in a script:
<script>
    def scriptVar = "test123"
    execution.setVariable("myVar", scriptVar)
</script>
Note: the following names are reserved and cannot be used as variable names: out, out:print, lang:import, context, elcontext.
The return value of a script task can be assigned to an existing or to a new process variable by specifying the process variable name as a literal value for the 'activiti:resultVariable' attribute of a script task definition.
Any existing value for a specific process variable will be overwritten by the result value of the script execution. When not specifying a result variable name, the script result value gets ignored.
<scriptTask id="theScriptTask" name="Execute script" scriptFormat="juel" activiti:resultVariable="myVar">
  <script>#{echo}</script>
</scriptTask>
In the above example, the result of the script execution (the value of the resolved expression '#{echo}' ) is set to the process variable named 'myVar' after the script completes.
5.4.3. Service task
You use a service task to invoke an external Java class.
Graphical notation.
There are four ways of invoking Java logic:
-
Specifying a class that implements JavaDelegate or ActivityBehavior
-
Evaluating an expression that resolves to a delegation object
-
Invoking a method expression
-
Evaluating a value expression
To specify a class that is called during process execution, the fully qualified classname must be provided by the 'activiti:class' attribute.
<serviceTask id="javaService"
             name="My Java Service Task"
             activiti:class="org.activiti.MyJavaDelegate" />
See the implementation section for more details on how to use such a class.
You can also use an expression that resolves to an object. This object
must follow the same rules as objects that are created when the
activiti:class attribute is used (see
further ).
<serviceTask id="serviceTask" activiti:delegateExpression="${delegateExpressionBean}" />
Here, the delegateExpressionBean is a bean that implements the
JavaDelegate interface, defined in for example the Spring container.
To specify a UEL method expression that should be evaluated, use attribute activiti:expression.
<serviceTask id="javaService"
             name="My Java Service Task"
             activiti:expression="#{printer.printMessage()}" />
Method printMessage (without parameters) will be called on the named
object called printer.
You can also pass parameters with a method used in the expression.
<serviceTask id="javaService"
             name="My Java Service Task"
             activiti:expression="#{printer.printMessage(execution, myVar)}" />
Method printMessage will be called on the object named printer. The
first parameter passed is the DelegateExecution, which is available in
the expression context by default available as execution. The second
parameter passed, is the value of the variable with name myVar in the
current execution.
To specify a UEL value expression that should be evaluated, use attribute activiti:expression.
<serviceTask id="javaService"
             name="My Java Service Task"
             activiti:expression="#{split.ready}" />
The getter method of property ready, getReady (without parameters),
will be called on the named bean called split. The named objects are
resolved in the execution’s process variables and (if applicable) in the
Spring context.
To implement a class that can be called during process execution, this class needs to implement the org.activiti.engine.delegate.JavaDelegate interface and provide the required logic in the execute method.
When process execution arrives at this particular step, it will execute this logic defined in that method and leave the activity in the default BPMN 2.0 way.
Let’s create for example a Java class that can be used to change a process variable String to uppercase. This class needs to implement the org.activiti.engine.delegate.JavaDelegate interface, which requires us to implement the execute(DelegateExecution) method. It is this operation that will be called by the engine and which needs to contain the business logic. Process instance information such as process variables and other can be accessed and manipulated through the DelegateExecution interface (click on the link for a detailed Javadoc of its operations).
public class ToUppercase implements JavaDelegate {

  public void execute(DelegateExecution execution) throws Exception {
    String var = (String) execution.getVariable("input");
    var = var.toUpperCase();
    execution.setVariable("input", var);
  }

}
Note: there will be only one instance of that Java class created for the serviceTask it is defined on. All process-instances share the same class instance that will be used to call execute(DelegateExecution). This means that the class must not use any member variables and must be thread-safe, since it can be executed simultaneously from different threads. This also influences the way ? is handled.
The classes that are referenced in the process definition (i.e. by using
activiti:class ) are NOT instantiated during deployment. Only when a
process execution arrives for the first time at the point in the process
where the class is used, an instance of that class will be created. If
the class cannot be found, an ActivitiException will be thrown. The
reasoning for this is that the environment (and more specifically the
classpath ) when you are deploying is often different from the actual
runtime environment. For example when using ant or the business archive
upload in Activiti Explorer to deploy processes, the classpath does not
contain the referenced classes.
[INTERNAL: non-public implementation classes] You can also provide a class that implements the org.activiti.engine.impl.pvm.delegate.ActivityBehavior interface. Implementations have then access to the more powerful ActivityExecution that for example also allows to influence the control flow of the process. Note that this is not good practice, and should be avoided as much as possible. The ActivityBehavior interface is only for advanced use cases.
It is possible to inject values into the fields of the delegated classes.
The following types of injection are supported:
-
Fixed string values
-
Expressions
If available, the value is injected through a public setter method on
your delegated class, following the Java Bean naming conventions (e.g.
field firstName has setter setFirstName(…) ). If no setter is
available for that field, the value of private member will be set on the
delegate. SecurityManagers in some environments don’t allow modifying
private fields, so it is safer to expose a public setter-method for the
fields you want to have injected. Regardless of the type of value
declared in the process-definition, the type of the setter/private field
on the injection target should always be
org.activiti.engine.delegate.Expression.
The following code snippet shows how to inject a constant value into a field. Field injection is supported when using the 'class' attribute. Note that we need to declare a 'extensionElements' XML element before the actual field injection declarations, which is a requirement of the BPMN 2.0 XML Schema.
<serviceTask id="javaService"
    name="Java service invocation"
    activiti:class="org.activiti.examples.bpmn.servicetask.ToUpperCaseFieldInjected">
    <extensionElements>
      <activiti:field name="text" stringValue="Hello World" />
  </extensionElements>
</serviceTask>
The class ToUpperCaseFieldInjected has a field text which is of type
org.activiti.engine.delegate.Expression. When calling
text.getValue(execution), the configured string value Hello World
will be returned.
Alternatively, for longs texts (e.g. an inline e-mail) the 'activiti:string' sub element can be used:
<serviceTask id="javaService"
    name="Java service invocation"
    activiti:class="org.activiti.examples.bpmn.servicetask.ToUpperCaseFieldInjected">
  <extensionElements>
    <activiti:field name="text">
        <activiti:string>
          Hello World
      </activiti:string>
    </activiti:field>
  </extensionElements>
</serviceTask>
To inject values that are dynamically resolved at runtime, expressions
can be used. Those expressions can use process variables, or Spring
defined beans (if Spring is used). As noted in
Service Task Implementation, an
instance of the Java class is shared among all process-instances in a
service task. To have dynamic injection of values in fields, you can
inject value and method expressions in a
org.activiti.engine.delegate.Expression which can be evaluated/invoked
using the DelegateExecution passed in the execute method.
<serviceTask id="javaService" name="Java service invocation"
  activiti:class="org.activiti.examples.bpmn.servicetask.ReverseStringsFieldInjected">

  <extensionElements>
    <activiti:field name="text1">
      <activiti:expression>${genderBean.getGenderString(gender)}</activiti:expression>
    </activiti:field>
    <activiti:field name="text2">
       <activiti:expression>Hello ${gender == 'male' ? 'Mr.' : 'Mrs.'} ${name}</activiti:expression>
    </activiti:field>
  </ extensionElements>
</ serviceTask>
The example class below uses the injected expressions and resolves them
using the current DelegateExecution. Full code and test can be found
in
org.activiti.examples.bpmn.servicetask.JavaServiceTaskTest.testExpressionFieldInjection
public class ReverseStringsFieldInjected implements JavaDelegate {

  private Expression text1;
  private Expression text2;

  public void execute(DelegateExecution execution) {
    String value1 = (String) text1.getValue(execution);
    execution.setVariable("var1", new StringBuffer(value1).reverse().toString());

    String value2 = (String) text2.getValue(execution);
    execution.setVariable("var2", new StringBuffer(value2).reverse().toString());
  }
}
Alternatively, you can also set the expressions as an attribute instead of a child-element, to make the XML less verbose.
<activiti:field name="text1" expression="${genderBean.getGenderString(gender)}" />
<activiti:field name="text1" expression="Hello ${gender == 'male' ? 'Mr.' : 'Mrs.'} ${name}" />
Since the Java class instance is reused, the injection only happens once, when the serviceTask is called the first time. When the fields are altered by your code, the values won’t be re-injected so you should treat them as immutable and don’t make any changes to them.
The return value of a service execution (for service task using expression only) can be assigned to an already existing or to a new process variable by specifying the process variable name as a literal value for the 'activiti:resultVariable' attribute of a service task definition.
Any existing value for a specific process variable will be overwritten by the result value of the service execution. When not specifying a result variable name, the service execution result value gets ignored.
<serviceTask id="aMethodExpressionServiceTask"
    activiti:expression="#{myService.doSomething()}"
    activiti:resultVariable="myVar" />
In the example above, the result of the service execution (the return value of the 'doSomething()' method invocation on an object that is made available under the name 'myService' either in the process variables or as a Spring bean) is set to the process variable named 'myVar' after the service execution completes.
When custom logic is executed, it is often required to catch certain business exceptions and handle them inside the surrounding process. Activiti provides different options to do that.
BPMN Errors can be thrown from user code inside Service Tasks or Script Tasks.
In order to do this, a special ActivitiException called BpmnError can be thrown in JavaDelegates, scripts, expressions and delegate expressions. The engine will catch this exception and forward it to an appropriate error handler, e.g., a Boundary Error Event or an Error Event Sub-Process.
public class ThrowBpmnErrorDelegate implements JavaDelegate {

  public void execute(DelegateExecution execution) throws Exception {
    try {
      executeBusinessLogic();
    } catch (BusinessException e) {
      throw new BpmnError("BusinessExceptionOccurred");
    }
  }

}
The constructor argument is an error code, which will be used to determine the error handler that is responsible for the error. See ? for information on how to catch a BPMN Error.
This mechanism should be used only for business faults that shall be handled by a Boundary Error Event or Error Event Sub-Process modeled in the process definition. Technical errors should be represented by other exception types and are usually not handled inside a process.
[INTERNAL: non-public implementation classes] Another option is to route process execution through another path in case some exception occurs. The following example shows how this is done.
<serviceTask id="javaService"
  name="Java service invocation"
  activiti:class="org.activiti.ThrowsExceptionBehavior">
</serviceTask>

<sequenceFlow id="no-exception" sourceRef="javaService" targetRef="theEnd" />
<sequenceFlow id="exception" sourceRef="javaService" targetRef="fixException" />
Here, the service task has two outgoing sequence flow, called
exception and no-exception. This sequence flow id will be used to
direct process flow in case of an exception:
public class ThrowsExceptionBehavior implements ActivityBehavior {

  public void execute(ActivityExecution execution) throws Exception {
    String var = (String) execution.getVariable("var");

    PvmTransition transition = null;
    try {
      executeLogic(var);
      transition = execution.getActivity().findOutgoingTransition("no-exception");
    } catch (Exception e) {
      transition = execution.getActivity().findOutgoingTransition("exception");
    }
    execution.take(transition);
  }

}
For some use cases, you might need to use the Activiti services from within a Java service task, for example starting a process instance through the RuntimeService, if the callActivity doesn’t suit your needs). The org.activiti.engine.delegate.DelegateExecution allows to easily use these services through the org.activiti.engine.EngineServices interface:
public class StartProcessInstanceTestDelegate implements JavaDelegate {

  public void execute(DelegateExecution execution) throws Exception {
    RuntimeService runtimeService = execution.getEngineServices().getRuntimeService();
    runtimeService.startProcessInstanceByKey("myProcess");
  }

}
All of the Activiti service API’s are available through this interface.
All data changes that occur as an effect of using these API calls, will be part of the current transaction. This also works in environments with dependency injection like Spring and CDI with or without a JTA enabled datasource. For example, the following snippet of code will do the same as the snippet above, but now the RuntimeService is injected rather than it is being fetched through the org.activiti.engine.EngineServices interface.
@Component("startProcessInstanceDelegate")
public class StartProcessInstanceTestDelegateWithInjection {

    @Autowired
    private RuntimeService runtimeService;

    public void startProcess() {
      runtimeService.startProcessInstanceByKey("oneTaskProcess");
    }

}
Important technical note: since the service call is being done as part of the current transaction any data that was produced or altered before the service task is executed, is not yet flushed to the database. All API calls work on the database data, which means that these uncommitted changes are not be 'visible' within the api call of the service task.
5.4.4. Web service task
A Web Service task is used to synchronously invoke an external Web service.
A Web Service task is visualized the same as a Java service task.
To use a Web service we need to import its operations and complex types. This can be done automatically by using the import tag pointing to the WSDL of the Web service:
<import importType="http://schemas.xmlsoap.org/wsdl/"
    location="http://localhost:63081/counter?wsdl"
    namespace="http://webservice.activiti.org/" />
The previous declaration tells Activiti to import the definitions but it doesn’t create the item definitions and messages for you. Let’s suppose we want to invoke a specific method called 'prettyPrint', therefore we will need to create the corresponding message and item definitions for the request and response messages:
<message id="prettyPrintCountRequestMessage" itemRef="tns:prettyPrintCountRequestItem" />
<message id="prettyPrintCountResponseMessage" itemRef="tns:prettyPrintCountResponseItem" />

<itemDefinition id="prettyPrintCountRequestItem" structureRef="counter:prettyPrintCount" />
<itemDefinition id="prettyPrintCountResponseItem" structureRef="counter:prettyPrintCountResponse" />
Before declaring the service task, we have to define the BPMN interfaces and operations that actually reference the Web service ones. Basically, we define and 'interface' and the required 'operation’s'. For each operation we reuse the previous defined message for in and out. For example, the following declaration defines the 'counter' interface and the 'prettyPrintCountOperation' operation:
<interface name="Counter Interface" implementationRef="counter:Counter">
    <operation id="prettyPrintCountOperation" name="prettyPrintCount Operation"
            implementationRef="counter:prettyPrintCount">
        <inMessageRef>tns:prettyPrintCountRequestMessage</inMessageRef>
        <outMessageRef>tns:prettyPrintCountResponseMessage</outMessageRef>
    </operation>
</interface>
Then you can declare a Web Service Task by using the ##WebService implementation and a reference to the Web service operation.
<serviceTask id="webService"
    name="Web service invocation"
    implementation="##WebService"
    operationRef="tns:prettyPrintCountOperation">
Unless we are using the simplistic approach for data input and output associations (See below), each Web Service Task needs to declare an IO Specification which states which are the inputs and outputs of the task.
The approach is pretty straightforward and BPMN 2.0 complaint, for our prettyPrint example we define the input and output sets according to the previously declared item definitions:
<ioSpecification>
    <dataInput itemSubjectRef="tns:prettyPrintCountRequestItem" id="dataInputOfServiceTask" />
    <dataOutput itemSubjectRef="tns:prettyPrintCountResponseItem" id="dataOutputOfServiceTask" />
    <inputSet>
        <dataInputRefs>dataInputOfServiceTask</dataInputRefs>
    </inputSet>
    <outputSet>
        <dataOutputRefs>dataOutputOfServiceTask</dataOutputRefs>
    </outputSet>
</ioSpecification>
There are 2 ways of specifying data input associations:
-
Using expressions
-
Using the simplistic approach
To specify the data input association using expressions we need to define the source and target items and specify the corresponding assignments between the fields of each item. In the following example we assign prefix and suffix fields of the items:
<dataInputAssociation>
    <sourceRef>dataInputOfProcess</sourceRef>
    <targetRef>dataInputOfServiceTask</targetRef>
    <assignment>
        <from>${dataInputOfProcess.prefix}</from>
        <to>${dataInputOfServiceTask.prefix}</to>
    </assignment>
    <assignment>
        <from>${dataInputOfProcess.suffix}</from>
        <to>${dataInputOfServiceTask.suffix}</to>
    </assignment>
</dataInputAssociation>
On the other hand you can use the simplistic approach which is much more simple. The 'sourceRef' element is an Activiti variable name and the 'targetRef' element is a property of the item definition. In the following example we assign to the 'prefix' field the value of the variable 'PrefixVariable' and to the 'suffix' field the value of the variable 'SuffixVariable'.
<dataInputAssociation>
    <sourceRef>PrefixVariable</sourceRef>
    <targetRef>prefix</targetRef>
</dataInputAssociation>
<dataInputAssociation>
    <sourceRef>SuffixVariable</sourceRef>
    <targetRef>suffix</targetRef>
</dataInputAssociation>
There are 2 ways of specifying data out associations:
-
Using expressions
-
Using the simplistic approach
To specify the data out association using expressions we need to define the target variable and the source expression. The approach is pretty straightforward and similar data input associations:
<dataOutputAssociation>
    <targetRef>dataOutputOfProcess</targetRef>
    <transformation>${dataOutputOfServiceTask.prettyPrint}</transformation>
</dataOutputAssociation>
On the other hand you can use the simplistic approach which is much more simple. The 'sourceRef' element is a property of the item definition and the 'targetRef' element is an Activiti variable name. The approach is pretty straightforward and similar data input associations:
<dataOutputAssociation>
    <sourceRef>prettyPrint</sourceRef>
    <targetRef>OutputVariable</targetRef>
</dataOutputAssociation>
5.4.5. Business rule task
A Business rule task synchronously executes one or more rules.
Activiti uses Drools Expert, the Drools rule engine to execute business
rules. The .drl files containing the business rules must be deployed
with the process definition that defines the business rule task to
execute those rules. This means that all .drl files that are used in a
process have to be packaged in the process BAR file like for example the
task forms. For more information about creating business rules for
Drools Expert please refer to the Drools documentation at
JBoss Drools
if you want to plug in your implementation of the rule task, e.g. because you want to use Drools differently or you want to use a completely different rule engine, then you can use the class or expression attribute on the BusinessRuleTask and it will behave exactly like a ?
Graphical notation.
To execute one or more business rules that are deployed in the same BAR file as the process definition, we need to define the input and result variables.
For the input variable definition a list of process variables can be defined separated by a comma. The output variable definition can only contain one variable name that will be used to store the output objects of the executed business rules in a process variable. Note that the result variable will contain a List of objects. If no result variable name is specified by default org.activiti.engine.rules.OUTPUT is used.
The following business rule task executes all business rules deployed with the process definition:
<process id="simpleBusinessRuleProcess">

  <startEvent id="theStart" />
  <sequenceFlow sourceRef="theStart" targetRef="businessRuleTask" />

  <businessRuleTask id="businessRuleTask" activiti:ruleVariablesInput="${order}"
      activiti:resultVariable="rulesOutput" />

  <sequenceFlow sourceRef="businessRuleTask" targetRef="theEnd" />

  <endEvent id="theEnd" />

</process>
The business rule task can also be configured to execute only a defined set of rules from the deployed .drl files. A list of rule names separated by a comma must be specified for this.
<businessRuleTask id="businessRuleTask" activiti:ruleVariablesInput="${order}"
      activiti:rules="rule1, rule2" />
In this case only rule1 and rule2 are executed.
You can also define a list of rules that should be excluded from execution.
<businessRuleTask id="businessRuleTask" activiti:ruleVariablesInput="${order}"
      activiti:rules="rule1, rule2" exclude="true" />
In this case all rules deployed in the same BAR file as the process definition will be executed, except for rule1 and rule2.
As mentioned earlier another option is to hook in the implementation of the BusinessRuleTask yourself:
<businessRuleTask id="businessRuleTask" activiti:class="${MyRuleServiceDelegate}" />
Now the BusinessRuleTask behaves exactly like a ServiceTask, but still keeps the BusinessRuleTask icon to visualize that we do business rule processing here.
5.4.6. Mail task
You can enhance your business process with this automatic mail service tasks that sends emails to one or more recipients. The task supports normal email features such as cc lists, bcc lists, and HTML content.
|
The mail task is a SkyVault Activiti extension, and is not part of the BPMN 2.0 specification. In SkyVault Activiti the mail task is implemented as a dedicated service task. |
Graphical notation.
The Activiti engine sends e-mails trough an external mail server with SMTP capabilities.
To actually send e-mails, the engine needs to know how to reach the mail server. The following properties can be set in the activiti.cfg.xml configuration file:
| Property | Required? | Description |
|---|---|---|
mailServerHost |
no |
The hostname of your mail server (e.g.
mail.mycorp.com). Default is |
mailServerPort |
yes, if not on the default port |
The port for SMTP traffic on the mail server. The default is 25 |
mailServerDefaultFrom |
no |
The default e-mail address of the sender of e-mails, when none is provided by the user. By default this is activiti@activiti.org |
mailServerUsername |
if applicable for your server |
Some mail servers require credentials for sending e-mail. By default not set. |
mailServerPassword |
if applicable for your server |
Some mail servers require credentials for sending e-mail. By default not set. |
mailServerUseSSL |
if applicable for your server |
Some mail servers require ssl communication. By default set to false. |
mailServerUseTLS |
if applicable for your server |
Some mail servers (for instance gmail) require TLS communication. By default set to false. |
The Email task is implemented as a dedicated ? and is defined by setting 'mail' for the type of the service task.
<serviceTask id="sendMail" activiti:type="mail">
The Email task is configured by ?. All the values for these properties can contain EL expression, which are resolved at runtime during process execution. The following properties can be set:
| Property | Required? | Description |
|---|---|---|
to |
yes |
The recipient of the e-mail. You can specify multiple recipients in a comma-separated list. |
from |
no |
The sender’s email address. If you do not specify this, the ? from address is used. |
subject |
no |
The subject of this email. |
cc |
no |
The cc list for this email. You can specify multiple recipients in a comma-separated list. |
bcc |
no |
The bcc list for this email. You can specify multiple recipients in a comma-separated list |
charset |
no |
The charset for this email. |
html |
no |
The HTML content of this email. |
text |
no |
The text content of this email. You can specify this as well as HTML to support email clients that do not support rich content. The client will fall back to this text-only alternative. |
htmlVar |
no |
The name of a process variable that holds the HTML that is the content of the email. The difference between this and html is that this content will have expressions replaced before being sent by the mail task. |
textVar |
no |
The name of a process variable that holds the plain text content of the email. The difference between this and text is that this content will have expressions replaced before being sent by the mail task. |
ignoreException |
no |
Specify exception handling the mail task throws an ActivitiException. By default this is set to false. |
exceptionVariableName |
no |
When ignoreException is true, this specifies a variable used to hold the failure message |
The following XML snippet shows an example of using the Email Task.
<serviceTask id="sendMail" activiti:type="mail">
  <extensionElements>
    <activiti:field name="from" stringValue="order-shipping@thecompany.com" />
    <activiti:field name="to" expression="${recipient}" />
    <activiti:field name="subject" expression="Your order ${orderId} has been shipped" />
    <activiti:field name="html">
      <activiti:expression>
        <![CDATA[
          <html>
            <body>
              Hello ${male ? 'Mr.' : 'Mrs.' } ${recipientName},<br/><br/>

              As of ${now}, your order has been <b>processed and shipped</b>.<br/><br/>

              Kind regards,<br/>

              TheCompany.
            </body>
          </html>
        ]]>
         </activiti:expression>
         </activiti:field>
         </extensionElements>
         </serviceTask>
with the following result:
5.4.7. Mule task
Lets you send messages to the Mule ESB (Enterprise Service Bus).
|
The Mule task is a SkyVault Activiti extension, and is not part of the BPMN 2.0 specification. In SkyVault Activiti the mail task is implemented as a dedicated service task. You must include the Activiti Camel module in your project to use the Camel task activity. |
You can find more information on Mule ESB here.
The Mule task is implemented as a dedicated ? and is defined by setting 'mule' for the type of the service task.
<serviceTask id="sendMule" activiti:type="mule">
The Mule task is configured by ?. All the values for these properties can contain EL expression, which are resolved at runtime during process execution. The following properties can be set:
| Property | Required? | Description |
|---|---|---|
endpointUrl |
yes |
The Mule endpoint you want to send your message to. |
language |
yes |
The language you want to use to evaluate the payloadExpression, for example juel. |
payloadExpression |
yes |
An expression that is the message’s payload. |
resultVariable |
no |
The name of the variable to store the result of the invocation. |
The following XML snippet shows an example of using the Mule Task.
  <extensionElements>
    <activiti:field name="endpointUrl">
      <activiti:string>vm://in</activiti:string>
    </activiti:field>
    <activiti:field name="language">
      <activiti:string>juel</activiti:string>
    </activiti:field>
    <activiti:field name="payloadExpression">
      <activiti:string>"hi"</activiti:string>
    </activiti:field>
    <activiti:field name="resultVariable">
      <activiti:string>theVariable</activiti:string>
    </activiti:field>
  </extensionElements>
5.4.8. Camel task
You use the Camel task to send messages to, and receive messages from, Apache Camel.
|
The Camel task is a SkyVault Activiti extension, and is not part of the BPMN 2.0 specification. In SkyVault Activiti the mail task is implemented as a dedicated service task. You must include the Activiti Camel module in your project to use the Camel task activity. |
You can find more information on Apache Camel here.
Graphical notation.
The Camel task is implemented as a dedicated ? and is defined by setting 'camel' for the type of the service task.
<serviceTask id="sendCamel" activiti:type="camel">
The process definition itself needs nothing else then the camel type definition on a service task. The integration logic is all delegated to the Camel container. By default the Activiti Engine looks for a camelContext bean in the Spring container. The camelContext bean defines the Camel routes that will be loaded by the Camel container. In the following example the routes are loaded from a specific Java package, but you can also define routes directly in the Spring configuration itself.
<camelContext id="camelContext" xmlns="http://camel.apache.org/schema/spring">
  <packageScan>
    <package>org.activiti.camel.route</package>
  </packageScan>
</camelContext>
For more documentation about Camel routes you can look on the Camel website. The basic concepts are demonstrated through a few small samples here in this document. In the first sample, we will do the simplest form of Camel call from an Activiti workflow. Let’s call it SimpleCamelCall.
If you want to define multiple Camel context beans and/or want to use a different bean name, this can be overridden on the Camel task definition like this:
<serviceTask id="serviceTask1" activiti:type="camel">
  <extensionElements>
    <activiti:field name="camelContext" stringValue="customCamelContext" />
  </extensionElements>
</serviceTask>
All the files related to this example can be found in org.activiti.camel.examples.simpleCamelCall package of activiti-camel module. The target is activating a specific camel route. First of all we need an Spring context which contains the introduction to the routes as mentioned previously. This part of the file serves this purpose:
<camelContext id="camelContext" xmlns="http://camel.apache.org/schema/spring">
  <packageScan>
    <package>org.activiti.camel.examples.simpleCamelCall</package>
  </packageScan>
</camelContext>
public class SimpleCamelCallRoute extends RouteBuilder {

  @Override
  public void configure() throws Exception {
    from("activiti:SimpleCamelCallProcess:simpleCall").to("log:org.activiti.camel.examples.SimpleCamelCall");
  }
}
| Endpoint Url Part | Description |
|---|---|
activiti |
refers to Activiti endpoint |
SimpleCamelCallProcess |
name of the process |
simpleCall |
name of the Camel service in the process |
<process id="SimpleCamelCallProcess">
  <startEvent id="start"/>
  <sequenceFlow id="flow1" sourceRef="start" targetRef="simpleCall"/>
  <b>
  <serviceTask id="simpleCall" activiti:type="camel"/>
  </b>
  <sequenceFlow id="flow2" sourceRef="simpleCall" targetRef="end"/>
  <endEvent id="end"/>
</process>
The example worked but nothing is transferred between Camel and Activiti.
In this example you try to send and receive data to and from Camel. You send a string, Camel concatenates something to it and returns back the result. You send your message in form of a variable to Camel Task. Here is the caller code:
 @Deployment
    public void testPingPong() {
        Map<String, Object> variables = new HashMap<String, Object>();
        variables.put("input", "Hello");
        Map<String, String> outputMap = new HashMap<String, String>();
        variables.put("outputMap", outputMap);
        runtimeService.startProcessInstanceByKey("PingPongProcess", variables);
        assertEquals(1, outputMap.size());
        assertNotNull(outputMap.get("outputValue"));
        assertEquals("Hello World", outputMap.get("outputValue"));
    }
variable "input" is actually the input for the Camel route and outputMap is there to capture the result back from Camel. The process should be something like this:
 <process id="PingPongProcess"> <startEvent id="start"/> <sequenceFlow id="flow1" sourceRef="start"
         targetRef="ping"/> <serviceTask id="ping" activiti:type="camel"/> <sequenceFlow id="flow2" sourceRef="ping"
         targetRef="saveOutput"/> <serviceTask id="saveOutput"
         activiti:class="org.activiti.camel.examples.pingPong.SaveOutput" /> <sequenceFlow id="flow3" sourceRef="saveOutput"
         targetRef="end"/> <endEvent id="end"/> </process>
Note that SaveOutput Service task, stores the value of "Output" variable from context to the previously mentioned OutputMap. Now we have to know how the variables are send to Camel and returned back. Here comes the notion of Camel behavior into the play. The way variables are communicated to Camel is configurable via CamelBehavior. Here you use Default one in the sample, a short description of the other ones comes afterwards. With such a code you can configure the desired camel behavior:
 <serviceTask id="serviceTask1" activiti:type="camel"> <extensionElements> <activiti:field
         name="camelBehaviorClass" stringValue="org.activiti.camel.impl.CamelBehaviorCamelBodyImpl" /> </extensionElements>
         </serviceTask>
If you do not specify and specific behavior then, org.activiti.camel.impl.CamelBehaviorDefaultImpl will be set. This behavior copies the variables to Camel properties of the same name. In return regardless of selected behavior, if the camel message body is a map, then each of its elements is copied as a variable, else the whole object is copied into a specific variable with the name of "camelBody". Knowing that, this camel route concludes the second example:
 @Override public void configure() throws Exception {
         from("activiti:PingPongProcess:ping").transform().simple("${property.input} World"); }
In this route, the string "world" is concatenated to the end of property named "input" and the result will be in the message body. It is accessible by checking "camelBody" variable in the java service task and copied to "outputMap" and checked in test case. Now that the example on its default behavior works, lets see what are the other possibilities. In starting every camel route, the Process Instance ID will be copied into a camel property with the specific name of "PROCESS_ID_PROPERTY". It is later used for correlating the process instance and camel route. Also it can be exploited in the Camel route.
There are three different behaviors already available out of the box in Activiti. The behavior can be overwritten by a specific phrase in the route URL. Here is an example of overriding the already defined behavior in URL:
from("activiti:asyncCamelProcess:serviceTaskAsync2?copyVariablesToProperties=true").
the following table provides an overview of three available camel behaviors:
| behavior | In Url | Description |
|---|---|---|
CamelBehaviorDefaultImpl |
copyVariablesToProperties |
Copy Activiti variables as Camel properties |
CamelBehaviorCamelBodyImpl |
copyCamelBodyToBody |
Copy only Activiti variable named "camelBody" as camel message body |
CamelBehaviorBodyAsMapImpl |
copyVariablesToBodyAsMap |
Copy all the Activiti variables in a map as Camel message body |
The table above shows how Activiti variables are transferred to Camel. The next table shows how the Camel variables are returned to Activiti. This can only be configured in route URLs.
| Url | Description | Default |
|---|---|---|
If Camel body is a map, copy each element as Activiti variable, otherwise copy the whole Camel body as "camelBody" Activiti variable |
copyVariablesFromProperties |
Copy Camel properties as Activiti variables of the same name |
copyCamelBodyToBodyAsString |
like default, but if camel Body is not a map, first convert it to String and then copy it in "camelBody" |
copyVariablesFromHeader |
Source files of this example are available in org.activiti.camel.examples.pingPong package of activiti-camel module as well.
Previous examples were all synchronous.
The workflow stops until the camel route is concluded and returned. In some cases, we might need the Activiti workflow to continue. For such purposes the asynchronous capability of the Camel service task is useful. You can make use of this feature by setting the async property of the Camel service task to true.
<serviceTask id="serviceAsyncPing" activiti:type="camel" activiti:async="true"/>
By setting this feature the specified Camel route is activated asynchronously by the Activiti job executor. When you define a queue in the Camel route the Activiti process will continue with the activities after the Camel service task. The Camel route will be executed fully asynchronously from the process execution. If you want to wait for a response of the Camel service task somewhere in your process definition, you can use a receive task.
<receiveTask id="receiveAsyncPing" name="Wait State" />
from("activiti:asyncPingProcess:serviceAsyncPing").to("activiti:asyncPingProcess:receiveAsyncPing");
-
constant string "activiti"
-
process name
-
receive task name
In the previous examples, the Activiti workflow started first and the Camel route was started within workflow.
A workflow can also be instantiated from an already started camel route. This is similar to a signalling receive task, except that the last part is not there. Here is a sample route:
from("direct:start").to("activiti:camelProcess");
The URL has two parts, the first is constant string "activiti" and the second name is the name of the process. The process should already be deployed and startable by engine configuration.
You can also set the initiator of the process to some authenticated user id that is provided in a Camel header. To achieve this first of all an initiator variable must be specified in the process definition:
<startEvent id="start" activiti:initiator="initiator" />
Then given that the user id is contained in a Camel header named CamelProcessInitiatorHeader the Camel route could be defined as follows:
from("direct:startWithInitiatorHeader").setHeader("CamelProcessInitiatorHeader",
            constant("kermit")).to("activiti:InitiatorCamelCallProcess?processInitiatorHeaderName=CamelProcessInitiatorHeader");
5.4.9. Manual task
A Manual Task defines a task that is external to Activiti. You use it to model work done which the Activiti engine does not know of. A manual task is handled as a pass-through activity, the Activiti engine automatically continues the process from the instant process execution arrives at a manual task activity.
Graphical notation.
<manualTask id="myManualTask" name="Call client for more information" />
5.4.10. Receive task
A Receive Task waits for the arrival of a specific message.
Only Java semantics are implemented for this task. When process execution arrives at a receive task, the process state is committed to the persistence store. This means the process will stay in a wait state, until a specific message is received by the engine, which triggers the continuation of the process.
Graphical notation.
<receiveTask id="waitState" name="wait" />
To continue a process instance that is currently waiting at such a Receive Task, the runtimeService.signal(executionId) must be called using the id of the execution that arrived in the Receive Task. The following code snippet shows how this works in practice:
ProcessInstance pi = runtimeService.startProcessInstanceByKey("receiveTask");
Execution execution = runtimeService.createExecutionQuery().processInstanceId(pi.getId()).activityId("waitState").singleResult();
assertNotNull(execution);

runtimeService.signal(execution.getId());</b>
5.4.11. Shell task
The shell task allows to run shell scripts and commands. Note that the Shell task is not an 'official' task of BPMN 2.0 spec (and it does not have a dedicated icon as a consequence).
The shell task is implemented as a dedicated ? and is defined by setting 'shell' for the type of the service task.
<serviceTask id="shellEcho" activiti:type="shell">
The Shell task is configured by ?. All the values for these properties can contain EL expression, which are resolved at runtime during process execution. The following properties could be set:
| Property | Required? | Type |
|---|---|---|
Description |
Default |
command |
yes |
String |
Shell command to execute. |
arg0-5 |
no |
|
String |
Parameter 0 to Parameter 5 |
|
wait |
no |
true/false |
wait if necessary, until the shell process has terminated. |
true |
redirectError |
no |
true/false |
Merge standard error with the standard output. |
false |
cleanEnv |
no |
true/false |
Shell process does not inherit current environment. |
false |
outputVariable |
no |
String |
Name of variable to contain the output |
Output is not recorded. |
errorCodeVariable |
no |
String |
Name of variable to contain result error code |
Error level is not registered. |
directory |
no |
String |
Default directory of shell process |
Current directory |
The following XML snippet shows an example of using the shell Task.
It runs shell script "cmd /c echo EchoTest", waits for it to be terminated and puts the result in resultVar
<serviceTask id="shellEcho" activiti:type="shell" >
  <extensionElements>
    <activiti:field name="command" stringValue="cmd" />
    <activiti:field name="arg1" stringValue="/c" />
    <activiti:field name="arg2" stringValue="echo" />
    <activiti:field name="arg3" stringValue="EchoTest" />
    <activiti:field name="wait" stringValue="true" />
    <activiti:field name="outputVariable" stringValue="resultVar" />
  </extensionElements>
</serviceTask>
5.4.12. Execution listener
Compatibility note: After releasing 5.3, we discovered that execution
listeners and task listeners and expressions were still in non-public
API. Those classes were in subpackages of org.activiti.engine.impl…,
which has impl in it).
org.activiti.engine.impl.pvm.delegate.ExecutionListener,
org.activiti.engine.impl.pvm.delegate.TaskListener and
org.activiti.engine.impl.pvm.el.Expression have been deprecated. From
now on, you should use org.activiti.engine.delegate.ExecutionListener,
org.activiti.engine.delegate.TaskListener and
org.activiti.engine.delegate.Expression. In the new publicly available
API, access to ExecutionListenerExecution.getEventSource() has been
removed. Apart from the deprecation compiler warning, the existing code
should run fine. But consider switching to the new public API interfaces
(without .impl. in the package name).
Execution listeners allow you to execute external Java code or evaluate an expression when certain events occur during process execution. The events that can be captured are:
-
Start and ending of a process instance.
-
Taking a transition.
-
Start and ending of an activity.
-
Start and ending of a gateway.
-
Start and ending of intermediate events.
-
Ending an start event or starting an end event.
The following process definition contains 3 execution listeners:
  <process id="executionListenersProcess">

    <extensionElements>
      <activiti:executionListener class="org.activiti.examples.bpmn.executionlistener.ExampleExecutionListenerOne" event="start" />
    </extensionElements>

    <startEvent id="theStart" />
    <sequenceFlow sourceRef="theStart" targetRef="firstTask" />

    <userTask id="firstTask" />
    <sequenceFlow sourceRef="firstTask" targetRef="secondTask">
    <extensionElements>
      <activiti:executionListener class="org.activiti.examples.bpmn.executionListener.ExampleExecutionListenerTwo" />
    </extensionElements>
    </sequenceFlow>

    <userTask id="secondTask" >
    <extensionElements>
      <activiti:executionListener expression="${myPojo.myMethod(execution.event)}" event="end" />
    </extensionElements>
    </userTask>
    <sequenceFlow sourceRef="secondTask" targetRef="thirdTask" />

    <userTask id="thirdTask" />
    <sequenceFlow sourceRef="thirdTask" targetRef="theEnd" />

    <endEvent id="theEnd" />

  </process>
The first execution listener is notified when the process starts. The
listener is an external Java-class (like ExampleExecutionListenerOne )
and should implement org.activiti.engine.delegate.ExecutionListener
interface. When the event occurs (in this case end event) the method
notify(ExecutionListenerExecution execution) is called.
public>ExecutionListener</b> {

  public void notify(ExecutionListenerExecution execution) throws Exception {
    execution.setVariable("variableSetInExecutionListener", "firstValue");
    execution.setVariable("eventReceived", execution.getEventName());
  }
}
You can also use a delegation class that implements the
org.activiti.engine.delegate.JavaDelegate interface. These delegation
classes can then be reused in other constructs, such as a delegation for
a serviceTask.
The second execution listener is called when the transition is taken.
Note that the listener element doesn’t define an event, since only
take events are fired on transitions. Values in the event attribute
are ignored when a listener is defined on a transition.
The last execution listener is called when activity secondTask ends.
Instead of using the class on the listener declaration, a expression
is defined instead which is evaluated/invoked when the event is fired.
<activiti:executionListener expression="${myPojo.myMethod(execution.eventName)}</b>" event="end" />
As with other expressions, execution variables are resolved and can be
used. Because the execution implementation object has a property that
exposes the event name, it is possible to pass the event-name to your
methods using execution.eventName.
Execution listeners also support using a delegateExpression, ?.
<activiti:executionListener event="start" delegateExpression="${myExecutionListenerBean}" />
In Activiti 5.12 we also introduced a new type of execution listener, the org.activiti.engine.impl.bpmn.listener.ScriptExecutionListener. This script execution listener allows you to execute a piece of script logic for an execution listener event.
<activiti:executionListener event="start" class="org.activiti.engine.impl.bpmn.listener.ScriptExecutionListener" >
  <activiti:field name="script">
    <activiti:string>
      def bar = "BAR";  // local variable
      foo = "FOO"; // pushes variable to execution context
      execution.setVariable("var1", "test"); // test access to execution instance
      bar // implicit return value
    </activiti:string>
  </activiti:field>
  <activiti:field name="language" stringValue="groovy" />
  <activiti:field name="resultVariable" stringValue="myVar" />
<activiti:executionListener>
Field injection on execution listeners
When using an execution listener that is configured with the class
attribute, field injection can be applied.
This is exactly the same mechanism as used ?, which contains an overview of the possibilities provided by field injection.
The fragment below shows a simple example process with an execution listener with fields injected.
 <process id="executionListenersProcess">
    <extensionElements>
      <activiti:executionListener>
        <activiti:field name="fixedValue" stringValue="Yes, I am " />
        <activiti:field name="dynamicValue" expression="${myVar}" />
      </activiti:executionListener>
    </extensionElements>

    <startEvent id="theStart" />
    <sequenceFlow sourceRef="theStart" targetRef="firstTask" />

    <userTask id="firstTask" />
    <sequenceFlow sourceRef="firstTask" targetRef="theEnd" />

    <endEvent id="theEnd" />
  </process>
public class ExampleFieldInjectedExecutionListener implements ExecutionListener {

  <b>private Expression fixedValue;

  private Expression dynamicValue;</b>

  public void notify(ExecutionListenerExecution execution) throws Exception {
    execution.setVariable("var", fixedValue.getValue(execution).toString() + dynamicValue.getValue(execution).toString());
  }
}
The class ExampleFieldInjectedExecutionListener concatenates the 2
injected fields (one fixed an the other dynamic) and stores this in the
process variable ' var '.
@Deployment(resources = {"org/activiti/examples/bpmn/executionListener/ExecutionListenersFieldInjectionProcess.bpmn20.xml"})
public void testExecutionListenerFieldInjection() {
  Map<String, Object> variables = new HashMap<String, Object>();
  variables.put("myVar", "listening!");

  ProcessInstance processInstance = runtimeService.startProcessInstanceByKey("executionListenersProcess", variables);

  Object varSetByListener = runtimeService.getVariable(processInstance.getId(), "var");
  assertNotNull(varSetByListener);
  assertTrue(varSetByListener instanceof String);

  // Result is a concatenation of fixed injected field and injected expression
  assertEquals("Yes, I am listening!", varSetByListener);
}
5.4.13. Task listener
A task listener is used to execute custom Java logic or an expression upon the occurrence of a certain task-related event.
A task listener can only be added in the process definition as a child element of a ?. Note that this also must happen as a child of the BPMN 2.0 extensionElements and in the activiti namespace, since a task listener is an Activiti-specific construct.
<userTask id="myTask" name="My Task" >
  <extensionElements>
    <activiti:taskListener event="create" class="org.activiti.MyTaskCreateListener" />
  </extensionElements>
</userTask>
A task listener supports following attributes:
-
event (required): the type of task event on which the task listener will be invoked. Possible events are
-
create: occurs when the task has been created an all task properties are set.
-
assignment: occurs when the task is assigned to somebody. Note: when process execution arrives in a userTask, first an assignment event will be fired, before the create event is fired. This might seem an unnatural order, but the reason is pragmatic: when receiving the create event, we usually want to inspect all properties of the task including the assignee.
-
complete: occurs when the task is completed and just before the task is deleted from the runtime data.
-
delete: occurs just before the task is going to be deleted. Notice that it will also be executed when task is normally finished via completeTask.
-
-
class: the delegation class that must be called. This class must implement the
org.activiti.engine.delegate.TaskListenerinterface.public class MyTaskCreateListener implements TaskListener { public void notify(DelegateTask delegateTask) { // Custom logic goes here } }</codeblock> You can also use <xref href="bpmnServiceTask.dita#bpmnServiceTask/serviceTaskFieldInjection">field injection</xref> to pass process variables or the execution to the delegation class. Note that an instance of the delegation class is created upon process deployment (as is the case with any class delegation in Activiti), which means that the instance is shared between all process instance executions. </p> </li><li> <p> expression: (cannot be used together with the class attribute): specifies an expression that will be executed when the event happens. You can pass the <codeph>DelegateTask</codeph> object and the name of the event (using <codeph>task.eventName</codeph> ) as parameter to the called object. <codeblock><![CDATA[<activiti:taskListener event="create" expression="${myObject.callMethod(task, task.eventName)}" /> -
delegateExpression allows to specify an expression that resolves to an object implementing the
TaskListenerinterface, ?.<activiti:taskListener event="create" delegateExpression="${myTaskListenerBean}" /> -
In Activiti 5.12 we also introduced a new type of task listener, the org.activiti.engine.impl.bpmn.listener.ScriptTaskListener. This script task listener allows you to execute a piece of script logic for an task listener event.
<activiti:taskListener event="complete" class="org.activiti.engine.impl.bpmn.listener.ScriptTaskListener" >
  <activiti:field name="script">
    <activiti:string>
      def bar = "BAR";  // local variable
      foo = "FOO"; // pushes variable to execution context
      task.setOwner("kermit"); // test access to task instance
      bar // implicit return value
    </activiti:string>
  </activiti:field>
  <activiti:field name="language" stringValue="groovy" />
  <activiti:field name="resultVariable" stringValue="myVar" />
<activiti:taskListener>
5.4.14. Multi-instance
A multi-instance activity lets you define repetition for a step in a business process.
In programming concepts, a multi-instance matches the for each construct: it allows to execute a certain step or even a complete sub-process for each item in a given collection, sequentially or in parallel.
A multi-instance is a regular activity that has extra properties defined, called multi-instance characteristics, which will cause the activity to be executed multiple times. The following activities can become a multi-instance activity:
-
?
-
?
-
?
-
?
-
?
-
?
-
?
-
?
-
?
-
?
A ? or ? can not become multi-instance.
As required by BPMN 2.0, each parent execution of the created executions for each instance will have following variables:
-
nrOfInstances: the total number of instances
-
nrOfActiveInstances: the number of currently active, i.e. not yet finished, instances. For a sequential multi-instance, this will always be 1.
-
nrOfCompletedInstances: the number of already completed instances.
These values can be retrieved by calling the execution.getVariable(x)
method.
Additionally, each of the created executions will have an execution-local variable (i.e. not visible for the other executions, and not stored on process instance level) :
-
loopCounter: indicates the index in the for-each loop of that particular instance. The loopCounter variable can be renamed by the Activiti elementIndexVariable attribute.
If an activity is multi-instance, this is indicated by three short lines at the bottom of that activity.
Three vertical lines indicates that the instances will be executed in parallel, while three horizontal lines indicate sequential execution.
To make an activity multi-instance, the activity XML element must have a
multiInstanceLoopCharacteristics child element.
<multiInstanceLoopCharacteristics isSequential="false|true">...
</multiInstanceLoopCharacteristics>
The isSequential attribute indicates if the instances of that activity are executed sequentially or parallel.
The number of instances are calculated once, when entering the activity. There are a few ways of configuring this. On way is directly specifying a number, by using the loopCardinality child element.
<multiInstanceLoopCharacteristics isSequential="false|true">
  <loopCardinality>5</loopCardinality>
</multiInstanceLoopCharacteristics>
Expressions that resolve to a positive number are can be used:
<multiInstanceLoopCharacteristics isSequential="false|true">
  <loopCardinality>${nrOfOrders-nrOfCancellations}</loopCardinality>
</multiInstanceLoopCharacteristics>
Another way to define the number of instances, is to specify the name of
a process variable which is a collection using the loopDataInputRef
child element. For each item in the collection, an instance will be
created. Optionally, you can set that specific item of the collection
for the instance using the inputDataItem child element. This is shown
in the following XML example:
<userTask id="miTasks" name="My Task ${loopCounter}" activiti:assignee="${assignee}">
  <multiInstanceLoopCharacteristics isSequential="false">
    <loopDataInputRef>assigneeList</loopDataInputRef>
    <inputDataItem name="assignee" />
  </multiInstanceLoopCharacteristics>
</userTask>
Suppose the variable assigneeList contains the values
[kermit, gonzo, fozzie]. In the snippet above, three user tasks will
be created in parallel. Each of the executions will have a process
variable named assignee containing one value of the collection, which
is used to assign the user task in this example.
The downside of the loopDataInputRef and inputDataItem is that 1)
the names are pretty hard to remember and 2) due to the BPMN 2.0 schema
restrictions they can’t contain expressions. Activiti solves this by
offering the collection and elementVariable attributes on the
multiInstanceCharacteristics:
<userTask id="miTasks" name="My Task" activiti:assignee="${assignee}">
  <multiInstanceLoopCharacteristics isSequential="true"
     activiti:collection="${myService.resolveUsersForTask()}" activiti:elementVariable="assignee" >
  </multiInstanceLoopCharacteristics>
</userTask>
A multi-instance activity ends when all instances are finished. However, you can specify an expression that is evaluated every time one instance ends. When this expression evaluates to true, all remaining instances are destroyed and the multi-instance activity ends, continuing the process. Such an expression must be defined in the completionCondition child element.
<userTask id="miTasks" name="My Task" activiti:assignee="${assignee}">
  <multiInstanceLoopCharacteristics isSequential="false"
     activiti:collection="assigneeList" activiti:elementVariable="assignee" >
    <completionCondition>${nrOfCompletedInstances/nrOfInstances >= 0.6 }</completionCondition>
  </multiInstanceLoopCharacteristics>
</userTask>
In this example, parallel instances are created for each element of the
assigneeList collection. However, when 60% of the tasks are completed,
the other tasks are deleted and the process continues.
Since a multi-instance is a regular activity, you can define a ? on its boundary. In case of an interrupting boundary event, when the event is caught, all instances that are still active will be destroyed. Take for example following multi-instance sub-process: Here, all instances of the sub-process will be destroyed when the timer fires, regardless of how many instances there are or which inner activities are currently not yet completed.
5.4.15. Compensation handlers
If an activity is used for compensating the effects of another activity, it can be declared to be a compensation handler. Compensation handlers are not contained in normal flow and are only executed when a compensation event is thrown.
Compensation handlers must not have incoming or outgoing sequence flows.
A compensation handler must be associated with a compensation boundary event using a directed association.
If an activity is a compensation handler, the compensation event icon is displayed in the center bottom area.
The following excerpt from a process diagram shows a service task with an attached compensation boundary event which is associated to a compensation handler. Notice the compensation handler icon in the bottom canter area of the "cancel hotel reservation" service task
<serviceTask id="undoBookHotel" isForCompensation="true" activiti:class="...">
</serviceTask>
5.5. Sub-Processes and Call Activities
A Sub-Process contains activities, gateways, and events, which itself forms a process that is embedded in a parent process. A call activity references a process that is external to the process definition. A call activity is a reusable process definition that can be called from many other process definitions.
5.5.1. Sub process
A sub process is a single activity that contains activities, gateways, and events which form a process. A sub process is completely embedded inside a parent process.
You use can use a sub process in your process modeling to assist in the following cases:
-
Sub-processes allow you to perform hierarchical modeling. You can define a sub process which you can expand and collapse within its parent process definition, making the the parent’s logic clearer.
-
You can use a sub process to create a new scope for events. Events that are thrown during execution of the sub process, can be caught by ? on the boundary of the sub process, creating a scope for that event limited to just the sub process.
Sub-processes in SkyVault Activiti must have the following characteristics:
-
A sub process has exactly one none start event. No other start event types are permitted. A sub process must have at least one end event.
-
Sequence flow can not cross sub process boundaries.
Graphical notation.
One of the main reasons to use a sub process, is to define a scope for a certain event. The following process model shows an example of defining an event scope by using a sub process. Both the investigate software/investigate hardware tasks need to be done in parallel, but both tasks must be done within a certain time, before Level 2 support is consulted. Here, the scope of the timer is constrained by the sub process.
A sub process is defined by the sub-process element.
All activities, gateways, events, and other elements that are part of the sub process must be enclosed by this element.
<subProcess id="subProcess">

  <startEvent id="subProcessStart" />... other sub process elements ...

  <endEvent id="subProcessEnd" />

 </subProcess>
5.5.2. Event sub-process
An event sub-process is a sub-process that is triggered by an event. You can use an event sub-process in your main process, or in any sub-process.
The event sub-process start event defines the event to be handled by the sub-process, so the type of start event you use must have an event associated with it – none start events are not supported bt the event sub-processes. Your SkyVault Activiti event sub-process can be started by a start message event, or a start error event. The subscription to the start event is created when the scope, process instance or sub-process, hosting the event sub-process is created. The subscription is removed when the scope is destroyed.
a SkyVault Activiti event sub-process is interrupting. An interrupting sub-process cancels any executions in the current scope, and can only be triggered once for each activation of the scope hosting it.
Your event sub-process does not have any incoming or outgoing sequence flows. An event sub-process is triggered by an event, so there can be no incoming sequence flow. When a SkyVault Activiti event sub-process ends, the current scope also ends.
Graphical notation.
An event sub-process is represented using XML in the same way as an ?
with the attribute triggeredByEvent set to true:
<subProcess id="eventSubProcess" triggeredByEvent="true">...
</subProcess>
This is the event sub-process XML definition :
<subProcess id="eventSubProcess" triggeredByEvent="true">
    <startEvent id="catchError">
        <errorEventDefinition errorRef="error" />
    </startEvent>
    <sequenceFlow id="flow2" sourceRef="catchError" targetRef="taskAfterErrorCatch" />
    <userTask id="taskAfterErrorCatch" name="Provide more data" />
</subProcess>
An event sub-process can also be added to an embedded sub-process. When added to an embedded sub-process, the event sub-process is an alternative to a boundary event. Consider these two process diagrams., in both cases the embedded sub-process throws an error event.The error is caught and handled using a user task.
as opposed to:
In both cases the same tasks are executed. However, there are some differences:
-
In the first example, the embedded sub-process runs in the the scope it is hosted in, so has has access to the variables local to its scope. In the second example, the boundary event again runs in the process scope, and when it runs, the embedded sub-process it is attached to has been already been deleted by the sequence flow leaving the boundary event, so the variables created by the embedded sub-process are not available to the subsequent handling activity.
-
When using an event sub-process, the event is completely handled by the sub-process it is added to. When using a boundary event, the event is handled by the parent process.
Consider these two differences when deciding if a boundary event or an embedded sub-process is better suited to any particular process modeling situation.
5.5.3. Transaction sub-process
A transaction sub-process is an embedded sub-process, which can be used to group multiple activities to a transaction. A transaction is a logical unit of work which allows to group a set of individual activities, such that they either succeed or fail collectively.
Possible outcomes of a transaction: A transaction can have three different outcomes:
-
A transaction is successful, if it is neither cancelled not terminated by a hazard. If a transaction sub-process is successful, it is left using the outgoing sequenceflow(s). A successful transaction might be compensated if a compensation event is thrown later in the process.
Note: just as "ordinary" embedded subprocesses, a transaction may be compensated after successful completion using an intermediary throwing compensation event.
-
A transaction is cancelled, if an execution reaches the cancel end event. In that case, all executions are terminated and removed. A single remaining execution is then set to the cancel boundary event, which triggers compensation. After compensation is completed, the transaction sub-process is left using the outgoing sequence flow(s) of the cancel boundary event.
-
A transaction is ended by a hazard, if an error event is thrown, that is not caught within the scope of the transaction sub-process. (This also applies if the error is caught on the boundary of the transaction sub-process.) In this case, compensation is not performed.
The following diagram illustrates the three different outcomes:
Relation to ACID transactions: it is important not to confuse theBPMNtransaction sub-process with technical (ACID) transactions. TheBPMNtransaction sub-process is not a way to scope technical transactions. In order to understand transaction management in Activiti, read the section on ?. ABPMNtransaction is different from a technical transaction in the following ways:
-
While an ACID transaction is typically short lived, aBPMNtransaction may take hours, days or even months to complete. (Consider the case where one of the activities grouped by a transaction is a usertask, typically people have longer response times than applications. Or, in another situation, aBPMNtransaction might wait for some business event to occur, like the fact that a particular order has been fulfilled.) Such operations usually take considerably longer to complete than updating a record in a database, or storing a message using a transactional queue.
-
Because it is impossible to scope a technical transaction to the duration of a business activity, a bpmn transaction typically spans multiple ACID transactions.
-
Since aBPMNtransaction spans multiple ACID transactions, we loose ACID properties. For example, consider the example given above. Let’s assume the "book hotel" and the "charge credit card" operations are performed in separate ACID transactions. Let’s also assume that the "book hotel" activity is successful. Now we have an intermediary inconsistent state, because we have performed an hotel booking but have not yet charged the credit card. Now, in an ACID transaction, we would also perform different operations sequentially and thus also have an intermediary inconsistent state. What is different here, is that the inconsistent state is visible outside of the scope of the transaction. For example, if the reservations are made using an external booking service, other parties using the same booking service might already see that the hotel is booked. This means, that when implementing business transactions, we completely loose the isolation property (Granted: we usually also relax isolation when working with ACID transactions to allow for higher levels of concurrency, but there we have fine grained control and intermediary inconsistencies are only present for short periods of time).
-
ABPMNbusiness transaction can also not be rolled back in the traditional sense. Since it spans multiple ACID transactions, some of these ACID transactions might already be committed at the time theBPMNtransaction is cancelled. At this point, they cannot be rolled back anymore.
SinceBPMNtransactions are long-running in nature, the lack of isolation and a rollback mechanism need to be dealt with differently. In practice, there is usually no better solution than to deal with these problems in a domain specific way:
-
The rollback is performed using compensation. If a cancel event is thrown in the scope of a transaction, the effects of all activities that executed successfully and have a compensation handler are compensated.
-
The lack of isolation is also often dealt with using domain specific solutions. For instance, in the example above, an hotel room might appear to be booked to a second customer, before we have actually made sure that the first customer can pay for it. Since this might be undesirable from a business perspective, a booking service might choose to allow for a certain amount of overbooking.
-
In addition, since the transaction can be aborted in case of a hazard, the booking service has to deal with the situation where a hotel room is booked but payment is never attempted (since the transaction was aborted). In that case the booking service might choose a strategy where a hotel room is reserved for a maximum period of time and if payment is not received until then, the booking is cancelled.
To sum it up: while ACID transactions offer a generic solution to such problems (rollback, isolation levels and heuristic outcomes), we need to find domain specific solutions to these problems when implementing business transactions.
Current limitations:
-
TheBPMNspecification requires that the process engine reacts to events issued by the underlying transaction protocol and for instance that a transaction is cancelled, if a cancel event occurs in the underlying protocol. As an embeddable engine, Activiti does currently not support this. (For some ramifications of this, see paragraph on consistency below.)
Consistency on top of ACID transactions and optimistic concurrency: ABPMNtransaction guarantees consistency in the sense that either all activities compete successfully, or if some activity cannot be performed, the effects of all other successful activities are compensated. So either way we end up in a consistent state. Note that in Activiti, the consistency model forBPMNtransactions is superposed on top of the consistency model for process execution. Activiti executes processes in a transactional way. Concurrency is addressed using optimistic locking. In Activiti,BPMNerror, cancel and compensation events are built on top of the same acid transactions and optimistic locking. For example, a cancel end event can only trigger compensation if it is actually reached. It is not reached if some undeclared exception is thrown by a service task before. Or, the effects of a compensation handler can not be committed if some other participant in the underlying ACID transaction sets the transaction to the state rollback-only. Or, when two concurrent executions reach a cancel end event, compensation might be triggered twice and fail with an optimistic locking exception. All of this is to say that when implementingBPMNtransactions in Activiti, the same set of rules apply as when implementing "ordinary" processes and subprocesses. So to effectively guarantee consistency, you should implement processes in a way that does take the optimistic, transactional execution model into consideration.
An transaction sub-process might be visualized as a an ? with a double outline.
A transaction sub-process is represented using XML using the
transaction tag:
<transaction id="myTransaction" >...
</transaction>
The following is an example of a transaction sub-process:
5.5.4. Call activity (subprocess)
BPMN 2.0 makes a distinction between a regular sub-process , often also called embedded sub-process , and the call activity, which looks similar. From a conceptual point of view, both will call a sub-process when process execution arrives at the activity.
The difference is that the call activity references a process that is external to the process definition, whereas the ? is embedded within the original process definition. The main use case for the call activity is to have a reusable process definition that can be called from multiple other process definitions.
When process execution arrives in the call activity, a new execution is created that is a sub-execution of the execution that arrives in the call activity. This sub-execution is then used to execute the sub-process, potentially creating parallel child execution as within a regular process. The super-execution waits until the sub-process is completely ended, and continues the original process afterwards.
A call activity is visualized the same as a ?, but with a thick border (collapsed and expanded). Depending on the modeling tool, a call activity can also be expanded, but the default visualization is the collapsed sub-process representation.
A call activity is a regular activity, that requires a calledElement that references a process definition by its key.
In practice, this means that the id of the process is used in the calledElement.
<callActivity id="callCheckCreditProcess" name="Check credit" calledElement="checkCreditProcess" />
Note that the process definition of the sub-process is resolved at runtime. This means that the sub-process can be deployed independently from the calling process.
You can pass process variables to the sub process and vice versa.
The data is copied into the sub-process when it is started and copied back into the main process when it ends.
 <callActivity id="callSubProcess" calledElement="checkCreditProcess" > <extensionElements>
            <activiti:in source="someVariableInMainProcess" target="nameOfVariableInSubProcess" /> <activiti:out
            source="someVariableInSubProcss" target="nameOfVariableInMainProcess" /> </extensionElements>
            </callActivity>
We use an Activiti Extension as a shortcut for the BPMN standard elements called dataInputAssociation and dataOutputAssociation, which only work if you declare process variables in the BPMN 2.0 standard way.
You can use expressions here as well:
 <callActivity id="callSubProcess" calledElement="checkCreditProcess" > <extensionElements>
            <activiti:in sourceExpression="${x+5}"" target="y" /> <activiti:out source="${y+5}" target="z" />
            </extensionElements> </callActivity>
So in the end z = y+5 = x+5+5
The following process diagram shows a simple handling of an order.
Since the checking of the customer’s credit could be common to many other processes, the check credit step is modeled here as a call activity. The process looks as follows:
<startEvent id="theStart" />
<sequenceFlow id="flow1" sourceRef="theStart" targetRef="receiveOrder" />

<manualTask id="receiveOrder" name="Receive Order" />
<sequenceFlow id="flow2" sourceRef="receiveOrder" targetRef="callCheckCreditProcess" />

<callActivity id="callCheckCreditProcess" name="Check credit" calledElement="checkCreditProcess" />
<sequenceFlow id="flow3" sourceRef="callCheckCreditProcess" targetRef="prepareAndShipTask" />

<userTask id="prepareAndShipTask" name="Prepare and Ship" />
<sequenceFlow id="flow4" sourceRef="prepareAndShipTask" targetRef="end" />

<endEvent id="end" />
The sub-process looks as follows: There is nothing special to the process definition of the sub-process. It could as well be used without being called from another process.
5.6. Transactions and Concurrency
5.6.1. Asynchronous continuations
Activiti executes processes in a transactional way which can be configured to suit your needs.
If you trigger Activiti by starting a process, completing a task, or signaling an execution, Activiti continue the process, until it reaches wait states on each active path of execution. A wait state is a task which is performed later, which means that Activiti persists the current execution and waits to be triggered again. The trigger can either come from an external source, for example, if we have a user task or a receive message task, or from Activiti itself, if we have a timer event. This is illustrated in the following diagram: There is a segment of a BPMN process with a user task, a service task, and a timer event. Completing the user task and validating the address is part of the same unit of work, so it should succeed or fail atomically. That means that if the service task throws an exception, we want to rollback the current transaction, such that the execution tracks back to the user task and the user task is still present in the database. This is the default behavior in Activiti. In (1) an application or client thread completes the task. In that same thread Activiti is now executing the service and advances until it reaches a wait state, in this case the timer event (2). Then it returns the control to the caller (3) potentially committing the transaction, if it was started by Activiti.
In some cases this is not what you want. Sometimes you need custom control over transaction boundaries in a process, in order to be able to scope logical units of work. This is where asynchronous continuations are useful. Consider the following process fragment: This time Activiti is completing the user task, generating an invoice and then sending that invoice to the customer. The generation of the invoice is not part of the same unit of work, so we do not want to rollback the completion of the user task if generating an invoice fails. So Activiti needs to complete the user task (1), commit the transaction and return the control to the calling application. Then it can generate the invoice asynchronously, in a background thread. This background thread is the Activiti job executor, actually a thread pool, which periodically polls the database for jobs. So internally, when the "generate invoice" task is reached, a job "message" is created for Activiti to continue the process later and persist it into the database. This job is then picked up by the job executor and executed. The local job executor given a hint that there is a new job, to improve performance.
In order to use this feature, you can use the activiti:async="true" extension. So for example, the service task would look like this:
 <serviceTask id="service1" name="Generate Invoice" activiti:class="my.custom.Delegate" activiti:async="true"
            />
activiti:async can be specified on the following BPMN task types: task, serviceTask, scriptTask, businessRuleTask, sendTask, receiveTask, userTask, subProcess, callActivity
On a userTask, receiveTask or other wait states, asynchronous continuations allow Activiti to execute the start execution listeners in a separate thread/transaction.
5.6.2. Fail retry
Activiti, in its default configuration, reruns a job 3 times in case of any exception in execution of a job.
This holds also for asynchronous task jobs. In some cases more flexibility is required. There are two parameters to be configured:
-
Number of retries
-
Delay between retries
These parameters can be configured by activiti:failedJobRetryTimeCycle
element. Here is a sample usage:
<serviceTask id="failingServiceTask" activiti:async="true" activiti:class="org.activiti.engine.test.jobexecutor.RetryFailingDelegate">
    <extensionElements>
        <activiti:failedJobRetryTimeCycle>R5/PT7M</activiti:failedJobRetryTimeCycle>
    </extensionElements>
</serviceTask>
Time cycle expression follows ISO 8601 standard, just like timer event expressions. The above example, makes the job executor to retry the job 5 times and wait 7 minutes between before each retry.
5.6.3. Exclusive jobs
An exclusive job cannot be performed at the same time as another exclusive job from the same process instance.
If you declare tasks to be exclusive, the JobExecutor will ensure that whenever it acquires an exclusive job from a specific process instance, it acquires all other exclusive jobs from that process instance, and delegates them to the same worker thread. This ensures sequential execution.
Exclusive jobs are specified in the default configuration. All
asynchronous continuations and timer events are therefore exclusive by
default. If you require a job to be non-exclusive, you can configure it
using activiti:exclusive="false". For example, the following service
task is asynchronous but non-exclusive.
<serviceTask id="service" activiti:expression="${myService.performBooking(hotel, dates)}" activiti:async="true" activiti:exclusive="false" />
Consider the following process definition:
There is a parallel gateway followed by three service tasks which all perform an asynchronous continuation. Three jobs are added to the database. Once such a job is present in the database it can be processed by the JobExecutor. The JobExecutor acquires the jobs and delegates them to a thread pool of worker threads. This means that using an asynchronous continuation, you can distribute the work to this thread pool (and in a clustered scenario even across multiple thread pools in the cluster). This scheme has an inherent problem: consistency. Consider the parallel join after the service tasks. When execution of a service task is completed, we arrive at the parallel join and need to decide whether to wait for the other executions or whether to continue. For each branch arriving at the parallel join, a decision is required on whether to continue or to wait for one or more other executions from the other branches.
Since the service tasks are configured using an asynchronous continuation, it is possible that the corresponding jobs are all acquired at the same time and delegated to different worker threads by the JobExecutor. The means that the transactions in which the services are executed, and in which the three individual executions arrive at the parallel join can overlap. If they do so, each individual transaction will not see that another transaction is arriving at the same parallel join concurrently and thus assume that it has to wait for the others. However, if each transaction assumes that it has to wait for the other ones, none will continue the process after the parallel join and the process instance will remain in that state forever.
To address this, Activiti performs optimistic locking. Whenever a decision is made based on data that might not be current, because another transaction might modify it before we commit, Activiti increments the version of the same database row in both transactions. This means whichever transaction commits first, wins, and the other ones fail with an optimistic locking exception. This solves the problem in the case of the process discussed above: if multiple executions arrive at the parallel join concurrently, they all assume that they have to wait, increment the version of their parent execution (the process instance) and then try to commit. Whichever execution is first will be able to commit and the other ones will fail with an optimistic locking exception. Since the executions are triggered by a job, Activiti will retry to perform the same job after waiting for a certain amount of time and try to pass the synchronizing gateway.
Optimistic locking allows Activiti to prevent inconsistencies. It makes sure that jobs do not get stuck at a joining gateway. Either all executions have passed the gateway or, there are jobs in the database that retry passing it. This is a solution to the problem of persistence and consistency, but might not be the required behavior at an higher level:
-
Activiti will retry the same job for a fixed maximum number of times only, three, in the default configuration. After that, the job will still be present in the database but not be retried actively anymore. That means that an operator would need to trigger the job manually.
-
If a job has non-transactional side effects, those will not be rolled back by the failing transaction. For instance, if the "book concert tickets" service does not share the same transaction as Activiti, the process might book multiple tickets if the job is retried.
5.7. Process initiation authorization
You can use both attributes simultaneously.
   <process id="potentialStarter">
     <extensionElements>
       <activiti:potentialStarter>
         <resourceAssignmentExpression>
           <formalExpression>group2, group(group3), user(user3)</formalExpression>
         </resourceAssignmentExpression>
       </activiti:potentialStarter>
     </extensionElements>
   <startEvent id="theStart"/>...
      <process id="potentialStarter" activiti:candidateStarterUsers="user1, user2"
                                        activiti:candidateStarterGroups="group1">...
After the process initiation authorizations are defined, a developer can retrieve the authorization definition using the following methods. This code retrieves the list of process definitions which can be initiated by the given user:
processDefinitions = repositoryService.createProcessDefinitionQuery().startableByUser("userxxx").list();
You can also retrieve all identity links that are defined as potential starter for a specific process definition
identityLinks = repositoryService.getIdentityLinksForProcessDefinition("processDefinitionId");
The following example shows how to get list of users who can initiate the given process:
List<User> authorizedUsers = identityService().createUserQuery().potentialStarter("processDefinitionId").list();
Exactly the same way, the list of groups that is configured as a potential starter to a given process definition can be retrieved:
List<Group> authorizedGroups = identityService().createGroupQuery().potentialStarter("processDefinitionId").list();
5.8. Data objects
BPMN provides the possibility to define data objects as part of a process or sub process element.
According to the BPMN specification you can include complex XML structures that might be imported from XSD definitions. To support data objects in Activiti the following XSD types are supported:
<dataObject id="dObj1" name="StringTest" itemSubjectRef="xsd:string"/>
<dataObject id="dObj2" name="BooleanTest" itemSubjectRef="xsd:boolean"/>
<dataObject id="dObj3" name="DateTest" itemSubjectRef="xsd:datetime"/>
<dataObject id="dObj4" name="DoubleTest" itemSubjectRef="xsd:double"/>
<dataObject id="dObj5" name="IntegerTest" itemSubjectRef="xsd:int"/>
<dataObject id="dObj6" name="LongTest" itemSubjectRef="xsd:long"/>
The data object definitions will be automatically converted to process variables using the 'name' attribute value as the name for the new variable. In addition to the definition of the data object Activiti also provides an extension element to assign a default value to the variable. The following BPMN snippet provides an example:
        <process id="dataObjectScope" name="Data Object Scope" isExecutable="true">
          <dataObject id="dObj123" name="StringTest123" itemSubjectRef="xsd:string">
            <extensionElements>
              <activiti:value>Testing123</activiti:value>
            </extensionElements>
          </dataObject>
5.9. Custom extensions
If BPMN 2.0 does not meet your needs when designing a process, Activiti provides BPMN 2.0 extensions. Extensions are new constructs that are not part of the BPMN 2.0 specification.
The BPMN 2.0 specification allows for custom extensions. However, to help you when using extensions, they are always indicated by giving the new XML elements and attributes the activiti: namespace prefix.
Several factors may influence your decision to use custom extensions. Activiti provides extensions where they can make your process definition simpler or more efficient.
6. Disclaimer
While SkyVault has used commercially reasonable efforts to ensure the accuracy of this documentation, SkyVault assumes no responsibility for the accuracy, completeness, or usefulness of any information or for damages resulting from the procedures provided.
Furthermore, this documentation is supplied "as is" without guarantee or warranty, expressed or implied, including without limitation, any warranty of fitness for a specific purpose.