- 1. Introduction
- 2. The SkyVault Activiti app
- 2.1. Kickstart app
- 2.2. Task app
- 2.3. Profile management
- 2.4. Identity management
- 2.5. Analytics app
- 2.6. Step editor
- 2.7. BPMN editor
- 2.8. Form editor
- 2.9. Business Rules - Decision Tables
- 2.10. Creating your first process
- 2.11. Creating your first app
- 2.12. Starting your first process
- 2.13. Creating a single task
- 3. The SkyVault Activiti Share connector
- 4. Disclaimer
Version 1.4.0, December 2015
1. Introduction
Activiti is a BPM platform that you can run on-premise or host on a private or public cloud, single or multi-tenant.
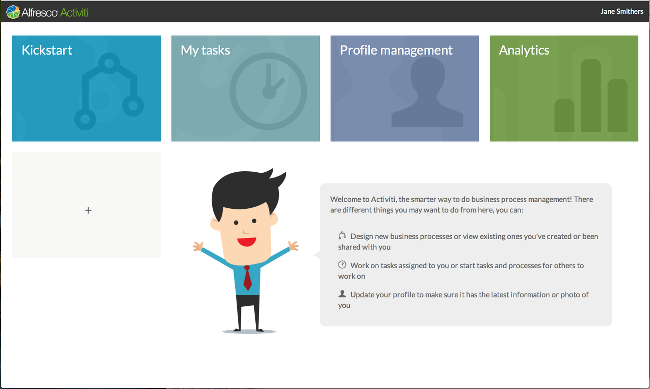
Once you have registered and signed in for the first time, you’ll see your Landing Page with some helpful hints from James.
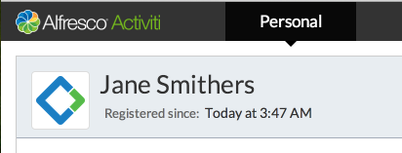
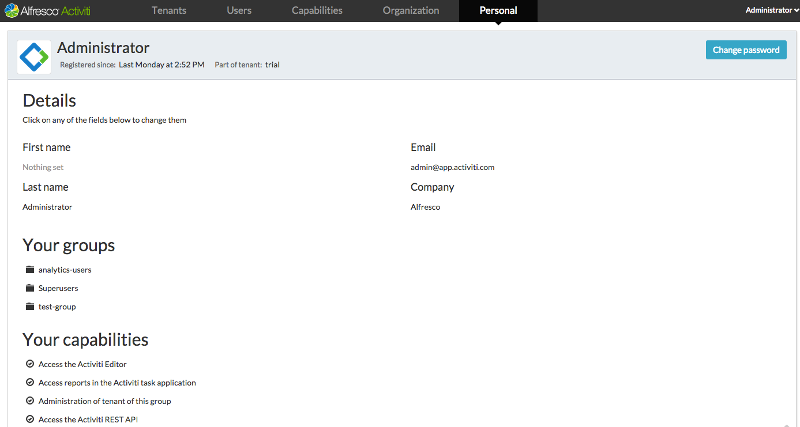
1.1. Personal profile
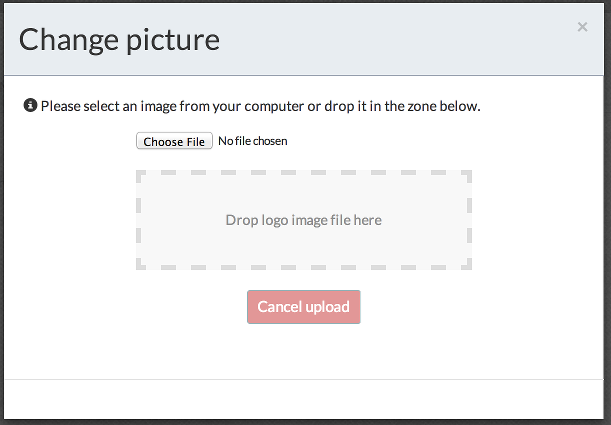
The first thing you might want to do is add a photo to your profile, so click on the Profile management tile.
On the Personal page you can edit your details, such as your name, change your password, and also view your group membership and capabilities.
To add your photo, click on the image to the left of your name and upload a photo to use.

1.2. Navigation
You can click on the SkyVault Activiti logo at any time to return to your Landing Page, so now you’ve got your photo uploaded, let’s return there.
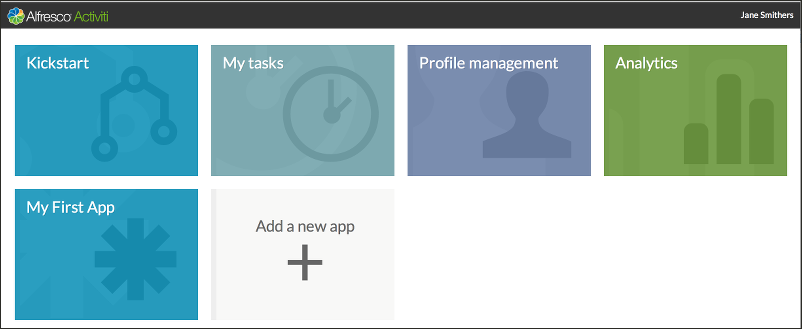
The Kickstart tile takes you to the process design tools, while the My Tasks tile takes you to your task inbox or queue. The Analytics tile takes you to a set of reports on process performance. Depending on the capabilities of your account you may not get access to Kickstart or Analytics.
If you have administrator capabilities, then the Profile management tile will show as the Identity management tile, giving access to your profile page as well as to user, group and capability management pages for your tenant or the whole system.
1.3. Kickstart for Process Design
Click on the Kickstart tile and you will be taken to the set of tools you can use to design business processes. There are several main pages within Kickstart: - Process a library of processes created by the Visual or Step Editors - Forms a library of forms that can be referenced from process models - Apps a library of Process Apps that define packages of process models - Stencils a library of process palette definitions that can be used by the process editors
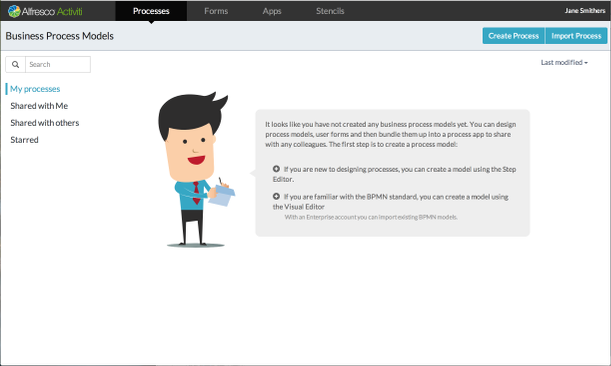
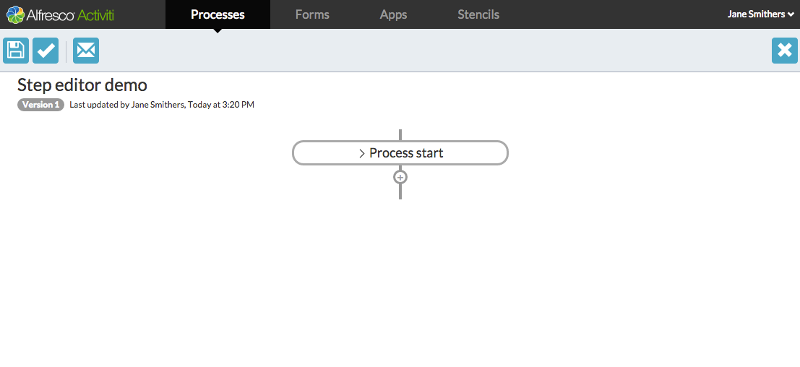
You will land on the Process page by default and have the option of creating a new process or editing an existing process model. If your account has the capability, you can also import existing models defined in the BPMN 2.0 standard format. Let’s start by creating a process model using the Step Editor. You can do this by clicking on the hint given by James, or by clicking the Create Process button. You will be presented with a dialog that allows you to give a name and description to the model, as well as specify which editor to use and which stencil. Give your process a name and click the Create new process button in the dialog. You will then be taken to the Step Editor.
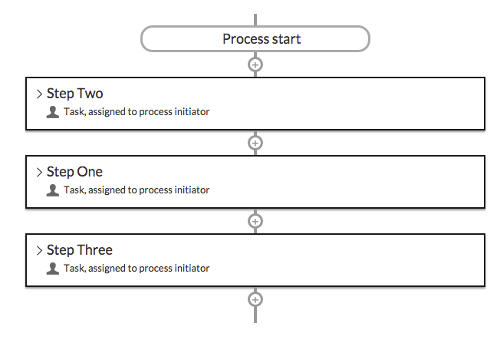
The Step Editor allows you to define a business process through a sequence of steps. There a number of Steps provided by default, but this can depend on the Stencil that you selected for editing the process model.
We’re going to begin by setting the process to start by the user completing a form. Click on the Process start box and it will expand to allow you to choose to start by filling a form.
If you already had some forms in your Forms library you could pick one, otherwise click the Create form button.
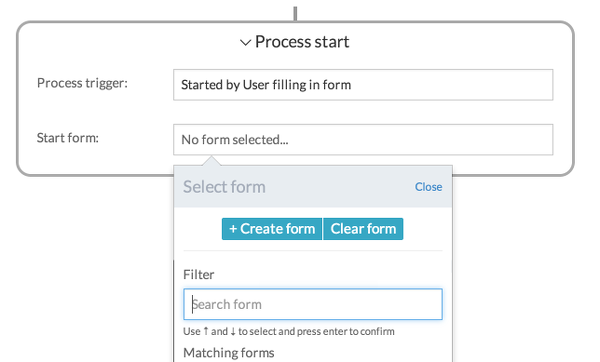
You will now be taken to the Form Editor. Any form you create this way will not be generally available in your Forms library as it was created as part of this process model. If you wish to create a form you can reuse in other process models, you can do this from the main Forms page. As we’re happy for this form to be just used by this process, we’ll continue defining the form from the Step Editor. The Form Editor has two main tabs: one for the layout of form fields, the other to define the outcome buttons for the form.
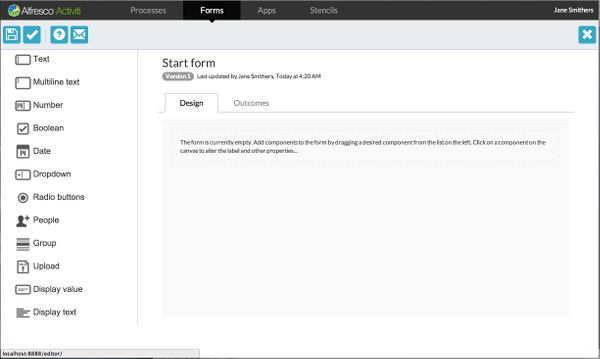
To design the form layout you can drag and drop the desired types of field from the palette on the left side. For each field dropped in the Design area, you can hover over it to either select the pencil icon to edit the field’s properties or to remove the field from the form. Depending on the type of field you will have different options. Most fields allow you to give a display label, which can be used later in the process design to reference a value entered into a field by a user in a running process. You can also define if the field is required to be filled before the form can be completed. For now, just give labels for the fields.
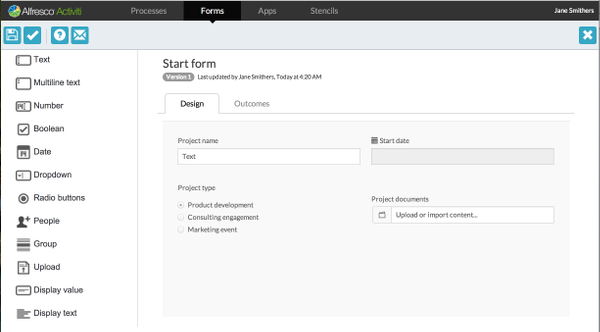
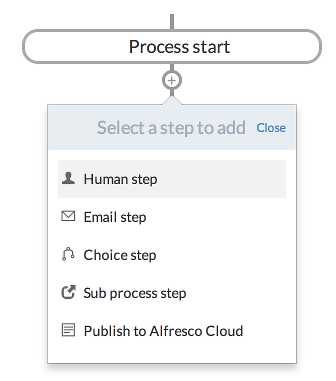
When you’ve finished designing the form, click the Save button at the top left and you will be returned to the Step Editor. By clicking on the + icon at the bottom of the Process start box you can add the first step in your process. The steps available to you are defined by the Stencil you created the model with. In the default stencil there is a Human step that can be used to assign a task to a user. Select the Human step and fill in a name within the step box just created.
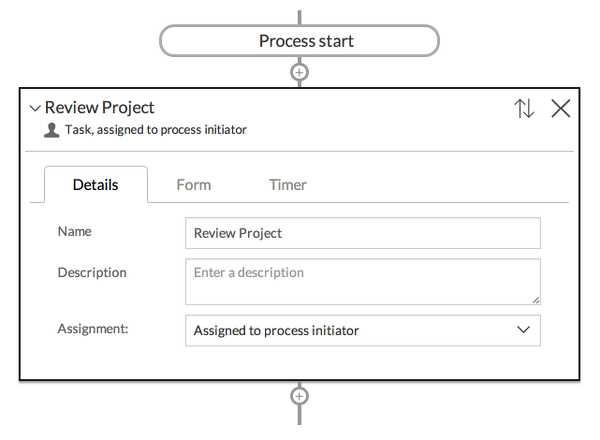
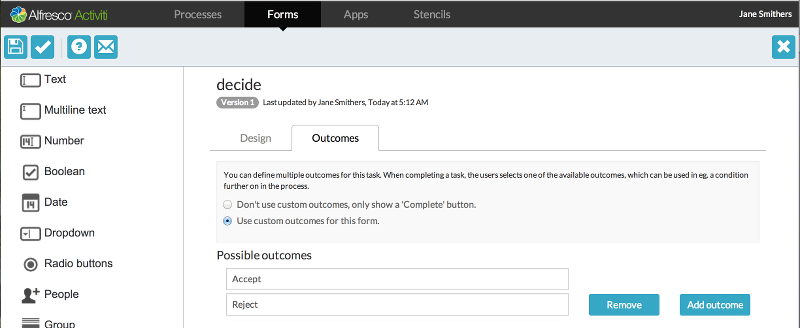
You can also choose who this task should be assigned to, including the person who initiated the process; a single user; a set of candidate users; or depending on your type of account, a group of users. When a task is assigned to a group or a list of candidate users, all of those users can see the task in their task list, but need to claim it in order to complete the task. For this process, we’re going to keep all tasks assigned to the process initiator so you can run the process and have the tasks assigned to yourself to keep things simple. On the Form tab, choose to create a new form, add a multiline text field and name it Review comment. Then select the Outcomes tab, choose the option for custom outcomes and add two outcomes: Accept and Reject, then save the form, returning to the Step Editor.
For the next step we are going to do different things depending on the outcome selected. To do this, add a Choice step by clicking the + icon below the Review Project step.
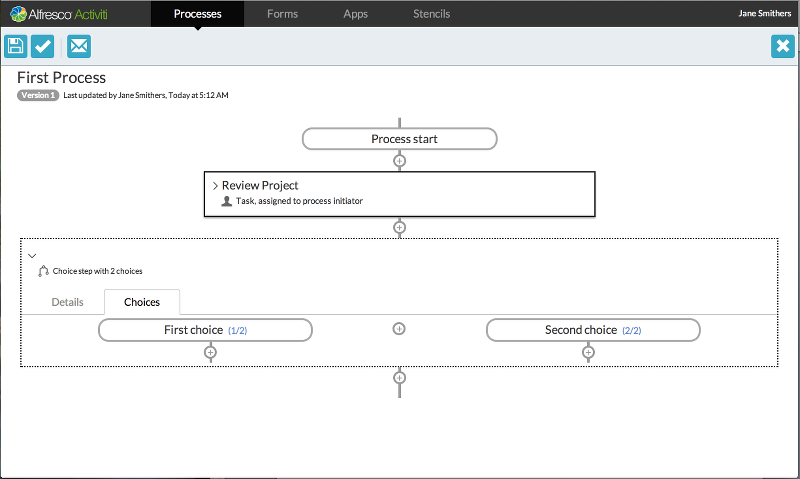
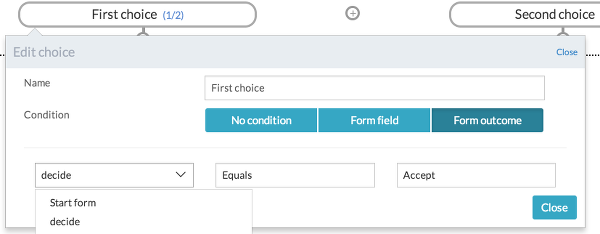
You can add more than two choices by clicking on the + icon in the middle of the Choice step, but we only need two based on the outcomes we have. To set the condition for following a choice, click on the choice box and a popup dialog allows you to select the condition based on existing form fields or outcomes. In this case we’re going to set the First choice to a form outcome, so select that button in the dialog. You can now select the review form from the list of those already added to the process and then select it to be Equal to Accept.
Similarly, we can set the condition on the Second choice to be equal to Reject. You can change the name for each choice so it is more meaningful if you wish. We can now add a task to be done if a project review is accepted by clicking the + under the First choice box.
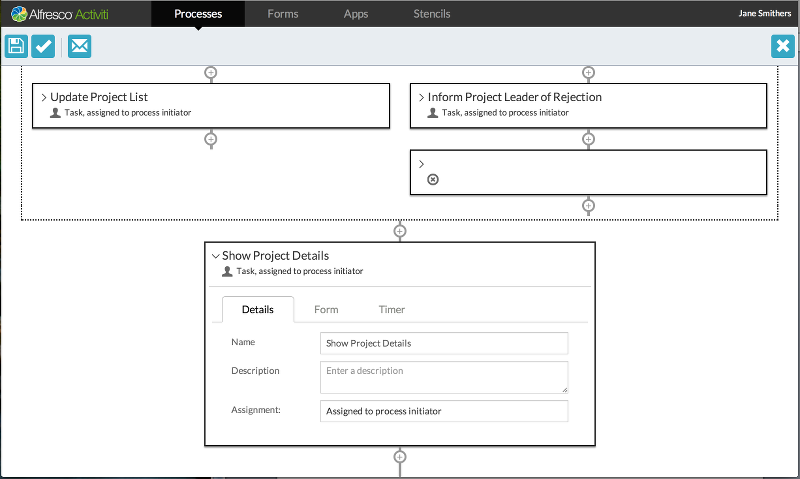
We’re going to add a simple human task with a name of Update Project List. Under the Second choice box we’ll add a human task with a name Inform Project Leader of Rejection. We now want the process to stop if the rejection task has completed, so add a Stop step on to the bottom of this task..

We can continue to add steps to the First choice, or in this case continue to add them after the complete Choice step by clicking the + at the very bottom. We’ll just add a Human task with the name Show Project Details.
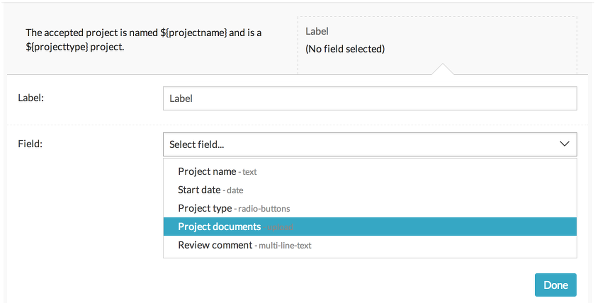
On the Form tab for this task, create a new form. Drag a Display text field on and enter the text message to display. The text can contain references to values added by a user in previous forms. There is a helper dropdown that you can select from to insert the given reference at the cursor position in the text.
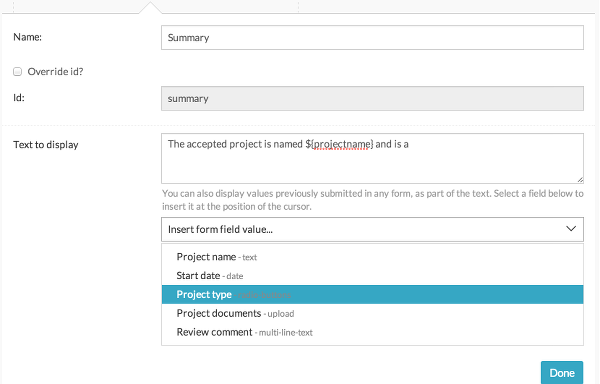
Add some text as shown. Then drag on a Display value field, setting it to display the project files by selecting the appropriate field from the list.
Now save the form, return to the Step Editor and save the process model you’ve just designed. All your processes are listed with a thumbnail of the process. You can edit a process from the list by clicking the Visual Edit button in the top right corner of the thumbnail. You can see additional information about a model by clicking on the thumbnail itself or the Show Details button in the top right corner of the thumbnail. This takes you to the Details page for the process model. Here, you can see a read-only preview of the model as well as some actions you can perform on it.
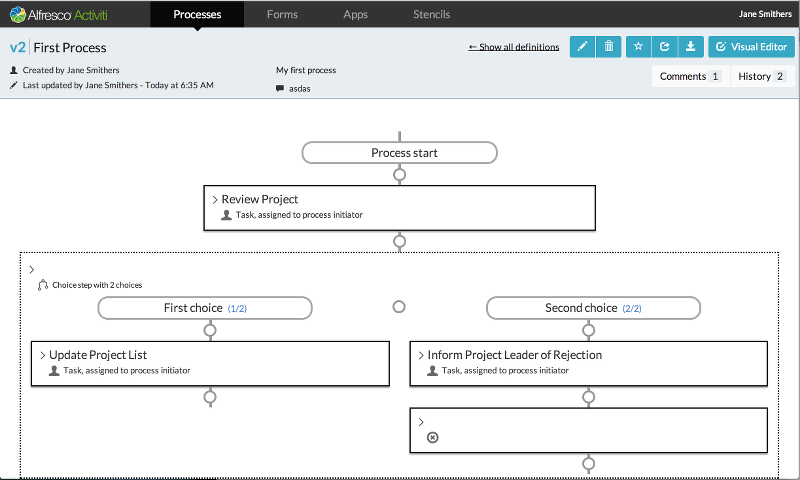
When you edit and save a model you can choose for the changes to be saved as a new version. Previous versions can be accessed from the History popup, as can any commentary from the Comments popup, where you can add further comments. The other action buttons are fairly self-explanatory, including deleting, starring (favorites), sharing or downloading the model. Now we have a process defined, we can create a process app using the Apps page. A process app is simply a collection of processes that you want to group together to make available to yourself or other users you share it with. On the Apps page, click the Create app definition button, then choose an icon and theme for the app’s tile. You can have an app without any process definitions linked to it, which lets you create a custom simple task list. We’re going to use the process we’ve just defined, so click the Edit included models button and add the model.
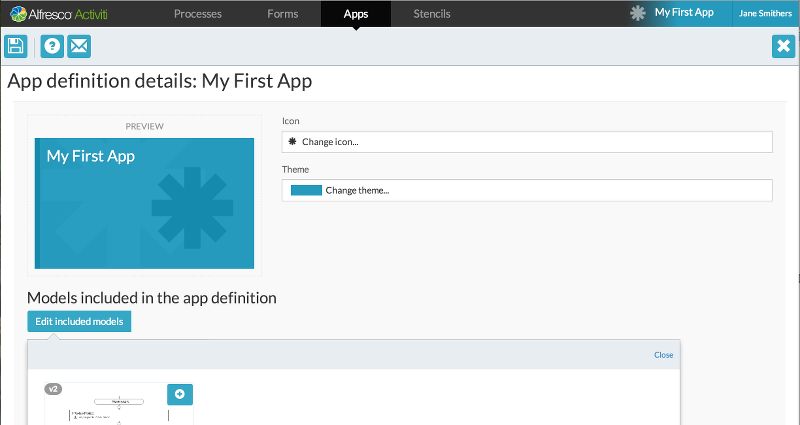
Save the app, selecting the option to publish the app in the Save dialog, then you will be returned to the Apps list view. You can do similar actions on an app in its Details page as for all models, such as deleting and sharing. An additional action is available here to Publish the app definition, without needing to use the save dialog. Publishing an app makes it available to everyone you’ve shared it with to add to their landing page. Let’s add it to our landing page so we can see our process in action. On your Landing Page, click on the tile with the + to get the Add app dialog. Choose the apps you wish to add and click the Deploy button. A new tile will be added to your landing page.
1.3.1. Using My Tasks and Process Apps
Click on the new tile and you will be taken to its Task page. This will only show you tasks created within this app or as part of the processes from the app. Click on the hint from James to create a task and fill in some text.
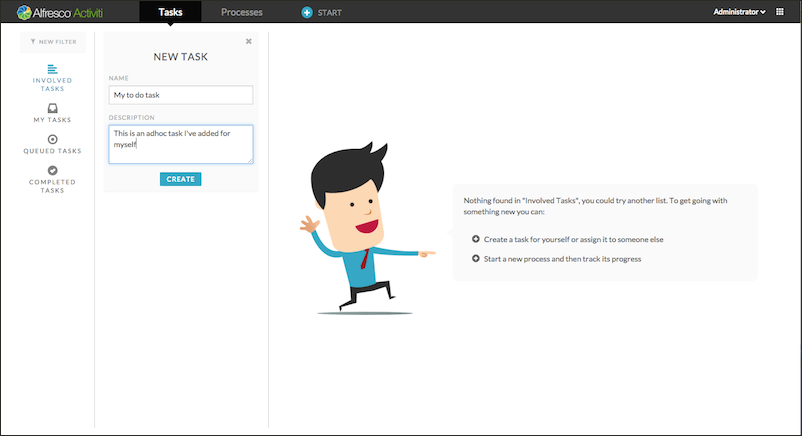
You will now have a task in your task list. You can complete a task by clicking the Complete button and it will disappear from your task list – but don’t do that yet! We can do a variety of things with a task, such as give it a due date or assign it to someone else. James also has some hints on adding reference documents, comments or even involving other people.

When you involve someone else with a task, it will appear in their task list. They then will be able to help you with the task, adding comments, documents, or even involving further people. However, only the person who is assigned the task can actually complete it. Below, we’ve added a document, a comment and involved a person.
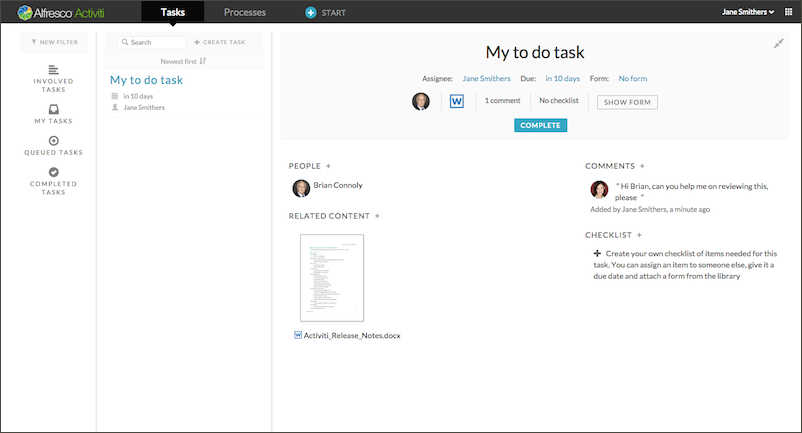
You can click the Complete button now. If you wish to view that task again, you can select the 'Completed tasks' filter on the left hand side. By default you will see all the tasks you are involved with, but you can change that to be only tasks directly assigned to you, or tasks where you are listed as a candidate or you’re the member of a group. Groups are only available for certain kinds of user account.
And now we’re going to start the process we designed earlier. You can click on the hint from James or click the 'Start' button in the header area. A list of available process will be displayed, which in our case will be only one. When you select it, the start form we created above is displayed. We can also change the name by clicking the title on the righ panel. When hovering over it with the mouse cursor, a little pencil icon indicates this. Note that by default the current date is added to the name of the process.
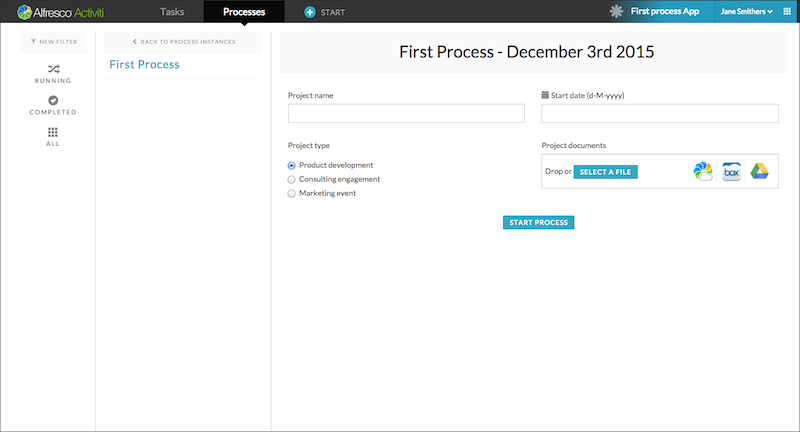
Fill in the form and click the *Start process button.
You will then be returned to the Processes page, showing the details of the newly started process in your process list.
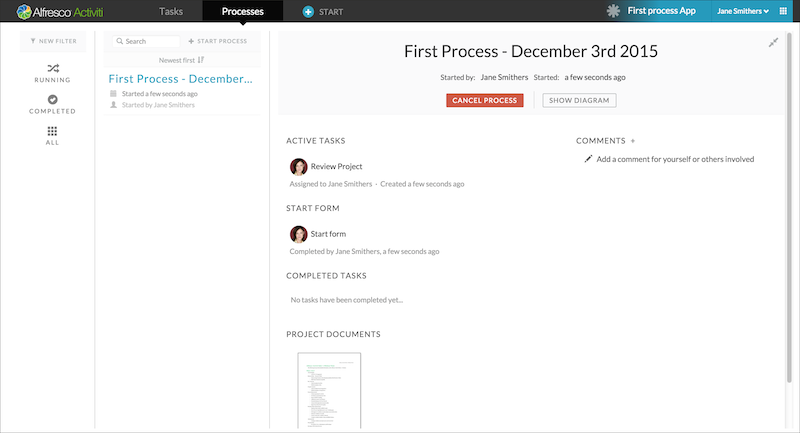
You can always view a process to see what the current and completed tasks are, as well as add comments that will be available for anyone involved in the process at any stage. If you go to our Task page now, you will see the first step in the process that was a task to review the project and accept or reject it. The task was assigned to you because it was set to the process initiator, and you started the process.
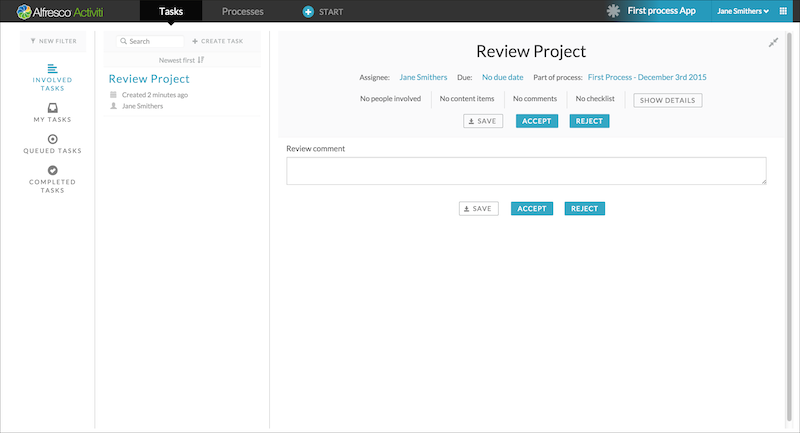
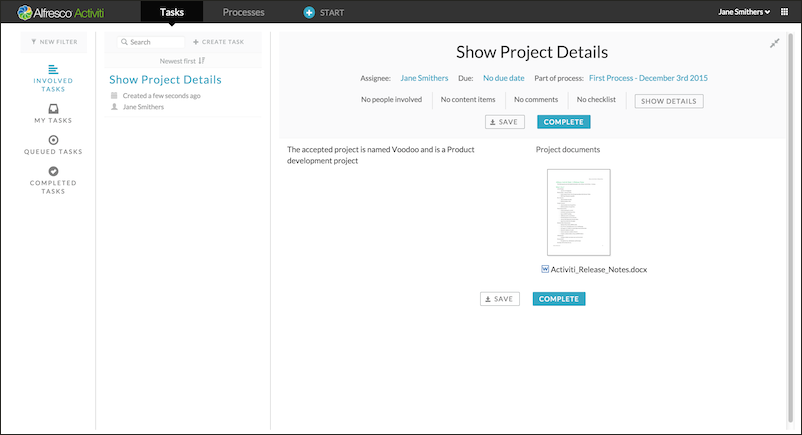
Before you fill in the review summary and choose accept or reject, you can still add people, documents and comments by clicking on the Show details button in the task header area. You can get back to the form from there by clicking the Show form button. If you click the Accept button, the Review Project task will disappear, but a new task, Update Project List, will appear. This is because it is the step defined if the choice was to accept the project. You can just click the Complete button to move to the next step, which was a task that shows the details of the accepted project.
When you complete this task, your task list will be empty, as will your process list. If you prefer to see all your tasks and processes in one place rather than through different process apps, you can use the My Tasks tile to get your complete task and process lists.
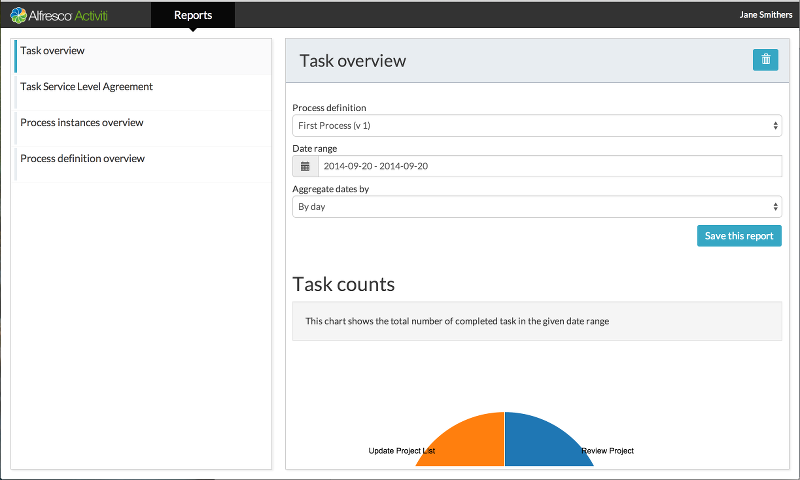
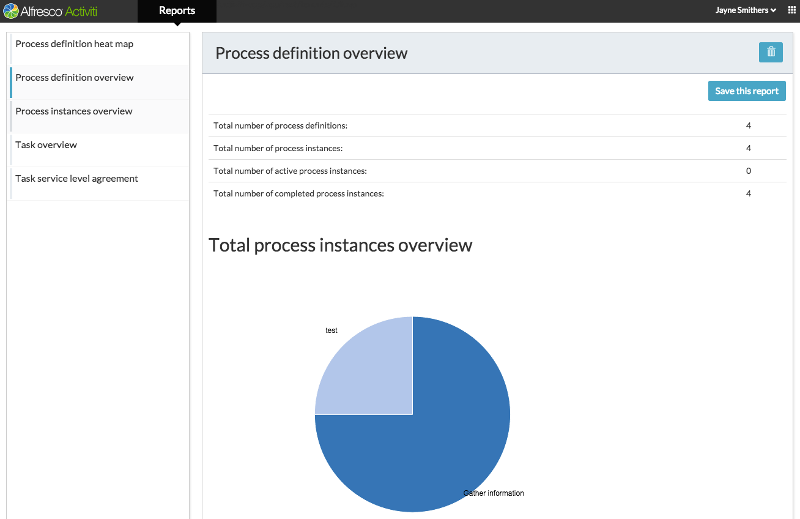
1.4. Analytics
Once you have run a few processes a number of times you can see some reports about your processes, provided you have an account with the Analytics capability. Click on the Analytics tile to go to the Reports page, and if you have not done so yet, click to add the standard reports. Once they have been added, you can select a report from the reports list and set the parameters you desire. The data, if available, will be presented in graph and tabular form, depending on the report selected. We’ll leave you to explore the reports and data available.
1.5. Summary
We’ve taken a very quick tour through some of the features of SkyVault Activiti to give you an idea of what’s possible and how it generally works. We haven’t explored the BPMN Editor, which offers a rich process design tool for creating BPMN 2.0 standard models. We haven’t explored how to define a Stencil and use it to extend the features available to the process designer in the Visual or Step Editors. There’s always more you can learn to do with SkyVault Activiti!
2. The SkyVault Activiti app
The SkyVault Activiti app is your user interface to Activiti. When you first logon to the app you will see your landing page.
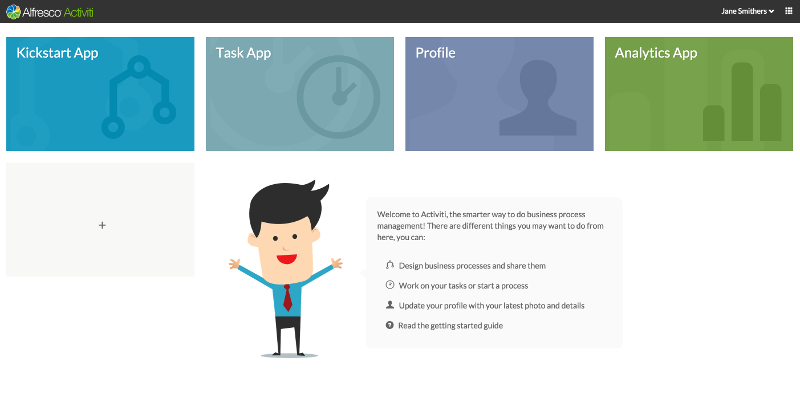
Each tile gives you tools for distinct sets of tasks
You can get back to your landing page at any time by clicking on the SkyVault Activiti logo in the top left of the page.
Your landing page is dynamic, and new tiles will appear when you create new process apps in the Kickstart App and deploy them in the Task app.
Below the tiles James appears to help you with a list of shortcuts for tasks you might want to do next. He appears in many places in the app to guide you, in particular when you haven’t worked with the tasks in the page. Here he gives shortcuts to help you design and share business processes, work with your tasks and processes, updating your profile, and a link to the getting started guide. The getting started guide is a tutorial embedded in the product that will help you learn the basics of working with SkyVault Activiti.
|
If you are an administrator, your landing page is slightly different. In place of the Profile management tile is a more powerful set of tools shown as the Identity management tile. |
In the top right corner of all pages you will see the app navigator . Click on this to use useful 1-click shortcuts to various parts of the app. You can navigate instantly to all your process models, tasks, and processes; or quickly start any process; or show the tasks and processes for a published and deployed app; or view and change your profile. As you deploy process apps, the app navigator will show new shortcuts for those process apps.
2.1. Kickstart app
From here, you can create process models, forms and app definitions, and share your models and definitions with others.
The Kickstart panel displays four tiles for working with processes, forms, apps, and stencils.
|
If you haven’t created any processes yet, then James will appear with shortcuts to let you create a process. You can use the simple Step editor, or the more powerful BPMN editor. If you are unfamiliar with the BPMN 2.0 Business Process Model language, then the Step Editor is for you. If you want to create complex processes and know BPMN 2.0, then the BPMN Editor will let you use the full power of the language. |
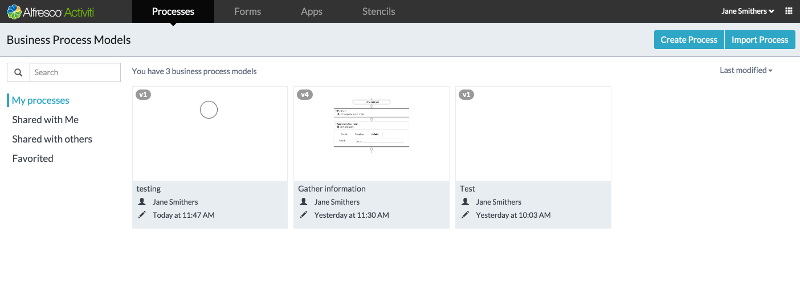
The Process panel provides tools for creating new processes, modifying existing processes, and importing processes from outside SkyVault Activiti. As you create processes, they appear as tiles on the page. A drop-down on the top right lets you change the default displayed order of Last modified to Oldest first, Name order, or reverse name order.
Controls on the left of the screen let you filter the list of displayed processes. You can view all your processes, or just those shared by others with you, or those you have shared with others, or just those you have favorited.
If you have many processes listed you may want to use the search box to find your processes
If your processes require human input then you will need forms to gather it.
|
If you haven’t created any forms yet, then the tab will show one button, Create a new form now!. |
The Forms panel provides tools for creating new forms, and modifying existing forms. As you create forms, they appear as tiles on the page. A drop-down on the top right lets you change the default displayed order of Last modified to Oldest first, Name order, or reverse name order.
Controls on the left of the screen let you filter the list of displayed forms. You can view all your forms, or just those shared by others with you, or those you have shared with others, or just those you have favorited.
If you have many forms listed you may want to use the search box to find your forms
The Decision Tables panel is used to create decision tables that can be used in processes. Decision tables are an easy way to define business rules.
You create an app to group one or more of your processes, so you manipulate them as one unit. You can make an app available for use to yourself, and you can share it with others. An app can contain no processes at all, this allows you to create simple task list.
The Apps panel provides tools for creating new apps, modifying existing apps, and importing apps from outside SkyVault Activiti. As you create apps, they appear as tiles on the page. A drop-down on the top right lets you change the default displayed order of Last modified to Oldest first, Name order, or reverse name order.
Controls on the left of the screen let you filter the list of displayed apps. You can view all your apps, or just those shared by others with you, or those you have shared with others, or just those you have favorited.
If you have many apps listed you may want to use the search box to find your apps
A stencil is a customized process palette that can be used by the step editor, the BPMN editor, and the forms editor. When you create a process or a form, you can specify a specific stencil or use the default for the editor you are using.
|
If you haven’t created any stencils yet, then the tab will show one button, Create a new stencil now!. |
The Stencils panel provides tools for creating new stencils, and modifying existing stencils. As you create stencils, they appear as tiles on the page. A drop-down on the top right lets you change the default displayed order of Last modified to Oldest first, Name order, or reverse name order.
Controls on the left of the screen let you filter the list of displayed stencils. You can view all your stencils, or just those shared by others with you, or those you have shared with others, or just those you have favorited.
If you have many stencils listed you may want to use the search box to find your forms
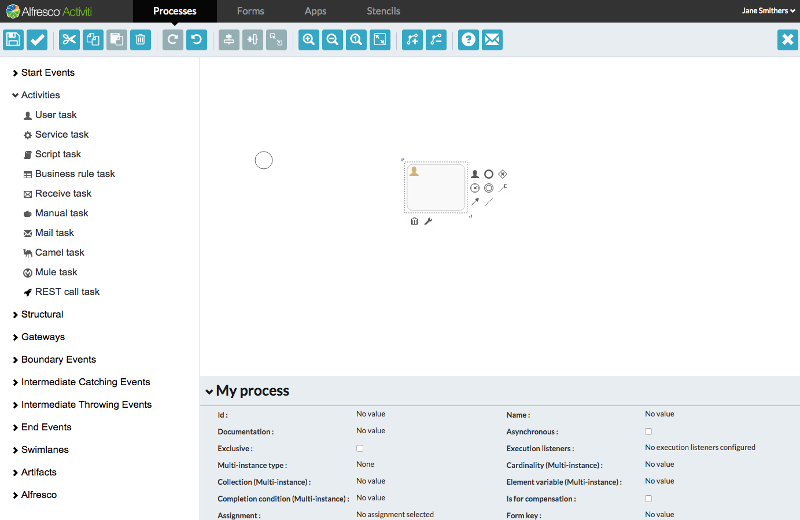
2.1.1. Kickstart editor
When you click on any process definition, reusable form, reusable decision table, app definition or stencil in the five Kickstart tabs, you open the Kickstart editor. The Kickstart editor lets you work with the item itself, rather than its contents. You can copy it, comment on it, delete it, favorite it, share it with others, and export it. You can also open the corresponding editor to make changes to the content, and perform actions specific to the item type. For example, you can publish an app definition.
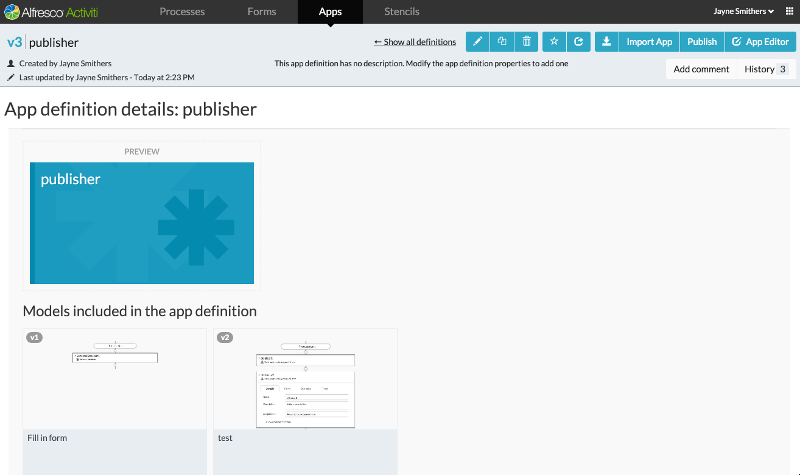
In the above example, the Kickstart editor is open on an app definition called publisher. The editor always shows item details in the top panel and a set of buttons in the top right. The right-most button opens the editor corresponding to the item displayed. So in this example, the right-most button opens the app editor. If a process definition created using the step editor is opened in the Kickstart editor, then the right-most button would open the step editor.
2.2. Task app
Provides access your task list and lets you work on tasks assigned to you from any process app. This is also where to start new processes and tasks.
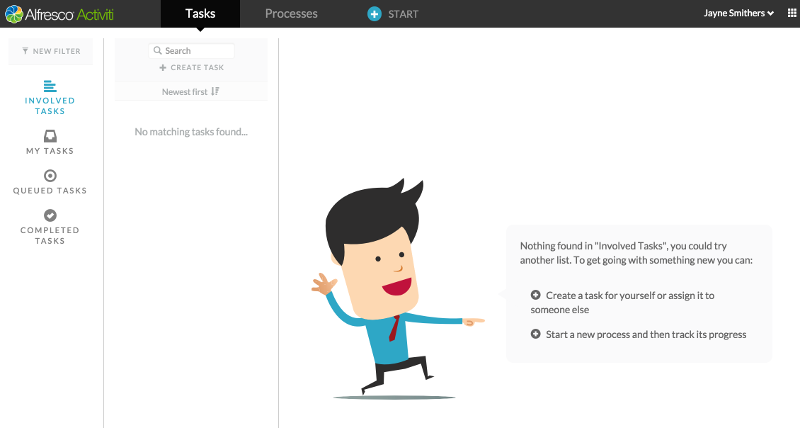
The Task app menu bar has two tabs for working with tasks and processes, and a Start button, which is a shortcut to start a process using a published process definition..
|
If you haven’t created any tasks for yourself, and there are no tasks for you from current processes or from other users, then James will appear with shortcuts to help you create a task or start a published process. |
The Tasks tab is organized into three columns.
The left hand column lets you filter the list of displayed tasks. There are four pre-defined filters and a New Filter control which lets you define and name your own filters. Any filters you create are appended to the list of displayed filters.
The middle column provides tools for creating new tasks, and lists the tasks included by the currently active filter. A drop-down above the list of tasks lets you change the default displayed order of Newest first to Oldest first, Due last order, or Due first order.
When you click on a task in the middle column, the right hand column displays the selected task details, ands provides tools for completing open tasks and for viewing the audit log of a completed task.
When you create a new filter, you can filter by task name, the state of the task, by process definition, and by assignment. You can also change the default sort order.
- Process definition
-
You choose a currently running process name, and display only those tasks that are associated with that process.
- State
-
You display open or completed tasks. The default is to display only open tasks.
- Assignment
-
You can choose to display on tasks in which you are involved, or just tasks that have been assigned to you, or just tasks where you are one of several candidates.
- Sort
-
You can sort the task list by Newest first, Oldest first, Due last, or Due first.
- Task name
-
You can enter a string to search for matching task names.
|
If you have no running processes, then James will appear with a shortcut to let you start an existing process and track its progress. |
The Processes tab is organized into three columns.
The left hand column lets you filter the list of displayed processes. There are three pre-defined filters and a New Filter control which lets you define and name your own filters. Any filters you create are appended to the list of displayed filters.
The middle column provides tools for starting a new process from a list of published process definitions, and lists the process instances included by the currently active filter. A drop-down above the list of tasks lets you change the default displayed order of Newest first to Oldest first. If the displayed list includes completed processes, then you can also show those Completed most recently and Completed least recently.
When you click on a process definition in the middle column, the right hand column displays the selected process details. All the tasks in the process are displayed. If the process is running, you will see the active tasks displayed first. You can show the diagram for the selected process, and you can cancel a running process.
When you create a new filter, you can filter by process definition, the state of the process, and by process name. You can also change the default sort order.
- Process definition
-
You choose a published process definition name, and display only those running processes that are associated with that process definition.
- Process state
-
You display running or completed processes. The default is to display only running processes.
- Sort
-
You can sort the process list by Newest first or Oldest first.
- Process name
-
You can enter a string to search for matching process names.
2.3. Profile management
You will see this tile if you are a user. Here you can manage your own personal information.
2.4. Identity management
You will see this tile if you are an administrator. Here you can manage your own personal information and, as you have administration rights, you can manage users and groups in your organization, and tenants in your SkyVault Activiti engine.
The Identity management page presents five tabs for managing tenants, users, capabilities, organization and personal information. The default tab displayed is for personal information.
|
The trial version of SkyVault Activiti has only one named tenant, trial. |
The Tenants panel provides tools for creating new tenants, and modifying existing tenants.
You will see the details of the currently selected tenant. You can and edit the name of the current tenant, and add SkyVault repositories to it. A log of management events is displayed for the tenant.
The Users panel provides tools for managing users. On the right-hand side is a list of current users. You can select from the list of users and use the Select an action control to change the details, status, account type and password.
On the left-hand side you can create a new user, or filter the list of current user by status, account type, email or name, or company.
The Capabilities panel provides tools for managing the capabilities groups of users have in this tenant. There are four capabilities an administrator can grant to a group:
-
Administration of tenant of this group gives full administration rights for the current tenant to the selected group.
-
Access Analytics app gives access to reports in the Activiti analytics app.
-
Access Kickstart app gives access to Kicstart app which allows the user to design and publish process definitions.
-
Access the Activiti REST API
You create and delete capabilities groups, add and remove users to and from a group, and add and remove capabilities to and from all users in a group.
You can create functional groups that reflect the structure of your organization using the Organization panel. You can add and remove users to and from a group, and create subgroups within a group.
|
When you remove a group, it will be deactivated, until all its tasks are complete. To remove the group completely, click the remove button a second time. When you remove a group, this will remove all its sub groups too. |
Personal.
2.5. Analytics app
Use this tile to generate reports of performance and throughput statistics for your processes.
You can create new reports by modifying the parameter settings of an existing report and saving it with a new name. The new report will appear in the list of reports on the left-hand side of the page.
2.6. Step editor
The Step Editor guides you through creating a business process through a sequence of simple steps. The processes you create using the step editor do not exploit the full power of BPMN 2.0 like those created by the BPMN editor, but you can use it to design both simple and quite complex process models, without knowledge of BPMN 2.0
The editor has a menu bar with buttons to save your model, validate that the model is a complete BPMN 2,0 model definition, provide feedback to the SkyVault Activiti team, and to close the editor.
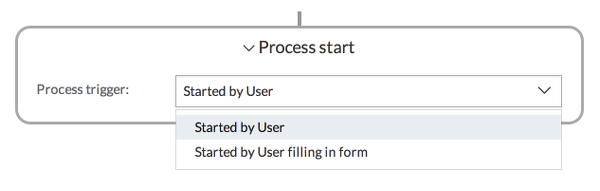
When you open the step editor on a new process definition, you can see the first step, the Process start step is already added to the process diagram for you. When you mouse-over a step, the stop becomes click-able. Click on it, and the details of the step are displayed and can be edited. This design principle is reflected throughout the SkyVault Activiti app. You can mouse-over and click text areas to modify their content, and variables to change their values. So for the Process start step, you can click on the single Process trigger variable and choose the trigger type:
The editor will guide you in creating your process. For example, when a form is required, it will present you with a list of existing forms and provide you with a button to create a new form. So for example if you choose the Started by User filling in form option for the Process trigger variable in the Process start step, you would see the following dialog:
Below the last step in a sequence, there is a + icon. Click on this to add a step to your process.
You can move steps around in your process Click in the top-right of the step and the step will be outlined in green, and the + icons will change to green discs.
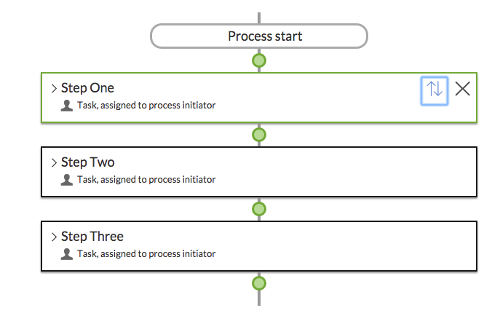
Click the green disk at which you want your highlighted step to move, and the step is moved to that position in the flow:
In addition to the Process start step, there are five types of step you can add to your process.
2.6.1. Human step
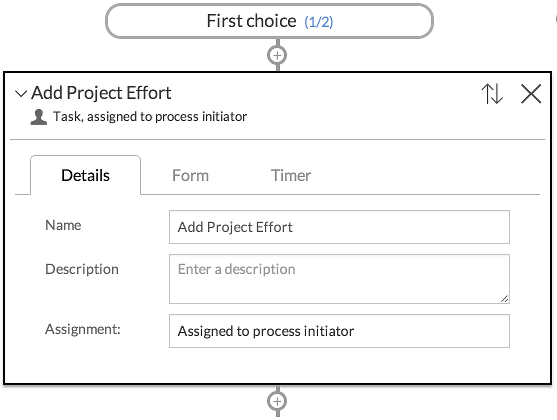
A human step is a task to be completed by a user. You choose who to assign the task to, you can provide a form for that user to complete, you can define a due date for the task, and set a timer which, if it is triggered will allow Activiti to take some action related to the task, such as reassign it to another user.
The human step dialog contains four tabs that let you fully define the task.
Name and Description are simple text fields that help you and others to identify the task in your task list. Assignment lets you choose who is assigned to complete this step:
- Assigned to process initiator
-
this is the user who starts the process, which could be you, or a user you have shared the process definition with. The process initiator is the default assignee.
- Assigned to single user
-
If you choose this option. a second Assignee field is displayed to allow you to search for single user or select someone using an email address. If that person is not currently a SkyVault Activiti user, they will receive an invite. A checkbox allows you specify whether or not the process initiator can complete the task too. This is checked by default.
- Candidate users
-
If you choose this option. a second Candidates field is displayed to allow you add one or more candidates. You can add SkyVault Activiti users or select someone using an email address. If that person is not currently a SkyVault Activiti user, they will receive an invite. Any one of the selected candidates is eligible to complete the task. A checkbox allows you specify whether or not the process initiator can complete the task too. This is checked by default.
- Candidate groups
-
If you choose this option. a second Groups field is displayed to allow you add one or more groups of SkyVault Activiti users. Any user in the selected groups is eligible to complete the task. A checkbox allows you specify whether or not the process initiator can complete the task too. This is checked by default.
You can select a form to display when the task runs. You can choose an existing form, or create a new one. Forms that you create here while designing your process definition are accessible to steps in this process definition only. Forms that you have designed in the Forms tab of the SkyVault Activiti app are reusable by any process definition owned by someone you have shared the form with. Both types of form are listed in the chooser dialog. You can filter the available list of forms by entering text in the Filter box.
If you specify a Due date, then the time remaining until that date will be displayed in the task details when the process is running. If the task is not completed in that time, then the amount of time since the due date is displayed. You have three options for setting a due date:
- No due date for this task
-
this is the default.
- Fixed duration after creation
-
specifies a Due date in years, months, days, hours, minutes and seconds after the task is started
- Based on field
-
you choose a date field from a list of those available in forms in this process definition. You can add or subtract a specified amount of time in years, months, days, hours, minutes and seconds from the value of the chosen date field to create a Due date.
Timer is similar to Due date, except you specify a time after which some action will be performed on the task by Activiti. You have three options for setting a timer:
- No timer for this task
-
this is the default.
- Fixed duration after creation
-
specifies a timer in years, months, days, hours, minutes and seconds after the task is started
- Based on field
-
you choose a date field from a list of those available in forms in this process definition. You can add or subtract a specified amount of time in years, months, days, hours, minutes and seconds from the value of the chosen date field to create a Timer.
You also specify an action for the task to be taken when the timer completes:
- No action
-
this is the default.
- Reassign task
-
You specify another assignee in exactly the same way as you specify the original assignee on the Details tab. When the timer completes, the task is assigned to the specified user, candidates users, or candidate groups.
- Keep task
-
When you specify Keep task, a new Timer date reached substep appears inside the current step with the + icon underneath it. You can add one or more subtasks inside this step by clicking this icon. When the timer completes, the task remains active, and the first substep becomes active too. The process continues running substeps as each substep is completed. Note that when you specify substeps here, the list of steps available now includes a Goto step. This allows you to choose one of the main process steps to run after this one.
- End task
-
When you specify End task, a new Timer date reached substep appears inside the current step with the + icon underneath it. You can add one or more subtasks inside this step by clicking this icon. When the timer completes, the task ends, and the first substep becomes active. The process continues running substeps as each substep is completed. Note that when you specify substeps here, the list of steps available now includes a Goto step. This allows you to choose one of the main process steps to run after this one.
- End the process
-
When the timer completes, all active tasks in the process are canceled and the process ends.
2.6.2. Email step
When an email step starts in a running process, it sends an email with a fixed text body and a fixed title to a single or multiple recipients.
The email step dialog contains two tabs that let you fully define the task.
Name and Description are simple text fields that help you and others to identify the task in your task list.
Recipient type lets you choose who receives the email defined in this step:
- Process initiator recipient
-
the user who starts the process is the sole recipient of the email. This is the default.
- Single user recipient
-
If you choose this option. a Recipient field is displayed to allow you to search for single user or select someone using an email address.
- Multiple user recipients
-
If you choose this option. a second Recipients field is displayed to allow you add one or more users. You can add SkyVault Activiti users or select someone using an email address.
2.6.3. Choice step
A choice step lets your process start one of two or more sequences of substeps, based on conditions.
The choice step dialog contains two tabs that let you fully define the task.
Name and Description are simple text fields that help you and others to identify the task in your task list.
When you select the Choices tab on a new choice step it shows two choice boxes. You can use the + icon between them to add more choices. When you click on a choice box you can edit the choice to give it a name and a condition. The condition can be one of the following:
- No condition
-
This choice runs its substeps if none of the other choices conditions are met. Note that only one of the choices in a choice step can specify this condition for the model to validate. This is the default.
- Form field
-
This choice runs its substeps if the value of a field in a form satisfies a conditional statement. If you click this option, three fields are presented.
-
You select a field in a form used in this process definition.
-
You choose an operator from Equals, Not equals, Less than, Greater than
-
You specify a value. For example you could select a radio button field named directionfrom a form, choose the Equals operator, and type the value
Left.
-
- Form outcome
-
This choice runs its substeps if the outcome of a form that matches the one specified for the choice is selected by the person assigned the task. If you click this option, three fields are presented.
-
You select an outcome of a form used in this process definition.
-
You choose an operator from Equals, Not equals, Less than, Greater than
-
You select a value of the outcome from a list. For example you could select an outcome named
directionfrom a form, choose the Equals operator, and choose the valueTurn leftfrom the drop-down list.
-
There are two steps that you can add at the end of a substep sequence in a choice step that change the flow of control in the process:
2.6.4. End process Step
You use an end process step to stop the process within a choice step in your process definition. It is available only when defining a substep within a choice step. Since this is a terminal step, no + icon appears after the step.
The End process step dialog contains one tab that lets you fully define the task.
Name and Description are simple text fields that help you and others to identify the task in your task list.
2.6.5. Goto step
You use a goto step to jump to a named step within your process definition. It is available only when defining a substep within a choice step. Like the End process step, it is a terminal step and no + icon appears after it.
The Goto step dialog has one tab to let you fully define the task.
Name and Description are simple text fields that help you and others to identify the task in your task list.
Goto step lets you choose a step in this process definition to go to next.
The process definition illustrated models driving a car. If you turn left, then you continue your journey. As long as you continue turning left, your journey continues. If you turn right, you drive a short distance to your final destination. The goto step provides two ways of managing the flow of control in a process:
-
You can implement repetition, as illustrated here.
-
You can move the flow of tasks to another step in the current process.
2.6.6. Sub process Step
A sub process step lets you create a step that itself contains a sequence of steps that constitute a complete process definition. When saved, this definition is added to the list of substeps available to your main process definition. This gives you a method of managing complex processes by refining repeated sequences of steps into a sub step. This can make your process definition easier to comprehend visually.
The sub step step dialog contains one tab that lets you fully define the task.
Name and Description are simple text fields that help you and others to identify the task in your task list.
Sub process lets you choose a sub process that you have already defined in this process definition, or you can create a new sub process that is reusable in this process definition.
2.6.7. Publish to SkyVault
This step allows you to write a document or all documents uploaded in your process to a SkyVault repository. This can be a SkyVault 2.0 on-premise repository, or SkyVault in the Cloud.
|
A user with administration privileges will need to add accounts for the SkyVault repositories that you can publish to. An administrator can add SkyVault repositories on the Tenant page of the Identity management app. The list of repositories you can publish to is then shown on your Personal Info page. If you click on a repository, an account to access the repository is added for you. |
The Publish to SkyVault step dialog contains three tabs that let you fully define the task.
Name and Description are simple text fields that help you and others to identify the task in your task list.
- Publish all content loaded in process
-
this is the default. All files that have been uploaded in an upload field in a form before this step are published to the specified location in the repository
- Publish content uploaded in field
-
If you select this option a second field Form field displays a list of form fields from all the forms in your process. You can select one from the list.
- Destination
-
This is the folder in a SkyVault repository to which the selected content will be published. Click Select Folder to display a dialog that lets you choose a folder from the available SkyVault repositories defined in your SkyVault Activiti app. Once you have selected a folder, the Repository details and folder path are displayed in this field.
- Subfolder
-
If you check create or reuse subfolder, a second field Based on field displays a list of fields from all the forms in your process. You can select one from the list. A folder with a name based on the content of the selected field will be created or reused within the specified destination folder to publish the content selected. If you do not select this option, all the items of content will be published directly to the specified destination folder.
2.6.8. Publish to Box
This is similar to the 'Publish to SkyVault' step, but for Box. (https://www.box.com/).
Note that a Box account needs to be configured ub the Identity Management > Personal tab.
2.6.9. Publish to Google Drive
This is similar to the 'Publish to SkyVault' step, but for Google Drive. (https://www.google.com/drive/).
Note that a Google Drive account doesn’t need to be configured like for Box or SkyVault. A popup will be shown when a document/folder needs to be selected and no account is found. This popup will allow to log in with the Google Drive credentials and use this account henceforth.
2.6.10. REST call
This step allows you make an arbitrary REST call. You can define a full endpoint directly or use an endpoint defined by an administrator on your Activiti server. You can supply parameters to the call directly in the URL or from process variables in forms, and you can extract properties from the JSON response into process variables for use in your process definition.
|
A user with administration privileges will need to add endpoints for standard REST calls, with Username and Password pairs that are permitted for basic authentication. An administrator can add these endpoints and authentications on the Tenant page of the Identity management app. The benefit of using standard endpoints is that they can be easily switched for test and deployment configurations. It is also possible to use a REST step to call Activiti’s own REST API. |
The REST call step dialog contains four tabs that let you fully define the call.
Name and Description are simple text fields that help you and others to identify the task in your task list.
You define the URL for your REST call in this tab.
- HTTP Method
-
This is the method associated with the REST call. The default is GET, but you must select between GET, POST, PUT, and DELETE based on the documentation for your chosen API call. The example shown in the screenshot, is using the
api/enterprise/app-versionREST call, which is documented as a GET call. - Base endpoint
-
You select one from a list of endpoints that have been defined by your administrator. In the example the endpoint for the local Activiti server REST API, http://localhost:8080/activiti-app/, has been chosen.
- Rest URL
-
Copy the URL fragment from your selected REST API call. In this example we are using
api/enterprise/app-version. - Form Field/Variables
-
You can insert values previously submitted in any form (or variables) in your process definition, into the REST URL. The value will be inserted at the position of the cursor in the Rest url field.
Some REST calls require a JSON request body. You can add one or more JSON properties using this tab.
For each property you define the name, property type and value. The value can either be a fixed value, or you can select the value of a form field from a list of available form fields in your process definition.
REST calls return a JSON response body. You can define one or more pairs JSON response properties and process variables. When the step completes, each process variable will contain the value of the returned response property. You can use those values later in your process. In this example, the returned JSON property edition will be contained in the process variable activitiedition which is a form field in a form used to display the edition string later in the process definition.
2.6.11. Generate document
This step lets you to generate a Microsoft Word or PDF document from a template document written in Microsoft Word. The process step will substitute any variables you place in the template document with process and form variables. You can upload global template documents for use by all users, or upload personal template documents for your own use.
|
A user with administration privileges can upload global templates. An administrator can add templates on the Tenant page of the Identity management app. |
The Generate Document step dialog contains three tabs that let you fully define the task.
Name and Description are simple text fields that help you and others to identify the task in your task list.
Output format choose the format that you want your generated document to be in, PDF or Word.
This tab lets you choose from a list of company templates that an
administrator has uploaded, or you can upload your own personal
template. In the above example, the offer.docx company template has
been chosen.
You can also filter the list of company templates with a search string, and download any template to see what form and process variable substitutions are made in the template.
Variable lets you enter a name for your output document.
In this example, Example Corp’s human resources department has a process to send out offer letters. They use a template document that looks like this:
Note the format of the templates. For example, <<[name]>> is
substituted in the output document by the form variable name. Templates
are processed using the
LINQ
reporting engine, the programming guide in the link describes the
format of
the templates, and provide a set of
examples
to help you create your own templates.
Templates can be simple, like the <<[name]>> example, or you can use
expressions to build more complex templates. For example, look at the
following section of the template letter:
Your initial salary will be <<if [annualsalary > 30000]>>a generous
<<else>>a standard starting<</if>> $<<[annualsalary]>> per year
This template uses a conditional expression that tests the value of the
form variable annualsalary and outputs one of two different text
phrases, depending on that value.
This is the process definition that uses the template:
The user starts the process by filling in a form called starter. The
form contains four fields, a text field with the ID name, a set of radio
buttons with the ID department, and two number fields with the IDs
annualsalary and annualbonus. Once the user has filled the form, the
Generate Document step takes the offer.docx template described above
and generates a document with a name defined by value of the Variable
tab shown, offer-letter.docx.
If the user fills in the starter form like this:
When the user clicks Start Process, the Generate Document step is
executed and the offer-letter.docx document is generated, and looks
like this:
In this example the Generate Document step is the last step in the process definition, and you can view and download the generated document in the completed process display.
2.6.12. Decision step
The decision step allows to create a Decision Table. Such a table is an easy way to expression business rules. See the Business Rules - Decision Tables section for more details on Decision Tables.
2.7. BPMN editor
With the BPMN editor you can create process definitions using the full power of BPMN 2.0. You build your process by dragging and dropping from a palette of grouped components to a canvas on which your process diagram is built.
The BPMN editor is structured into several areas:
- The Palette
-
On the left side of BPMN editor is the palette, which consists of collapse-able groups of BPMN objects.
- The Canvas
-
On the right side of BPMN editor is the canvas, where the BPMN objects can be added to create a process model.
- The properties sheet
-
Below the canvas is the properties sheet, which shows the properties of the selected BPMN object on the canvas, or if no BPMN object is selected, the properties of the process itself. You can click on any of the properties to modify its value. The property sheet is collapse-able to allow you more screen space to view your process diagram.
- The Toolbar
-
Above the canvas is the toolbar, with a set of grouped command icons. You can save and validate your model; delete selected elements in the diagram; cut, copy and paste selected elements; undo and redo the last action; zoom the process diagram; eliminate crossing connector lines by adding and removing bend-points; view the BPMN editor tour, and provide feedback to the SkyVault Activiti team.
When you first use the BPMN editor, a short guided tour runs showing you the components of the editor and running through the initial steps involved in creating a process definition. You can rerun the tour at any time by clicking the icon in the toolbar.
When you open the BPMN editor to create a new process definition, the canvas already contains a Start Event. Clicking on any event on the canvas frames the event icon with a dotted line and reveals a number of controls.
The controls below the icon allow you to delete the BPMN object, or change in to another object in the same group. For example, you can change a Start event to a Start timer event.. The controls to the right of the icon allow you to specify the next object type in the process. The list presented includes only those object types that are valid in the sequence after the current object. In addition, there are controls that allow you to create flows connecting other existing events in your diagrams, and to annotate the event.
There are two ways of adding BPMN objects to your process:
-
You can use the controls revealed when clicking on a current object icon. Using this method will create a valid connector between the current event icon and the new event icon.
-
You can drag and drop an object icon from the palette. In this case you add any flows to current event icons in the process yourself using the icon controls.
The following object groups are shown in a collapsible list in the Palette. The groups consist of all the objects available in the BPMN 2.0 specification, and some SkyVault Activiti extensions such as the Publish to SkyVault task.
2.7.1. Start events
A start event indicates where a process starts. You can define events that start on the arrival of a message, or start at specific time intervals, or start as a result of an error, or start as when a specific signal is raised, or start on no specific trigger.
In the XML representation, the type of start event is specified as a sub-element.
Start events are always catching: a start event waits until a specific trigger occurs.
None start event
A start event with an unspecified trigger. BPMN 2.0 refers to this as a none start event. It is visualized as a circle with no icon.

A none start event can have a start form. If so, the start form will be displayed when selecting the process definition from the processes list. Note that a process instance is not started until the start form us submitted. A none start event without a form will simply have a button displayed to start the process instance.
|
A sub-process always has a none start event. |
| Property | Description |
|---|---|
Id |
A unique identifier for this element |
Name |
A name for this element |
Documentation |
A description of this element |
Execution listeners |
Execution listeners configured for this element instance. An execution listeners is a piece of logic that is not shown in the diagram and can be used for technical purposes. |
Process Initiator |
The process variable in which the user id of the initiator of this instance should be stored. |
Form key |
A key that provides a reference to a form. This property is here for compatibility with Activiti community, but should not be used directly when using the Activiti BPM Suite forms. Use the Referenced form property instead. |
Referenced form |
A form reference |
Form properties |
A form definition with a list of form properties. Form properties are the way forms are defined in the community version of Activiti. Configuring them has no impact on the rendered form in the Activiti BPM Suite, the Referenced form property should be used instead. |
Start timer event
A timer start event initiates a process instance at specific time. You can use it both for processes which must start only once and for processes that must start in repeated time intervals.
It is visualized as a circle with a clock icon.

Note that a process instance started by a timer start event cannot have a start form, as it is started by the system. Similarly, it does not have a process initiator like a none start event. As such when assigning tasks later on in the process definition, keep in mind that the assignment 'assigned to process initiator' will not work.
|
A sub-process cannot have a timer start event. |
| Property | Description |
|---|---|
Id |
A unique identifier for this instance |
Name |
A name for this element |
Documentation |
A description of this element |
Execution listeners |
Execution listeners configured for this instance. An execution listeners is a piece of logic that is not shown in the diagram and can be used for technical purposes. |
Time Cycle |
A timer cycle defined in
http://en.wikipedia.org/wiki/ISO_8601 format, for example: |
Time Date in ISO-8601 |
A point in time defined as a
http://en.wikipedia.org/wiki/ISO_8601 date, for example:
|
Time Duration |
A period of time defined as a
http://en.wikipedia.org/wiki/ISO_8601 duration, for example: |
Start signal event
A signal start event starts a process instance using a named signal. The signal is fired from a process instance using the intermediary signal throw event (or programmatically through the java or REST API). In both cases, a process instance for any process definitions that have a signal start event with the same name are started. You can select a synchronous or asynchronous start of the process instances.
A signal start event is visualized as a circle with a triangle inside. The triangle is white inside.

| Property | Description |
|---|---|
Id |
A unique identifier for this element |
Name |
A name for this element |
Documentation |
A description of this element |
Execution listeners |
Execution listeners configured for this instance. An execution listeners is a piece of logic that is not shown in the diagram and can be used for technical purposes. |
Signal reference |
The name of the signal that initiates this event. Note that signal references are configured on the root level of the process instance and then linked to the signal start event via this property. To configure it, deselect any other element and click the 'Signal definitions' property. |
Start message event
A message start event starts a process instance using a named message. It is mainly used for starting process instance from external systems.
It is visualized as a circle with an envelope icon inside. The envelope is white inside.

When you deploy a process definition with one or more message start events, consider the following points:
-
The name of the message start event must be unique across the whole process definition. SkyVault Activiti will throw an exception on deployment of a process definition with two or more message start events that reference the same message or with two or more message start events that reference messages with the same name.
-
The name of the message start event must be unique across all deployed process definitions. SkyVault Activiti will throw an exception on deployment of a process definition with one or more message start events that reference a message with the same name as a message start event already deployed in a different process definition.
-
When a new version of a process definition is deployed, the message subscriptions of the previous version are canceled. This is also true for message events that are not present in the new version.
| Property | Description |
|---|---|
Id |
A unique identifier for this element |
Name |
A name for this element |
Documentation |
A description of this element |
Execution listeners |
Execution listeners configured for this instance. An execution listeners is a piece of logic that is not shown in the diagram and can be used for technical purposes. |
Message reference |
The name of the message that initiates this event. Note that messages are configured on the root level of the process instance and then linked to the message start event via this property. To configure it, deselect any other element and click the 'Message definitions' property. |
Start error event
An error start event triggers an event Sub-Process. An error start event cannot be used for starting a process instance.
It is visualized as a circle with lightning icon inside. The icon is white inside.

| Property | Description |
|---|---|
Id |
A unique identifier for this element |
Name |
A name for this element |
Documentation |
A description of this element |
Execution listeners |
Execution listeners configured for this instance. An execution listeners is a piece of logic that is not shown in the diagram and can be used for technical purposes. |
Error reference |
The name of the error that initiates this event. This reference needs to match the error identifier thrown by the event that throws the particular error. |
2.7.2. Activities
An activity describes a single item of work to be performed in a process. SkyVault Activity provides some Activity types that are additional to those described in the BPMN 2.0 specification.
An activity is always visualized as a rectangle with rounded corners.
User task
You use a user task to model work to be done by a human actor. When process execution arrives at a user task in the process definition, it creates a new task in the task list of the assignee or assignees defined in the task.
A user task is visualized as a rounded rectangle with a user icon in the top-left corner.
| Property | Description |
|---|---|
Id |
A unique identifier for this element |
Name |
A name for this element |
Documentation |
A description of this element |
Assignment |
Configures to who this task should be assigned. It is possible to set fixed value (advanced usage: these are Activiti expressions, for example by invoking a class or Spring bean) or use the 'Identity Store' option. Using the latter, it is possible to select groups and users in the system:
|
Referenced form |
Allows to configure or create the form for this task. This form (also called _task form) will be rendered when the task is shown in the task list of the user. A user task typically always has a form defined. |
Form key |
This is a property that exists for compatibility with Activiti community. When using the Activiti BPM Suite to work with task lists and forms, this property should not be set. |
Form properties |
This is a property that exists for compatibility with Activiti community. When using the Activiti BPM Suite to work with task lists and forms, this property should not be set. |
Due date |
Allows to configure a due date for the task. In the task list, tasks can be sorted by due date to see which tasks are needed to be completed the soonest. The possible ways of configuring are:
Based on field: Allows to configure the due date based on a previous field in the process instance, by adding or subtracting a certain amount of time. Based on variable: Allows to configure the due date based on a variable previously declared in the process instance, by adding or subtracting a certain amount of time.
|
Allo email notification |
When enabled, an email will be sent to the assignee when the task is created, |
Asynchronous |
(Advanced) Define this task as asynchronous. This means the task will not be created as part of the current action of the user, but later. This can be useful if it’s not important to have the task immediately ready. |
Exclusive |
(Advanced)Define this task as exclusive. This means that, when there are multiple asynchronous elements of the same process instance, none will be executed at the same time. This is useful to solve race conditions. |
Execution listeners |
Execution listeners configured for this instance. An execution listener lets you execute Java code or evaluate an expression when an event occurs during process execution. |
Multi-Instance type |
Determines if this task is performed multiple times and how. For more information on multi-instance, The possible values are:
|
Cardinality (Multi-instance) |
The number of times the task is to be performed. |
Collection (Multi-instance) |
(Used together with _Multi-Instance type)The name of a process variable which is a collection. For each item in the collection, an instance of this task will be created. |
Element variable (Multi-instance) |
A process variable name which will contain the current value of the collection in each task instance. |
Completion condition (Multi-instance) |
A multi-instance activity normally ends when all instances end. You can specify an expression here to be evaluated each time an instance ends. If the expression evaluates to true, all remaining instances are destroyed and the multi-instance activity ends. |
Is for compensation |
If this activity is used for compensating the effects of another activity, you can declare it to be a compensation handler. For more information on compensation handlers see the Activiti Developer Guide. |
Service task
You use a service task to invoke an external Java class or execute an expression (for example to call a Spring bean).
A service task is visualized as a rounded rectangle with a cog icon inside.
| Property | Description |
|---|---|
Id |
A unique identifier for this element instance |
Name |
A name for this element |
Documentation |
A description of this element |
Class |
The name of the Java class that implements your service task.
Your class must implement |
Expression |
An expression that either executes logic in the expression itself (for example ${execution.setVariable('myVar', 'someValue')}) or calls a method on a bean known by the Activiti engine (for example ${someBean.callMethod}). You can pass parameters (like the current execution) to the method in the expression. For more information on methods of invoking Java logic from a service task see the Activiti Developer Guide. |
Delegate expression |
An expression that resolves to an object which is of a class that implements |
Class fields |
Field extensions for the service task: configuring these |
Result variable name |
The name of a process variable in your process definition in which to store the result of this service task. This is only valid when using an expression. |
Execution listeners |
Execution listeners configured for this instance. An execution listeners is a piece of logic that is not shown in the diagram and can be used for technical purposes. |
Multi-Instance type |
Determines if this task is performed multiple times and how. For more information on multi-instance, see the Activiti Developer Guide. The possible values are:
|
Cardinality (Multi-instance) |
The number of times the task is to be performed. |
Collection (Multi-instance) |
The name of a process variable which is a collection. For each item in the collection, an instance of this task will be created. |
Element variable (Multi-instance) |
A process variable name which will contain the current value of the collection in each task instance. |
Completion condition (Multi-instance) |
A multi-instance activity normally ends when all instances end. You can specify an expression here to be evaluated each time an instance ends. If the expression evaluates to true, all remaining instances are destroyed and the multi-instance activity ends. |
Is for compensation |
If this activity is used for compensating the effects of another activity, you can declare it to be a compensation handler. For more information on compensation handlers see the Activiti Developer Guide. |
Asynchronous |
(Advanced) Define this task as asynchronous. This means the task will not be executed as part of the current action of the user, but later. This can be useful if it’s not important to have the task immediately ready. |
Exclusive |
(Advanced)Define this task as exclusive. This means that, when there are multiple asynchronous elements of the same process instance, none will be executed at the same time. This is useful to solve race conditions. |
Note that for service task it often makes sense to make them asynchronous. For example, suppose a service task is called after the user completes a form. When the service task is synchronous, the logic will be executed during the completion action of the user. This means the user has to wait until this logic is finished to have the UI refreshed. Often, this is not needed or wanted. By making the service task asynchronous, the UI will be refreshed when the task is completed. The logic will be executed later.
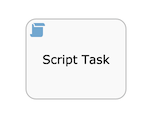
Script task
A script task defines a JavaScript script or other script language (JSR-223 compatible language) that is executed when a process instance executes this step.
A script task is visualized as a rounded rectangle with a paper icon inside.
| Property | Description |
|---|---|
Script format |
The JSR-223 name of the scripting engine your script is written for. By default the Activiti BPM Suite has support for 'javascript' and 'groovy' as format. |
Script |
The actual script that will be executed. |
Id |
A unique identifier for this element |
Name |
A name for this element |
Documentation |
A description of this element |
Variables |
In the script it is possible to set new process variables (using 'execution.setVariable('myVariable', 'myValue')'), however these won’t show up automatically in dropdowns later on (like the sequence flow condition builder, forms, etc.). To make them show up, this property needs to be configured with those variables that are set or 'exported' by this script task. |
Execution listeners |
Execution listeners configured for this instance. An execution listeners is a piece of logic that is not shown in the diagram and can be used for technical purposes. |
Asynchronous |
(Advanced) Define this task as asynchronous. This means the task will not be executed as part of the current action of the user, but later. This can be useful if it’s not important to have the task immediately ready. |
Exclusive |
(Advanced)Define this task as exclusive. This means that, when there are multiple asynchronous elements of the same process instance, none will be executed at the same time. This is useful to solve race conditions. |
Multi-Instance type |
Determines if this task is performed multiple times and how. For more information on multi-instance, The possible values are:
|
Cardinality (Multi-instance) |
The number of times the task is to be performed. |
Collection (Multi-instance) |
The name of a process variable which is a collection. For each item in the collection, an instance of this task will be created. |
Element variable (Multi-instance) |
A process variable name which will contain the current value of the collection in each task instance. |
Completion condition (Multi-instance) |
A multi-instance activity normally ends when all instances end. You can specify an expression here to be evaluated each time an instance ends. If the expression evaluates to true, all remaining instances are destroyed and the multi-instance activity ends. |
Is for compensation |
If this activity is used for compensating the effects of another activity, you can declare it to be a compensation handler. For more information on compensation handlers see the Activiti Developer Guide. |
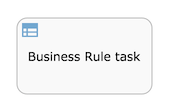
Business rule task
A Business rule task executes one or more rules. It is mainly there for compatibility with Activiti community. In the Activiti BPM Suite, it is advised to use the 'Decision tables'. See Business Rules - Decision Tables for more information on that.
A business rule is visualized a a rounded rectangle with a table icon in the top-left corner.
| Property | Description |
|---|---|
Id |
A unique identifier for this element |
Name |
A name for this element |
Documentation |
A description of this element |
Rules |
A comma-separated list of rules to include or exclude in this task. |
Input variables |
A comma-separated list of process variables to be used as input variables to your rules. |
Exclude |
If you check Exclude only rules that you have not specified in Rules will be executed. If the Exclude is unchecked, only the rules you have specified in Rules will be executed. |
Result variable |
The name of a process variable in your process
definition in which to store the result of this task. the result
variable is returned as a list of objects. If you do not specify a
result variable name, the default name
|
Asynchronous |
(Advanced) Define this task as asynchronous. This means the task will not be executed as part of the current action of the user, but later. This can be useful if it’s not important to have the task immediately ready. |
Exclusive |
(Advanced)Define this task as exclusive. This means that, when there are multiple asynchronous elements of the same process instance, none will be executed at the same time. This is useful to solve race conditions. |
Execution listeners |
Execution listeners configured for this instance. An execution listeners is a piece of logic that is not shown in the diagram and can be used for technical purposes. |
Multi-Instance type |
Determines if this task is performed multiple times and how. For more information on multi-instance, see the Activiti Developer Guide. The possible values are:
|
Cardinality (Multi-instance) |
The number of times the task is to be performed. |
Collection (Multi-instance) |
The name of a process variable which is a collection. For each item in the collection, an instance of this task will be created. |
Element variable (Multi-instance) |
A process variable name which will contain the current value of the collection in each task instance. |
Completion condition (Multi-instance) |
A multi-instance activity normally ends when all instances end. You can specify an expression here to be evaluated each time an instance ends. If the expression evaluates to true, all remaining instances are destroyed and the multi-instance activity ends. |
Is for compensation |
If this activity is used for compensating the effects of another activity, you can declare it to be a compensation handler. For more information on compensation handlers see the Activiti Developer Guide. |
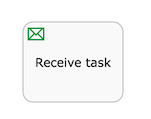
Receive task
A Receive Task waits for the arrival of an externa trigger. This trigger is sent programmatically (via Java or REST API). For process to process triggering, use the signal events.
A receive task is visualized as a rounded rectangle with an envelope icon in the top-left corner.
| Property | Description |
|---|---|
Id |
A unique identifier for this element |
Name |
A name for this element |
Documentation |
A description of this element |
Variables |
When the API is used to trigger the continuation of the process instance, a set of variables can be passed. However these won’t show up automatically in dropdowns later on (like the sequence flow condition builder, forms, etc.). To make them show up, this property needs to be configured with those variables that are set or 'exported' by this script task. |
Asynchronous |
(Advanced) Define this task as asynchronous. This means the task will not be executed as part of the current action of the user, but later. This can be useful if it’s not important to have the task immediately ready. |
Exclusive |
(Advanced)Define this task as exclusive. This means that, when there are multiple asynchronous elements of the same process instance, none will be executed at the same time. This is useful to solve race conditions. |
Execution listeners |
Execution listeners configured for this instance. An execution listeners is a piece of logic that is not shown in the diagram and can be used for technical purposes. |
Multi-Instance type |
Determines if this task is performed multiple times and how. For more information on multi-instance, see the Activiti Developer Guide. The possible values are:
|
Cardinality (Multi-instance) |
The number of times the task is to be performed. |
Collection (Multi-instance) |
The name of a process variable which is a collection. For each item in the collection, an instance of this task will be created. |
Element variable (Multi-instance) |
A process variable name which will contain the current value of the collection in each task instance. |
Completion condition (Multi-instance) |
A multi-instance activity normally ends when all instances end. You can specify an expression here to be evaluated each time an instance ends. If the expression evaluates to true, all remaining instances are destroyed and the multi-instance activity ends. |
Is for compensation |
If this activity is used for compensating the effects of another activity, you can declare it to be a compensation handler. For more information on compensation handlers see the Activiti Developer Guide. |
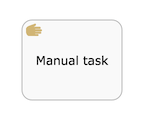
Manual task
A Manual Task defines a task that is external to Activiti. You use it to model work done which the Activiti engine does not know of. A manual task is handled as a pass-through activity, the Activiti engine automatically continues the process from the instant process execution arrives at a manual task activity.
| Property | Description |
|---|---|
Id |
A unique identifier for this element |
Name |
A name for this element |
Documentation |
A description of this element |
Asynchronous |
(Advanced) Define this task as asynchronous. This means the task will not be executed as part of the current action of the user, but later. This can be useful if it’s not important to have the task immediately ready. |
Exclusive |
(Advanced)Define this task as exclusive. This means that, when there are multiple asynchronous elements of the same process instance, none will be executed at the same time. This is useful to solve race conditions. |
Execution listeners |
Execution listeners configured for this instance. An execution listeners is a piece of logic that is not shown in the diagram and can be used for technical purposes. |
Multi-Instance type |
Determines if this task is performed multiple times and how. The possible values are:
|
Cardinality (Multi-instance) |
The number of times the task is to be performed. |
Collection (Multi-instance) |
The name of a process variable which is a collection. For each item in the collection, an instance of this task will be created. |
Element variable (Multi-instance) |
A process variable name which will contain the current value of the collection in each task instance. |
Completion condition (Multi-instance) |
A multi-instance activity normally ends when all instances end. You can specify an expression here to be evaluated each time an instance ends. If the expression evaluates to true, all remaining instances are destroyed and the multi-instance activity ends. |
Is for compensation |
If this activity is used for compensating the effects of another activity, you can declare it to be a compensation handler. For more information on compensation handlers see the Activiti Developer Guide. |
Mail task
You can enhance your business process with this automatic mail servicetasks that sends emails to one or more recipients. The task supports normal email features such as cc lists, bcc lists, and HTML content.
The mail task is visualized as a rounded rectangle with an envelope icon in the top-left corner.
| Property | Description |
|---|---|
Id |
A unique identifier for this element |
Name |
A name for this element |
Documentation |
A description of this element |
To |
The recipient of the e-mail. You can specify multiple recipients in a comma-separated list. When using a fixed value, this can be an expression. It is also possible, like with the user task, to use the 'Identity store' option here to pick users that are known in the system or to reference people that were selected in form fields prior to this email task. |
From |
The sender’s email address. If you do not specify this, the default configured system-wide setting from address is used. This can be an expression. |
Subject |
The subject of this email. This can be an expression. |
Cc |
The cc list for this email. You can specify multiple recipients in a comma-separated list. This can be an expression. |
Bcc |
The bcc list for this email. You can specify multiple recipients in a comma-separated list. This can be an expression. |
Text |
The text content of this email. You can specify this as well as HTML to support email clients that do not support rich content. The client will fall back to this text-only alternative. |
Html |
The HTML content of this email. |
Charset |
The charset for this email. By default UTF8 will be used. |
Asynchronous |
(Advanced) Define this task as asynchronous. This means the task will not be executed as part of the current action of the user, but later. This can be useful if it’s not important to have the task immediately ready. |
Exclusive |
(Advanced)Define this task as exclusive. This means that, when there are multiple asynchronous elements of the same process instance, none will be executed at the same time. This is useful to solve race conditions. |
Execution listeners |
Execution listeners configured for this instance. An execution listeners is a piece of logic that is not shown in the diagram and can be used for technical purposes. |
Multi-Instance type |
Determines if this task is performed multiple times and how. The possible values are:
|
Cardinality (Multi-instance) |
The number of times the task is to be performed. |
Collection (Multi-instance) |
The name of a process variable which is a collection. For each item in the collection, an instance of this task will be created. |
Element variable (Multi-instance) |
A process variable name which will contain the current value of the collection in each task instance. |
Completion condition (Multi-instance) |
A multi-instance activity normally ends when all instances end. You can specify an expression here to be evaluated each time an instance ends. If the expression evaluates to true, all remaining instances are destroyed and the multi-instance activity ends. |
Is for compensation |
If this activity is used for compensating the effects of another activity, you can declare it to be a compensation handler. For more information on compensation handlers see the Activiti Developer Guide. |
Camel task
You use the Camel task to send messages to, and receive messages from, Apache Camel.
A camel task is visualized as a rounded rectangle with a camel icon in the top-left corner.

You can find more information on Apache Camel here. Note that Camel is by default not installed and would need to be added by the system admin.
| Property | Description |
|---|---|
Id |
A unique identifier for this element. |
Name |
A name for this element. |
Documentation |
A description of this element. |
Camel context |
A camel context definition. If you do not specify a context, the default Camel context is used. |
Asynchronous |
(Advanced) Define this task as asynchronous. This means the task will not be executed as part of the current action of the user, but later. This can be useful if it’s not important to have the task immediately ready. |
Exclusive |
(Advanced)Define this task as exclusive. This means that, when there are multiple asynchronous elements of the same process instance, none will be executed at the same time. This is useful to solve race conditions. |
Execution listeners |
Execution listeners configured for this instance. An execution listeners is a piece of logic that is not shown in the diagram and can be used for technical purposes. |
Multi-Instance type |
Determines if this task is performed multiple times and how. The possible values are:
|
Cardinality (Multi-instance) |
The number of times the task is to be performed. |
Collection (Multi-instance) |
The name of a process variable which is a collection. For each item in the collection, an instance of this task will be created. |
Element variable (Multi-instance) |
A process variable name which will contain the current value of the collection in each task instance. |
Completion condition (Multi-instance) |
A multi-instance activity normally ends when all instances end. You can specify an expression here to be evaluated each time an instance ends. If the expression evaluates to true, all remaining instances are destroyed and the multi-instance activity ends. |
Is for compensation |
If this activity is used for compensating the effects of another activity, you can declare it to be a compensation handler. For more information on compensation handlers see the Activiti Developer Guide. |
Mule task
Lets you send messages to the Mule ESB (Enterprise Service Bus).
A mule task is visualized as a rounded rectangle with the Mule logo in the top-left corner.
You can find more information on Mule ESB here. Note that Camel is by default not installed and would need to be added by the system admin.
| Property | Description |
|---|---|
Id |
A unique identifier for this element. |
Name |
A name for this element. |
Documentation |
A description of this element. |
Endpoint url |
The Mule endpoint you want to send your message to. |
Language |
The language you want to use to evaluate the payloadExpression, for example juel. |
Payload expression |
An expression that is the message’s payload. |
Result variable |
The name of the variable to store the result of the invocation. |
Asynchronous |
(Advanced) Define this task as asynchronous. This means the task will not be executed as part of the current action of the user, but later. This can be useful if it’s not important to have the task immediately ready. |
Exclusive |
(Advanced)Define this task as exclusive. This means that, when there are multiple asynchronous elements of the same process instance, none will be executed at the same time. This is useful to solve race conditions. |
Execution listeners |
Execution listeners configured for this instance. An execution listeners is a piece of logic that is not shown in the diagram and can be used for technical purposes. |
Multi-Instance type |
Determines if this task is performed multiple times and how. The possible values are:
|
Cardinality (Multi-instance) |
The number of times the task is to be performed. |
Collection (Multi-instance) |
The name of a process variable which is a collection. For each item in the collection, an instance of this task will be created. |
Element variable (Multi-instance) |
A process variable name which will contain the current value of the collection in each task instance. |
Completion condition (Multi-instance) |
A multi-instance activity normally ends when all instances end. You can specify an expression here to be evaluated each time an instance ends. If the expression evaluates to true, all remaining instances are destroyed and the multi-instance activity ends. |
Is for compensation |
If this activity is used for compensating the effects of another activity, you can declare it to be a compensation handler. For more information on compensation handlers see the Activiti Developer Guide. |
Rest call task
The rest call task allows to communicate with a REST endpoint. This endpoint can be defined in the process definition, or it can be company-wide defined by an administrator. In the latter case, a logical name is all that is needed.
A rest call task is visualized as a rounded rectangle with a rocket icon the top-left corner.
Note that the REST call task always is executed asynchronously.
| Property | Description |
|---|---|
Id |
A unique identifier for this element. |
Name |
A name for this element. |
Documentation |
A description of this element. |
Endpoint |
Defines which REST endpoint to call. This is either an endpoint defined company-wide by the administrator (in that case simply select a logical name in the dropdown) or a URL. It’s possible to use previously defined form fields or variables to build up the URL. |
Request mapping |
Allows to construct the actual request. In case of an HTTP GET, this means the URL parameters. I case of a POST/PUT, this means the json body that is created when the request is sent. It is posible to use fixed values, form fields or variables defined prior to this activity. |
Response mapping |
Maps the JSON response from the REST endpoint to process variables. It’s possible to use a nested notation (e.g. 'prop1.prop2.prop3') for mapping values. The response values mapped like this, will be useable in steps further up the process as 'variables'. |
Generate document task
The generate document task generates a document (Word or PDF) and stores the reference to the document as a process variable. The document is based on a (Word) template that describes how the document needs to be renderd, using process variables and various constructs (such as if-clauses, loops, etc.). See the developers guide on more information on how to use the generate document task.
A generate document task is visualized as a rounded rectangle with a document icon the top-left corner.
| Property | Description |
|---|---|
Id |
A unique identifier for this element. |
Name |
A name for this element. |
Documentation |
A description of this element. |
Template |
The template upon which is used to generate the document. It can be uploaded as part of the process definition or can be defined company-wide by an administrator and reused by various process definitions. |
Output format |
The document format, PDF or Word. |
Document variable |
This is the process variable in which the reference to the generated document is stored. |
Decision task
The decision table defines a set of business rules that will be applied when it’s executed. See the section Business Rules - Decision Tables for more information.
A generate document task is visualized as a rounded rectangle with a table icon the top-left corner.
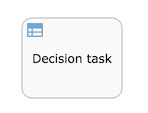
| Property | Description |
|---|---|
Id |
A unique identifier for this element. |
Name |
A name for this element. |
Documentation |
A description of this element. |
Reference decision table |
Defines the actual decision table that will be executed. The decision table can be part of the process definition (a so-called 'embedded' decision table) or defined on itself (a so-called 'reusable' decision table). |
Asynchronous |
(Advanced) Define this task as asynchronous. This means the task will not be executed as part of the current action of the user, but later. This can be useful if it’s not important to have the task immediately ready. |
Exclusive |
(Advanced)Define this task as exclusive. This means that, when there are multiple asynchronous elements of the same process instance, none will be executed at the same time. This is useful to solve race conditions. |
Execution listeners |
Execution listeners configured for this instance. An execution listeners is a piece of logic that is not shown in the diagram and can be used for technical purposes. |
Multi-Instance type |
Determines if this task is performed multiple times and how. The possible values are:
|
Cardinality (Multi-instance) |
The number of times the task is to be performed. |
Collection (Multi-instance) |
The name of a process variable which is a collection. For each item in the collection, an instance of this task will be created. |
Element variable (Multi-instance) |
A process variable name which will contain the current value of the collection in each task instance. |
Completion condition (Multi-instance) |
A multi-instance activity normally ends when all instances end. You can specify an expression here to be evaluated each time an instance ends. If the expression evaluates to true, all remaining instances are destroyed and the multi-instance activity ends. |
Is for compensation |
If this activity is used for compensating the effects of another activity, you can declare it to be a compensation handler. For more information on compensation handlers see the Activiti Developer Guide. |
Publish to SkyVault/Box/Google Drive
The publish task allow to publish created or changed during process instance execution to a content store. Currently, there is support for SkyVault (Cloud or on-premise, version 4.0 and higher), Box and Google Drive.
A publish task is visualized as a rounded rectangle with the icon of the content store in the top-left corner.
| Property | Description |
|---|---|
Id |
A unique identifier for this element. |
Name |
A name for this element. |
Documentation |
A description of this element. |
Content |
Configures what content to publish: a previously defined form field can be selected or all the content touched during process instance execution. |
Destination |
Configures where the content will be published to. Content can be published using the process initiator or a specific user (this is important when it comes to permissions in the content store). |
2.7.3. Structural components
You use structural components to group multiple components in a sub process to reuse in a parent process definition, and to embed and call other process definitions from inside your own process.
Sub-process
A sub process is a single activity that contains activities, gateways, and events which form a process. A sub process is completely embedded inside a parent process.
A sub-process is visualized as a rounded rectangle:
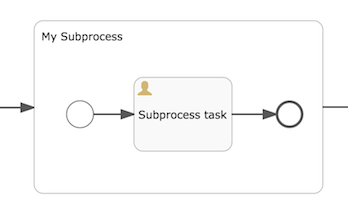
You can use a sub process to create a new scope for events. Events that are thrown during execution of the sub process, can be caught by Boundary events on the boundary of the sub process, creating a scope for that event limited to just the sub process.
Sub-processes must have the following characteristics:
-
A sub process has exactly one none start event. No other start event types are permitted. A sub process must have at least one end event.
-
Sequence flow can not cross sub process boundaries.
| Property | Description |
|---|---|
Id |
A unique identifier for this element. |
Name |
A name for this element. |
Documentation |
A description of this element. |
Asynchronous |
(Advanced) Define this task as asynchronous. This means the task will not be executed as part of the current action of the user, but later. This can be useful if it’s not important to have the task immediately ready. |
Exclusive |
(Advanced)Define this task as exclusive. This means that, when there are multiple asynchronous elements of the same process instance, none will be executed at the same time. This is useful to solve race conditions. |
Execution listeners |
Execution listeners configured for this instance. An execution listeners is a piece of logic that is not shown in the diagram and can be used for technical purposes. |
Multi-Instance type |
Determines if this task is performed multiple times and how. The possible values are:
|
Cardinality (Multi-instance) |
The number of times the task is to be performed. |
Collection (Multi-instance) |
The name of a process variable which is a collection. For each item in the collection, an instance of this task will be created. |
Element variable (Multi-instance) |
A process variable name which will contain the current value of the collection in each task instance. |
Completion condition (Multi-instance) |
A multi-instance activity normally ends when all instances end. You can specify an expression here to be evaluated each time an instance ends. If the expression evaluates to true, all remaining instances are destroyed and the multi-instance activity ends. |
Collapsed sub-process
You use a collapsed sub-process to add an existing process from your available process definitions as a sub-process to the process definition you are currently editing.
When you drag a collapsed sub-process from the palette to your canvas, and click on the Referenced Subprocess property, you are presented with a visual list of the process definitions you have access to. You can choose from the list, and the chosen process will be added to the current process definition. Note the the process chosen must have exactly one none start event, and no other start event type, and it must have at least one end event.
Not that during process instance execution, there is no difference between a collapsed or embedded sub-process. They both share the full process instance context (unlike the call activity).
Note that when you click on the plus icon in a collapsed sub-process, the BPMN editor will open the referenced sub-process definition.
A collapsed sub-process is visualized as a rounded rectangle with a plus icon inside.
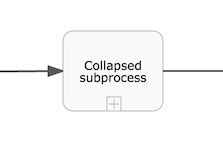
| Property | Description |
|---|---|
Id |
A unique identifier for this element. |
Name |
A name for this element. |
Documentation |
A description of this element instance |
Referenced Subprocess |
The process definition this collapsed sub-process contains. |
Asynchronous |
(Advanced) Define this task as asynchronous. This means the task will not be executed as part of the current action of the user, but later. This can be useful if it’s not important to have the task immediately ready. |
Exclusive |
(Advanced)Define this task as exclusive. This means that, when there are multiple asynchronous elements of the same process instance, none will be executed at the same time. This is useful to solve race conditions. |
Execution listeners |
Execution listeners configured for this instance. An execution listeners is a piece of logic that is not shown in the diagram and can be used for technical purposes. |
Multi-Instance type |
Determines if this task is performed multiple times and how. The possible values are:
|
Cardinality (Multi-instance) |
The number of times the task is to be performed. |
Collection (Multi-instance) |
The name of a process variable which is a collection. For each item in the collection, an instance of this task will be created. |
Element variable (Multi-instance) |
A process variable name which will contain the current value of the collection in each task instance. |
Completion condition (Multi-instance) |
A multi-instance activity normally ends when all instances end. You can specify an expression here to be evaluated each time an instance ends. If the expression evaluates to true, all remaining instances are destroyed and the multi-instance activity ends. |
Event sub-process
An event sub-process is a sub-process that is triggered by an event. You can use an event sub-process in your main process, or in any sub-process.
The event sub-process start event defines the event to be handled by the sub-process, so the type of start event you use must have an event associated with it – none start events are not supported bt the event sub-processes. Your event sub-process can be started by a start message event, start signal event or a start error event. The subscription to the start event is created when the scope, process instance or sub-process, hosting the event sub-process is created. The subscription is removed when the scope is destroyed.
Your event sub-process does not have any incoming or outgoing sequence flows. An event sub-process is triggered by an event, so there can be no incoming sequence flow.
The best way to look at an event subprocess is as a 'method' or 'routine' that is called when something happens, and handle it appropiately.
An event sub-process is visualized like a sub-process with a dashed border.
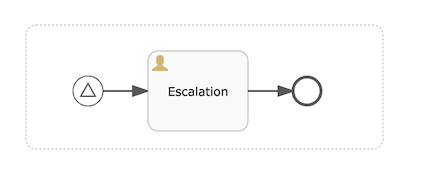
| Property | Description |
|---|---|
Id |
A unique identifier for this element. |
Name |
A name for this element. |
Documentation |
A description of this element. |
Asynchronous |
(Advanced) Define this task as asynchronous. This means the task will not be executed as part of the current action of the user, but later. This can be useful if it’s not important to have the task immediately ready. |
Exclusive |
(Advanced)Define this task as exclusive. This means that, when there are multiple asynchronous elements of the same process instance, none will be executed at the same time. This is useful to solve race conditions. |
Execution listeners |
Execution listeners configured for this instance. An execution listeners is a piece of logic that is not shown in the diagram and can be used for technical purposes. |
Call activity
A call activity is used to execute another process definition as part of te current process instance.
The main difference between a sub-process and a call activity is that the call activity does not share context with the process instance. Process variables are explicitely mapped between the process instance and the call activity.
A call activity is visualized as a rounded rectangle with a thick border.
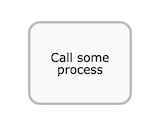
| Property | Description |
|---|---|
Id |
A unique identifier for this element. |
Name |
A name for this element. |
Documentation |
A description of this element. |
Called element |
This is the identifier of the process definition that should be called. |
In parameters |
Configures the process variables that are mapped into the called process instance when it’s executed. It’s possible to copy values directly (using the 'source' attribute) or with an expression (using the 'source expression' attribute) in a 'target' variable of the called process instance. |
Out parameters |
Configures the process variables that are mapped from the called process instance into the parent process instance. |
Asynchronous |
(Advanced) Define this task as asynchronous. This means the task will not be executed as part of the current action of the user, but later. This can be useful if it’s not important to have the task immediately ready. |
Exclusive |
(Advanced)Define this task as exclusive. This means that, when there are multiple asynchronous elements of the same process instance, none will be executed at the same time. This is useful to solve race conditions. |
Execution listeners |
Execution listeners configured for this instance. An execution listeners is a piece of logic that is not shown in the diagram and can be used for technical purposes. |
Multi-Instance type |
Determines if this task is performed multiple times and how. The possible values are:
|
Cardinality (Multi-instance) |
The number of times the task is to be performed. |
Collection (Multi-instance) |
The name of a process variable which is a collection. For each item in the collection, an instance of this task will be created. |
Element variable (Multi-instance) |
A process variable name which will contain the current value of the collection in each task instance. |
Completion condition (Multi-instance) |
A multi-instance activity normally ends when all instances end. You can specify an expression here to be evaluated each time an instance ends. If the expression evaluates to true, all remaining instances are destroyed and the multi-instance activity ends. |
2.7.4. Gateways
You use gateways to control the flow of execution in your process.
In order to explain how Sequence Flows are used within a Process, BPMN 2.0 uses the concept of a token. Tokens traverse sequence flows and pass through the elements in the process. The token is a theoretical concept used to explain the behavior of Process elements by describing how they interact with a token as it “traverses” the structure of the Process. Gateways are used to control how how tokens flow through sequence flows as they converge and diverge in a Process.
As the term “gateway” suggests, there is a gating mechanism that either allows or prevents passage of a token through the Gateway. As tokens arrive at a Gateway, they can be merged together on input and/or split apart on output from the Gateway.
A gateway is displayed as a diamond, with an icon inside. The icon depicts the type of gateway.
Exclusive gateway
You use an exclusive gateway model a decision in your process.When execution arrives at an exclusive gateway, the outgoing sequence flows are evaluated in the order in which they are defined. The first sequence flow whose condition evaluates to true, or which does not have a condition set, is selected and the process continues.
An exclusive gateway is visualized as a diamond shape with an X inside:
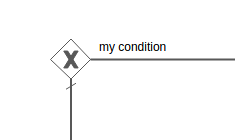
Note that if no sequence flow can be selected, an exception will be thrown.
| Property | Description |
|---|---|
Id |
A unique identifier for this element. |
Name |
A name for this element. |
Documentation |
A description of this element. |
Asynchronous |
(Advanced) Define this task as asynchronous. This means the task will not be executed as part of the current action of the user, but later. This can be useful if it’s not important to have the task immediately ready. |
Exclusive |
(Advanced)Define this task as exclusive. This means that, when there are multiple asynchronous elements of the same process instance, none will be executed at the same time. This is useful to solve race conditions. |
Flow order |
Select the order in which the sequence flow conditions are evaluated. The first sequence flow that has a condition that evaluates to true (or has no condition) will be selected to continue. |
Parallel gateway
You use a parallel gateway to model concurrency in a process. It allows you to fork multiple outgoing paths of execution or join multiple incoming paths of execution.
A parallel gateway is visualized as a diamond shape with a plus icon:
In a fork, all outgoing sequence flows are followed in parallel, which creates one concurrent execution for each sequence flow.
In a join, all concurrent executions arriving at the parallel gateway wait at the gateway until an execution has arrived for every incoming sequence flow. Then the process continues past the joining gateway. Note that the gateway simply wait until the required number of executions has been reached and does not check if the executions are coming from different incoming sequence flow.
A single parallel gateway can both fork and join, if there are multiple incoming and outgoing sequence flow. The gateway will first join all incoming sequence flows, before splitting into multiple concurrent paths of executions.
Unlike other gateways, the parallel gateway does not evaluate conditions. Any conditions defined on the sequence flow connected with the parallel gateway are ignored.
| Property | Description |
|---|---|
Id |
A unique identifier for this element. |
Name |
A name for this element. |
Documentation |
A description of this element. |
Asynchronous |
(Advanced) Define this task as asynchronous. This means the task will not be executed as part of the current action of the user, but later. This can be useful if it’s not important to have the task immediately ready. |
Exclusive |
(Advanced)Define this task as exclusive. This means that, when there are multiple asynchronous elements of the same process instance, none will be executed at the same time. This is useful to solve race conditions. |
Flow order |
Select the order in which the sequence flow conditions are evaluated. Note that for a parallel gateway this is not important, as conditions are not evaluated. |
Inclusive gateway
You use an inclusive to join and fork multiple sequence flows based on conditions.
Like an exclusive gateway you can define conditions on outgoing sequence flows and the inclusive gateway will evaluate them, but an inclusive gateway can take more than one sequence flow, like the parallel gateway.
All outgoing sequence flow conditions are evaluated. Every sequence flow with a condition that evaluates to true, is followed in parallel, creating one concurrent execution for each sequence flow.
The join behaviour for an inclusive gateway is more complex than the parallel gateway counterpars All concurrent executions arriving at the inclusive gateway wait at the gateway until executions that can reach the inclusive gateway have reached the inclusive gateway. To determine this, all current executions of the process instance are evaluated, checking if there is a path from that point in the process instance to the inclusive gatewat (ignoring any conditions on the sequence flow). When one such execution is found, the inclusive gateway join behaviour does not activate.
An inclusive gateway is visualized as a diamond shape with a circle icon inside:
Note that an inclusive gateway can have both fork and join behavior, in which case there are multiple incoming and outgoing sequence flows for the same inclusive gateway. The gateway will join all incoming sequence flows that have a process token, before splitting into multiple concurrent paths of executions for the outgoing sequence flows that have a condition that evaluates to true.
| Property | Description |
|---|---|
Id |
A unique identifier for this element instance |
Name |
A name for this element instance |
Documentation |
A description of this element instance |
Asynchronous |
(Advanced) Define this task as asynchronous. This means the task will not be executed as part of the current action of the user, but later. This can be useful if it’s not important to have the task immediately ready. |
Exclusive |
(Advanced)Define this task as exclusive. This means that, when there are multiple asynchronous elements of the same process instance, none will be executed at the same time. This is useful to solve race conditions. |
Flow order |
Select the order in which the sequence flow conditions are evaluated. This is of less importance as for the exclusive gateway, as all outgoing sequenceflow conditions will be evaluated anyway. |
Event based gateway
You use an event gateway to route process flow based on events.
Each outgoing sequence flow of the event gateway must be connected to an intermediate catching event. When process execution reaches an event gateway execution is suspended, and for each outgoing sequence flow, an event subscription is created. The flow for the event that occurs first, will be followed.
Outgoing sequence flows connect to an event gateway are never "executed", but they do allow the process engine to determine which events an execution arriving at an Event-based Gateway needs to subscribe to. The following restrictions apply to event gateways:
-
The gateway must have two or more outgoing sequence flows.
-
An Event-based Gateway can only be followed by intermediate catching events. Receive tasks after an event gateway are not supported by Activiti.
-
An intermediate catching event connected to an event gateway must have a single incoming sequence flow.
An event gateway is visualized as a diamond shape with a plus icon inside. Unlike the parallel gateway, the plus icon is not colored black inside:
| Property | Description |
|---|---|
Id |
A unique identifier for this element instance |
Name |
A name for this element instance |
Documentation |
A description of this element instance |
Asynchronous |
(Advanced) Define this task as asynchronous. This means the task will not be executed as part of the current action of the user, but later. This can be useful if it’s not important to have the task immediately ready. |
Exclusive |
(Advanced)Define this task as exclusive. This means that, when there are multiple asynchronous elements of the same process instance, none will be executed at the same time. This is useful to solve race conditions. |
Flow order |
Select the order in which the sequence flow conditions are evaluated. |
2.7.5. Boundary events
You use boundary events to handle an event associated with an activity. A boundary event is always attached to an activity.
While the activity the boundary event is attached to 'is active' (meaning the process instance execution is currently executing it right there), the boundary event is listening for a certain type of trigger. When the event is caught, the activity is either interrupted and the sequence flow going out of the event is followed (interrupting behaviour) or a new execution is created from the boundary event (non-interrupting behaviour).
Boundary timer event
A boundary timer event puts a timer on the activity it is defined on. When the timer fires, the sequence flow going out the boundary event is followed.
A boundary timer event is visualized as a circle with a clock icon inside:

| Property | Description |
|---|---|
Id |
A unique identifier for this element. |
Name |
A name for this element. |
Documentation |
A description of this element. |
Cancel activity |
Defines if the boundary event interrupts the activity is defined upon or not. |
Time Cycle |
A timer cycle defined in
http://en.wikipedia.org/wiki/ISO_8601 format, for example: |
Time Date in ISO-8601 |
A point in time defined as a
http://en.wikipedia.org/wiki/ISO_8601 date, for example:
|
Time Duration |
A period of time defined as a
http://en.wikipedia.org/wiki/ISO_8601 duration, for example: |
Boundary error event
A boundary error event catches an error that is thrown within the boundaries of the activity the event is defined upon and continues process execution from the event.
A boundary error event is always interrupting.
A boundary timer event is visualized as a circle with a lightning icon inside:

| Property | Description |
|---|---|
Id |
A unique identifier for this element. |
Name |
A name for this element. |
Documentation |
A description of this element. |
Error reference |
The identifier of the error to catch. |
Boundary signal event
A boundary signal event listens to a signal being fired (from within the process instance or system-wide) while the activity upon which the event is defined is active.
A boundary signal event is visualized as a circle with a triangle icon inside:

| Property | Description |
|---|---|
Id |
A unique identifier for this element. |
Name |
A name for this element. |
Documentation |
A description of this element. |
Signal reference |
The signal to listen to. Signals are defined on the root process definition level and are linked with this property. |
Boundary message event
A boundary message event listens to a message being received while the activity upon which the event is defined is active.
A boundary message event is visualized as a circle with an envelope icon inside:

| Property | Description |
|---|---|
Id |
A unique identifier for this element. |
Name |
A name for this element. |
Documentation |
A description of this element. |
Message reference |
The message to listen to. Messages are defined on the root process definition level and are linked with this property. |
Boundary cancel and compensation event
The boundary cancel and compensation event are currently experimental features. See http://activiti.org/userguide/index.html#bpmnBoundaryCancelEvent for more information on them.
2.7.6. Intermediate catching events
An intermediate catching event is a step in the process where the process needs to wait for a specific trigger (in BPMN this is described as 'catching' semantics).
An intermediate event is displayed as two concentric circles containing an icon. The icon shows the type of intermediate event:
Conceptually, the intermediate catch events are close to the boundary events, with that exception they don’t define a scope (the activity) for when the event is active. An intermediate catch event is active as long as the trigger hasn’t happened. A boundary event on the other hand can be destroyed if the activity completed.
All the supported intermediate catch events are configures like their boundary event counterparts.
2.7.7. Intermediate throwing events
An intermediate throw event is used to explicitely throw an event of a certain type.
Currently, two types are supported:
-
The none intermediate throwing event. Here, no event is thrown. This is mainly used as a marker in the process definition (for example to attach execution listeners that are used to indicate somehow that some state in the process has been reached).
-
The signal intermediate throwing event. Throws a signal event that will be catched by boundary signal events or intermediate signal catch events listening to that particular signal event.
An intermediate event is displayed as two concentric circles which may contain an icon. If present, the icon shows the type of intermediate event. A throwing none event contains no icon.
2.7.8. End events
You use an end event to signify the end of a process or sub-process, or the end of a path in a process or sub-process.
In a subprocess or process instance, only when all executions have reached an end event will the subprocess be continued or the whole process instance ended.
An end event is displayed as thick black circle which may contain an icon. If present, the icon shows the type of end event. A none end event has no icon.
None end event
A none end event ends the current path of execution.
| Property | Description |
|---|---|
Id |
A unique identifier for this element. |
Name |
A name for this element. |
Documentation |
A description of this element. |
Execution listeners |
Execution listeners configured for this event. |
Error end event
You use the end error event to throw an error and end the current path of execution.
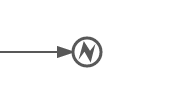
The error can be caught by an intermediate boundary error event that matches the error. If no matching boundary error event is found, an exception will be thrown
| Property | Description |
|---|---|
Id |
A unique identifier for this element. |
Name |
A name for this element. |
Documentation |
A description of this element. |
Execution listeners |
Execution listeners configured for this instance. |
Error reference |
The error identifier. This is used to find a matching catching boundary error event. If the name does not match any defined error, then the error is used as the error code in the thrown exception. |
Terminate end event
When a terminate end event is reached, the current process instance or sub-process will be terminated. Conceptually, when an execution arrives in a terminate end event, the first scope (process or sub-process) will be determined and ended. Note that in BPMN 2.0, a sub-process can be an embedded sub-process, call activity, event sub-process or transaction sub-process. This rule applies in general: when for example there is a multi-instance call activity or embedded subprocess, only that instance will be ended, the other instances and the process instance are not affected.
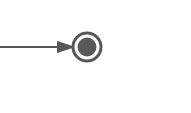
| Property | Description |
|---|---|
Id |
A unique identifier for this element. |
Name |
A name for this element. |
Documentation |
A description of this element. |
Execution listeners |
Execution listeners configured for this. on. |
Cancel end event
The cancel end event ends the current path of execution and throws a cancel event that can be caught on the boundary of a transaction subprocess.
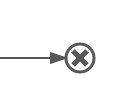
| Property | Description |
|---|---|
Id |
A unique identifier for this element. |
Name |
A name for this element. |
Documentation |
A description of this element. |
Execution listeners |
Execution listeners configured for this. on. |
2.7.9. Swimlanes
You use swimlanes to display activities in your process divided by business function or participant group. A process definition can have one swimlane diagram containing one pool, which in turn contains one or more lanes. The pool represents the whole process, and each lane corresponds to a business function or participant group.
For example the process of selling a book consists of several activities; Ordering a book, processing the order, shipping the book, and reading the book, but the activities are performed by participants in different groups; by the customer, by the sales department, and by the warehouse or store. The following process definition has one pool called Sell a book with three lanes, Customer, Sales, and Store. The process sequence flow moves between lanes in the pool as the order progresses.
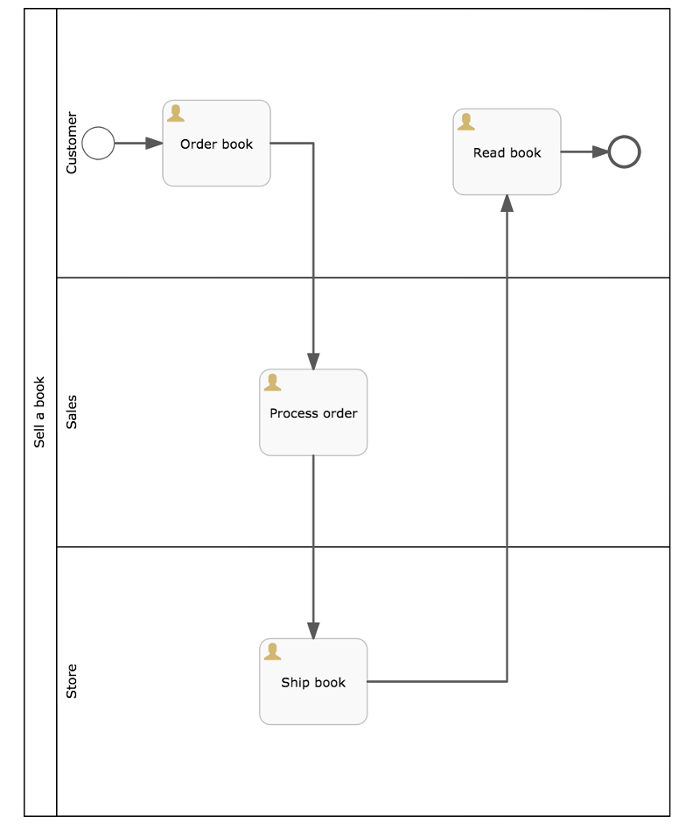
When you drag a pool to your process diagram it creates an unnamed pool containing one unnamed lane. You can add lanes by dragging a lane icon from the palette to the canvas. When you mouse-over the name box of the pool, the whole pool border turns green, indicating the lane will be added to the pool when you release the mouse button.
2.7.10. Artifacts
You use artifacts to provide additional information about the Process. The BPMN editor supports the text annotation artifact which associates additional text to an element in your process, or to the process itself. The text does not influence the execution of a process, it is provided by the process designer to give information to the user of the process.
Text annotation.
You can set the following properties in the property sheet:
| Property | Description |
|---|---|
Id |
A unique identifier for this element instance |
Name |
A name for this element instance |
Documentation |
A description of this element instance |
Text |
The text you want to display in your annotation |
2.8. Form editor
The form editor provides a powerful drag and drop interface to let you design forms from a rich set of controls. You can define form outcomes and create forms with multiple tabs. Individual controls and whole tabs can be made visible depending on the value of other form fields and process variables. You can design your form with groups of controls in varying numbers of columns.
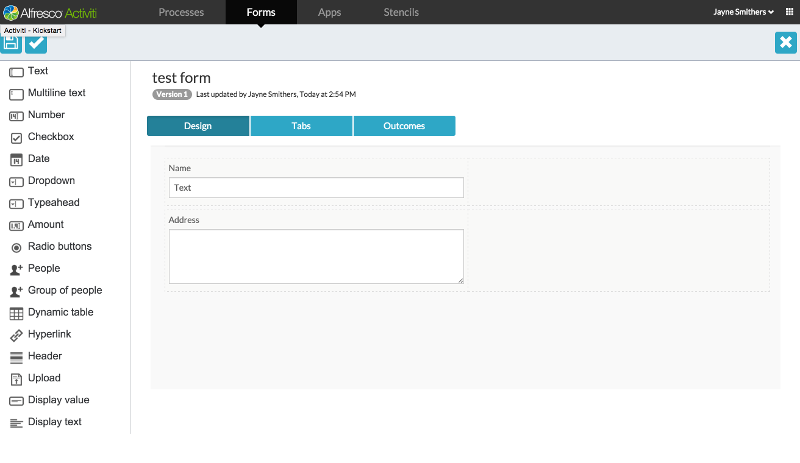
In the example above, the form editor is open on an form containing two controls, a text box, and a multiline text box.
2.9. Business Rules - Decision Tables
There are many situations in a business process where you wish to evaluate some data you have collected and come to some conclusion or decision. Business rules provide a natural way to express the logic of decision making. Typical decision examples are calculating discounts, credit ratings, who to assign tasks to, what service level (SLA) to use, and so on.
There are business rule systems that are hugely complex and intended for a wide range of uses. You can, of course, integrate SkyVault Activiti to these systems if they provide what you need. Often, within a business process, the rules can be very focused and need to be managed by business users. This is where Activiti’s Decision Tables provide a natural solution.
In a Decision Table you only test, set and create variables using a set of business rules. There are no other side effects possible, such as calling out to external systems, because these are not needed: the Activiti process can do all this using the full range of its BPM capabilities before or after a Decision Table task.
You can think of a Decision Table as a spreadsheet that allows you to define a row for each business rule, with columns representing each variable that needs to be tested or set. There are two parts to a rule: the conditions (if they all match, the rule "succeeds") and the conclusions (then set some values). In each cell of the table there can be a value expression that is used to try and match against variable’s values, or to calculate the value to set. When a Decision Table is evaluated, it tries all the rules in turn (so ordering of rules matters), testing and setting values. Depending on how you want the rules to be interpreted, you can set the rules to stop as soon as one rule matches and succeeds in setting its values, or to run through all the rules, setting values for every matching rule. If it runs through all rules, you can think of the last successful rule winning, as it may overwrite values that were set for the same variables in other successful rules.
Activiti’s Decision tables follow the Decision Model Notation (DMN) specification.
In the following, we will create a simple process that makes use of a Decision task and its Decision Table. We will use the BPMN editor, but you can just as well use the Step editor to achieve the same result. First let’s take a look at the process we want to create:
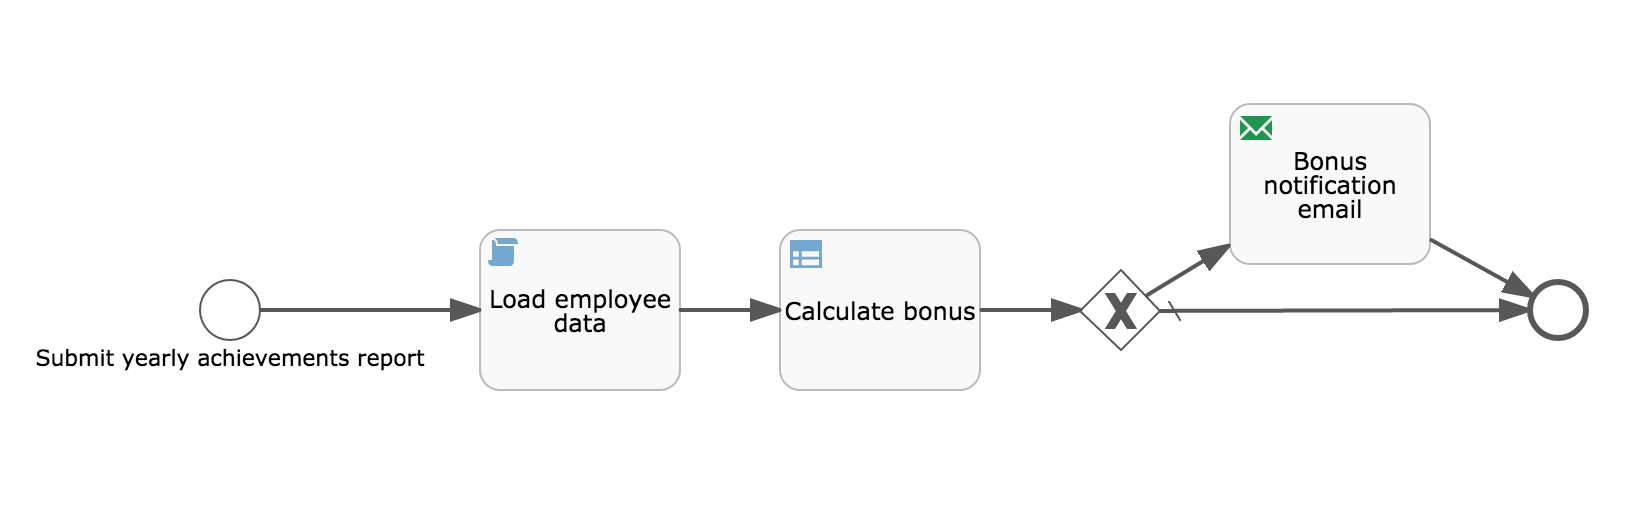
In this "Annual Work Review" process, a user can enter the details of his or hers achievements for the current year, and if the work efforts have gone beyond the employee’s obligations a bonus will be given and an email sent notifying the user about it. The logic to decide if a bonus should be given or not is implemented using a Decision Table in the "Calculate bonus" Decision task above. Before we take a look at the Decision Table itself, let’s quickly take a look at the tasks before the "Calculate bonus" Decision task.
The process' start form is shown below and defines 4 fields: obligationsCompleted (boolean), additionalAchievements (string), completedDate (date) and dueDate (date). See the Form editor section for more information on how to create forms.
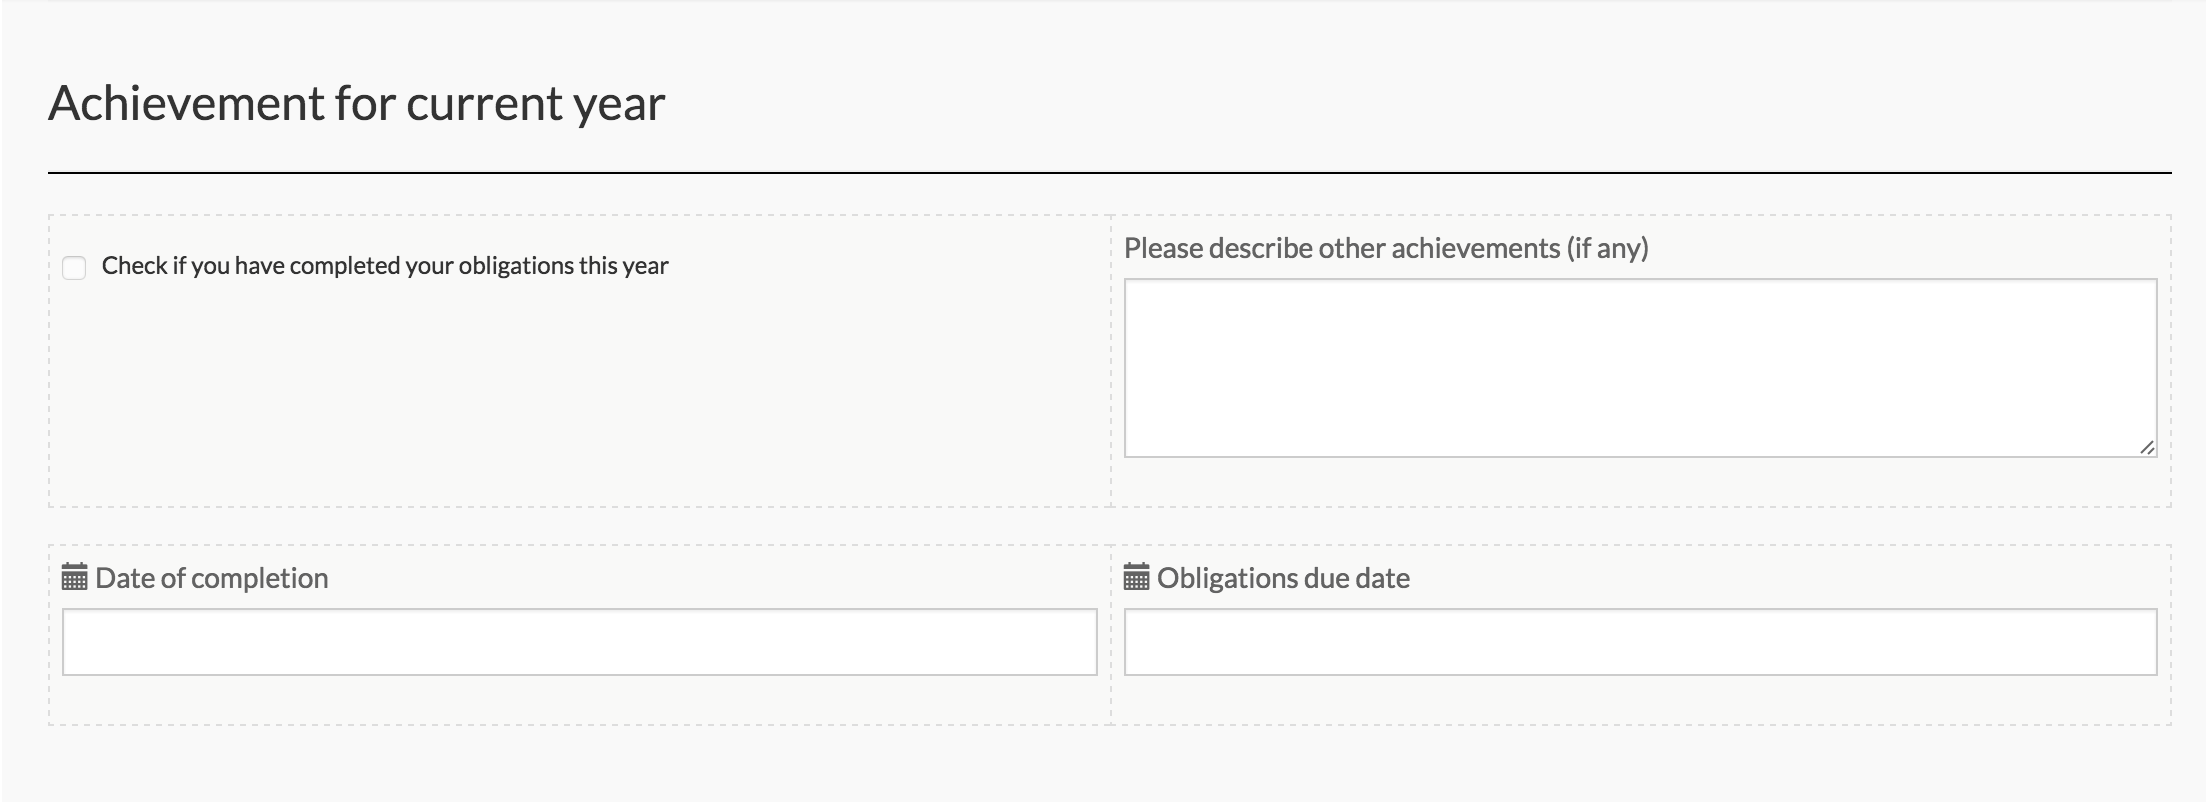
The second task in the process is a "Script task" that we are using to load some demo user data. It has format javascript and declares 2 variables: yearsOfService (integer) and salary (integer) in the "Variables" property dialog. In the "Script" property dialog for the script task the following code has been added to get some employee data.
execution.setVariable("salary", 1000);
execution.setVariable("yearsOfService", 5);
Now we are ready to create our Decision Table that will have all the input values it needs to decide if a bonus should be given or not. The decision task is created by dragging and dropping a "Decision Task" from the "Activities" section in the editor palette. The only mandatory property is the "Referenced decision table" property in which you should choose "New decision table". Enter "Calculate Bonus" as the name and click the "Create decision table" button to be taken to the decision table editor, as shown below.
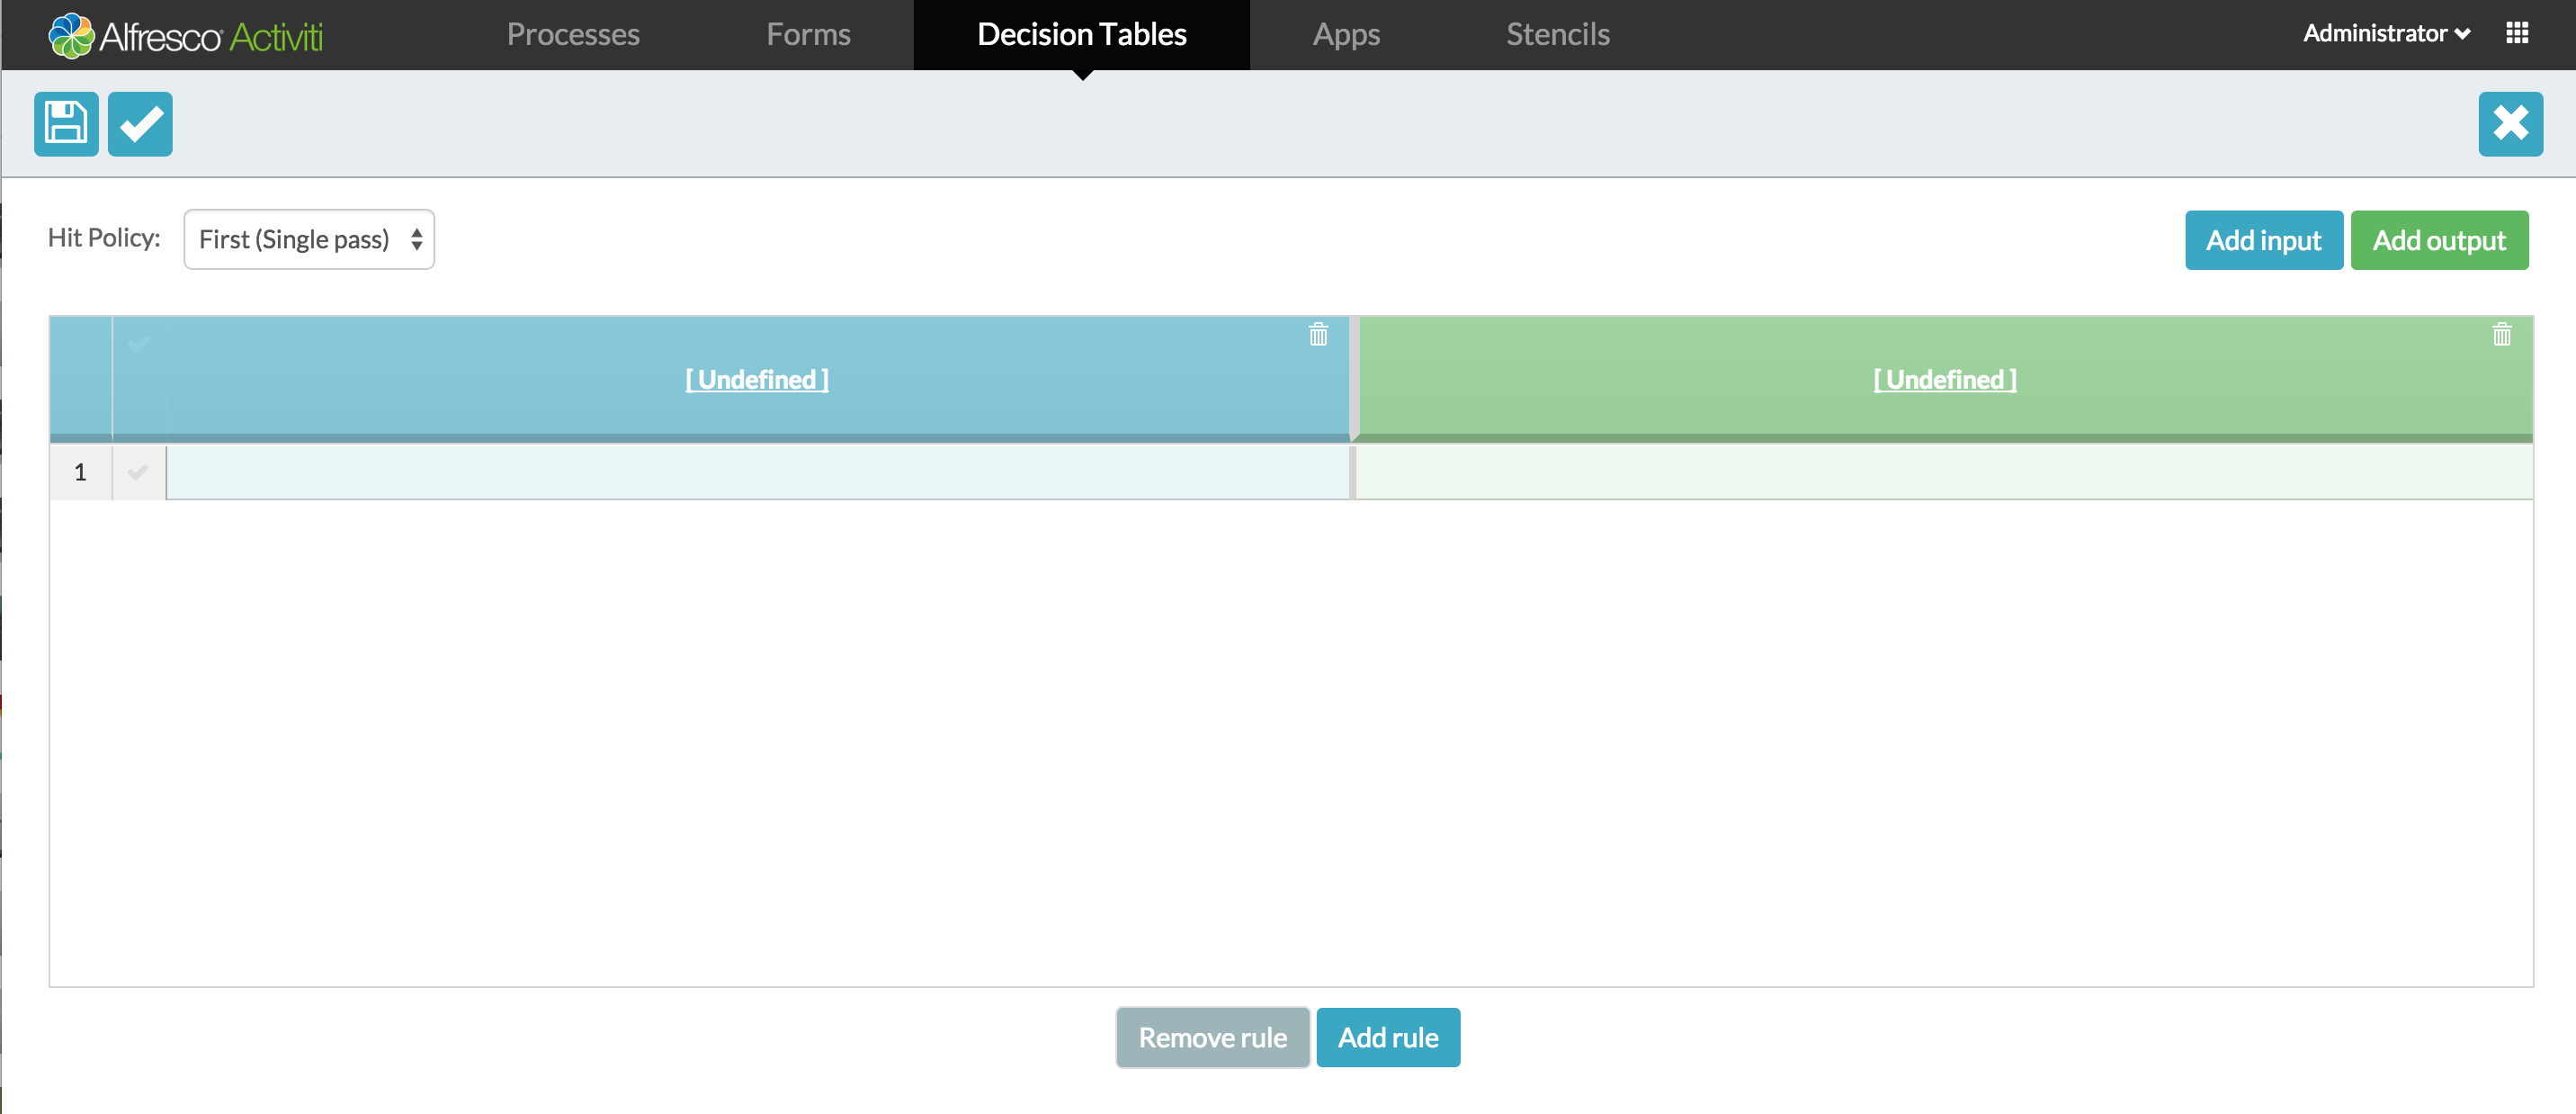
Before starting to look at the details of the editor, let’s start by looking at the rules that we want to create to decide if a bonus should be given or not. The logic (or the rules) we will create can be seen in the Decision Table below:

The logic can be summarized as:
-
IF the user has completed the obligations AND has performed additional achievements AND has worked for the company more than 5 years AND completed the obligations 3 months before the due date
-
THEN the bonus is 5% of the salary
-
-
IF the user has completed the obligations AND has performed additional achievements
-
THEN the bonus is 3% of the salary
-
-
IF the user has completed the obligations AND has worked for the company more than 5 years
-
THEN the bonus is 3% of the salary
-
-
IF the user has completed the obligations AND completed the obligations 3 months before the due date
-
THEN the bonus is 3% of the salary
-
-
IF none of the rules above matched (empty cells are treated as an automatic match)
-
THEN the user gets no bonus
-
The expressions in each cell is an MVEL expression. MVEL is an embeddable scripting language that you can read more about here. Note though that you don’t have to write MVEL syntax yourself but can use the edit icon in each cell to display a structured expression dialog where you can create these expressions through a simple interface. Once you are familiar with the syntax you can just enter them directly in the cells, like editing a spreadsheet.
Note: By default it is NOT possible to type in any MVEL expression, but only a sub-set that is supported by the structured expression editor. If you want to be able to write more complex MVEL expressions, you may do so globally by your system administrator setting the validator.editor.dmn.expression property in activiti-app.properties to false. By disabling the default validation you will be able to run any MVEL expression, but you will not get the same help validating that your syntax is correct. Also, you will get a warning message in the structured editor when trying to open an expression it isn’t able to recognize.
Even of you don’t know MVEL, most expressions are self-explanatory. The complex date expression < fn_subtractDate(dueDate,0,3,0) probably requires a small explanation though. A custom Activiti calculation for dates is used that takes the dueDate as the first parameter and then will calculate a date value by subtracting from it the last 3 parameters for years, months and days. In this case the expression checks if the completedDate is 3 months before the due date.
Now create the Decision Table above for yourself. The first thing you need to do is add 4 input expressions using the "Add input" button in the Decision Table editor. For each of these, select the process variable or form field to use as input for the column. When adding yearsOfService it should look like the following.
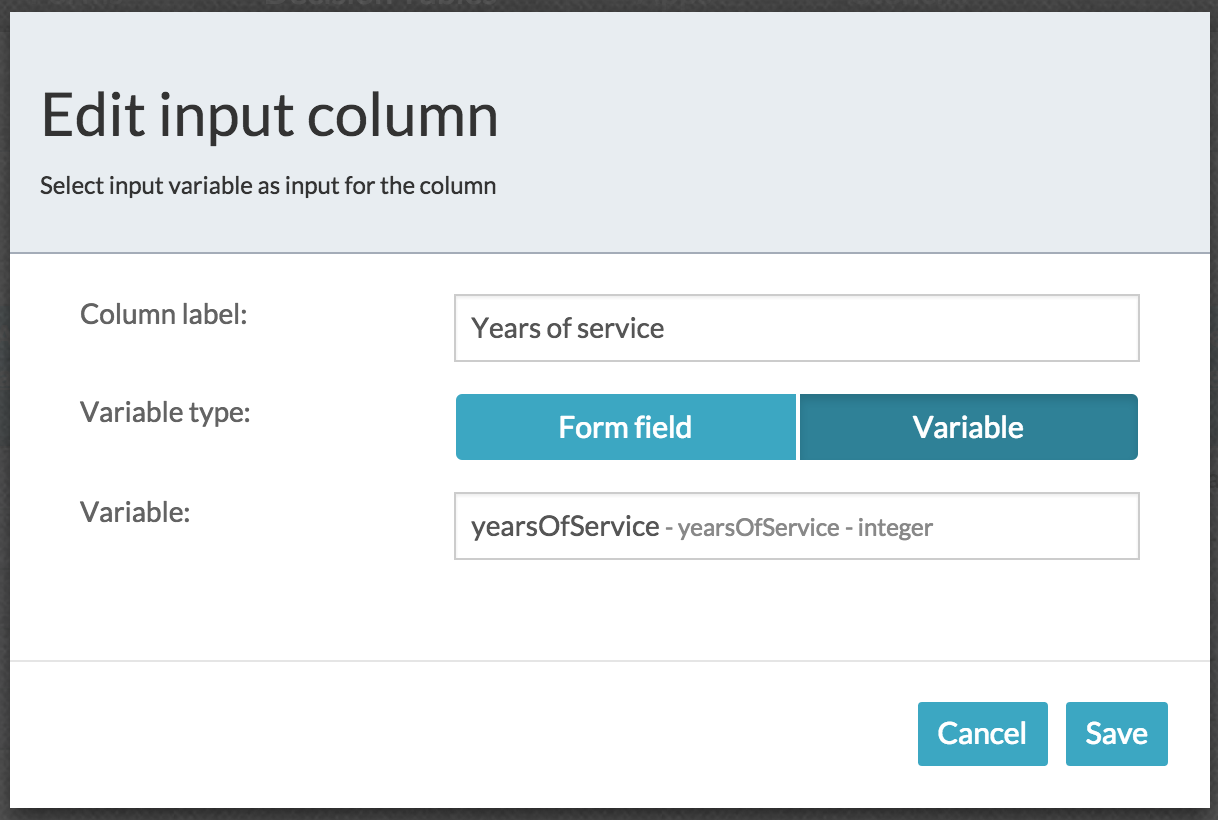
Then you need to add an output column by clicking "Add output", making sure the dialog looks as below to create a new process variable named bonus.
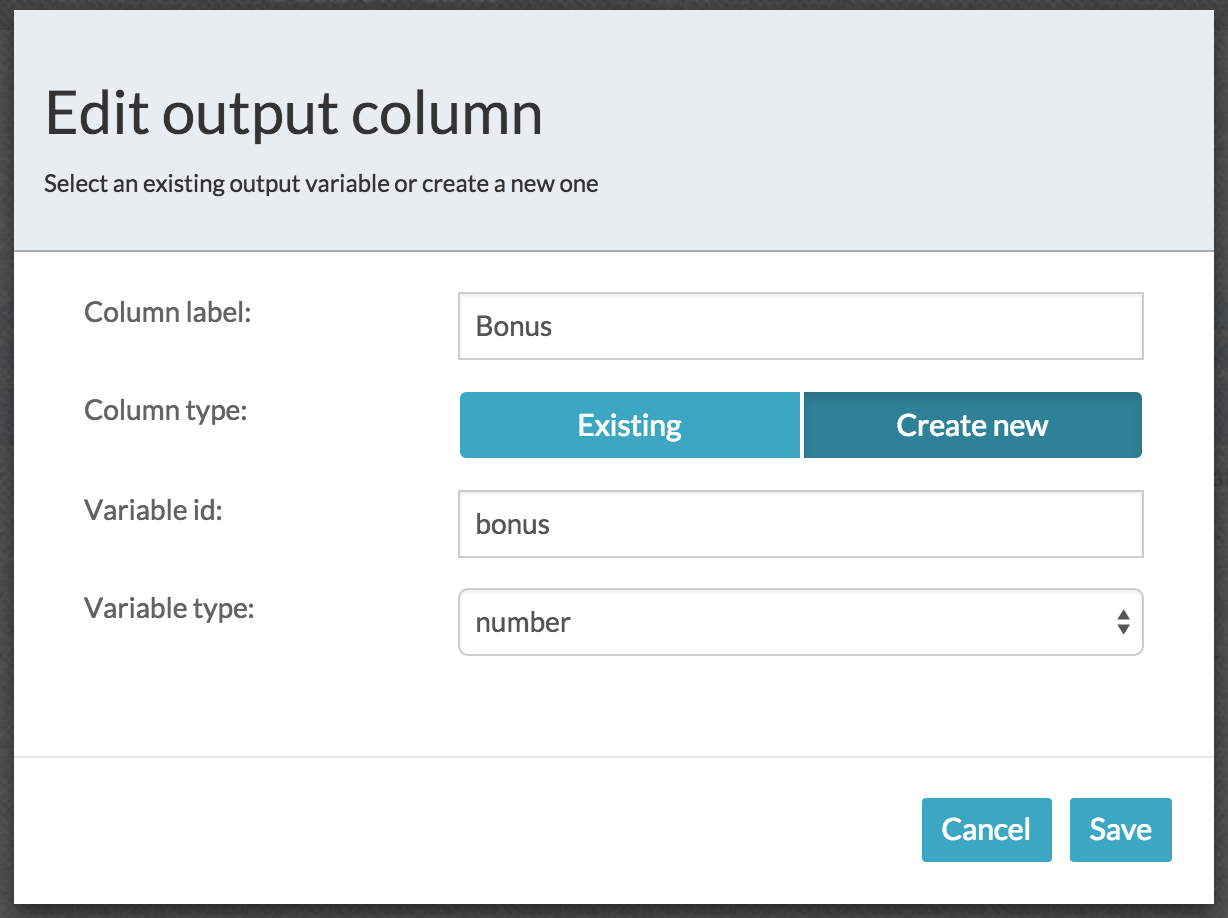
Time to add our rules. Feel free to type them directly into the cell or use the structured editor (which pops up when clicking the edit icon to the right in each cell). Below you can see how the structured editor looks like when adding the date expression from above.
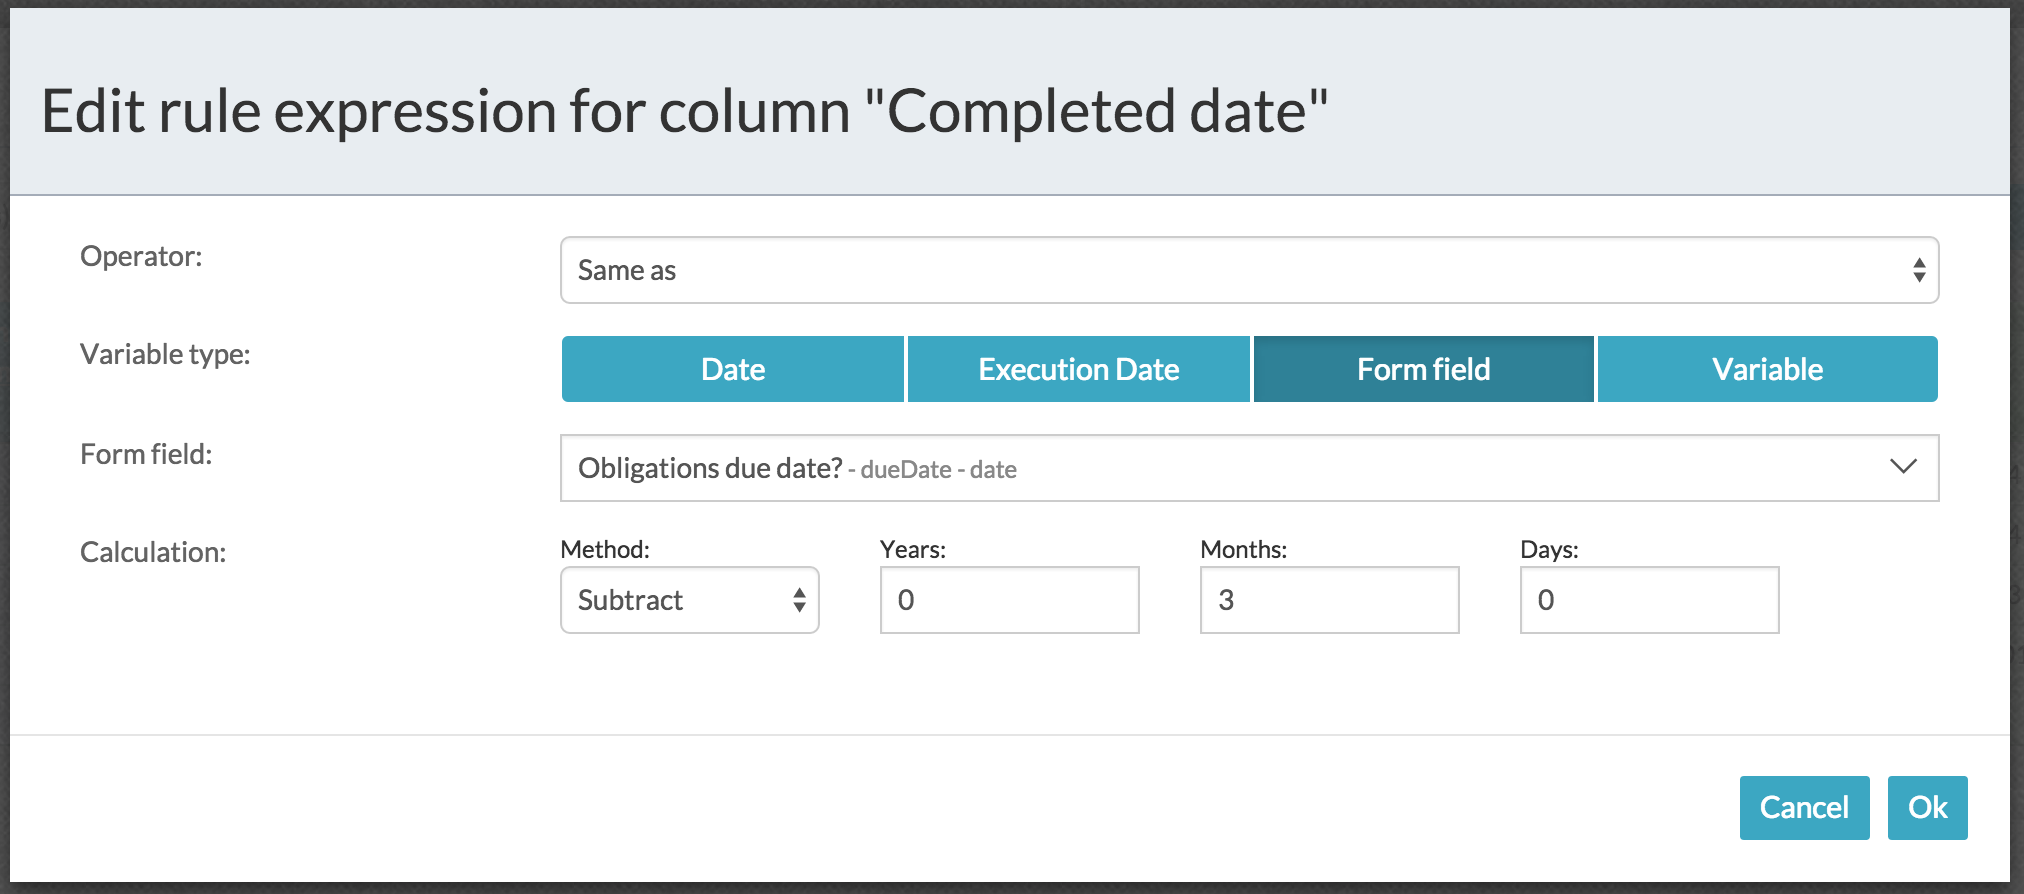
When done, click the validate button to make sure your decision table doesn’t contain any errors. Note that once you’ve clicked validate, the editor will validate your table for every change you make. When you’re happy with your table, click the save ico. You will be prompted to give a "Decision Table key" which can be any value unique to the process.
Back at the BPMN editor add an "Exclusive gateway" and from it add a new "End event" by clicking the circle with the thick border. Select the arrow that connects them and enable the "Default flow" property.
Now drag and drop a "Mail task" and set its "To" property’s "Fixed value" to ${emailBean.getProcessInitiator(execution)} so it sends the email to the initiator of the process. Then enter values for its "Subject" and "Text" (or "Html") properties. Add a sequence flow arrow to connect the gateway to the email task and make sure to set its "Flow condition" property to have an advanced condition as in the image below.
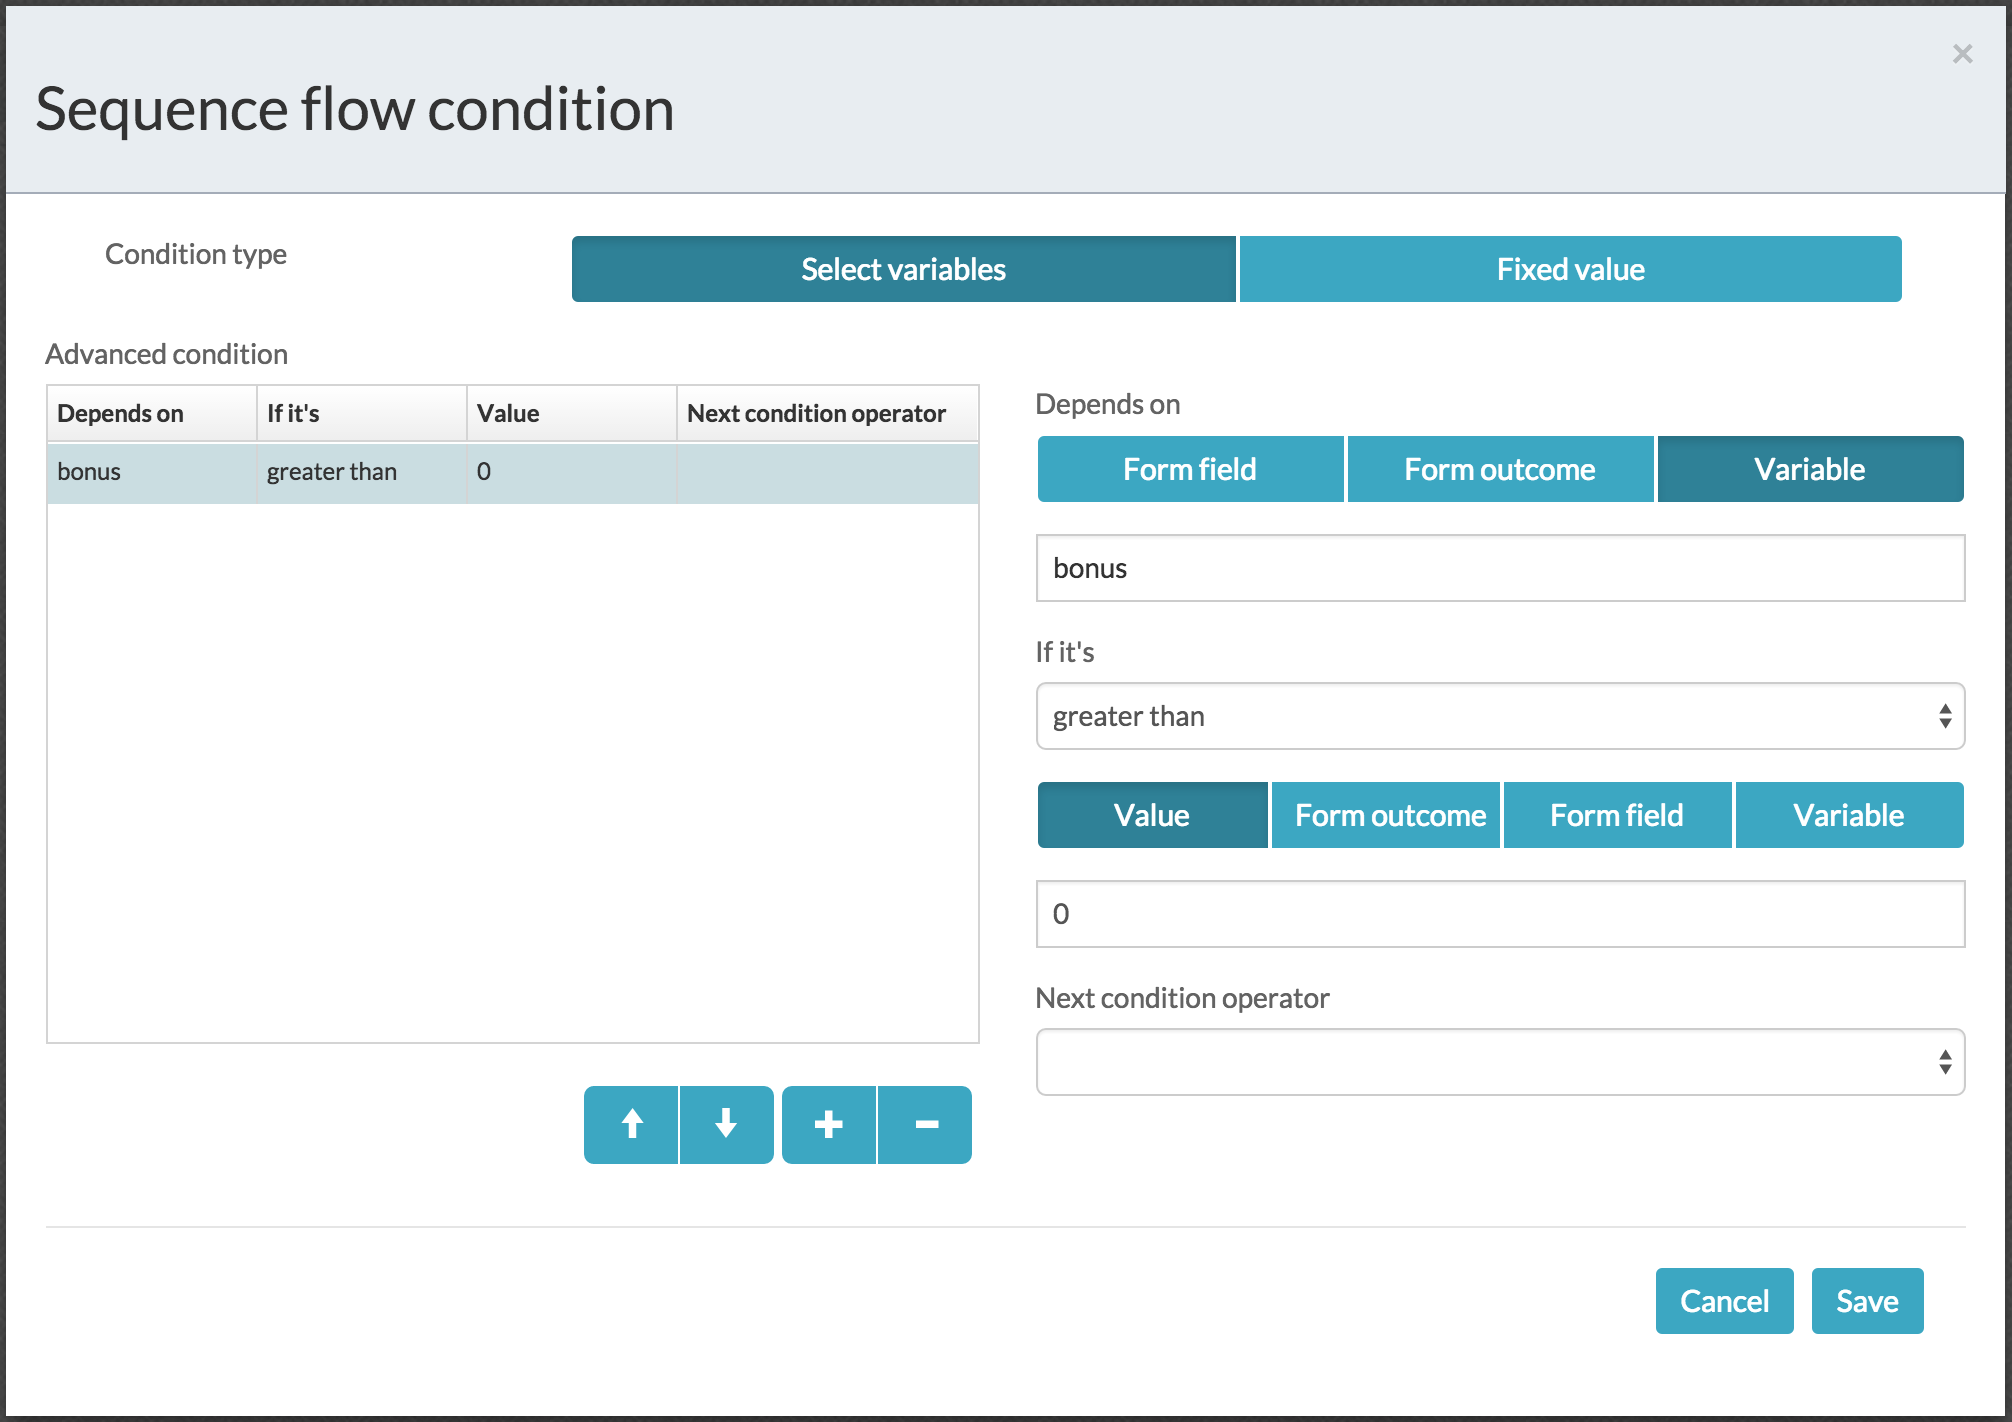
Finally, draw the sequence flow arrow from the mail task to the end event.
We are now ready to use our Decision Table in the Task app. Once you have deployed your process, start an "Annual Work Review" process by entering the following details into its start form and click "Start process".
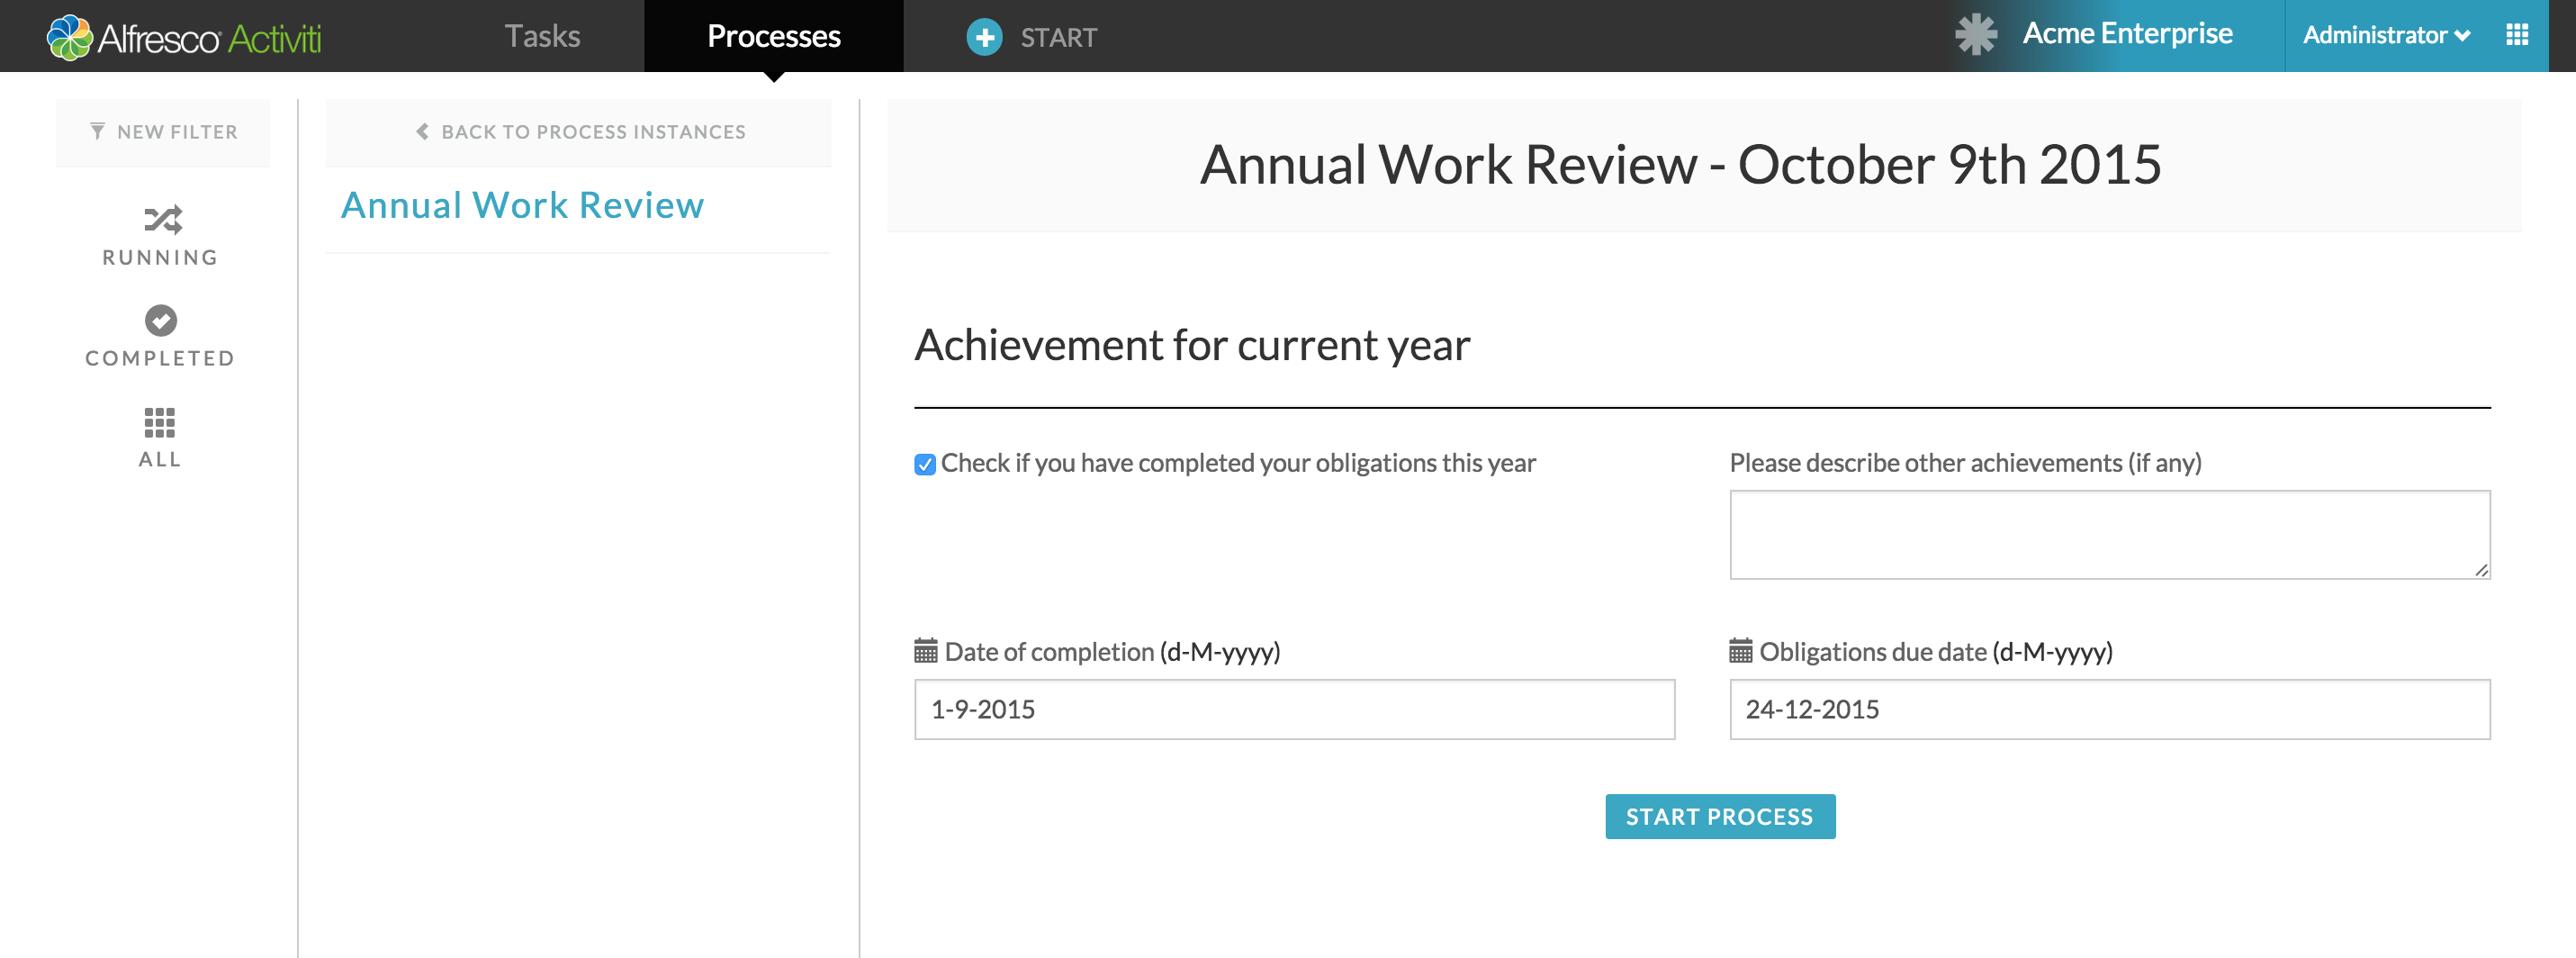
You should now see the process detail view as shown below. As a decision table has been executed in the process it is listed in the "Executed decision tables" section. If something caused the decision table to fail during execution, it is displayed as a red icon and message saying an error occurred. If you click on the "Calculate bonus" decision table in the ui you will be able to see details about the decision table and its evaluation.
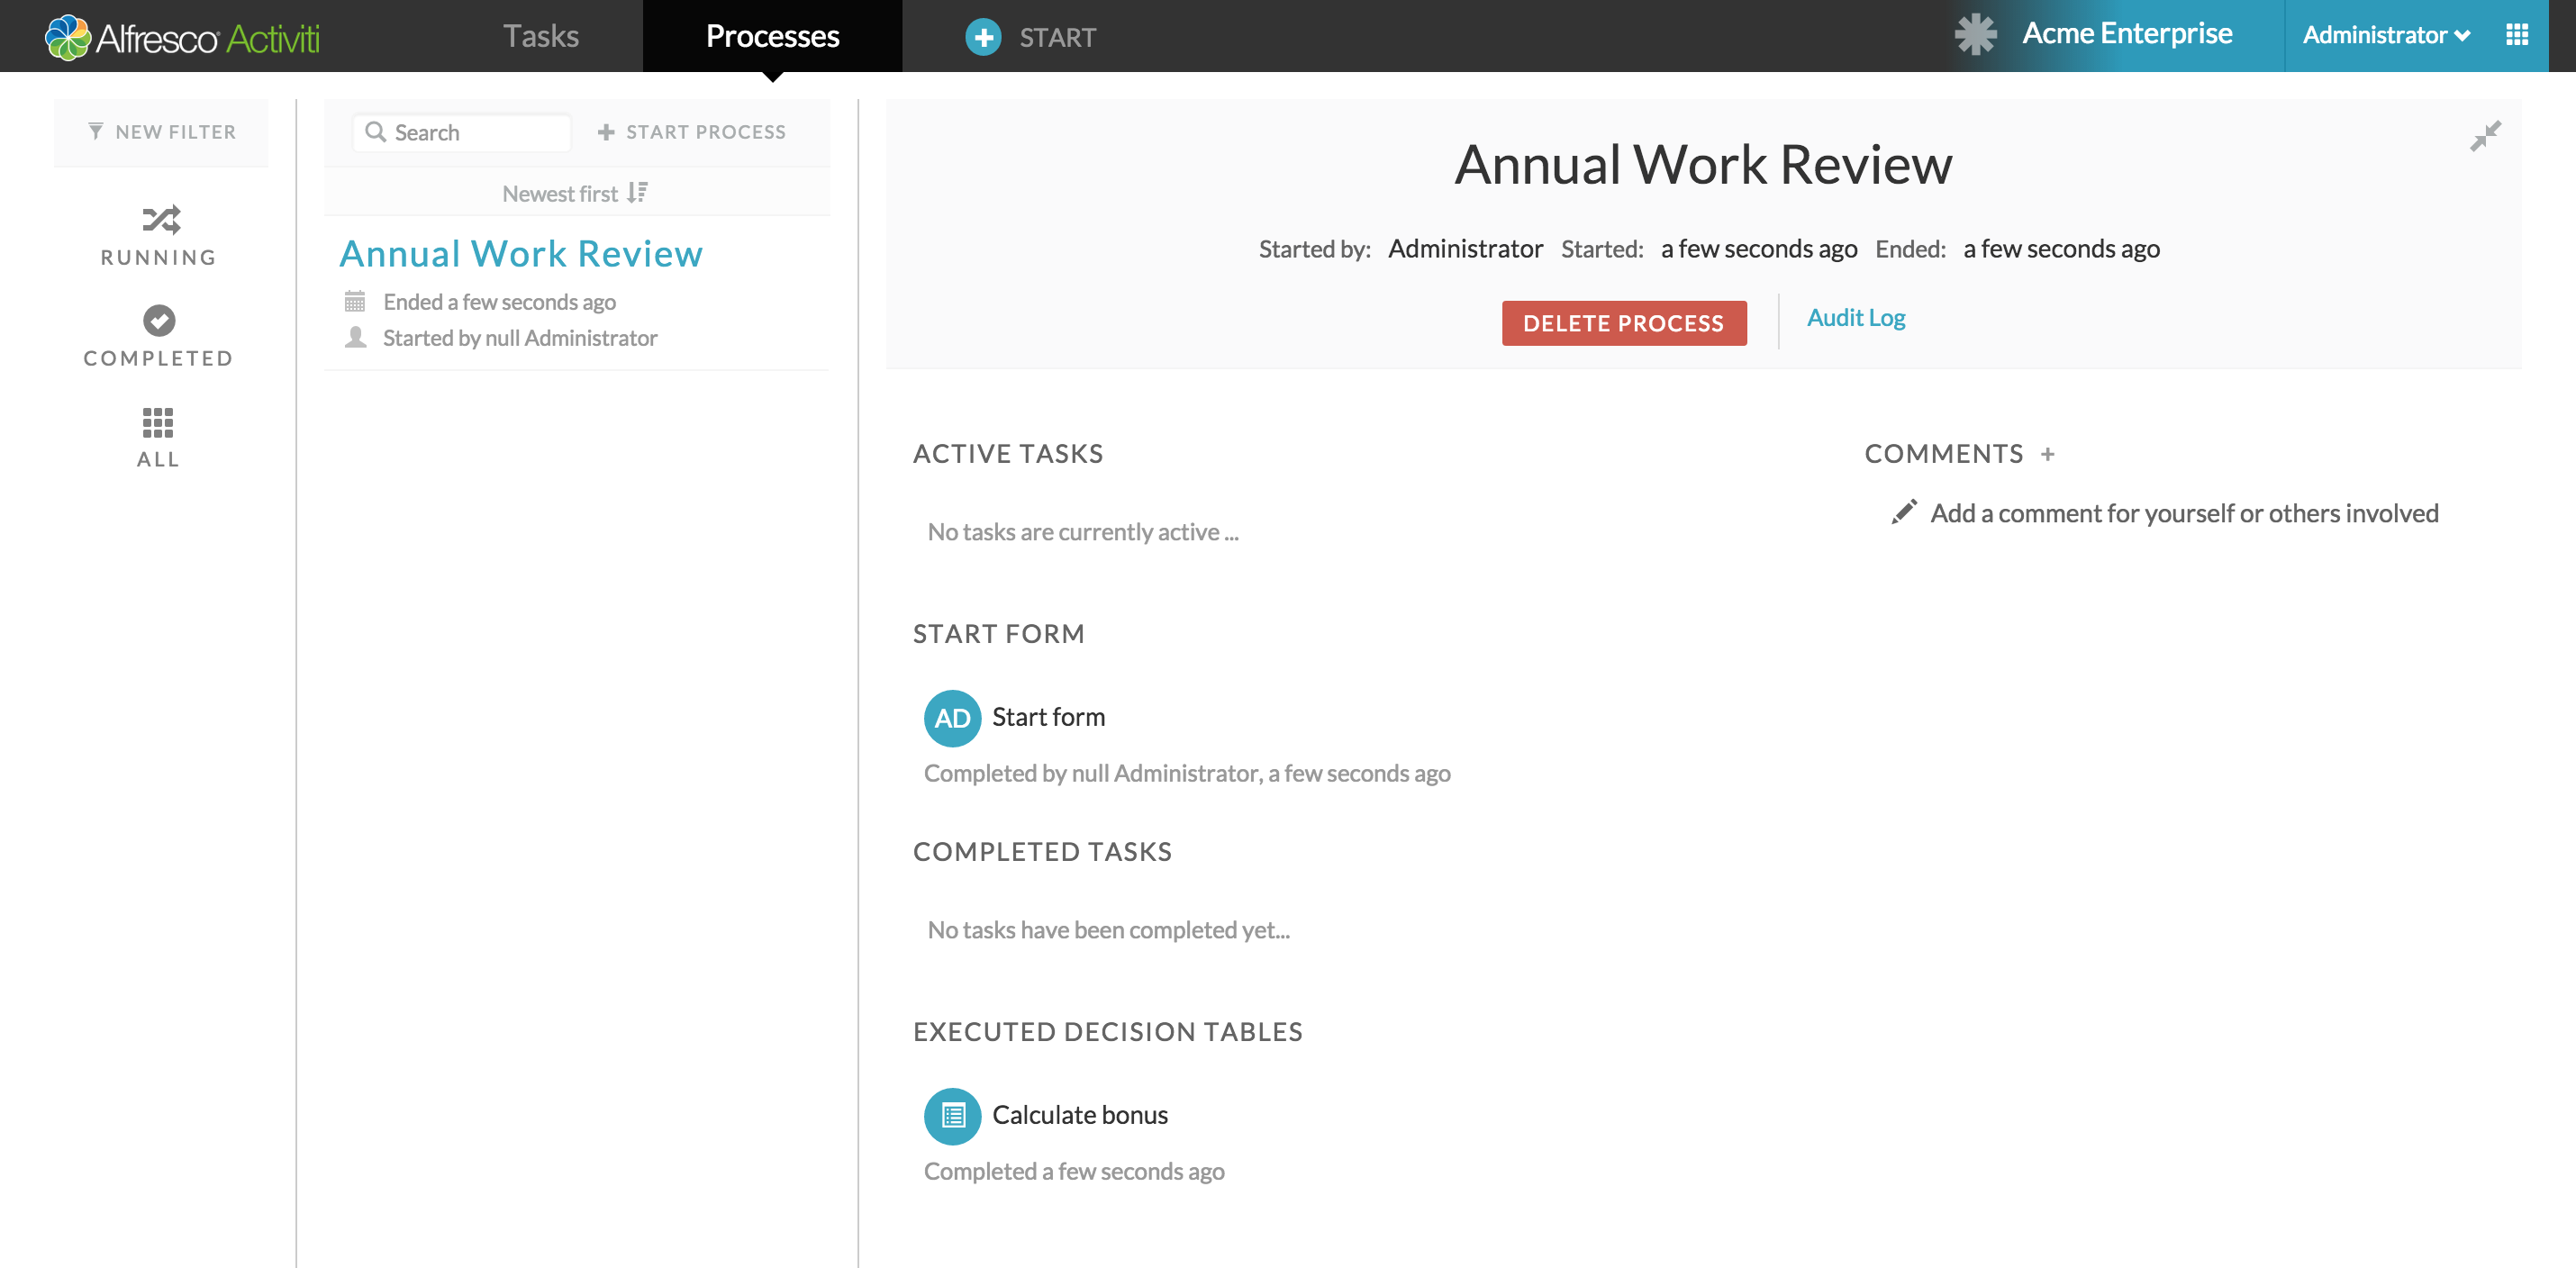
As a decision table can seem a bit like a black box, it’s possible to see what actually happened when it was executed. In the image below you can see the audit trail of the decision table.
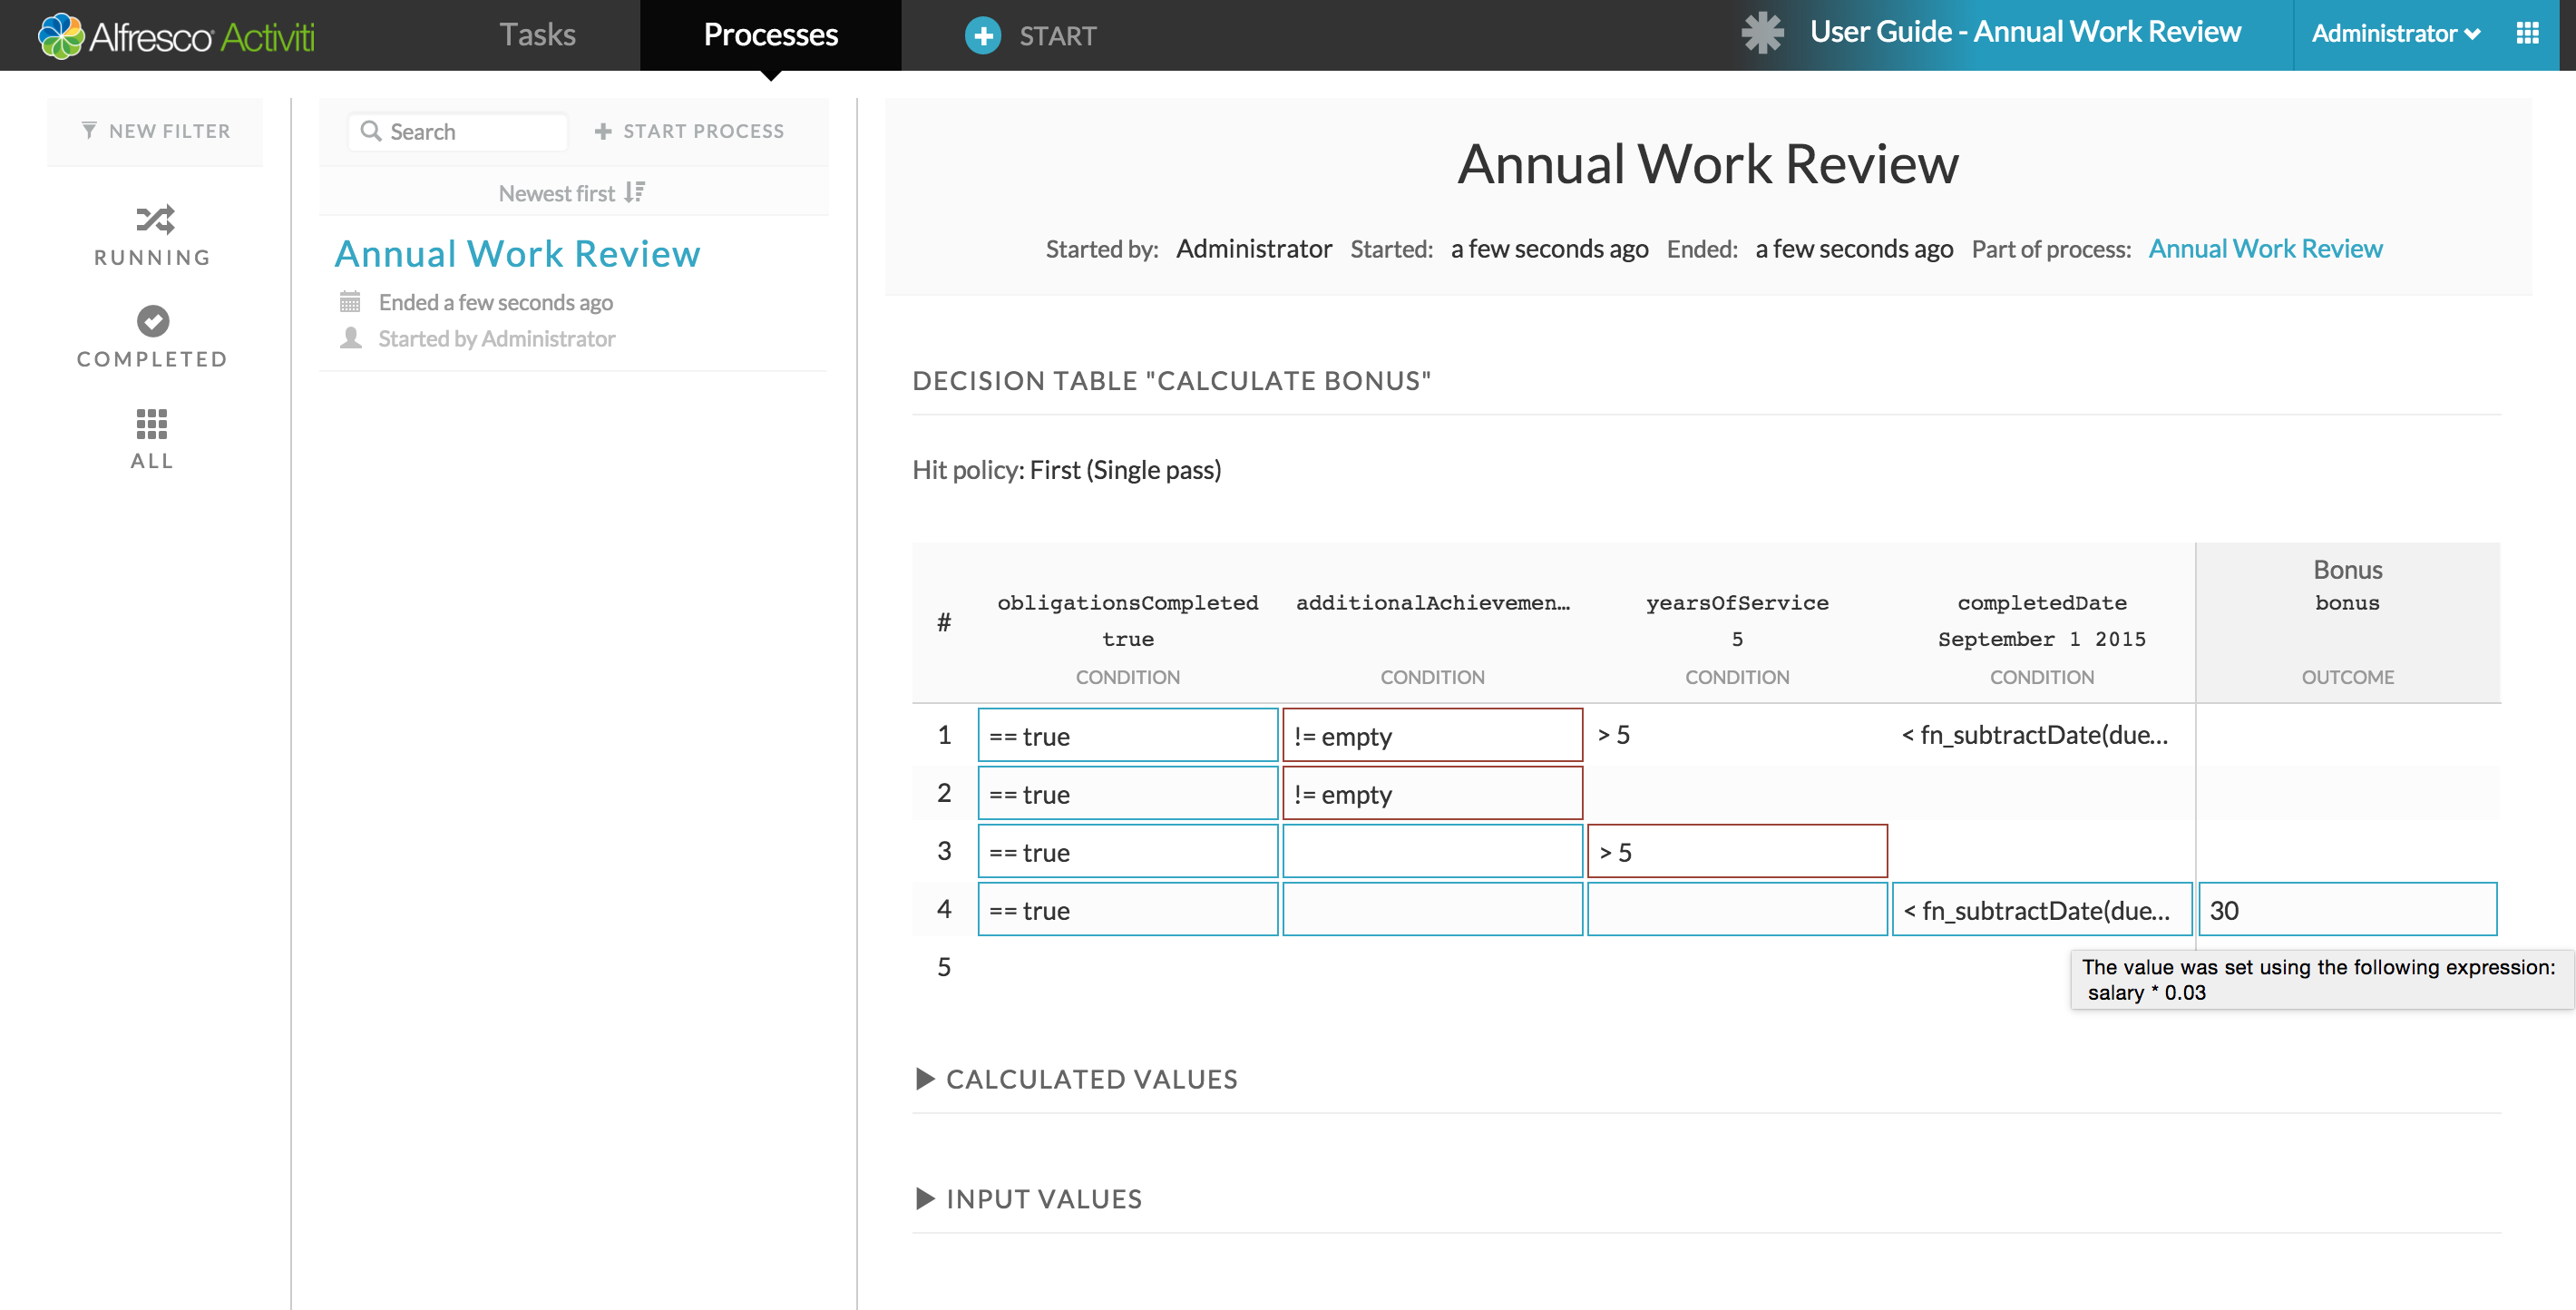
An input cell marked with a blue border indicates that the expression in the cell matched the input value. If a cell border is red it means it did not match. If it has no border it means it wasn’t evaluated at all (for example, a previous cell had failed to match and is shown as red). If an exception occurs during evaluation it is also marked with a red border, but also with a red error icon in the right part of the cell.
An output cell only displays the value that was set by its expression. If it is marked with a blue border that indicates that it was successfully set. If the border is red that means an error occured during execution of the cell expression. It is possible to hover your mouse above a cell to get a tooltip provinding more information. An example of this can be seen in the image above where the output cell sets the bonus to "30": hover over the cell and the expression used to calculate the value is displayed.
To see a list of all the input values that were provided to the decision table before execution, click the "Input values" section and you will see the table below.

To see a list of all the output values that were set by the decision table after execution, click the "Output values" section and you will see the table below.

You may have noticed that we haven’t yet mentioned anything about the decision table’s "Hit policy". The hit policy decides "how" the decision table will be executed when rules succeed (a "hit"). In our decision table we have selected "First (single pass)", which means the decision engine will execute all rules in the given order until it has found a rule where all cell expressions match their input values. Then no further rules will be tested and the outcome expressions specified on the successful rule will be used to set the output values.
Empty cells are considered to be an automatic match, meaning that a rule with only empty cells will always be treated as succeeding (a hit). In our decision table we have such a rule in row #5, but with the input we gave, it will find a match on row #4 and the rule on row #5 will never get tested.
If we change the Hit policy in our table to be "Any (single pass)" the result after executing the decision table will be different. The execution evaluate all rows until the last rule, even if it found a rule that matched on a previous row.
Given the rules in our example, the Any hit policy does not make much sense, since the result would always be that bonus is set to "0" because the last rule always matches, no matter what input is given.
2.10. Creating your first process
You create a SkyVault Activiti process model to represent a series of tasks in your business process. This tutorial guides you through creating a simple process model.
The process you are modeling here is a simplified business project lifecycle. Each project has a name, a type, a due date and some documents associated with it. Each project is started, and then reviewed to determine if it should be accepted on to the project list, or rejected.
-
From your landing page, click the Kickstart app tile.
-
Click the Create Process Button.
The Create a new business process model dialog is displayed.
-
Give your new process model a name.
For example,
First Process. -
In the Editor type drop-down, choose the Step editor
-
Click Create new model.
The Step editor is displayed.
The first step, Process start, is already added to your process. You are going to set the process to start by having the user complete a form.
-
Click on the Process start step.
It expands to allow you to change the step.
If you have some forms in your Forms library, they will be listed here, and you can pick one, but in this tutorial we will create a new form.
-
Click on the Start form box.
-
Click Create form.
The Create a new form> dialog is displayed. The form you create now is part if this process model and is not available in your forms library for use in other process models. If you want to create a form you can reuse in other process models you can do so from the Forms page.
-
Give the new form a name.
In this tutorial use the name
Start form. -
Click Create new form.
The Form Editor is displayed. You design the form by dragging and dropping the types of field from the palette on the left-hand side of the Form Editor. You can hover over each field in the Design area, and either select the pencil icon to edit the field’s properties, or to remove the field from the form. For each type of field you different options. Most fields allow you to give a display label, which is used later in the process design to reference a value entered into a field by a user in a running process. You can also define if the field is required to be filled before the form can be completed. In this tutorial, you just give labels to the fields.
-
Drag and drop the required fields from the palette to the canvas on the right-hand side.
From the screen shot you can see your form has four fields. .. A Text field for the project name. .. A Date field for the project’s start date. .. A group of three Radio buttons to select the project type. .. An Attach control to allow the user to store project documents.
-
Click the Save button at the top-left of the editor to save your form.
You are back in the Step editor.
-
Clicking the + icon below the Process start box to add the first step in your process.
You need to add a Human step that can be used to assign a task to a user.
-
Select the Human step and fill in a name in the step box just created.
For this tutorial, use the name
Review projectThe Human step allows you to select who the task should be assigned to. You can assignthe person who initiated the process, a single named user, a set of candidate users, or depending on the type of your account, a group of users. When a task is assigned to a group or a list of candidate users, all of those users can see the task in their task list, and will need to claim it in order to complete the task. For this tutorial, you will assign all tasks to the process initiator, that’s you, so you can run the process and see the tasks yourself.
-
You need to create a form to allow review comments before we create the next step in the process.
-
On the Form tab for the Review project step, create a new form called
decide. -
Add a Multiline text field and name it
Review comment. -
Select the Outcomes tab and choose the Use custom outcomes for this form option, and add two outcomes:
AcceptandReject. -
Save the form, and return to the step editor.
-
-
Add a Choice step by clicking the + icon below the Review Project step.
This step allows you to take a different action depending on the outcome selected in the associated form.
You can add more choices by clicking on the + icon in the middle of the Choice step. For this tutorial, we only need two based on your accept and reject outcomes..
-
Click on the First choice box. A dialog allows you to select a condition based on existing form fields or outcomes. For this tutorial, set the First choice to a Form outcome. Choose the
decideform from the drop-down list of those already added to the process, and then select it to be Equals, to the value Accept. -
Click on the Second choice box, and repeat the last step, this time choosing the value Reject.
-
You need to add a task to be done if a project review is accepted.
-
Under the First choice click the + icon.
-
Add a Human step with the name
Update project list.
-
-
You need to add a task to be done if a project review is rejected.
-
Under the Second choice click the + icon.
-
Add a Human step with the name
Inform project leader of rejection. -
Since the process should stop after rejection, add a End process step under the
Inform project leader of rejectionstep.
-
-
Add a final step after the accept/reject choice step to display the project details by clicking the + icon at the bottom of the step diagram..
-
Add a Human step with the name
Show Project Details. -
On the Form tab for this step, create a new form. Drag a Display text field to the canvas, and enter a text message to display.
The text can contain references to values in forms in the process. There is a helper drop-down list from which a form field reference. It is inserted at the current cursor position in the text.
-
Save the form.
The step editor is displayed.
-
-
Save your completed process model.
Your process is listed in the Process tab as a thumbnail of the process. You can edit any process from the list by clicking the BPMN Editor button in the top right corner of the thumbnail. You can see additional information about a model by clicking on the thumbnail itself or the Show Details button in the top right corner of the thumbnail. This takes you to the Details page for the process model. Here, you can see a read-only preview of the model and the actions you can perform on it.
Now you have created a process, you need to Creating your first app[create a process app] so you can publish and deploy your process model.
2.11. Creating your first app
You create a SkyVault Activiti process app to group together a number of processes to make them available to yourself or other users. An app is the vehicle for handling a group of published processes and deploying them to a SkyVault Activiti engine. This tutorial leads you through the steps required to create and use an app containing a single process.
This tutorial uses the process model created in the Creating your first process tutorial.
-
From the Kickstart App, click on the Apps tab click the Create App button
The Create a new app definition dialog is displayed.
-
Choose a name for your app and click Create a new app definition.
Use the name
My First Appfor this tutorial. -
Choose an icon and theme for your new app’s tile.
-
Click the Edit included models button and add the published model from the Creating your first process tutorial.
-
Save the app, selecting the checkbox to publish the app in the Save app definition dialog.
Publishing an app makes it available to everyone you’ve shared it with.
-
You can now add the app as a tile on your landing page.
-
On the Landing Page, click on the last tile labelled + to display the >Add a new app dialog.
-
Choose your My Firsp App from the list of published apps and click the Deploy button.
A new app tile is added to your landing page.
-
Your app is now deployed and ready to be used.
2.12. Starting your first process
You start a process from the Processes tab of the Task app page. In this tutorial you are going to start the and monitor the process you designed in a previous tutorial. A process must be added to an app and that app must be deployed in order for the process to be started.
This tutorial uses the process model created in the Creating your first process tutorial, and the corresponding app created and deployed in the Creating your first app tutorial.
-
On the Processes tab of the Task App page click the START PROCESS button
The form you created in the Creating your first process tutorial is displayed.
-
Fill in the details on the form, and add any documents you need, and click the Start process button.
You are back on the Processes page, which shows your started process in your process list.
On the Process page you can view any running process and see the current and completed tasks. You can also add comments that are available for anyone involved in the process.
-
Now that you have started the process, you want to complete the tasks you defined in it. Go to the Tasks tab.
You see the first step in the process. It is the task to review the project, and accept or reject it. Remember that when you created step you specified the task should be assigned to the process initiator. Since you started the process, you are the process initiator so this task is assigned to you.
-
Click on the Show details button.
At this stage you can add people, documents and comments to the task.
-
Click on the Show form button to return to the form.
-
Click the Accept button.
The Review Project task is complete and a new task, Update Project List is displayed. This is the step you defined if the user choice was to accept the project.
-
Click the Complete button to go to the next step.
The task that shows the details of the accepted project is displayed.
-
Click the Complete button to dismiss the details.
You have completed all the tasks in the process and there are no tasks displayed for you in the Tasks tab, and if you click on the Processes tab, you see there are no running processes.
You have started your first process, performed the tasks assigned to you in that process, and so completed the process.
2.13. Creating a single task
As you have seen from other tutorials, processes are made up of individual tasks. You can also create a single task for yourself or others and assign it for completion. This tutorial guides you through the steps for creating and completing a single task.
In this tutorial you will add a single task Brush teeth and complete
the task yourself.
-
On the Tasks tab of the Task app page click the CREATE TASK button
The New task dialog appears.
-
Give your new task a name, and optionally a description, and click Create.
Your new task appears in the task list, and the task details are displayed in the right-hand panel.
Now you have created a task you can alter the details such as the assignee and the Due date, involve others in the task, add a document and add comments to be shared with other collaborators in the task. For this simple task of
Brushing teeth, you are just going to add a due date oftoday. -
Click on Due date.
A date chooser drops down.
-
Click Due today.
The Due date now has a timer displayed showing the number of hours before the end of the day. Many fields displayed in the Activiti app can accept user input when you click on them. The Assignee field the task is another example.
-
When you’ve brushed your teeth, click Complete in the task details area.
The task is removed from the open task list.
-
By default, your task list displays only open tasks. That is why you no longer see the task you just completed. You can see your completed tasks clicking the COMPLETED TASKS filter in the right-most column of the Tasks tab.
You have created and completed your first single task and used some of the filtering capabilities of the Task app.
3. The SkyVault Activiti Share connector
The Share connector lets you to start and run Activiti processes and tasks in a SkyVault Share environment. You can create process definitions in SkyVault Activiti, and deploy them to Share using a special predefined SkyVault Share app. Installing the Share connector changes the standard SkyVault workflow and task management to use the Activiti processes and tasks by default, but the standard Share workflow capabilities are still available.
Once you have installed the Activiti Share connector on a SkyVault system, you have the following new features available:
-
The Activiti Review Process app provided with the Share connector includes four pre-defined process definitions: Ad hoc Task, Group ad hoc task, Review and Approve - Group, and Review and Approve - Single person. These four processes are already deployed to SkyVault Share. When you start a workflow in SkyVault you can choose any of the four pre-defined processes.
-
The Activiti user interface for working with processes and tasks is embedded in the Share user interface.
-
When you select people and documents in a workflow, the native SkyVault Share choosers are used.
-
In SkyVault Share you can add a new My Activiti Tasks dashlet to your home dashboard. This dashlet shows tasks created using the Activiti Share connector. You can filter the tasks shown by: Active Tasks, Completed Tasks, Tasks Due Today, Tasks Assigned to Me, Unassigned (Pooled Tasks), and Overdue Tasks.
-
When you start a workflow on a document in Share or from the My Activiti Tasks dashlet, you are creating Activiti workflows and not the standard internal SkyVault workflows.
-
The original SkyVault My Tasks dashlet is still available, so you can still see the old internal workflows and receive new site invitations.
-
The original SkyVault My Tasks page can be accessed by clicking Internal Tasks on the new Activiti My Tasks page, so you can still work with old, internal tasks
-
. The original My Workflows page can be accessed by clicking Internal Workflow on the new Activiti Processes page, so you can still work with old, internal workflows. The Workflows panel on the Document details page will list both internal and external workflows.
-
The Workflows panel on the Document details page lists both internal and external workflows.
3.1. Using the Share connector demo
Follow these steps to start creating and running processes inside SkyVault Share.
|
Note that LDAP demo server installed with the demo includes four fixed users. The password for each user is password. The four users are set up so you can try out various group and user scenarios.
|
-
Go to the installed SkyVault Share system at http://localhost:8090/share and login with the userid admin and the password password.
The current Activiti Share connector installs a demo LDAP system which provides several fixed userid/password pairs. The admin user id gives you the correct permissions to start tasks and processes on SkyVault Share, and to create and deploy processes and apps on the embedded SkyVault Activiti app.
-
On your personal dashboard, click the cogwheel in the top-right and add the My Activiti Tasks dashlet.
This dashlet is now displayed as well as the original My Tasks dashlet. You use the new dashlet to control Activiti processes and tasks inside SkyVault Share.
-
Go to the Activiti app at http://localhost:8080/activiti-app/, and login with the userid admin and the password password.
In the embedded Activiti app, you can create process definitions and deploy them to SkyVault Share.
3.1.1. Starting a workflow on a file
In your site’s document library, you can start a workflow on one or more files. In this tutorial you start a workflow, using one of the pre-defined Activiti processes, on two files.
The tutorial assumes you have your own site and added some files and folders to it.
-
Find the file or files you want to start the workflow on and click Selected Items > Start Workflow in the menu bar.
The Start Workflow page opens.
-
Select the Ad hoc Task predefined process from the list of processes
The start form for the process is displayed.
Note that the two files selected are already shown in the upload field of the form. When you start a workflow on a file or files, the selected content items are always associated with the first upload field in the process definition.
-
Fill in the start form, assigning the process to yourself, and click Start process
The process is started, and the first task is showed as active.
You have started an Activiti process on selected files in a SkyVault site.
3.1.2. Starting a workflow in SkyVault Share
This tutorial leads you though the steps required to run your first Activiti process as a workflow from the SkyVault Share from the My Activiti Tasks dashlet.
All process definitions that you deploy to Apps in SkyVault Activiti are available to you in SkyVault Share. This tutorial assumes you have deployed the First process workflow using the Creating your first process tutorial. If you havn’t done so already, follow that tutorial now to deploy the workflow.
-
Go to your SkyVault Share dashboard, http://localhost:8090/share.
You run an Activiti process in SkyVault Share as a workflow.
-
In your My Activiti Tasks dashlet click Start workflow.
The Start workflow dialog is displayed.
Note that the alphabetical list of processs definitions includes your First Process.
-
Select your First Process.
The workflow is started and the page now shows the form for the start task in this workflow, just like it does in the Activiti app.
-
Fill in the form
Note that when you click the Select a file button for the Project files the file chooser dialog is for SkyVault Share to allow you to select files from your SkyVault respository.
-
Click Start process to start the workflow.
The My Workflow page now displays the active and completed tasks in your workflow.
-
Click the Review project task.
The My tasks page is displayed.
-
Add a review comment and click Accept to continue with the next step in the workflow, and continue until you have completed all tasks in the workflow.
You have run an Actviti process definition as a workflow in SkyVault Share. Note on the menu bar that you can get to the My tasks and My workflows pages from the Tasks menu, and you can go to the associated SkyVault Activiti for this SkyVault Share site.
4. Disclaimer
While SkyVault has used commercially reasonable efforts to ensure the accuracy of this documentation, SkyVault assumes no responsibility for the accuracy, completeness, or usefulness of any information or for damages resulting from the procedures provided.
Furthermore, this documentation is supplied "as is" without guarantee or warranty, expressed or implied, including without limitation, any warranty of fitness for a specific purpose.