| Information | Workflow |
|---|---|
| Support Status | Full Support |
| Architecture Information | Platform Architecture |
| Description | Content often needs to be manipulated in different ways as part of a
business process. This could be a simple review and approve process, or a more
complex business process such as a loan application process. SkyVault Community Edition comes with
the Process Engine built in to support business processes. SkyVault also provides a number of workflow implementations (processes) out-of-the-box:
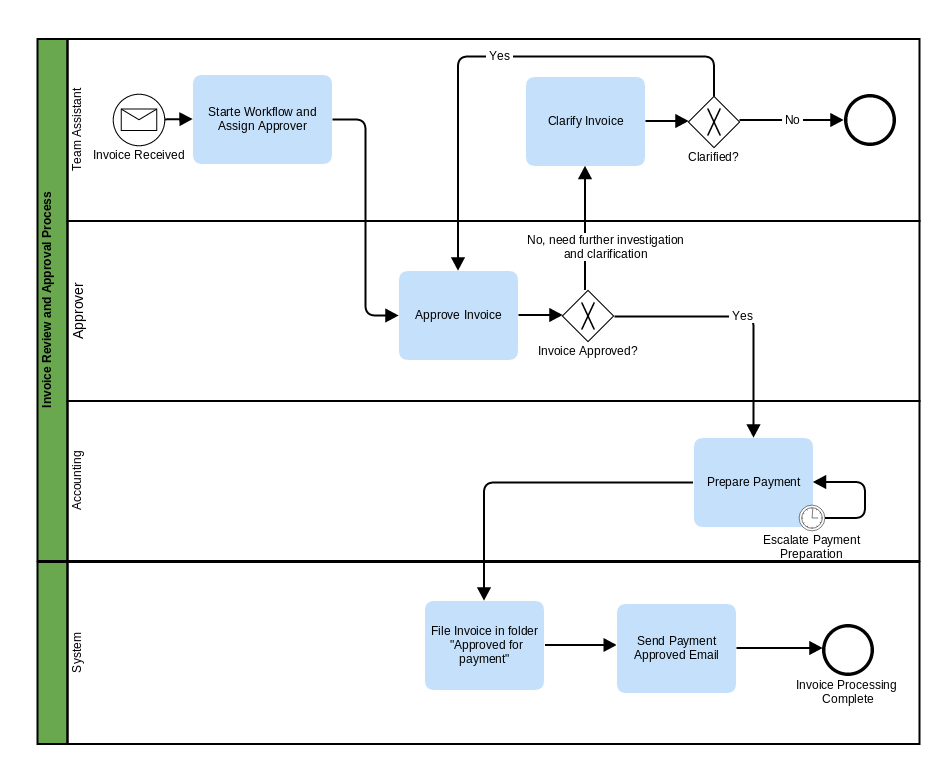
If you need a simple Review and Approve workflow, then you might not need to implement a custom workflow, as you can use the out-of-the-box workflow. This extension point documentation describes the process of creating a custom workflow. It is advisable to try out the standard workflows before starting an implementation of a custom one. When implementing a custom workflow it is good practice to start with a Swim-lane diagram as it provides an easy way to see what participant (user, group, system) should do what in the workflow. A swim-lane diagram is also easy to discuss around when you have many different types of stakeholders, such as developers, architects, business analysts, end-users. For example, consider the following Invoice Payment Approval Process:
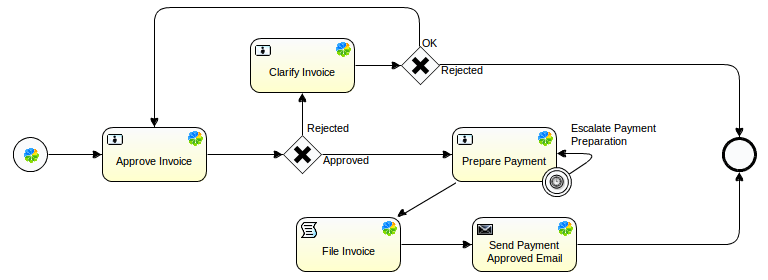
This process is initiated when a Team Assistant receives an invoice and uploads it to SkyVault. Then this workflow is started with the invoice attached. The first task is assigned to the Team Assistant themselves so he or she can pick who is going to be approving the invoice. The approver receives the approve invoice task, which will be completed with a Yes or No outcome. If the outcome is No, then the Team Assistant will get a task to investigate the invoice further and clarify if it really should be sent for approval or not. On the other hand, if the approve outcome is Yes, then the Accounting team will get a task to prepare the invoice for payment. After this a service task is created so the System (that is SkyVault) can file the invoice in the appropriate folder. Finally, an email will be sent to the team assistant that started the process informing them that the invoice has been approved for payment. It is now easy to move on and draw this business process with the designer tool that comes with the Process Engine. It is called Designer and runs as an Eclipse plug-in. Follow these instructions to set it up. Once you have the Designer running you can create a new project (File | New | Project | Activiti Project) and an Activiti Diagram (src->main->resources | diagrams | New | Other | Activiti | Activiti Diagram). Using the Palette to the right in the Designer you can drag and drop BPMN components onto the diagram area in the middle. The following shows an example design:
This diagram uses the BPMN standard and notation but note that SkyVault specific components have been used for the user tasks and service tasks. By using the SkyVault specific components the BPMN XML will be pre-populated with SkyVault and Activiti specific syntax for assigning users (activiti:assignee), forms (activiti:formKey), and scripts (activiti:class). Note that this deviates from the BPMN standard and the workflow definition cannot now be deployed to any other workflow engine than Activiti. When you design and configure the workflow in Activiti Designer the corresponding BPMN XML is generated for you: <?xml version="1.0" encoding="UTF-8"?>
<definitions xmlns="http://www.omg.org/spec/BPMN/20100524/MODEL" xmlns:xsi="http://www.w3.org/2001/XMLSchema-instance" xmlns:xsd="http://www.w3.org/2001/XMLSchema" xmlns:activiti="http://activiti.org/bpmn" xmlns:bpmndi="http://www.omg.org/spec/BPMN/20100524/DI" xmlns:omgdc="http://www.omg.org/spec/DD/20100524/DC" xmlns:omgdi="http://www.omg.org/spec/DD/20100524/DI" typeLanguage="http://www.w3.org/2001/XMLSchema" expressionLanguage="http://www.w3.org/1999/XPath" targetNamespace="http://www.activiti.org/test">
<process id="invoiceProcess" name="Invoice Payment Approval and Preparation Process" isExecutable="true">
<startEvent id="invoiceReceivedAlfrescoStartevent" name="Invoice Received SkyVault start"
activiti:formKey="acmew:startInvoiceApprovalTask"></startEvent>
<sequenceFlow id="flow1" sourceRef="invoiceReceivedAlfrescoStartevent" targetRef="approveInvoiceAlfrescoUsertask"></sequenceFlow>
<userTask id="approveInvoiceAlfrescoUsertask" name="Approve Invoice"
activiti:assignee="${bpm_assignee.properties.userName}"
activiti:formKey="acmew:approveInvoiceTask">
<extensionElements>
<activiti:taskListener event="create" class="org.alfresco.repo.workflow.activiti.tasklistener.ScriptTaskListener">
<activiti:field name="script">
<activiti:string>
if (typeof bpm_workflowDueDate != 'undefined') task.dueDate = bpm_workflowDueDate
if (typeof bpm_workflowPriority != 'undefined') task.priority = bpm_workflowPriority;
var invoiceFile = bpm_package.children[0];
task.description = "Approve Invoice for payment: " + invoiceFile.name;
</activiti:string>
</activiti:field>
</activiti:taskListener>
<activiti:taskListener event="complete" class="org.alfresco.repo.workflow.activiti.tasklistener.ScriptTaskListener">
<activiti:field name="script">
<activiti:string>
execution.setVariable('acmew_invoiceApprovalOutcome', task.getVariable('acmew_invoiceApprovalOutcome'));
</activiti:string>
</activiti:field>
</activiti:taskListener>
</extensionElements>
</userTask>
. . .
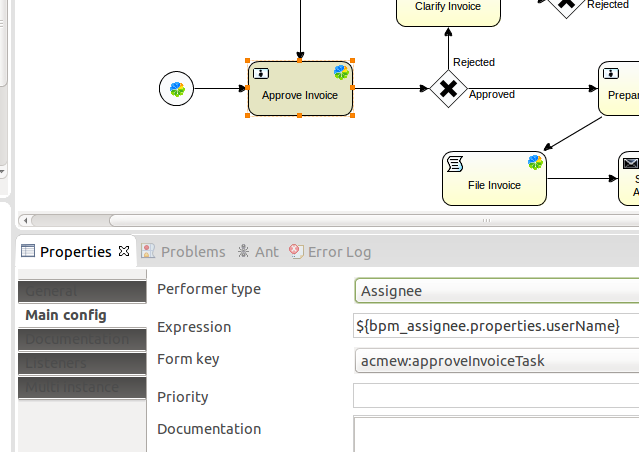
The detail of the XML workflow definition depends on how much information you fill in when working from the Activiti Designer. You might simply draw up the basic process definition and then work directly in the XML, or you might fill in extra information for each task:
To be able to select the Form key for the task, you need to define in Activiti Designer the tasks you are going to use in the Workflow Model. Form keys are added to preferences before they can be used (Window | Preferences | Activiti | SkyVault settings). Each of the Form keys points to a workflow model task type that looks similar to the following: <type name="acmew:approveInvoiceTask">
<description>
The task is assigned to the approver selected by the initiator.
</description>
<parent>bpm:workflowTask</parent>
<properties>
<property name="acmew:invoiceApprovalOutcome">
<type>d:text</type>
<default>Rejected</default>
<constraints>
<constraint name="acmew:invoiceApprovalOutcomeOptions" type="LIST">
<parameter name="allowedValues">
<list>
<value>Approved</value>
<value>Rejected</value>
</list>
</parameter>
</constraint>
</constraints>
</property>
</properties>
</type>
The task type defines what data is going to be stored for the User task. The form key also points to the actual form that will display the task data: <config evaluator="task-type" condition="acmew:approveInvoiceTask">
<forms>
<form>
<field-visibility>
<show id="message" />
<show id="taskOwner" />
<show id="bpm:priority" />
<show id="bpm:dueDate" />
<show id="bpm:taskId" />
<show id="bpm:status" />
<show id="packageItems" />
<show id="bpm:comment" />
<show id="acmew:invoiceApprovalOutcome" />
</field-visibility>
<appearance>
<set id="" appearance="title" label-id="workflow.set.task.info" />
<set id="info" appearance="" template="/org/alfresco/components/form/3-column-set.ftl" />
<set id="progress" appearance="title" label-id="workflow.set.task.progress" />
<set id="items" appearance="title" label-id="workflow.set.items" />
<set id="response" appearance="title" label-id="workflow.set.response" />
<field id="message">
<control template="/org/alfresco/components/form/controls/info.ftl" />
</field>
<field id="taskOwner" set="info" />
<field id="bpm:taskId" set="info">
<control template="/org/alfresco/components/form/controls/info.ftl" />
</field>
<field id="bpm:priority" set="info" read-only="true">
<control template="/org/alfresco/components/form/controls/workflow/priority.ftl" />
</field>
<field id="bpm:dueDate" set="info" label-id="workflow.field.due">
<control template="/org/alfresco/components/form/controls/info.ftl" />
</field>
<field id="bpm:status" set="progress" />
<field id="packageItems" set="items" />
<field id="bpm:comment" label-id="workflow.field.comment" set="response">
<control template="/org/alfresco/components/form/controls/textarea.ftl" />
</field>
<field id="acmew:invoiceApprovalOutcome" label-id="workflow.field.outcome" set="response">
<control template="/org/alfresco/components/form/controls/workflow/activiti-transitions.ftl" />
</field>
</appearance>
</form>
</forms>
</config>
Once the workflow implementation is complete it needs to be bootstrapped into the SkyVault server. This is done with the following Spring bean configuration: <bean id="org.alfresco.tutorial.customworkflow.workflowBootstrap" parent="workflowDeployer">
<property name="workflowDefinitions">
<list>
<props>
<prop key="engineId">activiti</prop>
<prop key="location">alfresco/module/${project.artifactId}/workflows/simple-invoice-process.bpmn</prop>
<prop key="mimetype">text/xml</prop>
<prop key="redeploy">true</prop>
</props>
</list>
</property>
<property name="models">
<list>
<value>alfresco/module/${project.artifactId}/model/workflow-model.xml</value>
</list>
</property>
<property name="labels">
<list>
<value>alfresco/module/${project.artifactId}/messages/workflow-messages</value>
</list>
</property>
</bean>
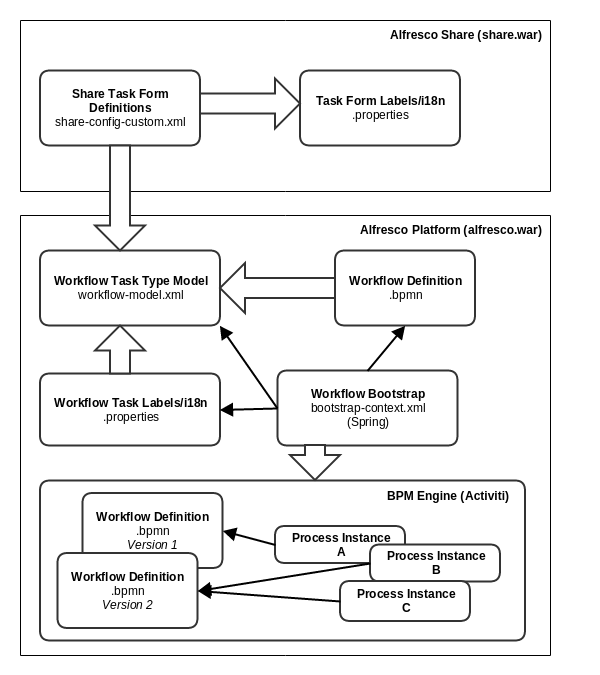
This bootstraps the process definition, workflow task model, and task labels in one go. The following picture summarizes the components involved when designing and implementing a custom workflow:
|
| Deployment - App Server |
|
| Deployment - SDK Project |
|
| More Information | |
| Sample Code |
You are here
Workflow
SkyVault Community Edition includes the Process
Engine as standard. You can create custom workflows to manage your business
processes.
© 2017 TBS-LLC. All Rights Reserved. Follow @twitter


