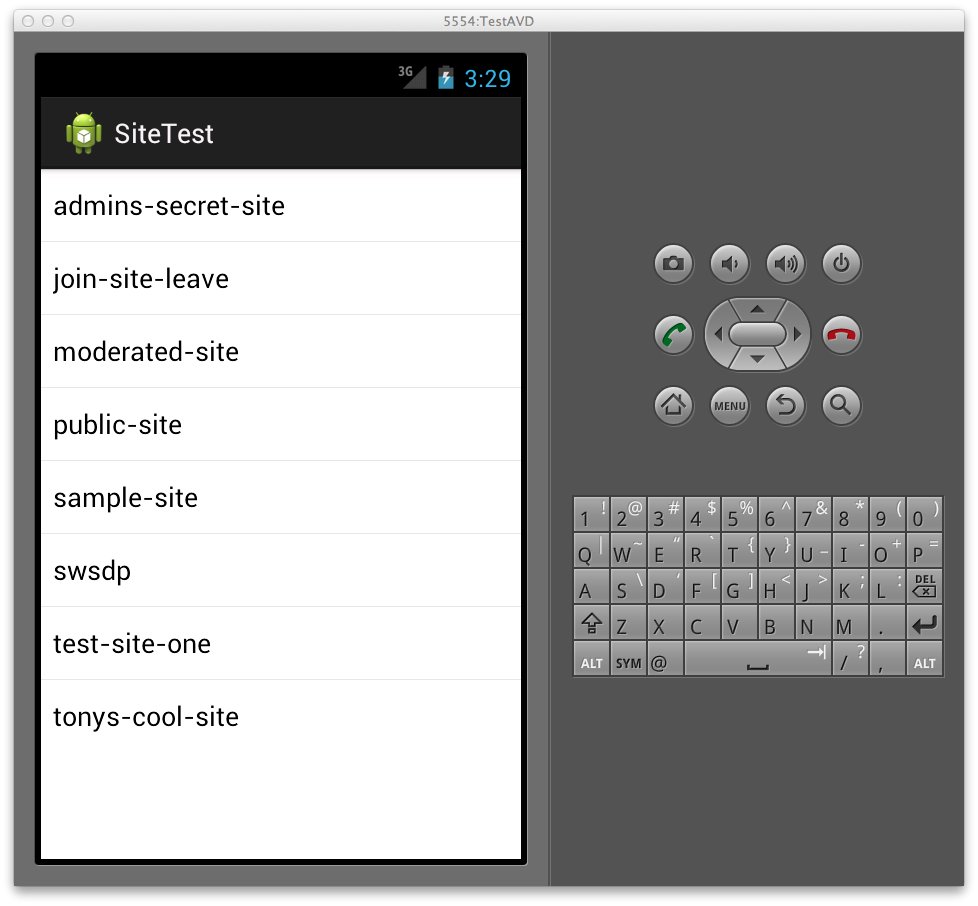
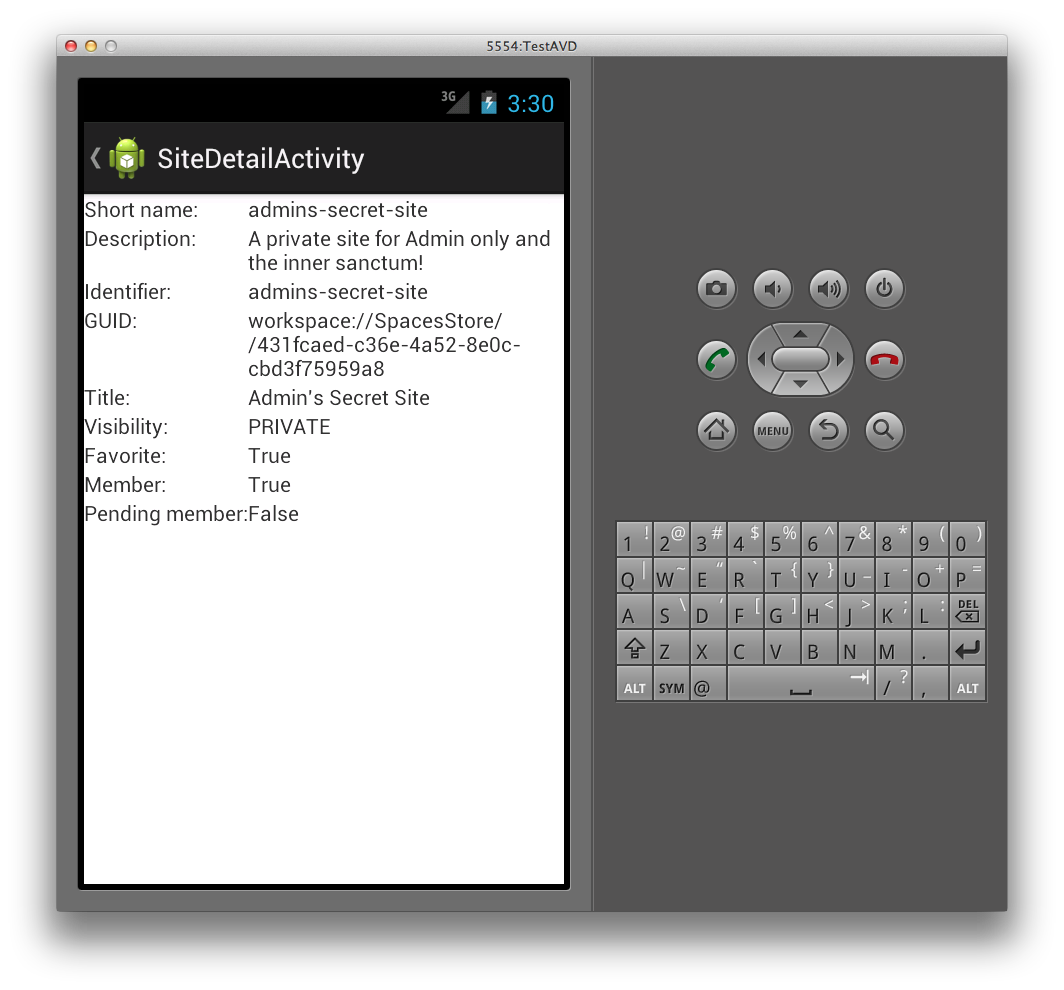
In this task you will learn how to enumerate sites and add these to a list view. You will then select a site and have the site's details displayed in a site detail view. The arrangement is similar to the one you saw in the Extending HelloRepo tutorial - the list view is hooked up to a custom adapter, SiteArrayAdapter, which stores an array list of site objects. As Site is Serializable the MessageObject of the previous tutorial is not required, the selected site object can simply be serialized into the intent, which is then passed to the site detail activity which displays the details of the selected site.
In this task you will create a MainActivity that connects to the repo and retrieves a list of all sites. You then have the custom adapter to store the list of sites, SiteArrayAdapter, which connects to the SiteDetailActivity, which displays the site's information.
- Create a new Android project called SiteTest, in the package com.alfresco.tutorials.sitetest. If you are not sure how to do this refer to previous tutorials.
- Link in the SkyVault SDK. If you are not sure how to do this review previous tutorials.
-
Modify your MainActivity class. This class is similar to the code seen
in previous tutorials - you simply connect to the repo and obtain a list of all sites. In
the onPostExecute method you add the list of sites to your custom adapter
and send a notifcation to indicate the adapter data has changed.
package com.alfresco.tutorials.sitetest;

import java.util.ArrayList;

import org.alfresco.mobile.android.api.exceptions.AlfrescoSessionException;
import org.alfresco.mobile.android.api.model.Site;
import org.alfresco.mobile.android.api.services.SiteService;
import org.alfresco.mobile.android.api.session.RepositorySession;

import android.app.Activity;
import android.content.Intent;
import android.os.AsyncTask;
import android.os.Bundle;
import android.util.Log;
import android.view.View;

import android.widget.AdapterView.OnItemClickListener;
import android.widget.Toast;
import android.widget.LinearLayout;
import android.widget.ListView;
import android.widget.AdapterView;


public class MainActivity extends Activity {

	private SiteArrayAdapter adapter;
	private ArrayList<Site> sites;

    @Override
    public void onCreate(Bundle savedInstanceState) {
        super.onCreate(savedInstanceState);

        setContentView(R.layout.activity_main);

        LinearLayout ll = (LinearLayout) findViewById(R.id.linearLayout);
        ListView lv = new ListView(this);

        sites = new ArrayList<Site>();
        adapter = new SiteArrayAdapter(this, sites);
        lv.setAdapter(adapter);
        ll.addView(lv);
        adapter.setNotifyOnChange(true);

        lv.setOnItemClickListener(new OnItemClickListener() {

  		  @Override
        	  public void onItemClick(AdapterView<?> parent, View view,
        	    int position, long id) {

        		Intent intent = new Intent(getApplicationContext(), SiteDetailActivity.class);

        		Site site = sites.get(position);

    			intent.putExtra("targetSite", site);
        		startActivity(intent);

        	  }
        });


        // Modify to suit your SkyVault server installation
        String url = "http://localhost:8080/alfresco";
        String username = "admin";
        String password = "admin";

        new ConnectToRepo().execute(url, username, password);

    }


    class ConnectToRepo extends AsyncTask<String, Integer, String> {

        private static final String TAG = "ConnectToRepo";

        @Override
        protected String doInBackground(String... params) {

            Log.d(TAG, "doInBackground");
            Log.d(TAG, params[0] + ":" + params[1] + ":" + params[2]);

            String url = params[0];
            String username = params[1];
            String password = params[2];

            try {
                // connect to on-premise repo
               RepositorySession session = RepositorySession.connect(url,
                        username, password);

                    // Get site service
                    SiteService siteService = session.getServiceRegistry()
                            .getSiteService();

                    // Get all sites
                    sites = (ArrayList<Site>) siteService.getAllSites();


            } catch (AlfrescoSessionException e) {
            	Log.e(TAG, "Failed to connect: " + e.toString());
            	System.exit(0);
            }

            Log.d(TAG, "doInBackground Complete");
            return "doInBackground Complete";
        }

        @Override
        protected void onPostExecute(String result) {
            super.onPostExecute(result);
            Log.d(TAG, "onPostExecute");
            Toast.makeText(MainActivity.this, result, Toast.LENGTH_LONG).show();
        	adapter.addSites((ArrayList<Site>) sites);
        	adapter.notifyDataSetChanged();
        }

    }

}
Note: Note that when a site in the list view is clicked that site object is packaged up into an intent and sent to the SiteDetailActivity.Note: At this pont you will have compile errors as you have yet to create the SiteArrayAdapter class. - Edit URL/login details for your SkyVault server as usual.
-
Note: As mentioned you need to have a custom adapter to store a list of Site objects. This adapter is very similar to the adapter you created in the Extending HelloRepo tutorial, but stores Site objects rather than Node objects.Create a new class called SiteArrayAdapter with the following code:
package com.alfresco.tutorials.sitetest;

import java.util.ArrayList;

import org.alfresco.mobile.android.api.model.Site;

import android.content.Context;
import android.view.LayoutInflater;
import android.view.View;
import android.view.ViewGroup;
import android.widget.ArrayAdapter;
import android.widget.TextView;

public class SiteArrayAdapter extends ArrayAdapter<String> {

	private Context context;
	private ArrayList<Site> sites;
	private int count;

	public SiteArrayAdapter (Context context, ArrayList<Site> sites){
		super (context, android.R.layout.simple_list_item_1, android.R.id.text1, getValues(sites));
		this.context = context;
		this.sites = sites;
		this.count = this.sites.size();
	}


	@Override
	public View getView(int position, View convertView, ViewGroup parent) {

	    LayoutInflater inflater = (LayoutInflater) context
	            .getSystemService(Context.LAYOUT_INFLATER_SERVICE);
        View rowView = inflater.inflate(android.R.layout.simple_list_item_1, null);
        TextView textView = (TextView) rowView.findViewById(android.R.id.text1);
        textView.setText(this.sites.get(position).getShortName());

		return rowView;
	}

	@Override
	public int getCount() {
		return this.count;
	}


	// returns list of strings that are site short names
	private static ArrayList<String> getValues(ArrayList<Site> sites){

		ArrayList<String> values = new ArrayList<String>();

		for (Site site : sites){
			values.add(site.getShortName());
		}

		return values;
	}

	public void addSites (ArrayList<Site> sites){
		this.sites.addAll(sites);
		this.count = this.sites.size();
	}
}
Note: You will still have compile errors at this point, but these issues will be fixed in the following steps. -
You also need to create the class to display the site's details. This will correspond
to a new activity. Create a new class, SiteDetailActivity, with the
following code:
package com.alfresco.tutorials.sitetest;

import org.alfresco.mobile.android.api.model.Site;

import android.os.Bundle;
import android.app.Activity;
import android.content.Intent;
import android.view.Menu;
import android.view.MenuItem;
import android.widget.TextView;
import android.support.v4.app.NavUtils;

public class SiteDetailActivity extends Activity {

	@Override
	protected void onCreate(Bundle savedInstanceState) {
		super.onCreate(savedInstanceState);
		setContentView(R.layout.activity_site_detail);
		// Show the Up button in the action bar.
		getActionBar().setDisplayHomeAsUpEnabled(true);

		// Get message from intent
		Intent intent = getIntent();
		Site site = (Site) intent.getSerializableExtra("targetSite");

		// We now need to display site details in a UI

		TextView tv = (TextView) findViewById(R.id.site_short_name_value);
		tv.setText((CharSequence)site.getShortName());

		tv = (TextView) findViewById(R.id.site_description_value);
		tv.setText((CharSequence)site.getDescription());

		tv = (TextView) findViewById(R.id.site_identifier_value);
		tv.setText((CharSequence)site.getIdentifier());

		tv = (TextView) findViewById(R.id.site_GUID_value);
		tv.setText((CharSequence)site.getGUID());

		tv = (TextView) findViewById(R.id.site_title_value);
		tv.setText((CharSequence)site.getTitle());

		tv = (TextView) findViewById(R.id.site_visibility_value);

		tv.setText((CharSequence)site.getVisibility().value());

		// isFavorite
		if(site.isFavorite()){
			tv = (TextView) findViewById(R.id.site_is_favorite_value);
			tv.setText("True");
		}
		else{
			tv = (TextView) findViewById(R.id.site_is_favorite_value);
			tv.setText("False");
		}

		// isMember
		if(site.isMember()){
			tv = (TextView) findViewById(R.id.site_is_member_value);
			tv.setText("True");
		}
		else{
			tv = (TextView) findViewById(R.id.site_is_member_value);
			tv.setText("False");
		}

		// isPendingMember
		if(site.isPendingMember()){
			tv = (TextView) findViewById(R.id.site_is_pending_member_value);
			tv.setText("True");
		}
		else{
			tv = (TextView) findViewById(R.id.site_is_pending_member_value);
			tv.setText("False");
		}

	}

	@Override
	public boolean onCreateOptionsMenu(Menu menu) {
		// Inflate the menu; this adds items to the action bar if it is present.
		getMenuInflater().inflate(R.menu.activity_site_detail, menu);
		return true;
	}

	@Override
	public boolean onOptionsItemSelected(MenuItem item) {
		switch (item.getItemId()) {
		case android.R.id.home:
			// This ID represents the Home or Up button. In the case of this
			// activity, the Up button is shown. Use NavUtils to allow users
			// to navigate up one level in the application structure. For
			// more details, see the Navigation pattern on Android Design:
			//
			// http://developer.android.com/design/patterns/navigation.html#up-vs-back
			//
			NavUtils.navigateUpFromSameTask(this);
			return true;
		}
		return super.onOptionsItemSelected(item);
	}

}
It's now necessary to create the supporting XML files.
-
You will need to modify the AndroidManifest.xml file for
SiteTest. This is so as to include SiteDetailActivity as a child activity
of the MainActivity, and also to set the required permissions for the
application:
<?xml version="1.0" encoding="utf-8"?> <manifest xmlns:android="http://schemas.android.com/apk/res/android" package="com.alfresco.tutorials.sitetest" android:versionCode="1" android:versionName="1.0" > <uses-sdk android:minSdkVersion="14" android:targetSdkVersion="21" /> <uses-permission android:name="android.permission.INTERNET" /> <uses-permission android:name="android.permission.WRITE_EXTERNAL_STORAGE" /> <application android:allowBackup="true" android:icon="@drawable/ic_launcher" android:label="@string/app_name" android:theme="@style/AppTheme" > <activity android:name="com.alfresco.tutorials.sitetest.MainActivity" android:label="@string/app_name" > <intent-filter> <action android:name="android.intent.action.MAIN" /> <category android:name="android.intent.category.LAUNCHER" /> </intent-filter> </activity> <activity android:name="com.alfresco.tutorials.sitetest.SiteDetailActivity" android:label="@string/title_activity_site_detail" android:parentActivityName="com.alfresco.tutorials.sitetest.MainActivity" > <meta-data android:name="android.support.PARENT_ACTIVITY" android:value="com.alfresco.tutorials.sitetest.MainActivity" /> </activity> </application> </manifest> -
Note: There are several other XML files that will now need to be modified or created. These are to be found in the res folder and its sub-directories. The three sub-directories of interest are layout, menu and values.You will first edit the activity_main.xml in layout to specify the root interface:
<LinearLayout xmlns:android="http://schemas.android.com/apk/res/android" android:orientation="vertical"
    xmlns:tools="http://schemas.android.com/tools"

    android:id="@+id/linearLayout"

    android:layout_width="fill_parent"
    android:layout_height="fill_parent"
    tools:context=".MainActivity" >

</LinearLayout>
As you can see we are using a simple LinearLayout view. The list view will be added to this view.
-
Now create the layout XML file, activity_site_detail.xml, for the
site detail activity in the layout folder:
<TableLayout xmlns:android="http://schemas.android.com/apk/res/android"
    xmlns:tools="http://schemas.android.com/tools"
    android:layout_width="fill_parent"
    android:layout_height="fill_parent"
    android:shrinkColumns="1"
    android:id="@+id/tableLayout"
    tools:context=".SiteDetailActivity" >

    <TableRow>

        <TextView android:text="@string/site_short_name" />

        <TextView android:id="@+id/site_short_name_value" />
    </TableRow>

    <TableRow>

        <TextView android:text="@string/site_description" />

        <TextView android:id="@+id/site_description_value" />
    </TableRow>

    <TableRow>

        <TextView
            android:text="@string/site_identifier" />

        <TextView
            android:id="@+id/site_identifier_value" />
    </TableRow>

    <TableRow>

        <TextView android:text="@string/site_GUID" />

        <TextView android:id="@+id/site_GUID_value" />
    </TableRow>

    <TableRow>

        <TextView android:text="@string/site_title" />

        <TextView android:id="@+id/site_title_value" />
    </TableRow>

    <TableRow>

        <TextView android:text="@string/site_visibility" />

        <TextView android:id="@+id/site_visibility_value" />
    </TableRow>

    <TableRow>

        <TextView android:text="@string/site_is_favorite" />

        <TextView android:id="@+id/site_is_favorite_value" />
    </TableRow>

    <TableRow>

        <TextView android:text="@string/site_is_member" />

        <TextView android:id="@+id/site_is_member_value" />
    </TableRow>

    <TableRow>

        <TextView android:text="@string/site_is_pending_member" />

        <TextView android:id="@+id/site_is_pending_member_value" />
    </TableRow>

</TableLayout>
This layout is a table view that will contain the details for the selected site object.
-
As a menu is being used to flip back and forth between activities, you will need to
modify and create appropriate menu resource files. These resources are stored in the
menu folder. Load the main.xml file in the
menu folder. Make sure it is as follows:
<menu xmlns:android="http://schemas.android.com/apk/res/android" > <item android:id="@+id/action_settings" android:orderInCategory="100" android:showAsAction="never" android:title="@string/action_settings"/> </menu> -
Now, also in the same menu folder, create the file
activity_site_detail.xml, with the following contents:
<menu xmlns:android="http://schemas.android.com/apk/res/android" > <item android:id="@+id/menu_settings" android:orderInCategory="100" android:showAsAction="never" android:title="@string/menu_settings"/> </menu> -
Finally, you need to create all the strings required by the program. These are mostly
for the UI labels. These are held in strings.xml in the
values folder. Load strings.xml into the
Eclipse editor and modify as follows:
<?xml version="1.0" encoding="utf-8"?>
<resources>

    <string name="app_name">SiteTest</string>
    <string name="menu_settings">Settings</string>
    <string name="action_settings">Settings</string>
    <string name="title_activity_site_detail">SiteDetailActivity</string>

    <string name="site_short_name">Short name: </string>
    <string name="site_description">Description: </string>
    <string name="site_identifier">Identifier: </string>
    <string name="site_GUID">GUID: </string>
    <string name="site_title">Title: </string>
    <string name="site_visibility">Visibility: </string>
    <string name="site_is_favorite">Favorite: </string>
    <string name="site_is_member">Member: </string>
    <string name="site_is_pending_member">Pending member: </string>

</resources>
The main additions are for the labels required for the SiteDetailActivity view.
-
Your code is now ready to compile and run. You will see a list of sites.

-
Click on a site to display the site details.

