This tutorial shows you how to create and start a new workflow
process.
This tutorial assumes you are familiar with the content of previous tutorials. It also assumes that you are using Eclipse.
In version 1.3 of the SDK, methods were added for managing workflow. For each type
of workflow there is a Process Definition, which provides a template for workflow
process creation. Each workflow process consists of one or more specific tasks to be
carried out. This tutorial focuses on using the Workflow API to create (and start) a
workflow process. Subsequent tutorials deal with other aspects of the Workflow
API.
-
In SkyVault Share, navigate to the Repository and upload a test file.
In the code below the test file is called android.pdf. This is the file that is to be attached to a workflow task - for example to be reviewed or signed off. The file can be named as convenient and can be in any format.
- In Eclipse create a new Android project called WorkflowTest. It should be in the package com.alfresco.tutorials.workflowtest. Use a minimum API level of 14. Make sure you add the correct permissions to the Android Manifest. If you are not sure how to do this see the tutorial How to create an SDK application.
- Now in the Eclipse Package Explorer, locate the WorkflowTest project and expand it to locate MainActivity.java.
-
Replace the code with the following:
package com.alfresco.tutorials.workflowtest;

import java.io.Serializable;
import java.util.ArrayList;
import java.util.Calendar;
import java.util.GregorianCalendar;
import java.util.HashMap;
import java.util.List;
import java.util.Map;

import org.alfresco.mobile.android.api.constants.WorkflowModel;
import org.alfresco.mobile.android.api.exceptions.AlfrescoSessionException;
import org.alfresco.mobile.android.api.model.Document;
import org.alfresco.mobile.android.api.model.Person;
import org.alfresco.mobile.android.api.model.ProcessDefinition;
import org.alfresco.mobile.android.api.services.WorkflowService;
import org.alfresco.mobile.android.api.session.RepositorySession;
import org.alfresco.mobile.android.api.utils.DateUtils;
import org.alfresco.mobile.android.api.model.Process;

import android.app.Activity;
import android.os.AsyncTask;
import android.os.Bundle;
import android.util.Log;
import android.widget.Toast;

public class MainActivity extends Activity {

	@Override
	public void onCreate(Bundle savedInstanceState) {
		super.onCreate(savedInstanceState);
		setContentView(R.layout.activity_main);

		// Modify to suit your SkyVault server installation
		String url = "http://localhost:8080/alfresco";
		String username = "admin";
		String password = "admin";

		new ConnectToRepo().execute(url, username, password);

	}

	class ConnectToRepo extends AsyncTask<String, Integer, String> {

		private static final String TAG = "ConnectToRepo";
		protected static final String DESCRIPTION = "Tutorial Adhoc Process";
		private WorkflowService workflowService;

		@Override
		protected String doInBackground(String... params) {

			Log.d(TAG, "doInBackground");
			Log.d(TAG, params[0] + ":" + params[1] + ":" + params[2]);

			String url = params[0];
			String username = params[1];
			String password = params[2];

			try {
				// connect to on-premise repo
				RepositorySession session = RepositorySession.connect(url,
						username, password);

				if (session != null) {

					// Get WorkflowService
					workflowService = session.getServiceRegistry()
							.getWorkflowService();

					// start an adhoc workflow

					Map<String, Serializable> variables = new HashMap<String, Serializable>();

					// Process Definition
					String processDefinitionIdentifier = "activitiAdhoc:1:4";
					ProcessDefinition adhoc = workflowService
							.getProcessDefinition(processDefinitionIdentifier);

					// Assignee
					Person user = session.getServiceRegistry()
							.getPersonService()
							.getPerson(session.getPersonIdentifier());
					List<Person> users = new ArrayList<Person>();
					users.add(user);

					// Items - Attachments
					String sampleDocumentName = "android.pdf";
					Document doc = (Document) session.getServiceRegistry()
							.getDocumentFolderService()
							.getChildByPath(sampleDocumentName);
					Log.d(TAG, "sample document id: " + doc.getIdentifier());
					List<Document> docs = new ArrayList<Document>();
					docs.add(doc);

					// Due date
					GregorianCalendar calendar = new GregorianCalendar();
					calendar.set(Calendar.YEAR, 2013);
					variables.put(WorkflowModel.PROP_WORKFLOW_DUE_DATE,
							DateUtils.format(calendar));

					// Priority
					variables.put(WorkflowModel.PROP_WORKFLOW_PRIORITY,
							WorkflowModel.PRIORITY_HIGH);

					// Description
					variables.put(WorkflowModel.PROP_WORKFLOW_DESCRIPTION,
							DESCRIPTION);

					// Notification
					variables.put(WorkflowModel.PROP_SEND_EMAIL_NOTIFICATIONS,
							"true");

					// START THE PROCESS
					Process adhocProcess = workflowService.startProcess(adhoc,
							users, variables, docs);

				} else {

					Log.d(TAG, "No Session available!");

				}

			} catch (AlfrescoSessionException e) {
				Log.e(TAG, "Failed to connect: " + e.toString());
			}

			Log.d(TAG, "doInBackground Complete");
			return "doInBackground Complete";
		}

		@Override
		protected void onPostExecute(String result) {
			super.onPostExecute(result);
			Log.d(TAG, "onPostExecute");
			Toast.makeText(MainActivity.this, result, Toast.LENGTH_LONG).show();
		}

		@Override
		protected void onProgressUpdate(Integer... values) {
			super.onProgressUpdate(values);
			Log.d(TAG, "onProgressUpdate");

		}

	}

}
This code provides a starting point to which you will add code to in later tutorials.
- Find the code comment // Modify to suit your SkyVault server installation and modify the settings to suit your SkyVault installation.
-
Rebuild and run your project.
The code will create a new workflow.
- In the Share main menu bar, click on to see the newly created workflow.
-
Click on Tutorial Adhoc Process (the process just
created).
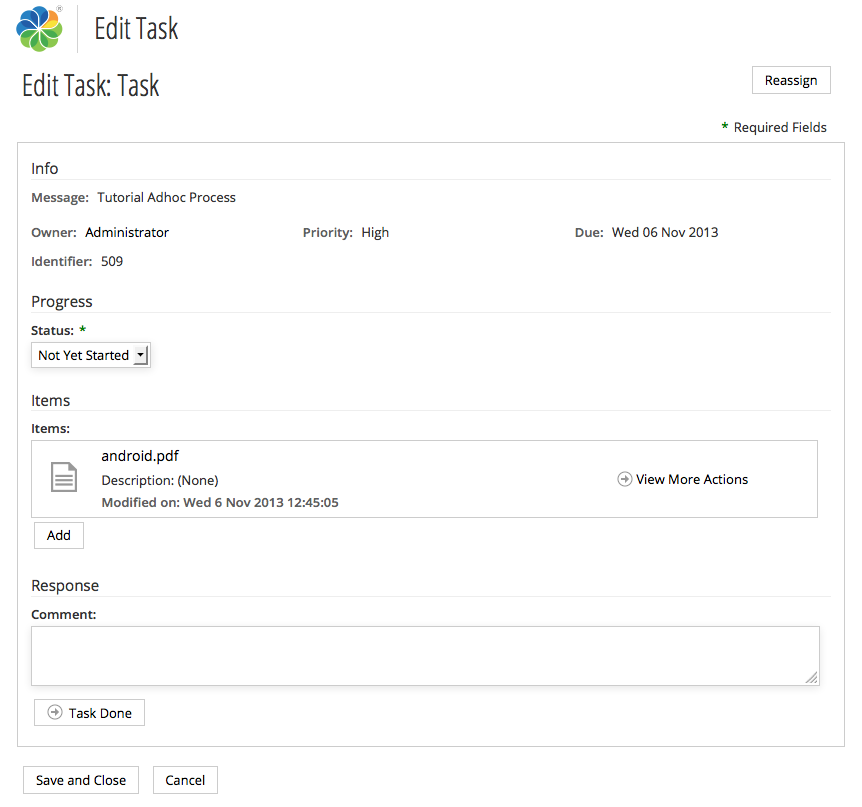
You will see something similar to the following:

- Check the values displayed for the task, for example for priority, match those set in the code.
In this tutorial you have seen how to use the new Workflow API added in version 1.3
of the SDK to create a new workflow. Subsequent tutorials will investigate further parts
of the Workflow API.
