You will perform a step-by-step walk-through of creating and using models, custom types, aspects, and their properties in Share.
In this tutorial we assume that SkyVault Content Services is implemented in a fictitious company called DemoCo as their ECM solution for managing content on their new website. DemoCo wants to add new types of content (for example, white papers) to their website and track metadata for all their files in the repository.
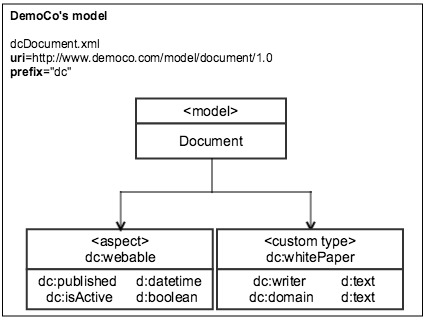
For this purpose, DemoCo needs to create a new model, Document with a custom type called whitePaper. If a document is a white paper, then DemoCo would want to capture its writer's name and domain area. Also, for each document, DemoCo wants to determine if the content needs to be shown on their website. If yes, there should be a flag to indicates that the content is active and the date when the content was set to active.
So, let's start by creating a new model called Document. It has a custom type - whitePaper with properties writer and domain. The model has an aspect - Webable with properties published and isActive.
- Step 1: Navigate to Model Manager
- Step 2: Create a new model, Document
- Step 3: Create a new type, whitePaper
- Step 4: Create new type properties, writer and domain
- Step 5: Add new type properties to the Layout Designer
- Step 6: Create new aspect, webable
- Step 7: Create new aspect properties, published and isActive
- Step 8: Add new aspect properties to the Layout Designer
- Step 9: Activate the model, Document
- Step 10: Apply type (whitePaper) and aspect (webable) to a file in Share
- Click Admin Tools.
- Under Tools, click Model
Manager.
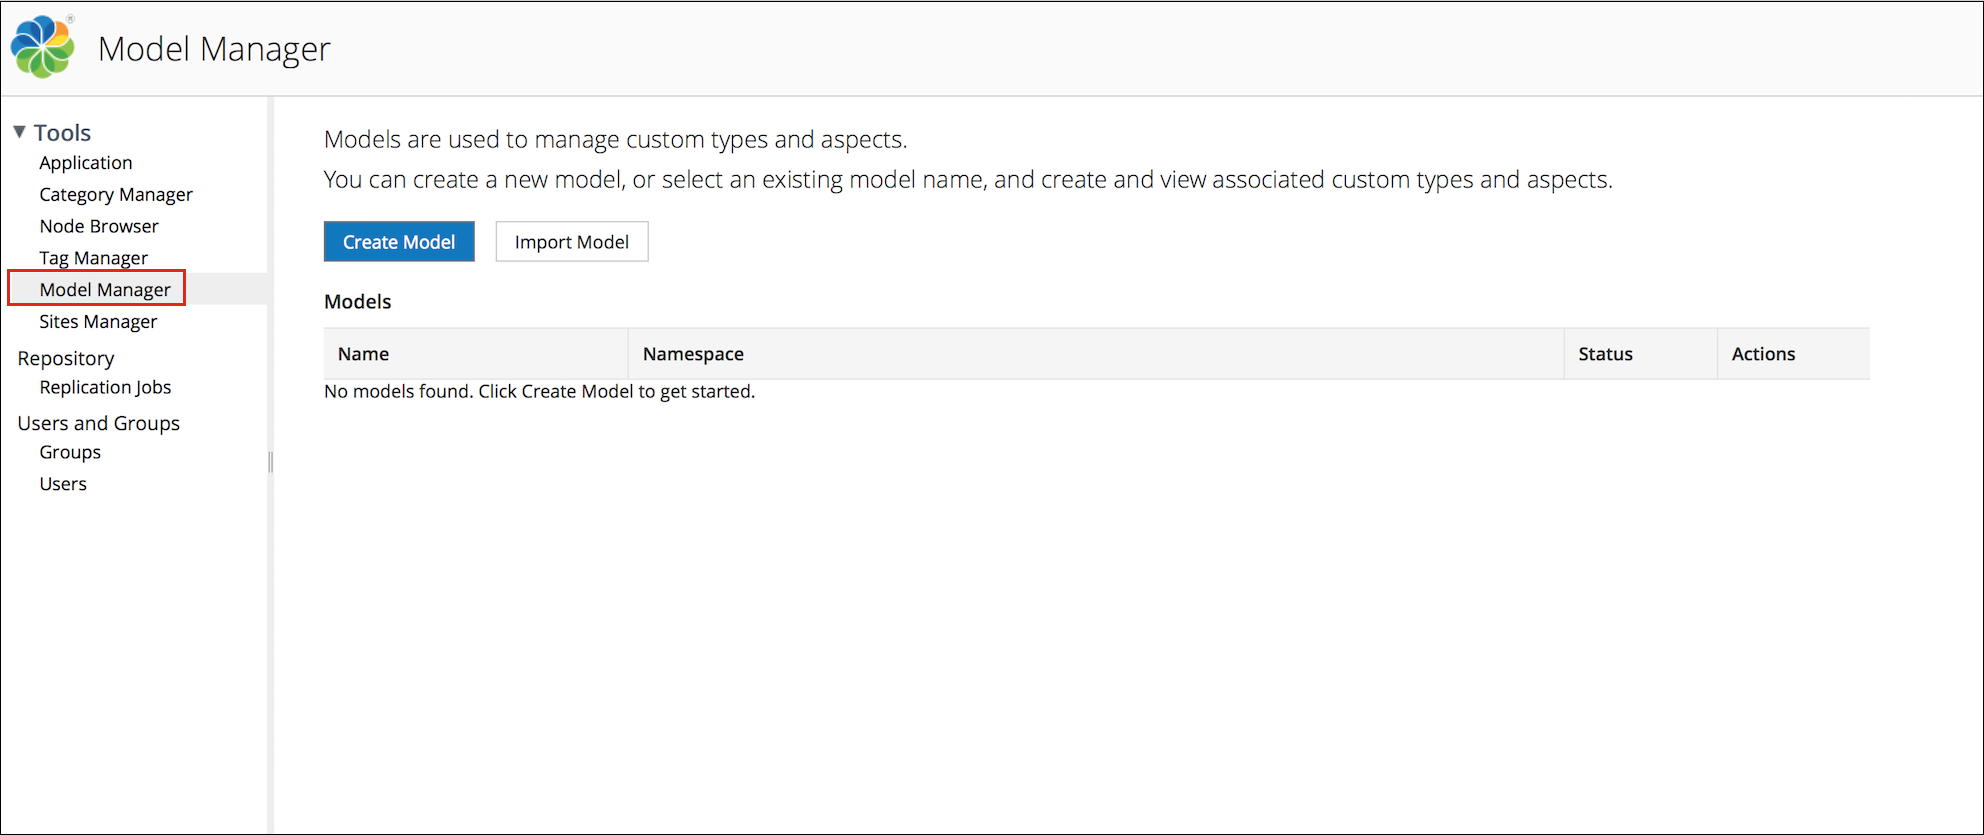
The Model Manager page is displayed.
- Click Create Custom Model.In the Create Model window, specify the following:
- Namespace: http://www.democo.com/model/document/1.0
- Prefix: dc
- Name: Document
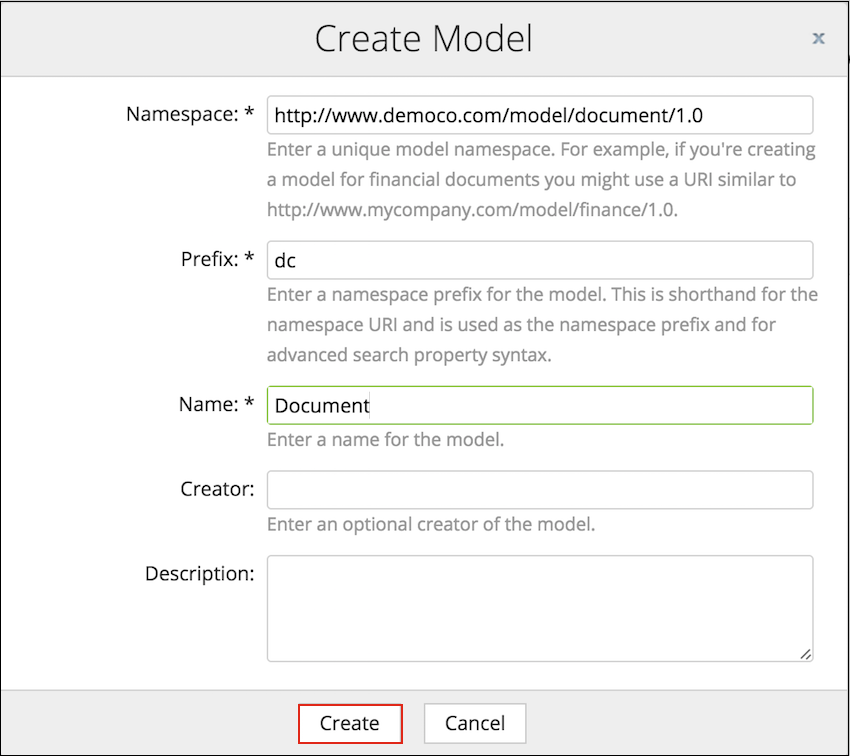
- Click Create.
The new model, Document appears in the Custom Models table on the Model Manager page. The current status of the model is Inactive.
- Click the model, Document.
The Document model page is displayed.
- To create a type - whitePaper, click Create Custom
Type.
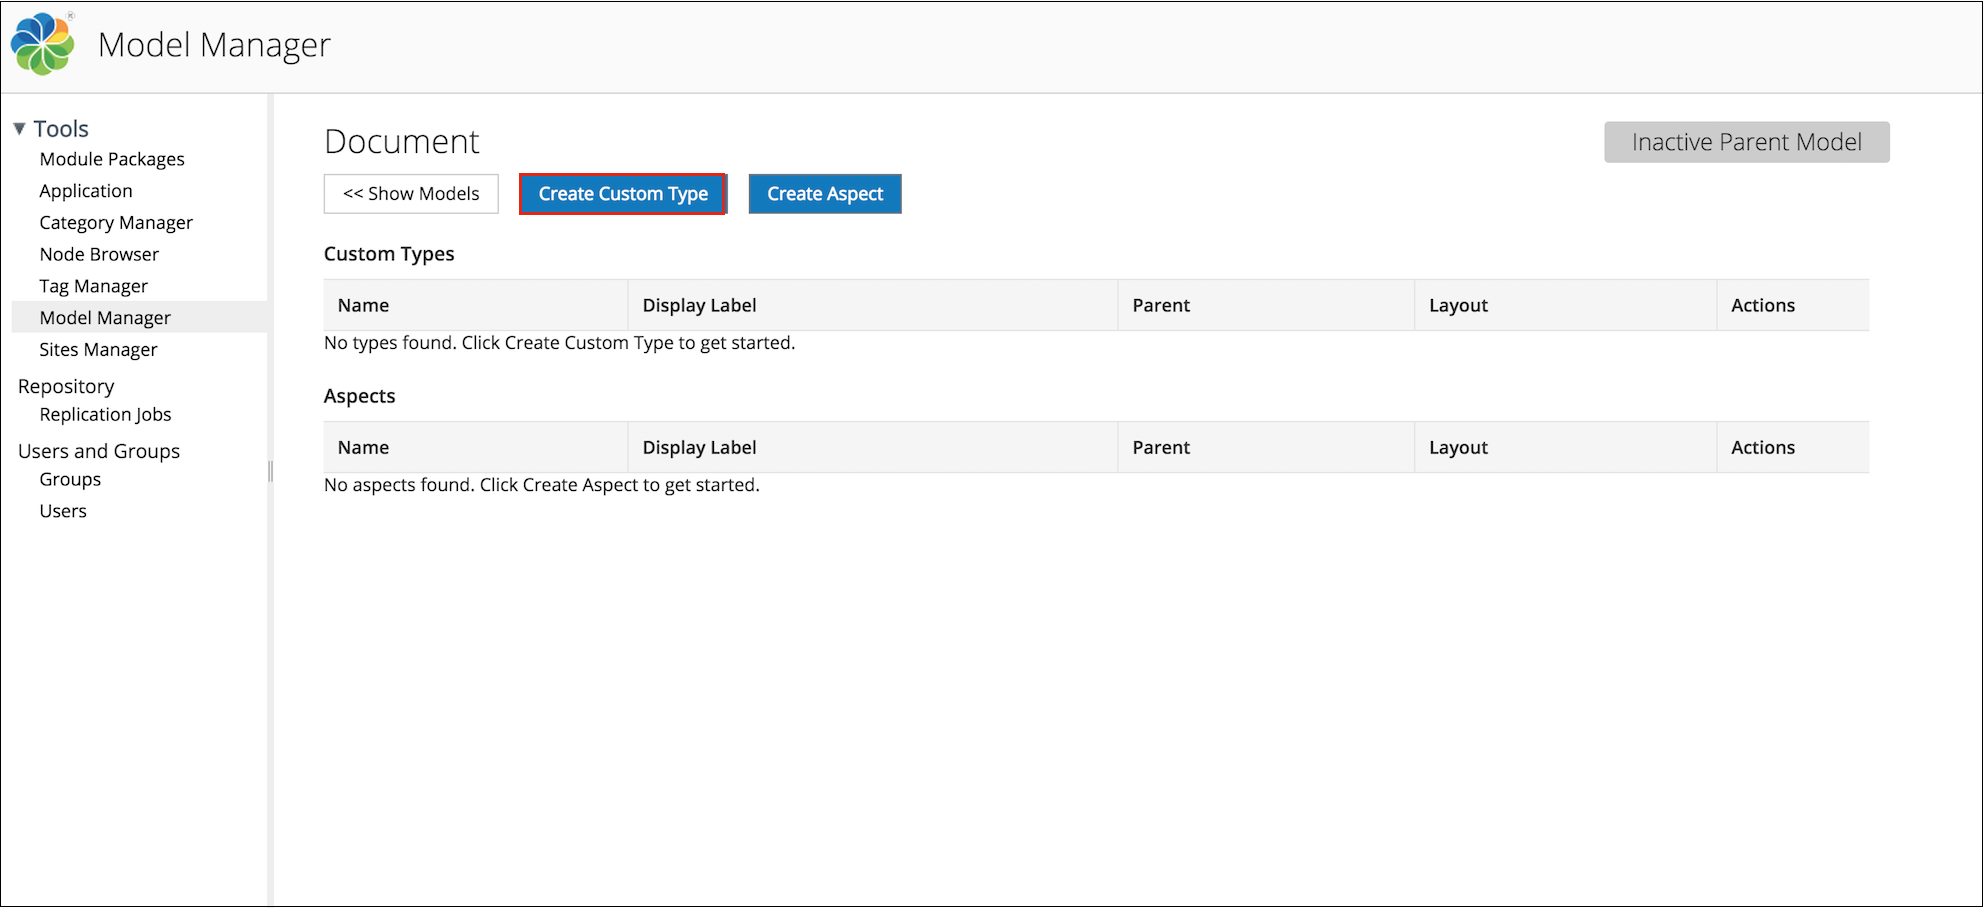
The Create Custom Type window appears.
- In the Name field, enter whitePaper.
- In the Display Label field, enter White Paper.
- Specify other optional fields, if required.
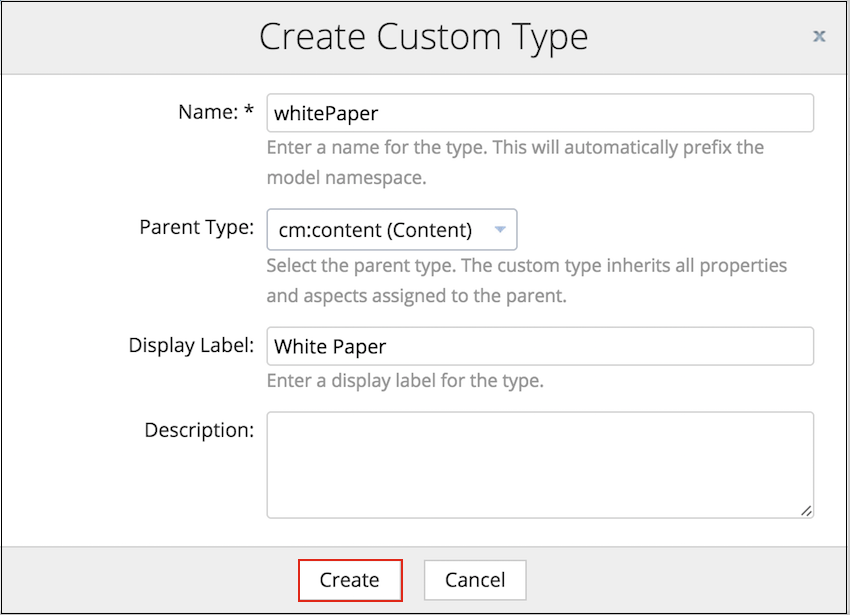
- Click Create.
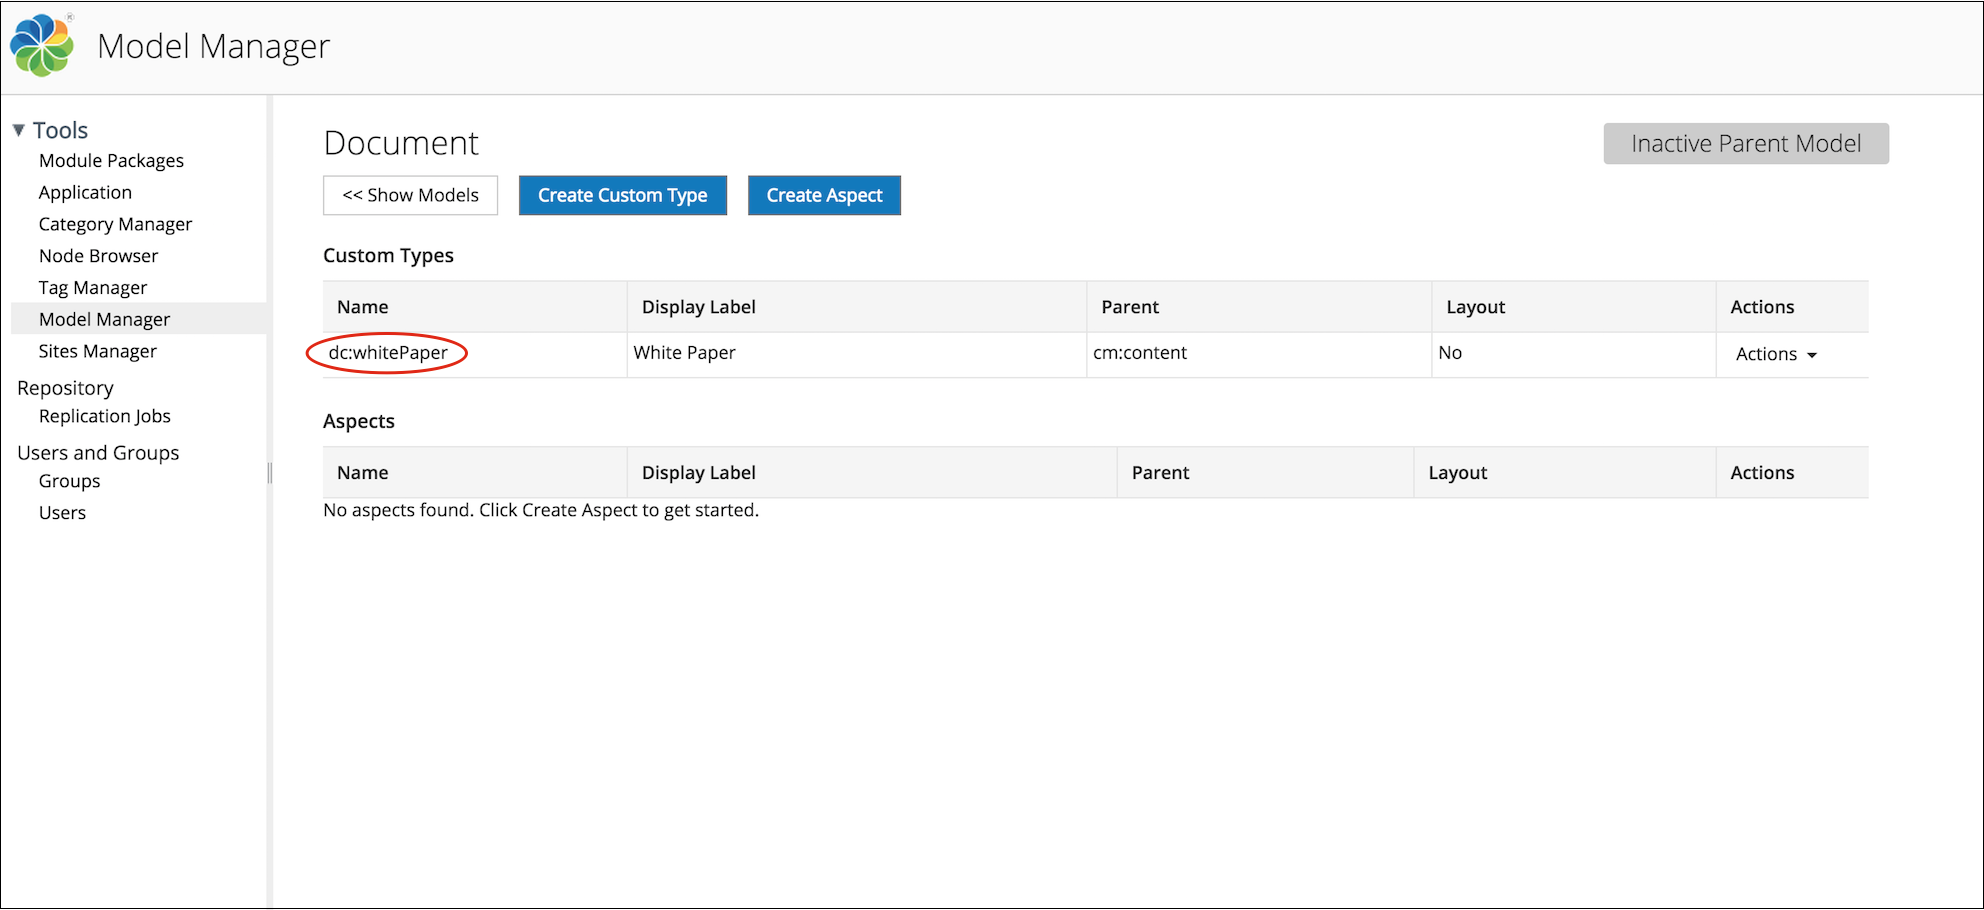
The new custom type, dc:whitePaper appears in the Custom Types table.
- Under the Custom Types list, click dc:whitePaper.
- Click Create Property.
- Enter the details of the new property, writer:
- In the Name field, enter writer.
- In the Display Label field, enter Writer.
- From the Data Type drop-down list, select d:text.
- To make the property mandatory in Share, select Mandatory from the Requirement drop-down list.
- Specify other optional fields, if required.
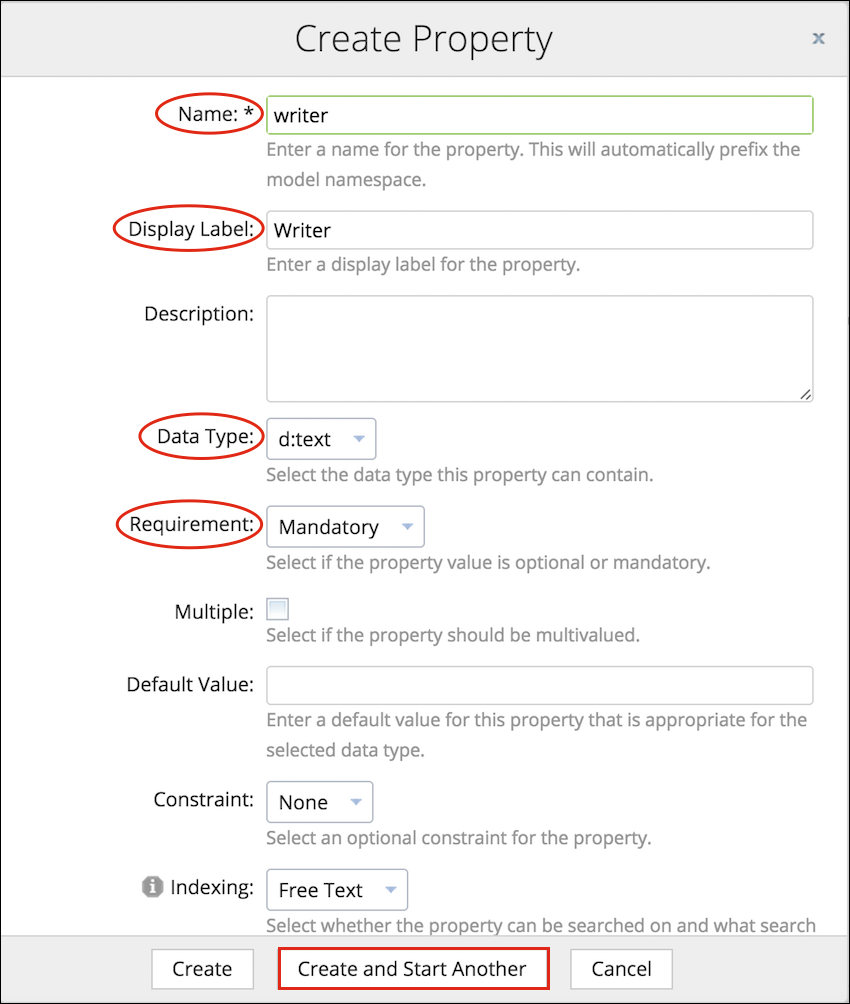
- Click Create and Start Another.
- Enter the details of the new property, domain:
- In the Name field, enter domain.
- In the Display Label field, enter Domain.
- From the Data Type drop-down list, select d:text.
- From the Constraints drop-down list, select List of Values.
- In the List of Values field, enter Engineering, Marketing, HR, Sales, Finance, and Operations in separate lines.
- Select Sort Alphanumerically to display the above specified values in an alphabetical order in Share.
- Specify other optional fields, if required.
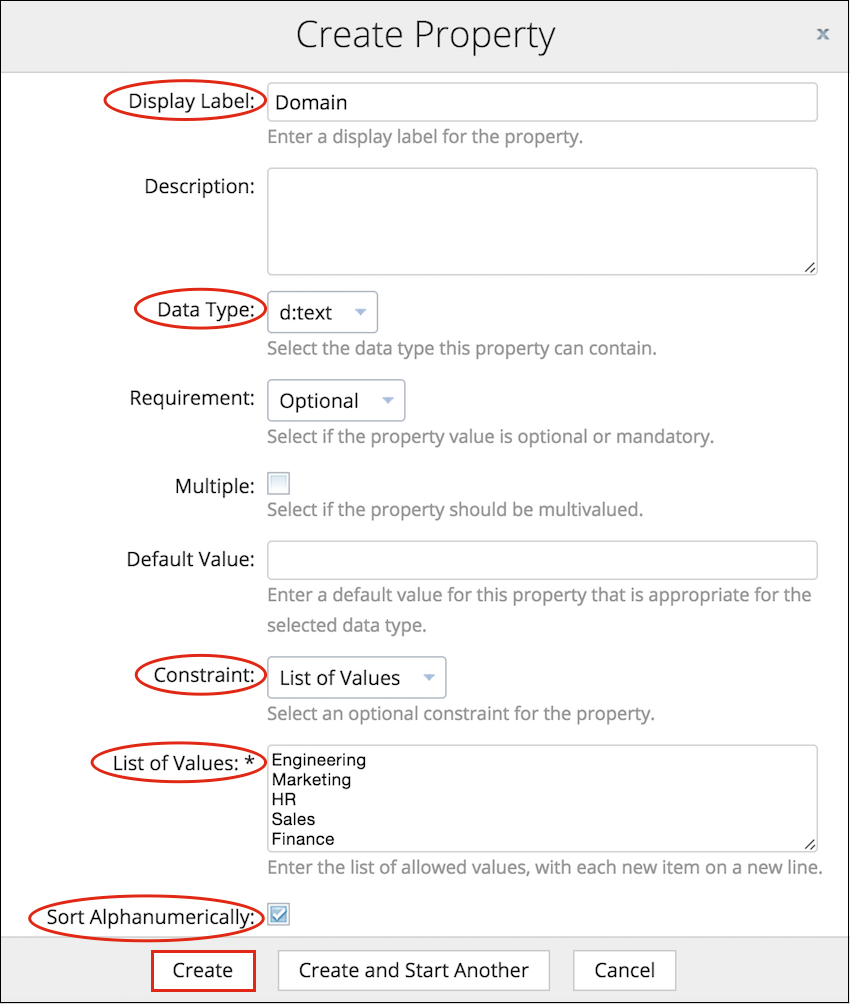
- Click Create.
- Navigate to the page displaying the custom types list.
- Click Layout Designer from the Actions
drop-down list for the type, dc:whitePaper.
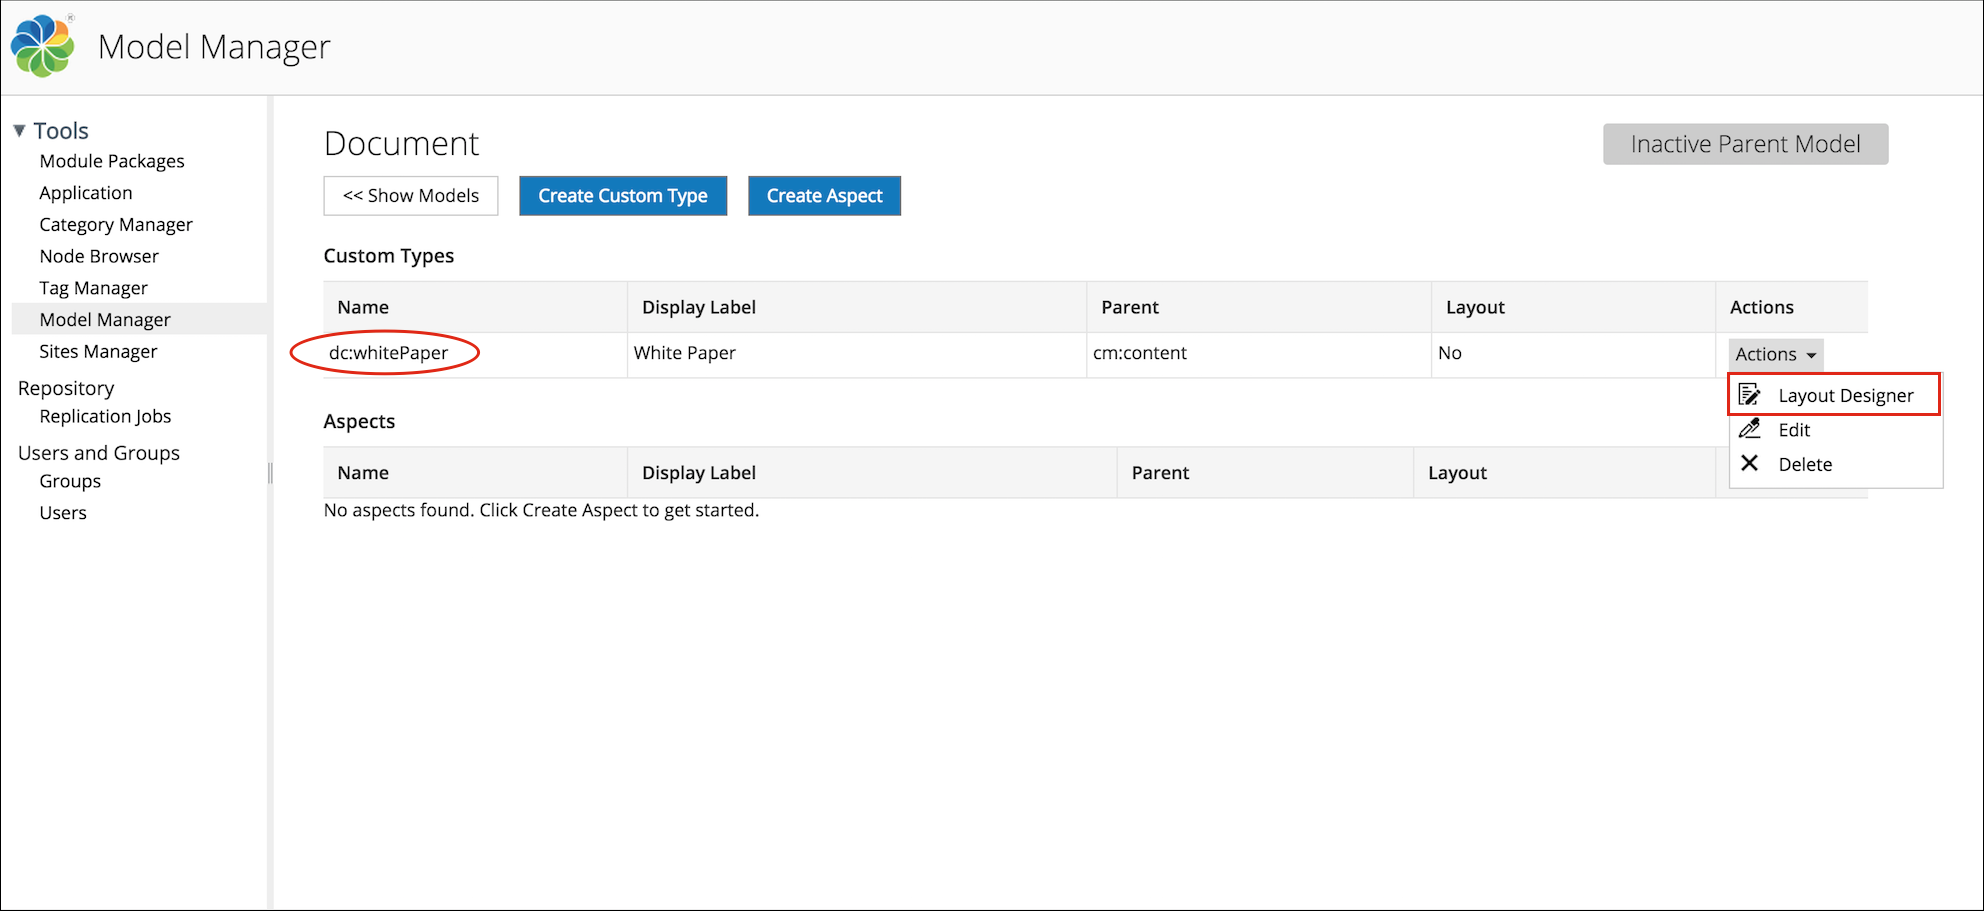
The Layout Designer page is displayed.
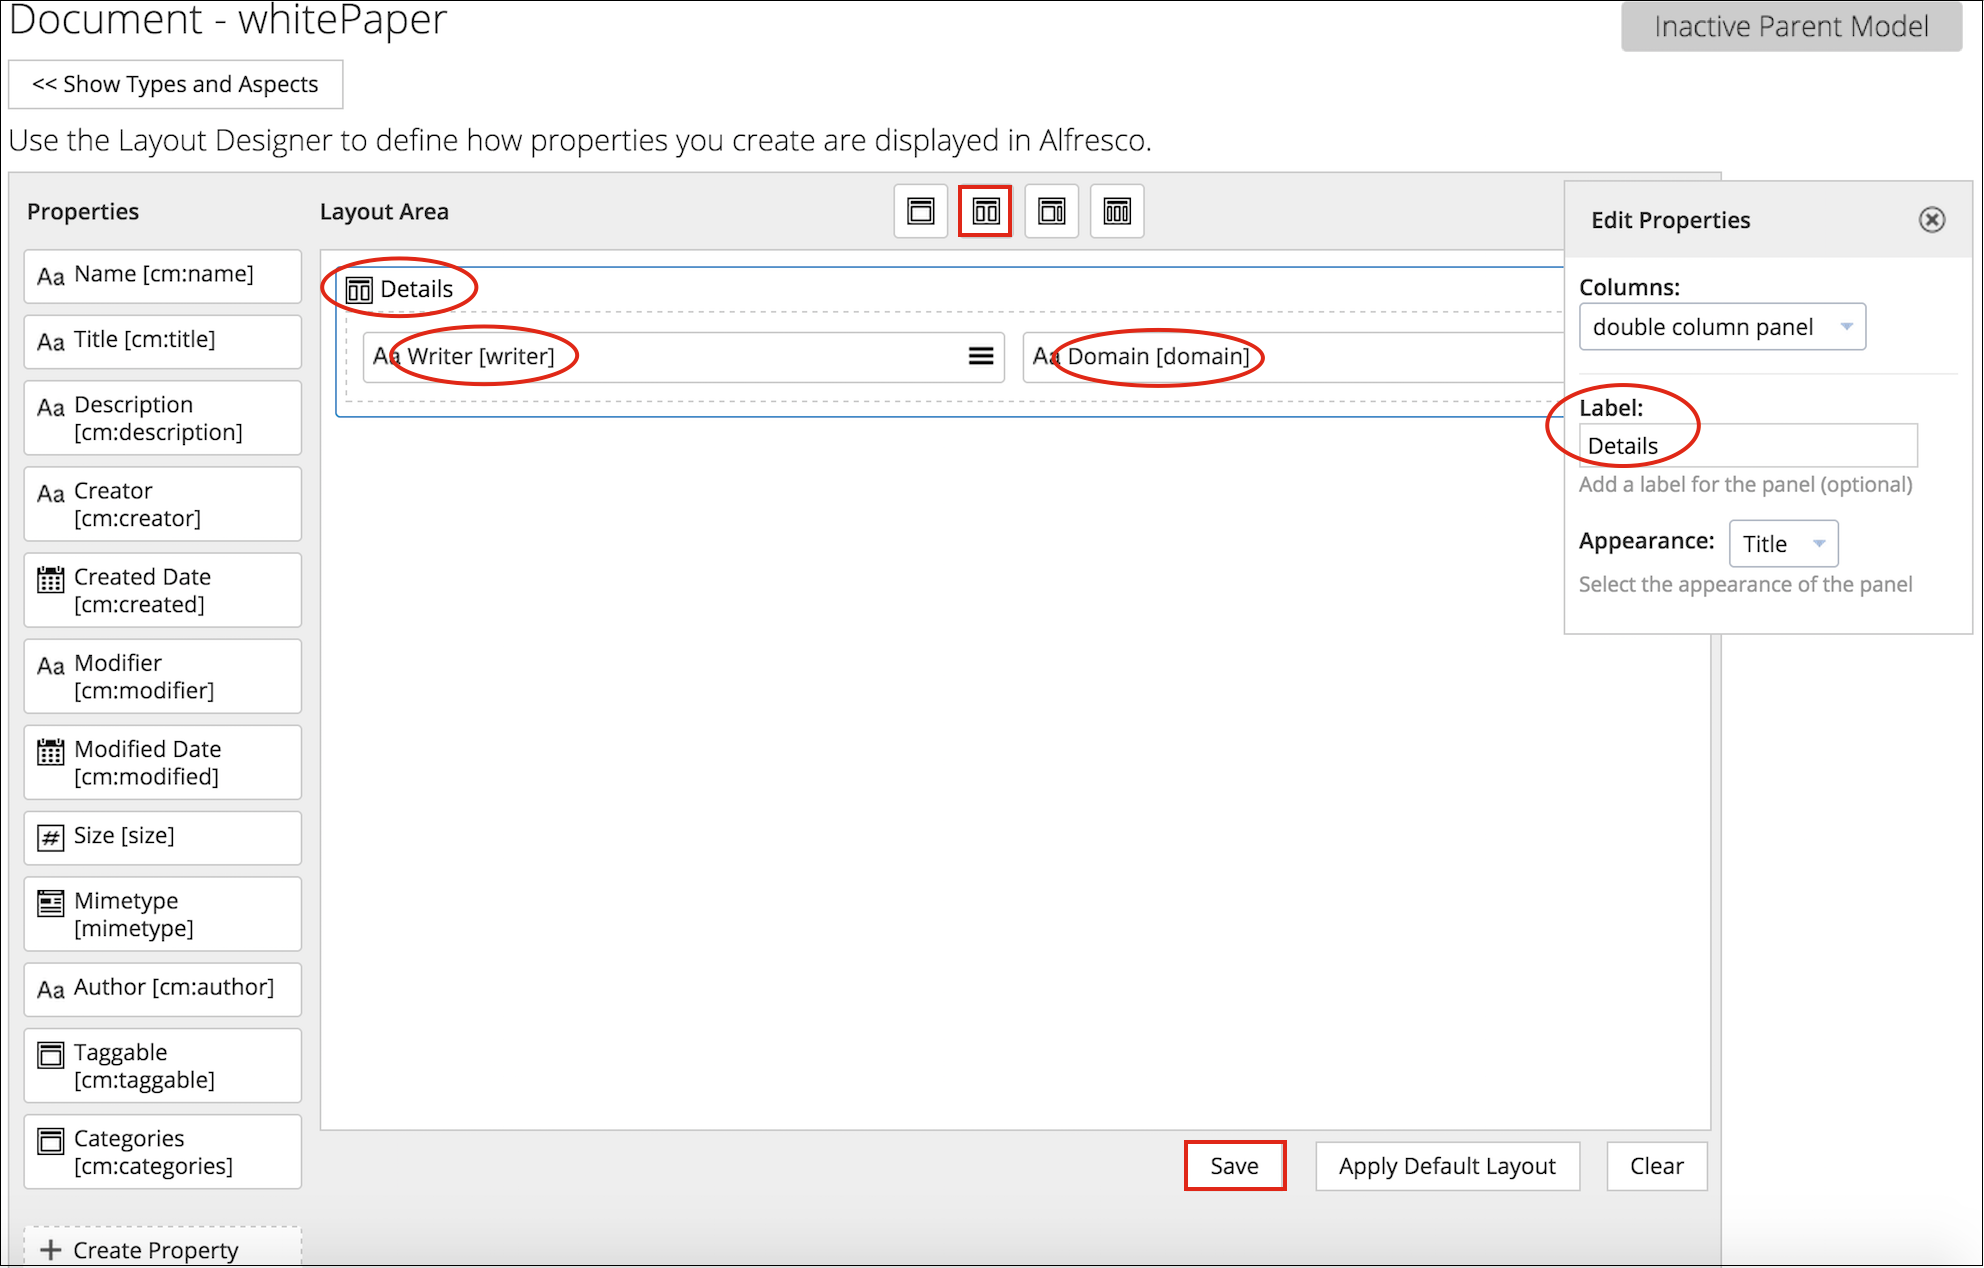
- Drag the double column panel layout from top onto the layout area.
- To specify the panel label, click anywhere on the element's top panel displaying the
label, double column panel.
This displays the Edit Properties window.
- In the Label field, enter Details.
- Configure other optional fields, if required.
- Drag the properties, writer and domain onto the Details element.
- To configure the properties, click anywhere on the property.
- On the Layout Designer, click Save.
- Navigate to the Model Manager page.
- Click the model, Document.
The Document model page is displayed.
- To create new aspect - webable, click Create Aspect.
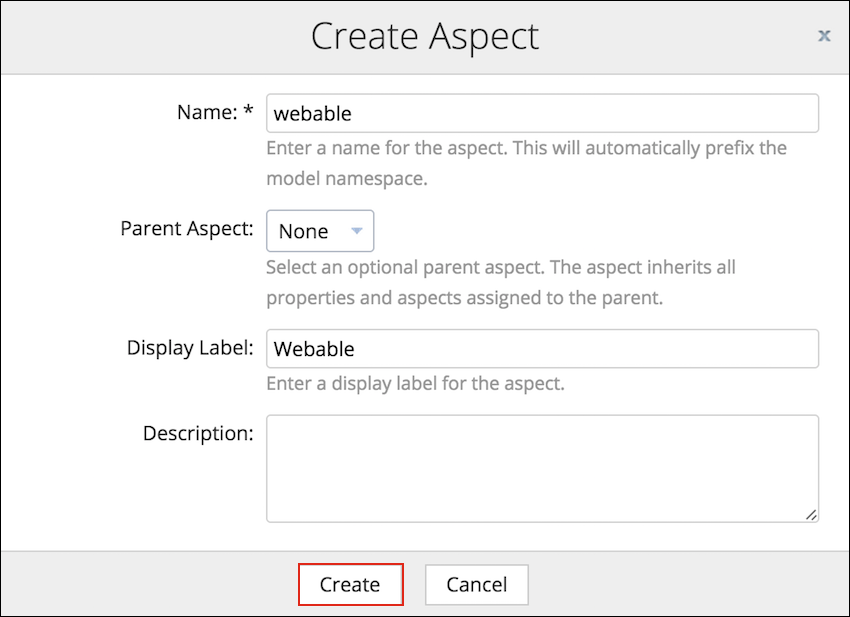
The Create Aspect window appears.
- In the Name field, enter webable.
- In the Display Label field, enter Webable.
- Specify other optional fields, if required.
- Click Create.
The new aspect, dc:webable appears in the Aspects table.
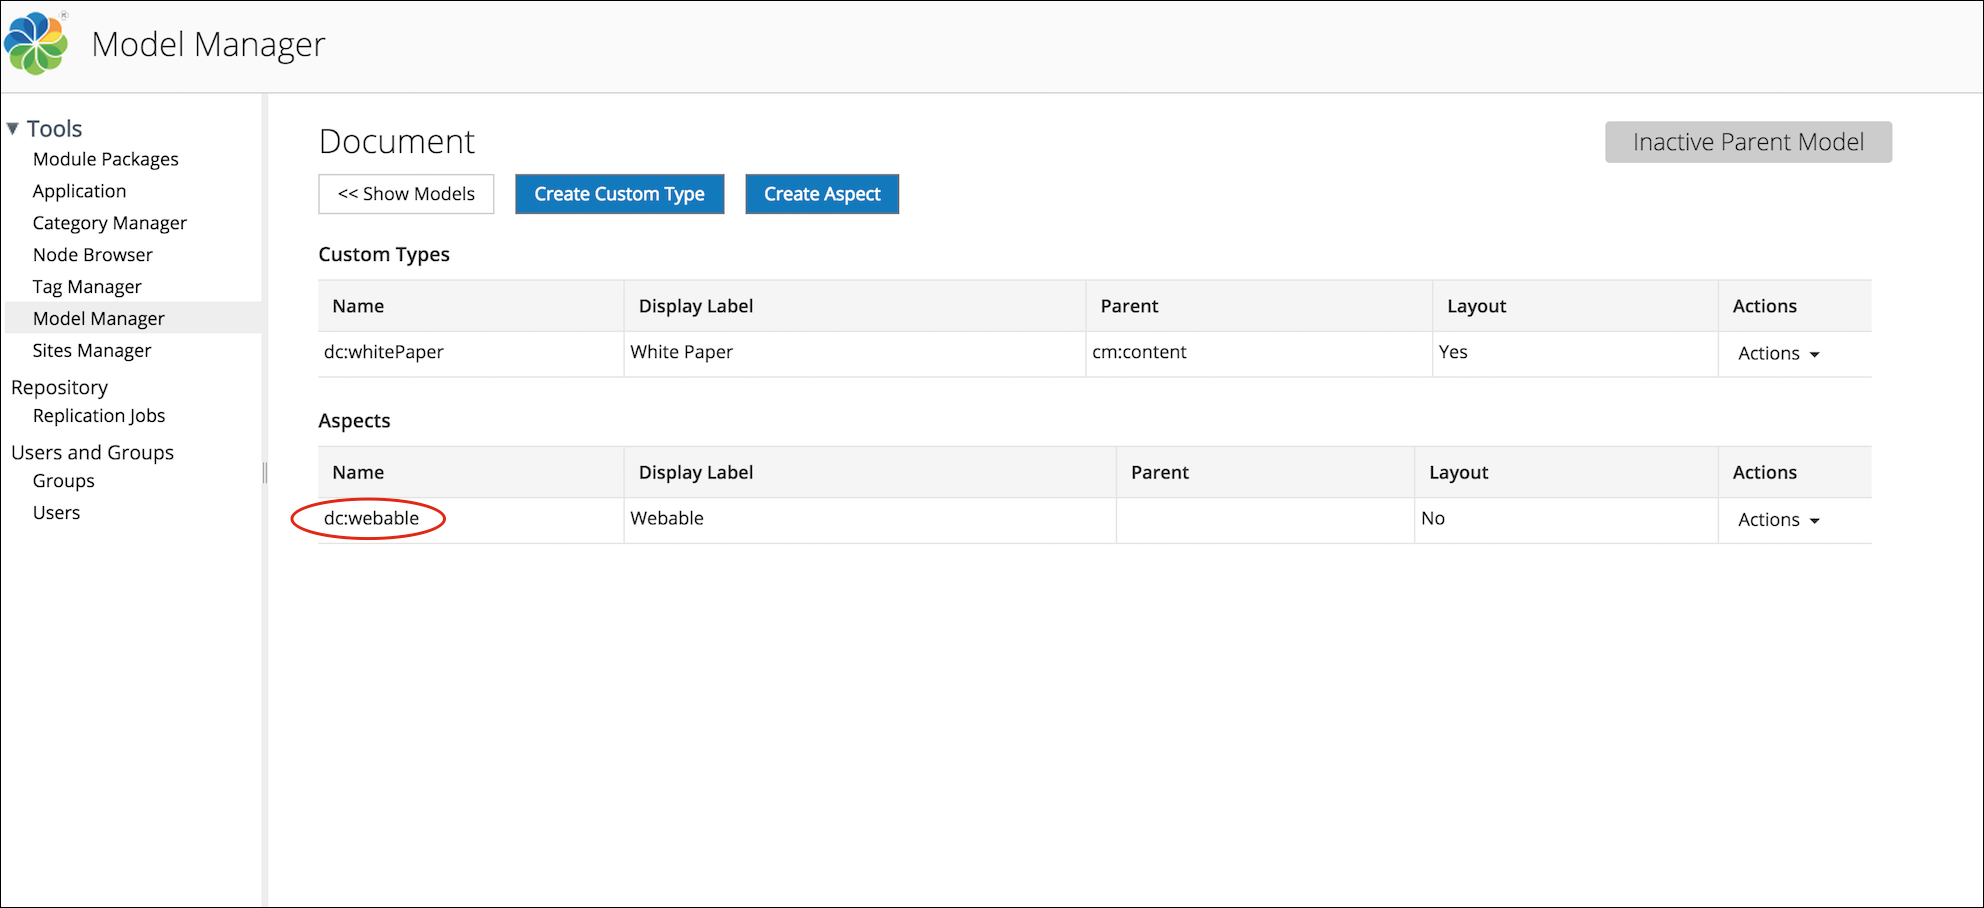
- Under the Aspects list, click dc:webable.
- Click Create Property.
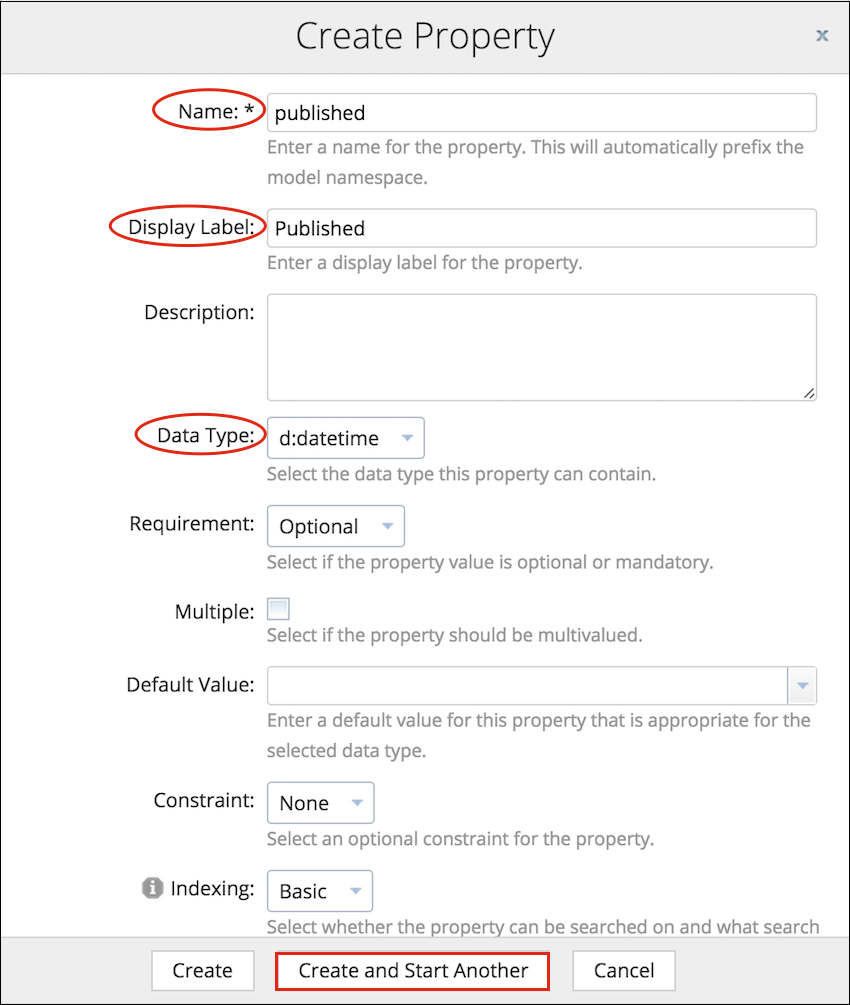
- Enter the details of the new property, published:
- In the Name field, enter published.
- In the Display Label field, enter Published.
- From the Data Type drop-down list, select d:datetime.
- Specify other optional fields, if required.
- Click Create and Start Another.
- Enter the details of the new property, isActive:
- In the Name field, enter isActive.
- In the Display Label field, enter Is Active.
- From the Data Type drop-down list, select d:boolean.
- From the Default Value drop-down list, select False.
- Specify other optional fields, if required.
- Click Create.
- Navigate to the page displaying the aspects list.
- Click Layout Designer from the Actions
drop-down list for the aspect, dc:webable.
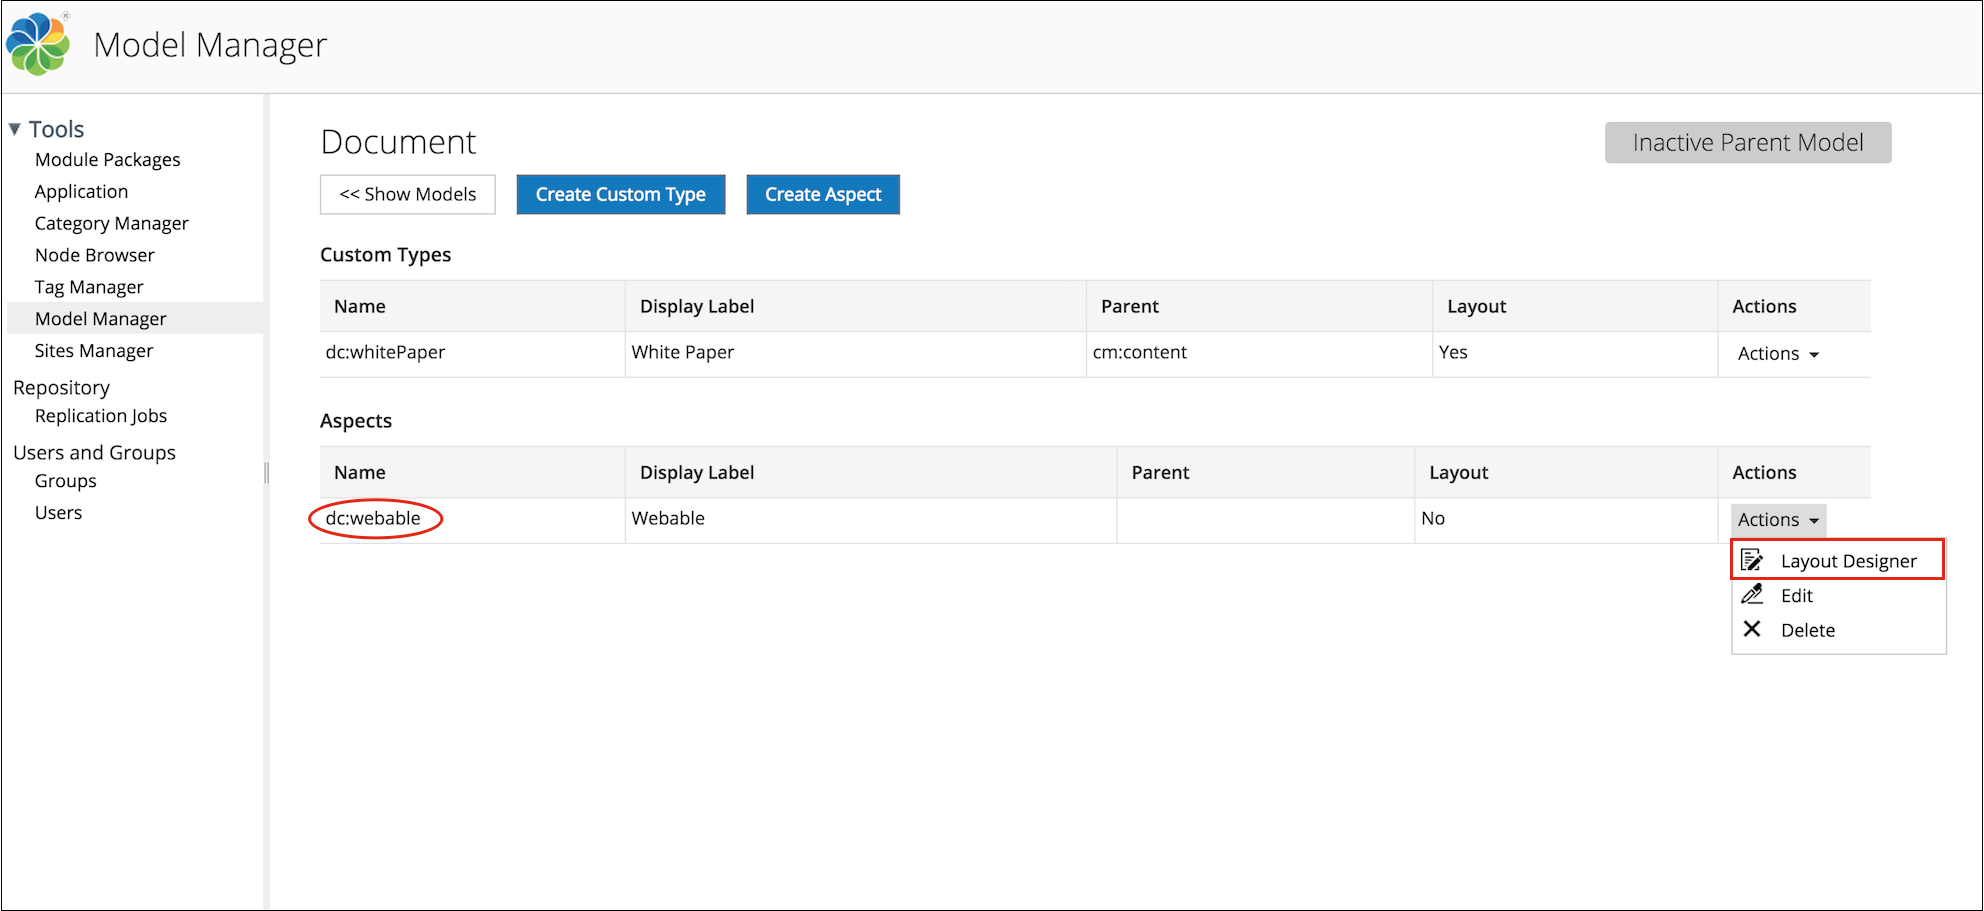
The Layout Designer page is displayed.
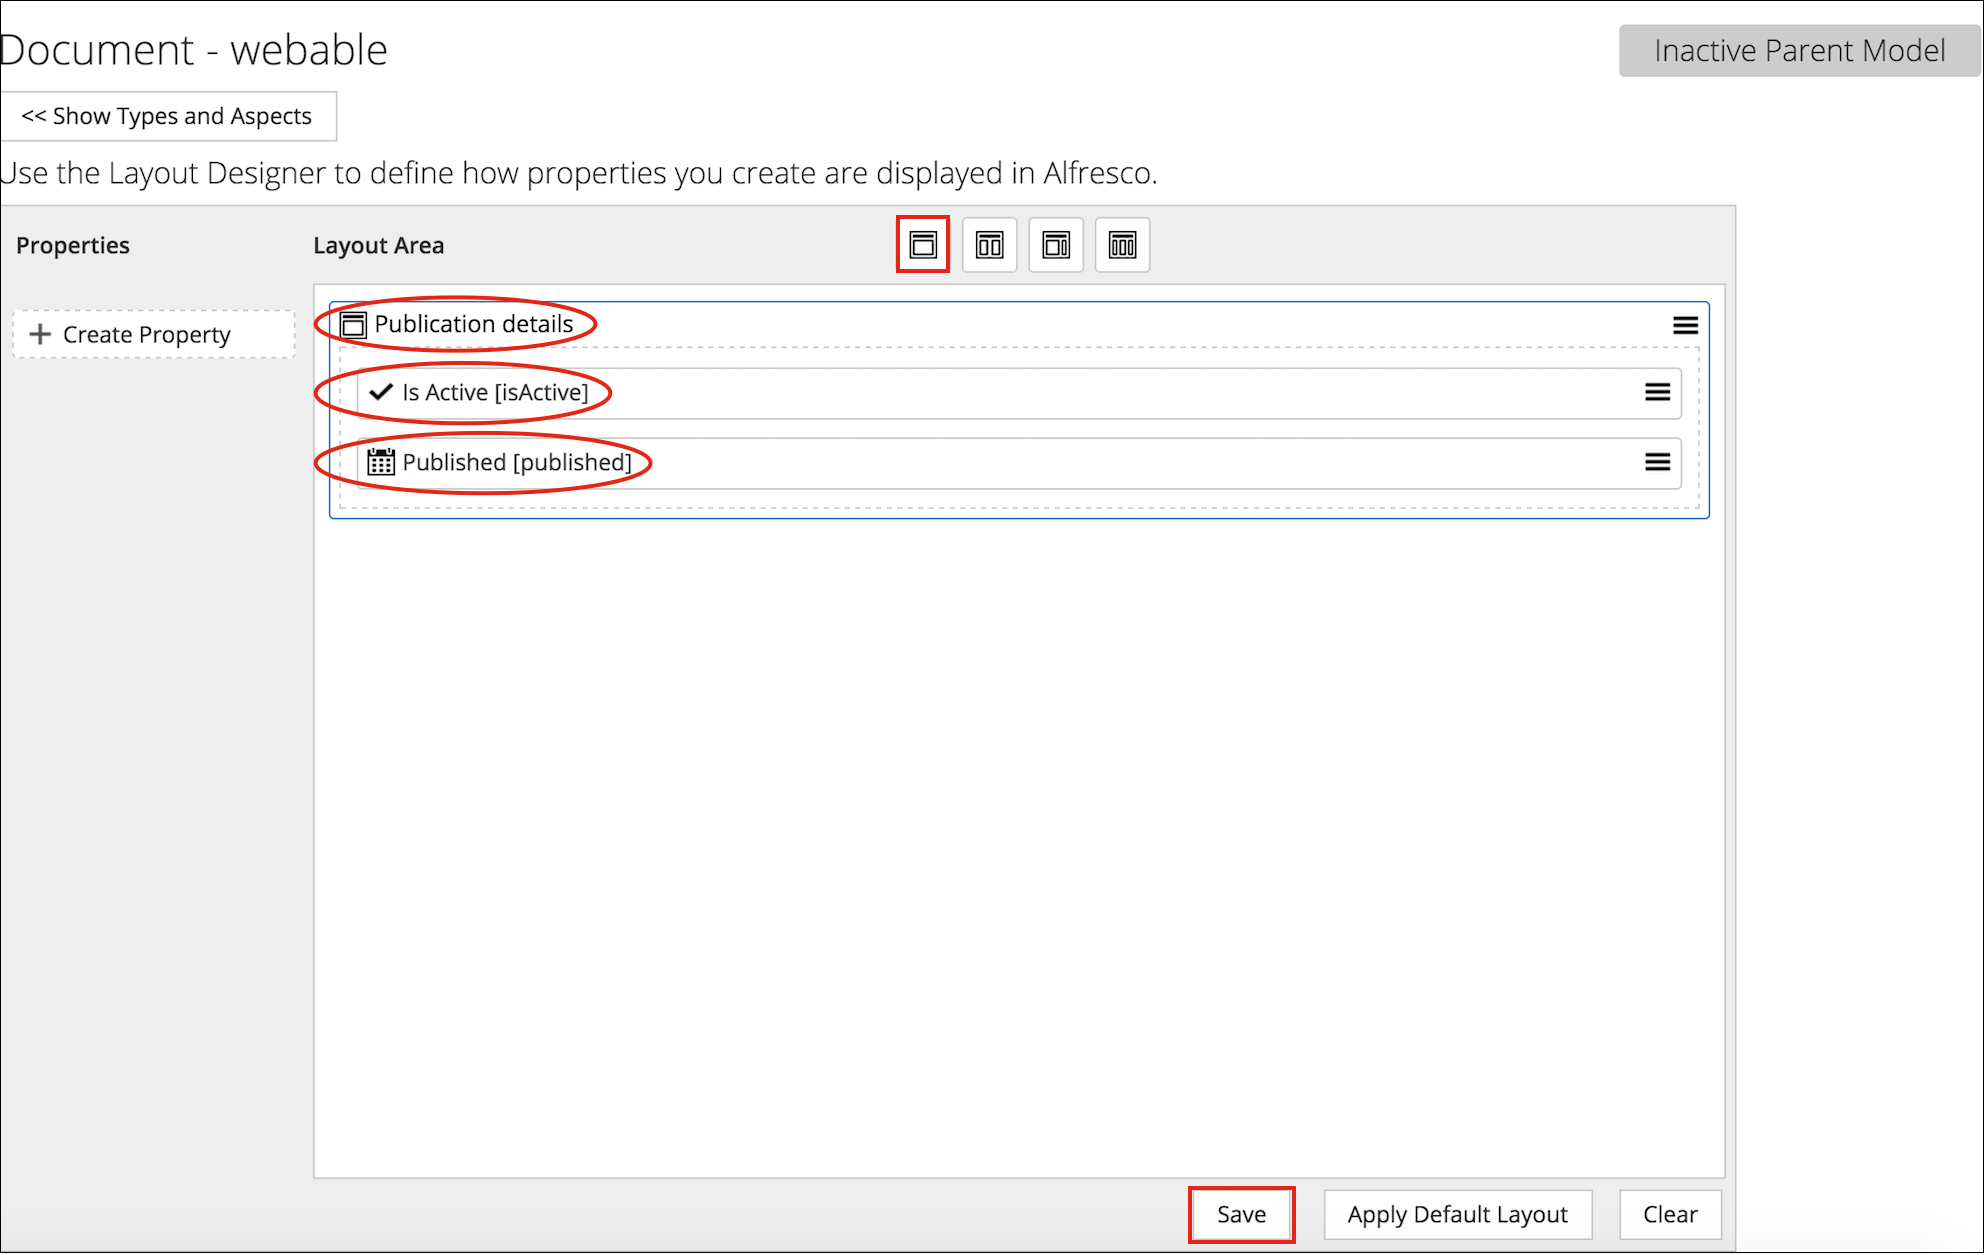
- Drag the single column panel layout from top onto the layout area.
- To specify the panel label, click anywhere on the element's top panel displaying the
label, single column panel.
This displays the Edit Properties window.
- In the Label field, enter Publication details.
- Configure other optional fields, if required.
- Drag the properties, published and isActive onto the Publication details element.
- To configure the properties, click anywhere on the property.
- On the Layout Designer, click Save.
- Navigate to the Model Manager page.
- Click the Actions drop-down list for the model, Document.
- Click Activate.
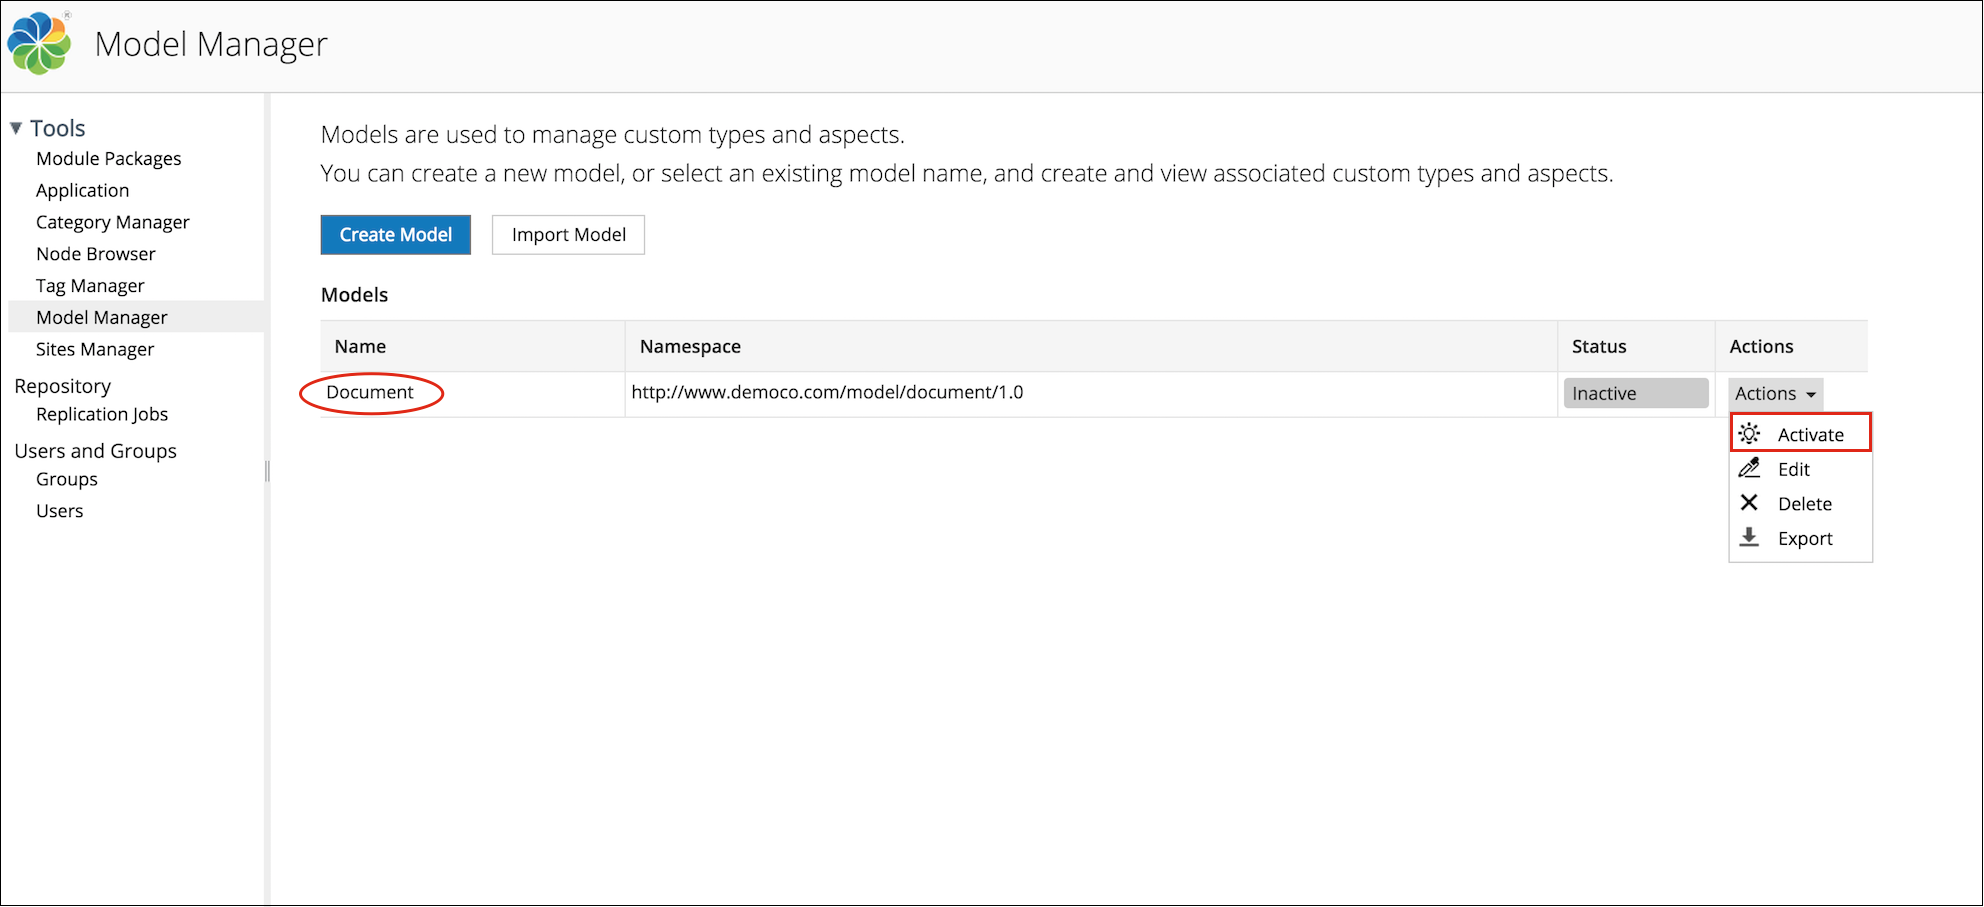
The status of Document changes to Active.

To do so, follow the steps below:
- In your site, click Document Library to access the library.
- Click on a file in the library to view it in the file preview screen.
- To apply the type, perform the following steps:
- Under Document Actions, click Change
Type.
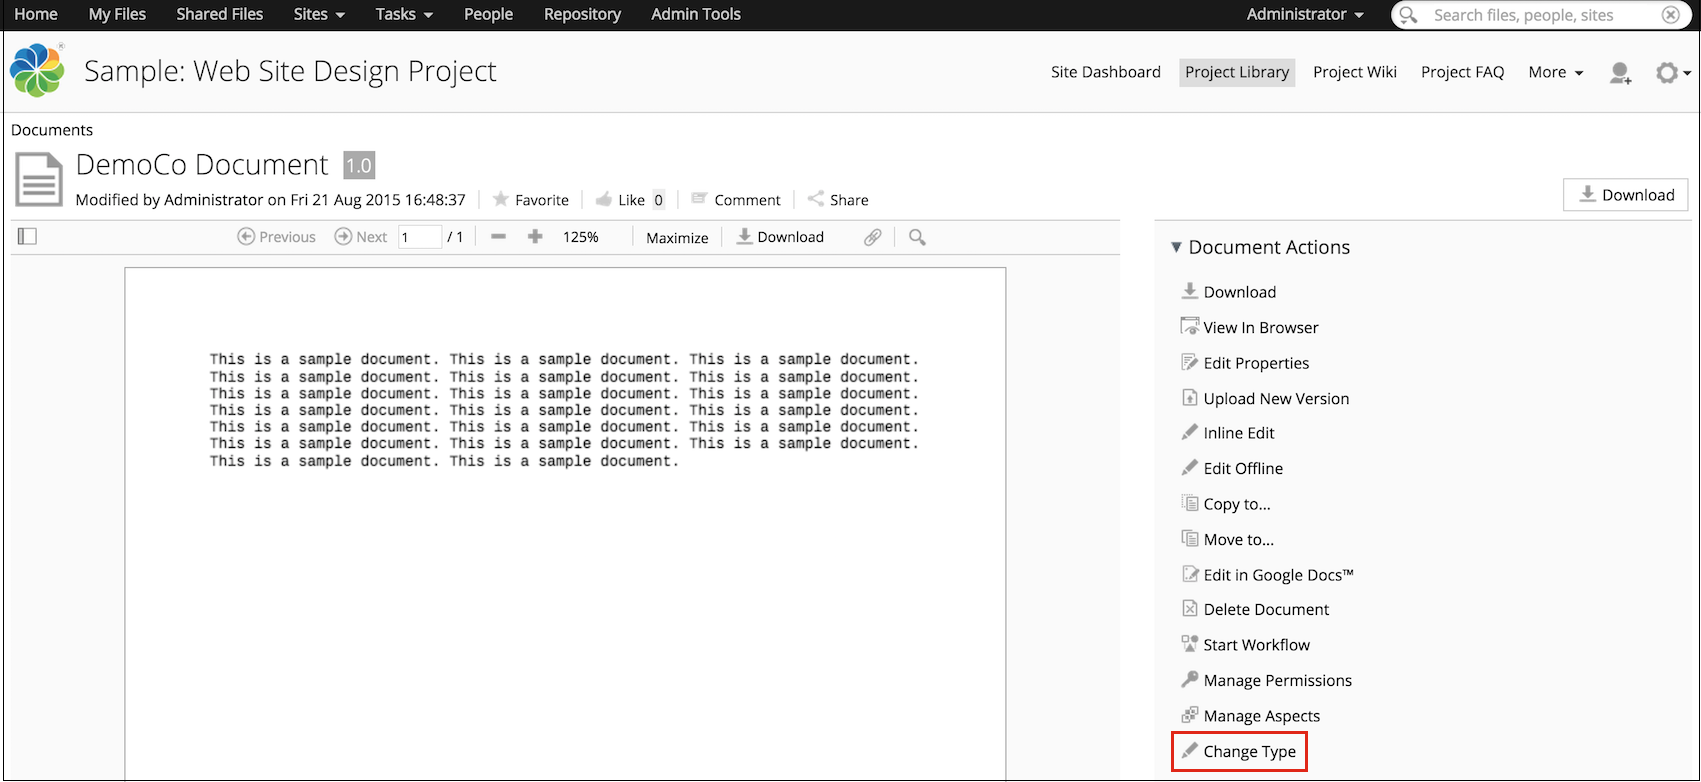
- In the Change Type window, select whitePaper
(dc:whitePaper) from the New Type drop-down list.

- Click OK.
The type (dc:whitePaper) and its properties (writer and domain) are successfully applied to your file.
The type properties are displayed on the file preview page, under Properties. You can edit these properties using Edit Properties under Document Actions.

- In the Writer field, enter User1.
- In the domain field, select Sales.
- Click Save.
- Under Document Actions, click Change
Type.
- To apply the aspect, perform the following steps:
- Under Document Actions, click Manage Aspects.
- In the Available to Add list, click
 next to
Webable.
next to
Webable.Click
 to remove any existing aspects from the
Currently Selected list.
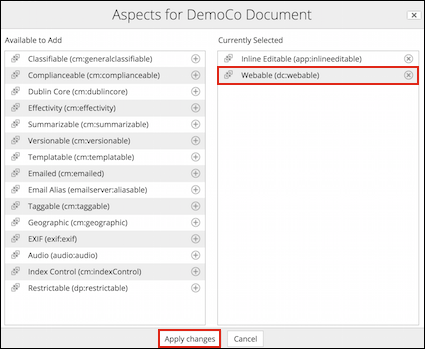
- Click Apply changes.
The aspect (Webable) and its properties (Published and Is Active) are successfully applied to the file.
The aspect properties are displayed on the file preview page, under Properties. You can edit these properties using Edit Properties under Document Actions.
- Select Is Active.
- In the Published field, enter the date and time as 31/07/2015 and 10:00, respectively.
- Click Save.
The updated information is displayed on the file preview page, under Properties.
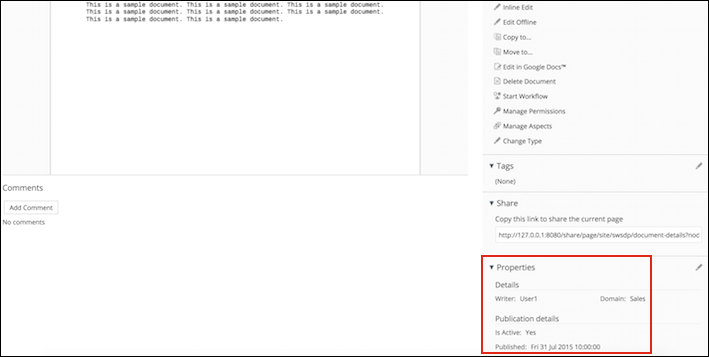
In this tutorial, you learned how to create and apply models, custom types, and aspects using the Model Manager to capture metadata about files.
