| Name | Adding new metadata templates to the Document Library |
| Extension Point | Document Library |
| Description |
When custom content models are deployed to the repository it is sometimes a requirement to display properties from these in the Document Library Browse view. This can be done with so called Metadata Templates, which are tied to an evaluator that decides if the template is applicable or not to the content item in question, such as a folder or a file. If there is no specific Metadata Template defined for a content item type
then it falls back on a default Metadata template that
looks like this (all out-of-the-box Metadata Templates can be found in
SkyVault/tomcat/webapps/share/WEB-INF/classes/alfresco/share-documentlibrary-config.xml):
<template id="default">
    <banner index="10" id="lockBanner" evaluator="evaluator.doclib.metadata.hasLockBanner">{lockBanner}</banner>
    <banner index="20" id="syncTransientError" evaluator="evaluator.doclib.metadata.hasSyncTransientErrorBanner">{syncTransientError}</banner>
    <banner index="30" id="syncFailed" evaluator="evaluator.doclib.metadata.hasSyncFailedBanner">{syncFailed}</banner>
    <line index="10" id="date">{date}{size}</line>
    <line index="20" id="description" view="detailed">{description}</line>
    <line index="30" id="tags" view="detailed">{tags}</line>
    <line index="40" id="categories" view="detailed" evaluator="evaluator.doclib.metadata.hasCategories">{categories}</line>
    <line index="50" id="social" view="detailed">{social}</line>
 </template>
This template gives you the basic information for the node, such is in the following example for a file:
This tutorial will demonstrate how to add a custom DocLib Metadata Template for a custom type from a content model that comes with the SDK Samples. This content model has a type called acme:document that contains a property called acme:documentId (for more info see sdk-samples/all-in-one/repo-amp/src/main/amp/config/alfresco/module/repo-amp/model/content-model.xml). We will create a new template that displays this custom property. The template will be based on the default template that you can see above and the property will use the default presentation rendering. The tutorial will also show how you can render a property in a custom way in your Metadata template. |
| Implementation Steps | Adding a new Metadata Template to the Document Library involves the
following steps:
|
| Related Information | This tutorial assumes that you are familiar with the Document Library in Share. If you are new to it read up on it here before starting this tutorial. Also, familiar yourself with how Surf Extension Modules work as we will be creating one of those. |
| Source Code | Go to code |
This tutorial will demonstrate the following:
- How to create a custom DocLib Metadata Template for the acme:document type. The template will be based on the default one but will also display the acme:documentId property.
- How to define an evaluator for a custom content type
- How to add another field to the custom template that displays the acme:documentId property in a custom way (i.e. custom rendering)
Tutorial implementation steps:
Implementing the custom Metadata Template for the acme:document type.
- Add a new Share AMP module called add-metadata-template-doclib-share to the AIO project. Instructions for how to do that can be found here (Note. do not add a repository AMP).
-
Add a new Surf Extension Module file and define the Metadata Template
Call the file add-metadata-template-doclib-extension-modules.xml and save it in the all-in-one/add-metadata-template-doclib-share/src/main/amp/config/alfresco/web-extension/site-data/extensions directory (note. it is important to give this file a unique name when several Share AMPs are installed, otherwise the last one wins).
Then define the custom Metadata Template as follows:
<extension>
    <modules>
        <module>
            <id>Add Acme Document Metadata Template</id>
            <version>1.0</version>
            <auto-deploy>true</auto-deploy>
            <configurations>
                <config evaluator="string-compare" condition="DocumentLibrary">
                    <metadata-templates>
                        <template id="acmeDocMetadataTemplate">
                            <evaluator>alfresco.tutorials.evaluator.isAcmeDocument</evaluator>
                            <banner index="10" id="lockBanner" evaluator="evaluator.doclib.metadata.hasLockBanner">{lockBanner}</banner>
                            <banner index="20" id="syncTransientError" evaluator="evaluator.doclib.metadata.hasSyncTransientErrorBanner">{syncTransientError}</banner>
                            <banner index="30" id="syncFailed" evaluator="evaluator.doclib.metadata.hasSyncFailedBanner">{syncFailed}</banner>
                            <line index="10" id="date">{date}{size}</line>
                            <line index="20" id="description" view="detailed">{description}</line>
                            <line index="30" id="tags" view="detailed">{tags}</line>
                            <line index="40" id="categories" view="detailed" evaluator="evaluator.doclib.metadata.hasCategories">{categories}</line>
                            <line index="50" id="acmeDocId" view="detailed">{acme_documentId org.alfresco.tutorial.label.acme_documentId}</line>
                            <line index="60" id="social" view="detailed">{social}</line>
                        </template>
                    </metadata-templates>
                </config>
            </configurations>
        </module>
    </modules>
</extension>
What we have done here is basically copied the metadata template with the identifier <template id="default"> from the /alfresco/tomcat/webapps/share/WEB-INF/classes/alfresco/share-documentlibrary-config.xml configuration file. Then added the line with id="acmeDocId" just before the social properties. We have also added a custom evaluator to the template that will only return true if the node in question has the type acme:document applied.
The different attributes and sub-elements for the template element have the following meaning:
Name Description template id The global identifier for this template. Make sure to change it after copying from out-of-the-box templates, otherwise you will override those. So change it from default to acmeDocMetadataTemplate.
banner
Message banner that will display above the node name. A common message that you might see is the one about a node being locked by another user for editing.
banner id
Unique identifier for this banner item.
line
One line in the template displaying label and value for a property. The text content of the line element consist of the property value and optionally the label to use, such as {lockBanner} and {acme_documentId org.alfresco.tutorial.label.acme_documentId}. The Acme Doc Id line specifies the content model property we want to display (i.e. acme:documentId, note that we use underscore instead of colon when specifying the type in the template) and the label we want to use (i.e. org.alfresco.tutorial.label.acme_documentId).
line id
Unique identifier for this line item.
index
For banner items: determines the order the banner messages are displayed in. The lower the index the higher up it is displayed.
For line items: determines the order the properties are displayed in. The lower the index the higher up it is displayed.
evaluator
Determines the overall applicability of this template for a content node (e.g. file, folder etc.), if it evaluates to false then the template will not be used and it falls back on the default one. A banner or line item can also have a boolean evaluator associated with it that will determine if the item should be displayed or not. view
Determines in what Browse view the line item should be displayed. Can be simple or detailed. If not specified the property will be displayed in both views (e.g. date in above template). So our acmeDocId line item will only be displayed in the detailed view. -
Add an i18n resource file that will contain the property labels and messages
for the Metadata Template.
We can use the existing all-in-one/add-metadata-template-doclib-share/src/main/amp/config/alfresco/web-extension/messages/custom.properties file for this, we just need to update its name so it does not clash with other Share AMPs that might be deployed (Not needed if using SDK 2.1.1). Change the name to add-metadata-template-doclib-custom.properties. Then add the following properties to it:
org.alfresco.tutorial.label.acme_documentId=Acme Doc ID
-
Update the name of the
custom-slingshot-application-context.xml file (Not
needed if using SDK 2.1.1).
Change it to all-in-one/add-metadata-template-doclib-share/src/main/amp/config/alfresco/web-extension/add-metadata-template-doclib-context.xml. This way it will not clash with the same file from other deployed Share AMPs. We also need to update the resource bundle name that it should load as we changed it in previous step:
<property name="resourceBundles"> <list> <value>alfresco.web-extension.messages.add-metadata-template-doclib-custom</value> -
Define a custom evaluator for the custom Metadata Template.
This evaluator should return true if the node is of type acme:document. This is also done in the add-metadata-template-doclib-context.xml Spring context file:
...
    <bean id="alfresco.tutorials.evaluator.isAcmeDocument" parent="evaluator.doclib.action.nodeType">
        <property name="types">
            <list>
                <value>acme:document</value>
            </list>
        </property>
    </bean>
</beans>
Here we are using a built in evaluator called evaluator.doclib.action.nodeType. It can be used to evaluate if a node is of a specific type. We set the bean id so it matches what we specified above as <metadata-template><evaluator>. We add only the content type QName for the Acme Document type (i.e. acme:document) in the list.There are a number of predefined evaluators (i.e. out of the box evaluators ready to use):
See the slingshot-documentlibrary-context.xml file located in the SkyVault/tomcat/webapps/share/WEB-INF/classes/SkyVault directory of your SkyVault Content Services installation for more information about out-of-the-box evaluators.
- The implementation of the custom Metadata Template is now complete. However, before we start the server up we need to make sure we have the Share AMP installed that provides the Create Acme Document feature. This will make it easy to create a new text document with the specific acme:document type so we can test our new Metadata Template. Download the source and include the AMP in your AIO project.
-
Make sure web application resources are available when using
-Prun.
Because we got a lot of web application resources located under the all-in-one/add-metadata-template-doclib-share/src/main/amp/web directory, and this directory is not included in the AMP when using the -Prun profile for hot-reloading, we need another way of picking them up. This is done by adding the resource path to the virtual web application context, open the all-in-one/runner/tomcat/context-share.xml file and add the following configuration:
    <Resources className="org.apache.naming.resources.VirtualDirContext"
               extraResourcePaths="/=${project.parent.basedir}/add-metadata-template-doclib-share/target/add-metadata-template-doclib-share/web" />

    <Loader className="org.apache.catalina.loader.VirtualWebappLoader"
            searchVirtualFirst="true"
            virtualClasspath="${project.parent.basedir}/add-metadata-template-doclib-share/target/classes;
            ${project.parent.basedir}/add-metadata-template-doclib-share/target/add-metadata-template-doclib-share/config;
            ${project.parent.basedir}/add-metadata-template-doclib-share/target/test-classes;
            ${project.parent.basedir}/share/target/test-classes" />
If there are already other Share AMP configurations in the file then it would look something like this:<Resources className="org.apache.naming.resources.VirtualDirContext" extraResourcePaths="/=${project.parent.basedir}/add-theme-share/target/add-theme-share/web,/=${project.parent.basedir}/add-action-doclib-share/target/add-action-doclib-share/web,/=${project.parent.basedir}/add-metadata-template-doclib-share/target/add-metadata-template-doclib-share/web" /> <Loader className="org.apache.catalina.loader.VirtualWebappLoader" searchVirtualFirst="true" virtualClasspath="${project.parent.basedir}/add-theme-share/target/classes; ${project.parent.basedir}/add-theme-share/target/add-theme-share/config; ${project.parent.basedir}/add-theme-share/target/test-classes; ${project.parent.basedir}/add-action-doclib-share/target/classes; ${project.parent.basedir}/add-action-doclib-share/target/add-action-doclib-share/config; ${project.parent.basedir}/add-action-doclib-share/target/test-classes; ${project.parent.basedir}/add-metadata-template-doclib-share/target/classes; ${project.parent.basedir}/add-metadata-template-doclib-share/target/add-metadata-template-doclib-share/config; ${project.parent.basedir}/add-metadata-template-doclib-share/target/test-classes; ${project.parent.basedir}/share/target/test-classes" /> -
Build and start the application server as follows:
/all-in-one$ mvn clean install -Prun
-
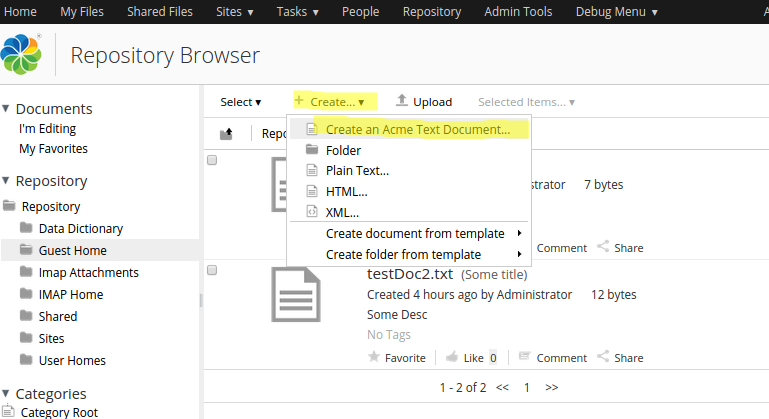
Now, login to Share
(http://localhost:8080/share) and you will see the new
Create... | Create an Acme Text Document menu item as follows:
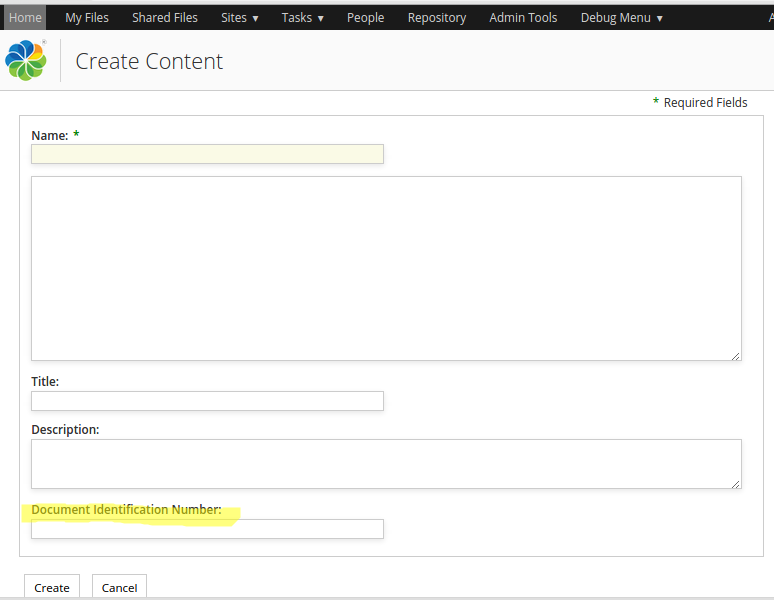
Clicking the new menu item brings up a form that looks like this:
Note the custom field for the document identifier at the bottom of the form. Fill in some values for the Name, Title, and Descriptor fields. Give the Document Identifier a value of DOC001 and then click the Create button.
-
The Acme Document file should now display in the Browse view with the custom
metadata template:

Implementing custom rendering for the Document Identifier field.
-
Add an extra field representing the Acme Doc Id custom rendered
Open the add-metadata-template-doclib-extension-modules.xml Surf Extension module file again, it is located in the all-in-one/add-metadata-template-doclib-share/src/main/amp/config/alfresco/web-extension/site-data/extensions directory.
Then update the Metadata Template definition so it has the extra Acme Document Id field at the end:
<extension>
    <modules>
        <module>
            <id>Add Acme Document Metadata Template</id>
            <version>1.0</version>
            <auto-deploy>true</auto-deploy>
            <configurations>
                <config evaluator="string-compare" condition="DocumentLibrary">
                    <metadata-templates>
                        <template id="acmeDocMetadataTemplate">
                            <evaluator>alfresco.tutorials.evaluator.isAcmeDocument</evaluator>
                            <banner index="10" id="lockBanner" evaluator="evaluator.doclib.metadata.hasLockBanner">{lockBanner}</banner>
                            <banner index="20" id="syncTransientError" evaluator="evaluator.doclib.metadata.hasSyncTransientErrorBanner">{syncTransientError}</banner>
                            <banner index="30" id="syncFailed" evaluator="evaluator.doclib.metadata.hasSyncFailedBanner">{syncFailed}</banner>
                            <line index="10" id="date">{date}{size}</line>
                            <line index="20" id="description" view="detailed">{description}</line>
                            <line index="30" id="tags" view="detailed">{tags}</line>
                            <line index="40" id="categories" view="detailed" evaluator="evaluator.doclib.metadata.hasCategories">{categories}</line>
                            <line index="50" id="acmeDocId" view="detailed">{acme_documentId org.alfresco.tutorial.label.acme_documentId}</line>
                            <line index="60" id="social" view="detailed">{social}</line>
                            <line index="70" id="acmeDocIdCustom" view="detailed">{acmeDocumentIdCustomRendition org.alfresco.tutorial.label.acme_documentId}</line>
                        </template>
                    </metadata-templates>
                </config>

                <config evaluator="string-compare" condition="DocLibCustom">
                    <dependencies>
                        <js src="components/documentlibrary/custom-metadata-template-renderer.js"/>
                    </dependencies>
                </config>
            </configurations>
        </module>
    </modules>
</extension>
Here we have added an extra line identified with the id="acmeDocIdCustom" that will represent the custom rendered document identifier. The custom rendering will be done via some client side JavaScript code that is going to be associated with the line via the property name acmeDocumentIdCustomRendition. The custom JavaScript code will be loaded via the above DocLibCustom definition that loads a new JavaScript file called custom-metadata-template-renderer.js. This file needs to be created next.
-
Add custom JavaScript file with the rendering code
Add a JavaScript file called custom-metadata-template-renderer.js to the all-in-one/add-metadata-template-doclib-share/src/main/amp/web/components/documentlibrary directory. Then add the following function:
(function () {
    YAHOO.Bubbling.fire("registerRenderer",
        {
            propertyName: "acmeDocumentIdCustomRendition",
            renderer: function acmeDocumentId_renderer(record, label) {
                var jsNode = record.jsNode,
                    properties = jsNode.properties,
                    html = "";
                var acmeDocId = properties["acme:documentId"] || "";
                html = '<span>' + label + '<h2>' + acmeDocId + '</h2></span>';

                return html;
            }
        });
})();
The important thing here is that the propertyName matches what we got in the line element text content in the metadata template, which is acmeDocumentIdCustomRendition. There is not much of a fancy rendering going on here, we just change the presentation of the property value so it is displayed as header <h2>. -
The implementation of the custom rendering of the property is now complete,
build and start the application server as follows:
/all-in-one$ mvn clean install -Prun
-
Now, log in to Share
(http://localhost:8080/share) and look at the file
previously created, you should see the extra Acme Doc Id field with the value in
h2 style:


