| Name | Remove Surf Page Content |
| Extension Point | Surf Extension Modules |
| Description | This tutorial demonstrates how to prevent content from being rendered in a Surf page. This tutorial also shows how to use evaluations to decide whether content should be rendered or not. |
| Implementation Steps | A simple and effective way to remove content from a Surf page is to follow these steps:
|
| Related Information | This tutorial assumes that you are familiar with the Spring Surf development framework. If you are new to it then read up on it here before starting this tutorial. If you have not already done so you should also review the Introducing SurfBug topic as this tool is used in this tutorial. |
| Source Code | Go to code |
- Add a new Share AMP module called remove-page-content-share to the AIO project. Instructions for how to do that can be found here (Note. do not add a repository AMP).
-
Identify which component that corresponds to the content that should be
removed.
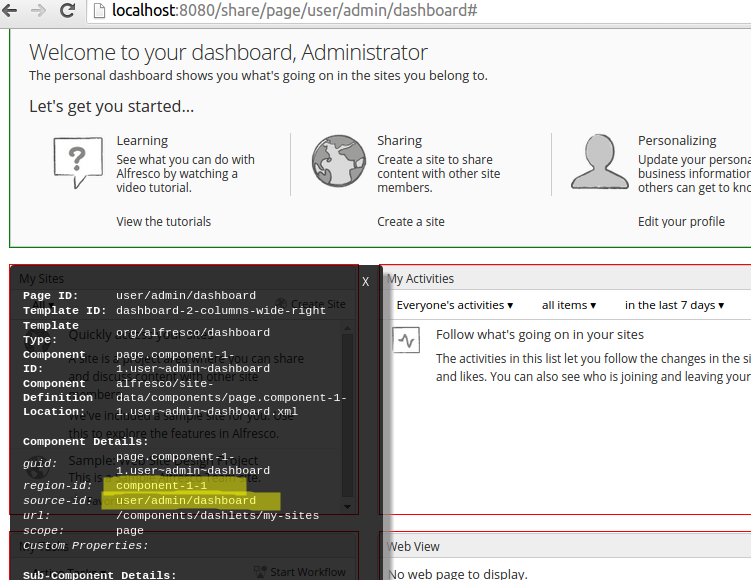
For this we use the SurfBug tool. Once the tool is activated (from http://localhost:8080/share/page/surfBugStatus) we can identify the component on the page as follows:
In this case we have clicked on the "My Sites" dashlet, which brings up the above black information box where we can see the region-id, source-id, and scope values that we need to be able to hide the dashlet.
-
Add a new Surf Extension Modules file called
remove-page-content-extension-modules.xml to the
all-in-one/remove-page-content-share/src/main/amp/config/alfresco/web-extension/site-data/extensions
directory (note. it is important to give this file a unique name when several
Share AMPs
are installed, otherwise the last one wins):
<extension>
    <modules>
        <module>
            <id>Remove content from Share (hide My Sites)</id>
            <version>1.0</version>
            <auto-deploy>true</auto-deploy>
            <components>
                <component>
                    <region-id>component-1-1</region-id>
                    <source-id>user/{userid}/dashboard</source-id>
                    <scope>page</scope>
                    <sub-components>
                        <sub-component id="default">
                            <evaluations>
                                <evaluation id="guaranteedToHide">
                                    <render>false</render>
                                </evaluation>
                            </evaluations>
                        </sub-component>
                    </sub-components>
                </component>
            </components>
        </module>
    </modules>
</extension>
What we are doing here is overriding the default sub-component and putting in a new evaluation for it. The targeted component is identified with the values we got via SurfBug. So we set region-id to component-1-1, source-id to user/{userid}/dashboard, and scope to page. Note that we are changing the source-id from the specific one for Administrators (i.e. user/admin/dashboard) to one that is valid for all user dashboards.
The sub-component evaluation definition is quite simple, we just give it a unique "bogus" id and set rendering to false. This evaluation definition is guaranteed to hide the component.
This module will be deployed automatically when the application server is started as we have the auto-deploy property set to true.
-
The implementation of this sample is now done, build and start the application
server as follows:
/all-in-one$ mvn clean install -Prun
-
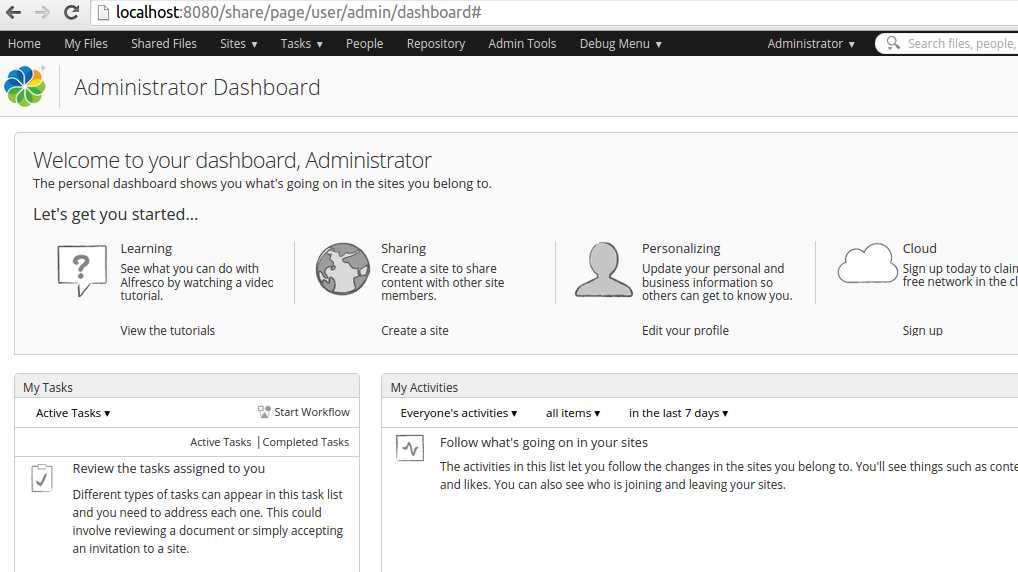
Now, log in to Share
(http://localhost:8080/share) and you will no longer
see the "My Sites" dashlet on the Dashboard (that is, the "My Tasks" dashlet has
taken its place):
 Note: A Surf Extension module like this can be deployed and undeployed during runtime. And this means that an Administrator can control when different customizations should be visible or hidden. This is managed via the Module deployment page that can be found at: http://localhost:8080/share/service/modules/deploy.
 -
Further information
Some features introduced in this tutorial are explained in more detail in the following sections:
Parametrized source-id mapping: Every Share user gets their own dashboard page, which enables them to customize the layout to suit their own needs, but each user dashboard is generated from a single preset. In this tutorial you specify user/{userid}/dashboard. Note the use of the userid variable. This allows you to change the appearance of the dashboard for any user, not just the admin user.
Extending existing sub-components: When the dashboard pages were first created, the concept of sub-components in Surf did not exist. Consequently, if you search through the existing dashboard configuration files you will not find sub-components specified. Surf automatically converts these "legacy" components into the new extensible components containing a single sub-component with the ID "default".
This allows you to add new content to these legacy components through sub-components, or customize the original content without affecting any new content. In the previous configuration XML, you can change the behaviour of the components through modification of the default sub-component.
Note that multiple modules can extend the same component, which is why the deployment order of modules is important.
Sub-component evaluations: Every sub-component can optionally have zero or more evaluations. Each evaluation acts like an AND gate to a series of evaluators where an evaluation is considered successful if no evaluators fail. If an evaluation contains no evaluators, it is still considered to have evaluated successfully because nothing has failed.
The purpose of an evaluation is to change the behaviour of a sub-component in one of three ways:
- Change the Web Script that renders the content by specifying a new URL.
- Change the default properties (and/or provide new properties) that are passed to the Web Script.
- Control whether or not the sub-component is actually rendered.
In this example, you are simply overriding the default behaviour of the sub-component to prevent it from rendering by setting the <render> element to have a value of false (this defaults to true) if not defined.
.
