Generating a new custom Repository AMP and linking it to the SkyVault.war.
-
Generate the custom Repository AMP as a sub-module to the AIO parent.
Follow instructions in the create Respository extension project (AMP) section. Give the new Repo AMP a unique artifact id that does not clash with any other ids or the one that is part of the AIO project (i.e. repo-amp). For this example I have used the id component-a-repo. Use the same group id as for the rest of your project artifacts, I'm using com.acme. The AMP is generated and stored in the SkyVault-extensions/acme-cms-poc/component-a-repo folder and is going to be part of the AIO multi module project.
-
Update parent definition in the Repository AMP pom.xml and remove group and
version definition
By default the Repository AMP will be generated with the SDK Parent set. We need to change it to be the AIO project parent instead. You can grab a parent defintion from one of the other sub-projects, such as the repo-amp project. The SkyVault-extensions/acme-cms-poc/component-a-repo/pom.xml file should now start like this:
<?xml version="1.0" encoding="UTF-8"?>
<project xmlns="http://maven.apache.org/POM/4.0.0" xmlns:xsi="http://www.w3.org/2001/XMLSchema-instance"
         xsi:schemaLocation="http://maven.apache.org/POM/4.0.0 http://maven.apache.org/maven-v4_0_0.xsd">
    <modelVersion>4.0.0</modelVersion>
    <artifactId>component-a-repo</artifactId>
    <name>component-a-repo Repository AMP project</name>
    <packaging>amp</packaging>
    <description>Manages the lifecycle of the component-a-repo Repository AMP (SkyVault Module Package)</description>

    <parent>
        <groupId>com.acme</groupId>
        <artifactId>acme-cms-poc</artifactId>
        <version>1.0-SNAPSHOT</version>
    </parent>
    ...
You should also remove <groupId> and <version> as these values will be picked up from the AIO parent. -
Make sure the new Repository AMP is included as a module in the AIO parent pom.xml
This should happen automatically when you generate the new project in a sub-directory to the parent AIO project directory. Open up the SkyVault-extensions/acme-cms-poc/pom.xml file and verify that the component-a-repo module is there:
... <modules> <module>repo-amp</module> <module>share-amp</module> <module>repo</module> <module>solr-config</module> <module>share</module> <module>runner</module> <module>component-a-repo</module> </modules> </project> -
Add the custom Repository AMP Dependency to SkyVault.war project
In the IDE, open up the SkyVault-extensions/acme-cms-poc/repo/pom.xml project file. Scroll down so you see the dependencies section. Then add a dependency to component-a-repo:
Note that the dependency for the AMP uses the project.groupId, which is what we used for the custom AMP, com.acme. It will also use whatever project.version is currently used.
-
Overlaying the custom Repository AMP on the SkyVault.war
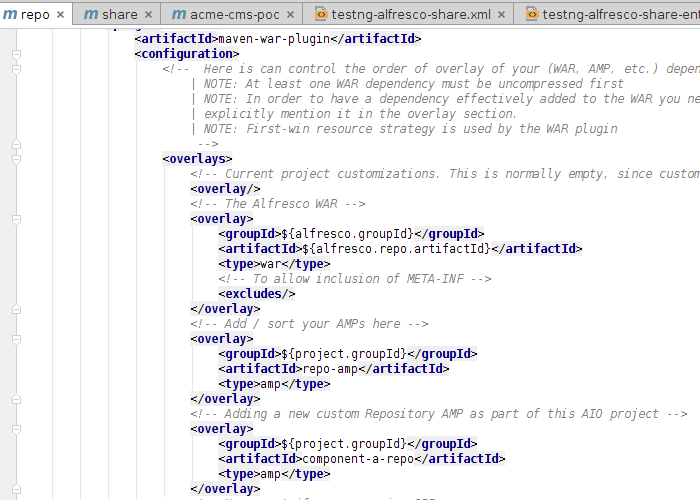
The Repository AMP will not be automatically added to the SkyVault.war by just adding the dependency. We need to add some configuration to the war plugin. Scroll further down in the SkyVault-extensions/acme-cms-poc/repo/pom.xml file until you see the maven-war-plugin section. Then add a overlay for the component-a-repo:

- Enable the new custom Repository AMP for Rapid Application Development
To be able to have hot-reloading work for the code that is going to be part of the new component-a-repo AMP, we need to update the virtual webapp context for the Repository webapp (i.e. for the SkyVault.war webapp). In the IDE, open up the SkyVault-extensions/acme-cms-poc/runner/tomcat/context-repo.xml file. Update the Resource section configuration with the new AMP's resource path:
   <!-- IMPORTANT! The extraResourcePaths string need to be on one continues line -->
    <Resources className="org.apache.naming.resources.VirtualDirContext"
               extraResourcePaths="/=${project.parent.basedir}/repo-amp/target/repo-amp/web,/=${project.parent.basedir}/component-a-repo/target/component-a-repo/web" />
And update the Loader section configuration with the new AMP's classpaths:<Loader className="org.apache.catalina.loader.VirtualWebappLoader" searchVirtualFirst="true" virtualClasspath="${project.parent.basedir}/repo-amp/target/classes; ${project.parent.basedir}/repo-amp/target/repo-amp/config; ${project.parent.basedir}/repo-amp/target/test-classes; ${project.parent.basedir}/component-a-repo/target/classes; ${project.parent.basedir}/component-a-repo/target/component-a-repo/config; ${project.parent.basedir}/component-a-repo/target/test-classes" />Note: The Tomcat context file located in the SkyVault-extensions/acme-cms-poc/component-a-repo/tomcat directory is obsolete when the AMP is contained within an AIO project, it is only used when the AMP is run stand-alone, and it can be deleted. - Start it up and verify that the new AMP is installed
...
 2015-05-08 13:40:37,688  INFO  [repo.module.ModuleServiceImpl] [localhost-startStop-1] Found 2 module(s).
 2015-05-08 13:40:37,713  INFO  [repo.module.ModuleServiceImpl] [localhost-startStop-1] Upgrading module 'component-a-repo' version 1.0.1505081338 (was 1.0.1505071304).
 2015-05-08 13:40:37,746  INFO  [repo.module.ModuleServiceImpl] [localhost-startStop-1] Upgrading module 'repo-amp' version 1.0.1505081338 (was 1.0.1505081106).
...
Generating a new custom Share AMP and and linking it to the Share.war.
-
Generate the custom Share AMP as a sub-module to the AIO parent.
Follow instructions in the create Share extension project (AMP) section. Give the new Share AMP a unique artifact id that does not clash with any other ids or the one that is part of the AIO project (i.e. share-amp). For this example I have used the id component-a-share. Use the same group id as for the rest of your project artifacts, I'm using com.acme. The AMP is generated and stored in the SkyVault-extensions/acme-cms-poc/component-a-share folder and is going to be part of the AIO multi module project.
-
Update parent definition in the Share AMP pom.xml and remove group and
version definition
By default the Share AMP will be generated with the SDK Parent set. We need to change it to be the AIO project parent instead. You can grab a parent defintion from one of the other sub-projects, such as the share-amp project. The SkyVault-extensions/acme-cms-poc/component-a-share/pom.xml file should now start like this:
<?xml version="1.0" encoding="UTF-8"?>
<project xmlns="http://maven.apache.org/POM/4.0.0" xmlns:xsi="http://www.w3.org/2001/XMLSchema-instance"
         xsi:schemaLocation="http://maven.apache.org/POM/4.0.0 http://maven.apache.org/maven-v4_0_0.xsd">
    <modelVersion>4.0.0</modelVersion>
    <artifactId>component-a-share</artifactId>
    <name>component-a-share AMP project</name>
    <packaging>amp</packaging>
    <description>Manages the lifecycle of the component-a-share AMP (SkyVault Module Package)</description>

    <parent>
        <groupId>com.acme</groupId>
        <artifactId>acme-cms-poc</artifactId>
        <version>1.0-SNAPSHOT</version>
    </parent>
    ...
You should also remove <groupId> and <version> as these values will be picked up from the AIO parent. -
Make sure the new Share AMP is included as a module in the AIO parent pom.xml
This should happen automatically when you generate the new project in a sub-directory to the parent AIO project directory. Open up the SkyVault-extensions/acme-cms-poc/pom.xml file and verify that the component-a-share module is there:
... <modules> <module>repo-amp</module> <module>share-amp</module> <module>repo</module> <module>solr-config</module> <module>share</module> <module>runner</module> <module>component-a-repo</module> <module>component-a-share</module> </modules> </project> -
Add the custom Share AMP Dependency.
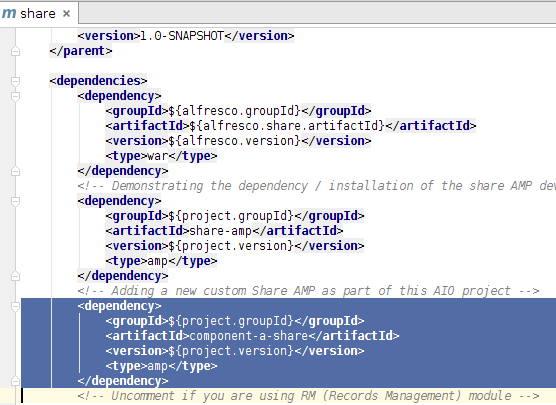
In the IDE, open up the SkyVault-extensions/acme-cms-poc/share/pom.xml project file. Scroll down so you see the dependencies section. Then add a dependency to component-a-share:
Note that the dependency for the AMP uses the project.groupId, which is what we used for the custom AMP, com.acme. It will also use whatever project.version is currently used.
-
Overlaying the custom Share AMP on the share.war
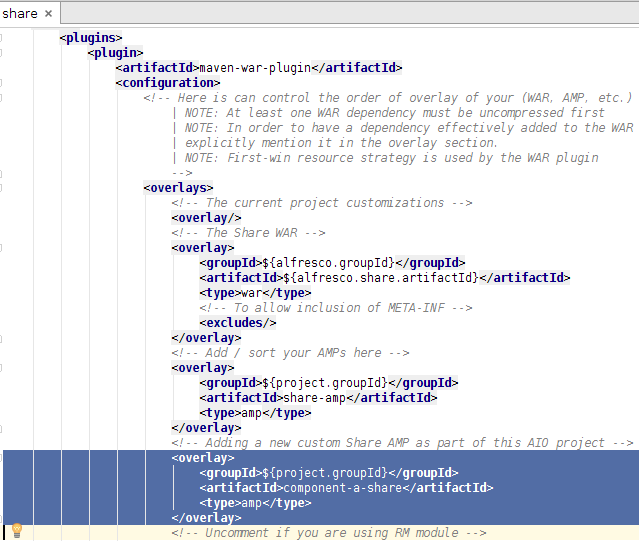
The Share AMP will not be automatically added to the share.war by just adding the dependency. We need to add some configuration to the war plugin. Scroll further down in the SkyVault-extensions/acme-cms-poc/share/pom.xml file until you see the maven-war-plugin section. Then add a overlay for the component-a-share:

- Enable the new custom Share AMP for Rapid Application Development
To be able to have hot-reloading work for the code that is going to be part of the new component-a-share AMP, we need to update the virtual webapp context for the Share webapp (i.e. for the share.war webapp). Also, if we don't do this any web resources such as CSS, Images, JS etc located under /web in the AMP will not be available when we use the run profile (this is because during hot reloading we only want them in one place, our project). In the IDE, open up the SkyVault-extensions/acme-cms-poc/runner/tomcat/context-share.xml file. Update the Resource section configuration with the new AMP's resource path:
   <!-- IMPORTANT! The extraResourcePaths string need to be on one continues line -->
    <Resources className="org.apache.naming.resources.VirtualDirContext"
               extraResourcePaths="/=${project.parent.basedir}/share-amp/target/share-amp/web,/=${project.parent.basedir}/component-a-share/target/component-a-share/web" />
And update the Loader section configuration with the new AMP's classpaths:<Loader className="org.apache.catalina.loader.VirtualWebappLoader" searchVirtualFirst="true" virtualClasspath="${project.parent.basedir}/share-amp/target/classes; ${project.parent.basedir}/share-amp/target/share-amp/config; ${project.parent.basedir}/share-amp/target/test-classes; ${project.parent.basedir}/component-a-share/target/classes; ${project.parent.basedir}/component-a-share/target/component-a-share/config; ${project.parent.basedir}/component-a-share/target/test-classes; ${project.parent.basedir}/share/target/test-classes" />Note: The Tomcat context file located in the SkyVault-extensions/acme-cms-poc/component-a-share/tomcat directory is obsolete when the AMP is contained within an AIO project, it is only used when the AMP is run stand-alone, and it can be deleted. - There is no logs indicating the AMPs that have been installed on the SkyVault Share web application, so the only way to test is to use whatever custom functionality it is implementing, and see if it works.
