Generating a new custom Repository AMP and linking it to the SkyVault.war.
-
Generate the custom Repository AMP.
Follow instructions in the create Respository extension project (AMP) section. Give the new Repo AMP a unique artifact id that does not clash with any other ids or the one that is part of the AIO project (i.e. repo-amp). For this example I have used the id component-a-repo. Use the same group id as for the rest of your project artifacts, I'm using com.acme. The AMP is stored in the SkyVault-extensions/component-a-repo folder and is not part of the AIO build.
-
Build and release version 1.0.0 of the Repository AMP. (Optional)
It is best to avoid SNAPSHOTS when this AMP is included in the All-in-One project. So, use the maven-release-plugin and release and tag the AMP so it is ready to be include in the main AIO project.
Note: Going through how to configure and setup the maven-release-plugin is out of scope for this article. -
Add the custom Repository AMP Dependency
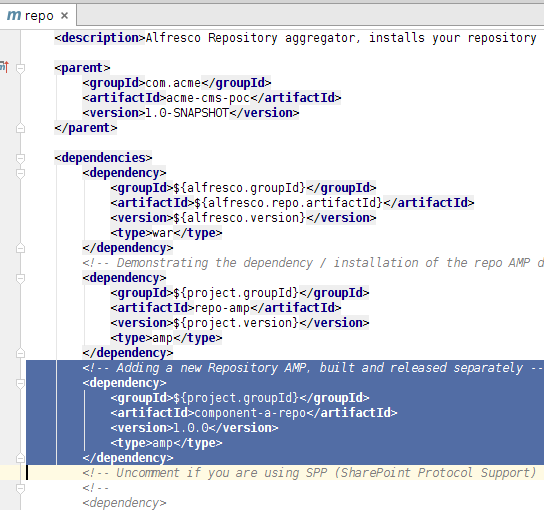
In the IDE, open up the SkyVault-extensions/acme-cms-poc/repo/pom.xml project file. Scroll down so you see the dependencies section. Then add a dependency to component-a-repo:
Note that dependency for the AMP uses the project.groupId, which is the same as what we used for the custom AMP, com.acme. If you skipped the build and release step (2), then use version 1.0-SNAPSHOT instead.
-
Overlaying the custom Repository AMP on the SkyVault.war
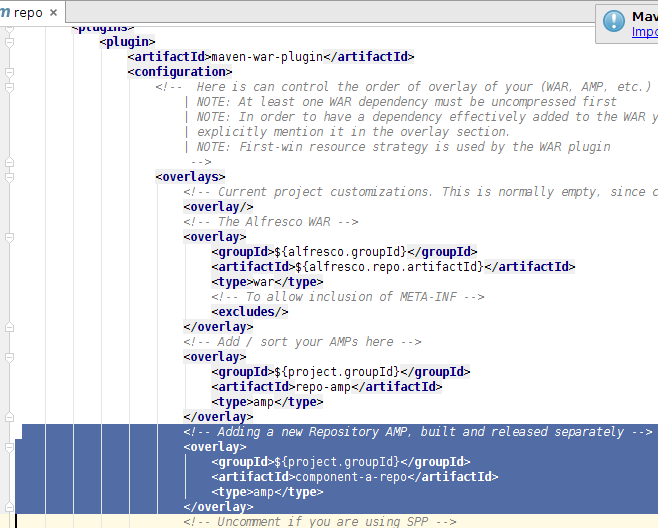
The Repository AMP will not be automatically added to the SkyVault.war by just adding the dependency. We need to add some configuration to the war plugin. Scroll further down in the SkyVault-extensions/acme-cms-poc/repo/pom.xml file until you see the maven-war-plugin section. Then add a overlay for the component-a-repo:

- Run the AIO project and verify that the new repo module is recognized
...
2015-05-07 14:18:44,770  INFO  [repo.module.ModuleServiceImpl] [localhost-startStop-1] Found 2 module(s).
2015-05-07 14:18:44,791  INFO  [repo.module.ModuleServiceImpl] [localhost-startStop-1] Installing module 'component-a-repo' version 1.0.0.
2015-05-07 14:18:44,808  INFO  [repo.module.ModuleServiceImpl] [localhost-startStop-1] Installing module 'repo-amp' version 1.0.1505071417.
....
Generating a new custom Share AMP and adding it to the Share.war.
-
Generate the custom Share AMP.
Follow instructions in the create Share extension project (AMP) section. Give the new Share AMP a unique artifact id that does not clash with any other ids or the one that is part of the AIO project (i.e. share-amp). For this example I have used the id component-a-share. Use the same group id as for the rest of your project artifacts, I'm using com.acme. The AMP is stored in the SkyVault-extensions/component-a-share folder and is not part of the AIO build.
-
Build and release version 1.0.0 of the Share AMP. (Optional)
It is best to avoid SNAPSHOTS when this AMP is included in the All-in-One project. So, use the maven-release-plugin and release and tag the AMP so it is ready to be include in the main AIO project.
Note: Going through how to configure and set up the maven-release-plugin is out of scope for this article. -
Add the custom Share AMP Dependency.
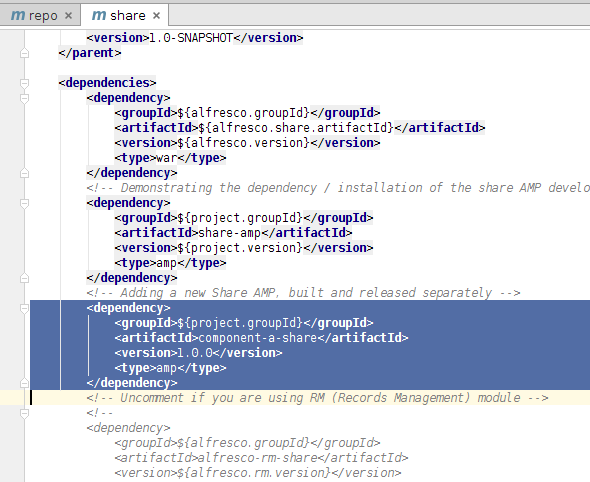
In the IDE, open up the SkyVault-extensions/acme-cms-poc/share/pom.xml project file. Scroll down so you see the dependencies section. Then add a dependency to component-a-share:
Note that dependency for the AMP uses the project.groupId, which is the same as what we used for the custom AMP, com.acme. If you skipped the build and release step (2), then use version 1.0-SNAPSHOT instead.
-
Overlaying the custom Share AMP on the share.war
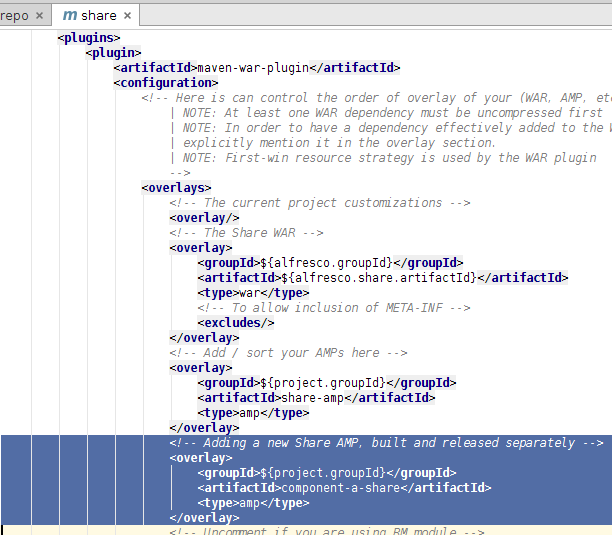
The Share AMP will not be automatically added to the share.war by just adding the dependency. We need to add some configuration to the war plugin. Scroll further down in the SkyVault-extensions/acme-cms-poc/share/pom.xml file until you see the maven-war-plugin section. Then add a overlay for the component-a-share:

- There is no logs indicating the AMPs that have been installed on the SkyVault Share web application, so the only way to test is to use whatever custom functionality it is implementing, and see if it works.
