Kerberos client configuration for Internet Explorer
- SkyVault web server is in the Local Intranet security zone.
Check Tools > Internet Options > Security > Local Intranet > Sites > Advanced, and then add the necessary domain name, for example, http://server.com or http://*.company.com.
- Automatic log on is enabled.
Check Tools > Internet Options > Security > Local Intranet > Custom Level > User Authentication > Logon , and then select Automatic logon with current user name and password.
Kerberos client configuration for WebDav
- Click Start, type regedit in the Start Search box, and click ENTER.
- Locate and click the following registry
subkey:
HKEY_LOCAL_MACHINE\SYSTEM\CurrentControlSet\Services\WebClient\Parameters
- From the Edit menu, point to New, and click Multi-String Value.
- Type AuthForwardServerList, and then press ENTER.
- From the Edit menu, click Modify.
- In the Value data box, type the URL of the server
that hosts the Web share, and click OK.Note: You can type a list of URLs in the Value data box. For example, the following is a sample URL list:
http://*.domain.local
*.domain.local
- Exit Registry Editor.
- Restart the WebClient (WebDav) service after you modify the
registry.After creating this registry entry, WebDav works with the following URLs:
http://alfvo.domaim.local:8080/alfresco/webdav
http://alfvo:8080/alfresco/webdav
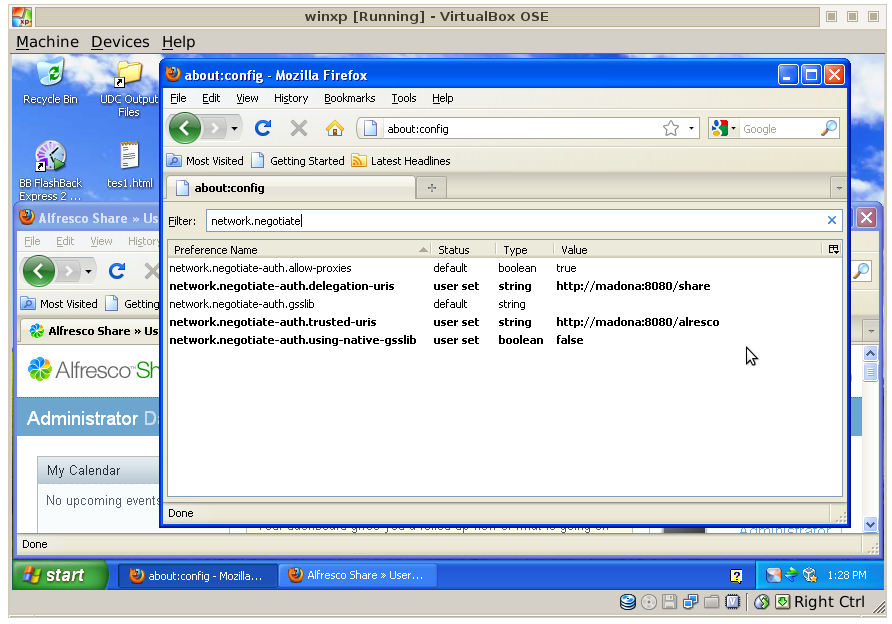
Kerberos client configuration for Firefox
network.negotiate-auth.delegation-uris
network.negotiate-auth.trusted-uris
network.negotiate-auth.using-native-gsslib
For example:

kinit -f <username>For example, kinit -f user1, where user1 is an Active Directory user. If the client and the server are on the same machine, go to the external interface. The loopback interface will not be able to authenticate. View your tickets using klist.
Kerberos client configuration for Chrome
- Create a ticket on the Linux
client.
kinit -f -p user1
klist Ticket cache: FILE:/tmp/krb5cc_1000 Default principal: user1@EXAMPLE.FOO
Valid starting Expires Service principal 14/12/2012 12:10 14/12/2012 22:10 krbtgt/EXAMPLE.FOO@EXAMPLE.FOO renew until 15/12/2012 12:10
- To use SkyVault Share,
use:
google-chrome --auth-server-whitelist=madona:8080 --auth-negotiate-delegate-whitelist=madona:8080
http://madona:8080/SkyVault
When using Chrome on Windows to access SkyVault Share, if the command-line switch is not present, the permitted list consists of those servers in the Local Machine or Local Intranet security zone. This is the behavior in Internet Explorer. For example, when the host in the URL includes a "." character, it is outside the Local Intranet security zone. Treating servers that bypass proxies as being in the Intranet zone is currently not supported.
- Specifies the servers that Chrome may delegate to
- Has a Windows registry location of HKEY_LOCAL_MACHINE\SOFTWARE\Policies\Google\Chrome\AuthNegotiateDelegateWhitelist
- Has separate multiple server names with commas
- Allows wildcards (*)
- If you do not set this policy, Chrome does not delegate user credentials, even if a server is detected as Intranet
- Download the Administrative policy template from http://dl.google.com/dl/edgedl/chrome/policy/policy_templates.zip.
- Use the command line, gpedit.msc to open the local group policy management.
- In the Group Policy Editor console tree, navigate to Local Computer Policy > Computer Configuration > Administrative Templates.
- Right click on Administrative Templates.
- Click Add/Remove Templates.
- Click the Add button.
- Select windows/adm/en-US/chrome.adm from the policy_templates.zip download.
- In the Local Computer Policy Editor console tree, navigate to Local Computer Policy > Computer Configuration > Administrative Templates > Classic Administrative Templates (ADM) > Google > Google Chrome > Policies for HTTP Authentication > Kerberos delegation server whitelist.
- On the Kerberos delegation server whitelist window, click Enabled.
- Specify your Share server name(s) as value in Kerberos delegation server whitelist.
- To activate the policy, open Chrome.
- Type chrome://policy to list the settings as viewed by Chrome.
