Solr 6 supports sharded indexes with SSL. Use the Search Server Sharding page to set up and configure a Solr 6 sharded search index.
- Check that you have installed SkyVault Content Services 5.2 and have a valid license.
- Support for shard groups requires a clustered license. Make sure that you enable clustering on your ACS license. For more information, see Repository server clustering and Uploading a new license.
- Open the Admin Console. For more information, see Launching the Admin Console.
-
In Repository Services, click Search Server
Sharding.
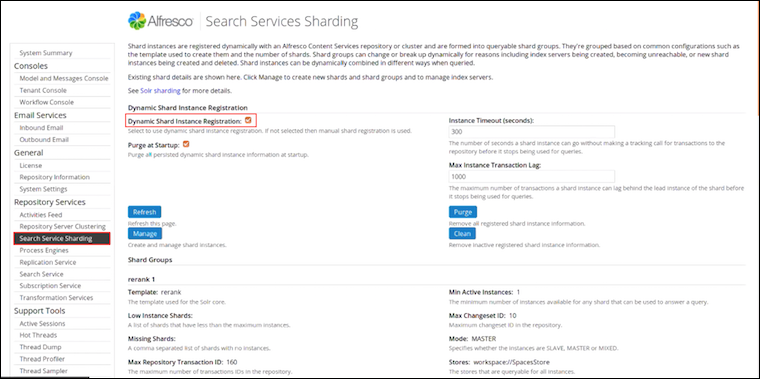
You see the Search Server Sharding page. It displays information about dynamic shard index registration, shard groups, and shard instances.
-
Under Dynamic Shard Instance Registration, select
Dynamic Shard Instance Registration and set the other shard
instance properties.
Shard registration property Example setting What is it? Dynamic Shard Instance Registration Enabled Yes Select this property to enable dynamic shard instance registration. If disabled, manual shard registration is used. Purge at Startup No This property purges all persisted dynamic shard instance information at startup. Instance Timeout (seconds) 100 This specifies the number of seconds a shard instance can go without making a tracking call for transactions to the repository before it stops being used for queries. Note: When tracking large change sets or rebuilding your indexes, increase the shard timeout. For example, change the value of this property to 3200 or 7200 seconds.Max Instance Transaction Lag 1000 This specifies the maximum number of transactions a instance can lag behind the lead instance of the shard before it stops being used for queries. - Click Refresh to refresh this page.
- Click Purge to remove all registered shard instance information and start from clean.
- Click Clean to remove inactive registered shard instance information.
-
Click Manage to create and manage shard instances.
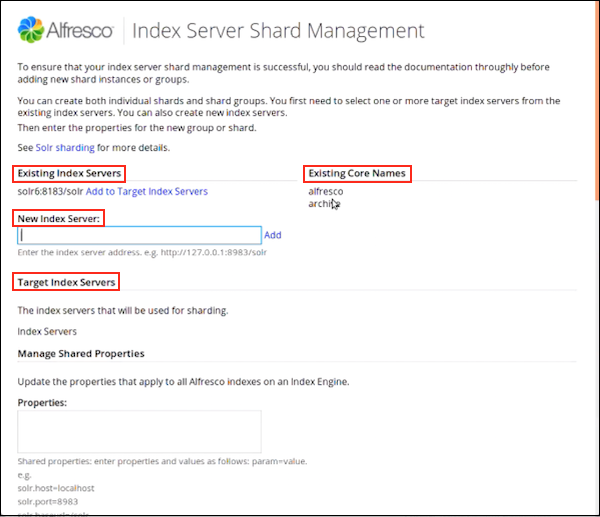
You see the Index Server Shard Management window. Use this window to create individual shards or shard groups.
-
Use Existing Index Servers to view a list of existing index
servers and to create new index servers.
To add a new index server, specify the server address in New Index Server and click Add.
You can view the newly created index server under Target Index Servers.
Click Add to Target Index Servers next to the server you want to add to the list of target index servers. Target Index Servers displays a list of index servers where you want to make the new shards.
- Under Existing Core Names, you can view a list of the core names already in use.
-
Under Target Index Servers, you can view a list of index
servers that will be used for sharding.
To remove an index server from the list of servers that will be used for sharding, click Remove.
-
Next, you need to create a core for the shard. There are two ways to do this. You
can either:
- use the Manage Default Indexes and Manage Shared Properties sections to create default indexes - see Step 7 (e) and 7 (f); or
- use the New Shard Group and New Shard Instance sections to create a shard group and instance - see Step 7 (g) and 7 (i).
-
Use Manage Default Indexes to create default indexes on the
servers listed in Target Index Servers.
The Manage Default Indexes section:
- appears only when you add a new index server.
- creates a core for a given shard, and therefore, can be used as an alternative to creating shards using the New Shard Group section (Step 7f).
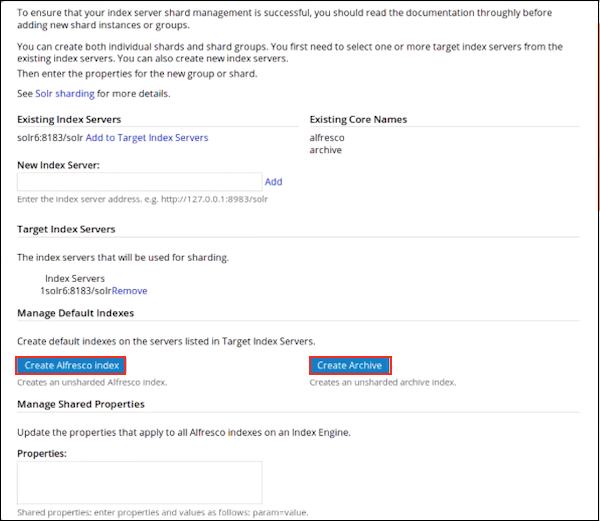 Important: The cores are visible in the Solr Admin web application only after you create them using the Index Server Sharding page.
- Click Create SkyVault Index to create an unsharded SkyVault index.
- Click Create Archive to create an unsharded archive
index.
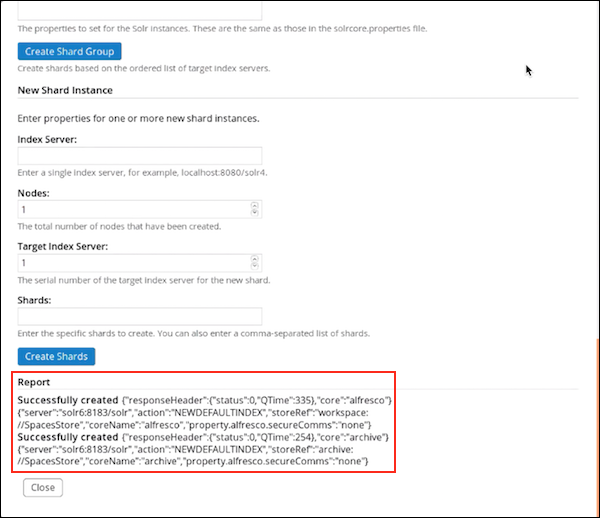
Use the Report section at the end of this page to view the detailed core creation message.
Check the Solr Admin UI to ensure that both the indexes are correctly listed.

-
Use Manage Shared Properties to update the properties that
apply to all SkyVault indexes on an Index Engine.
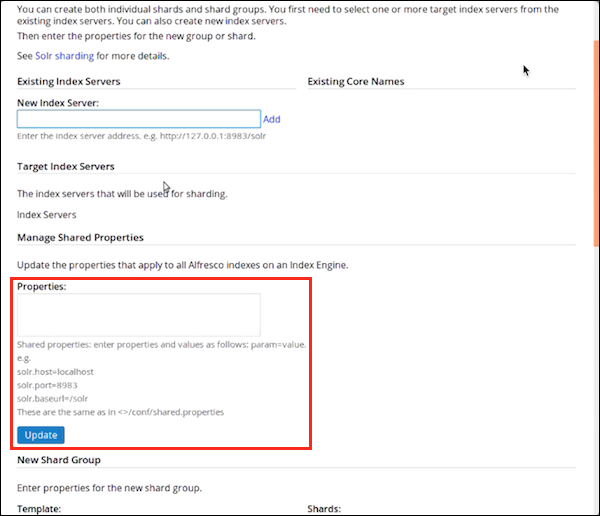
These properties are the same as in SkyVault-search-services-1.0.0.zip/solrhome/conf/shared.properties. For example:
solr.host=localhost
solr.port=8983
solr.baseurl=/solr
-
Alternatively, to create a shard group, set the following properties under
New Shard Group:
Shard group property Example setting What is it? Template rerank This specifies the template used for the shard group. Store workspace://SpacesStore This specifies the stores that are queryable for all shards. Core This specifies the name of the Solr core. Properties solr.suggester.enabled SkyVault.secureComms=https
SkyVault.port.ssl=8443
SkyVault.commitInterval=20000
SkyVault.newSearcherInterval=30000
This specifies the properties to set on the Solr instances. These are the same properties that are set in the solrcore.properties file. Shards 1 This specifies the total number of shards. Instances 1 This specifies the total number of instances. 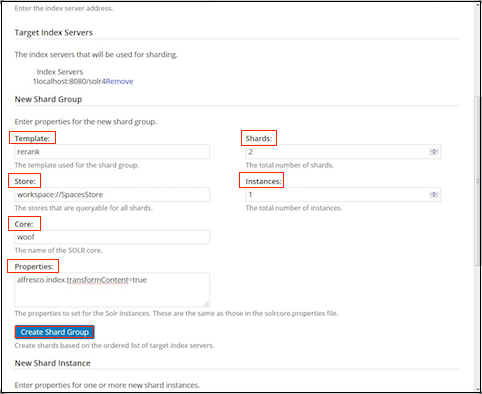
- Click Create Shards Group to create new shards based on the ordered list of target index servers.
-
To create a single shard instance, set the following properties under New
Shard Instance:
Shard property Example setting What is it? Index Server URL localhost:8080/solr4 This specifies the URL to a single index server. Nodes 1 This specifies the total number of Solr nodes that have been created. Target Index Server 1 This specifies, out of all the solr nodes above, the number given to the target index server node for this new shard. Shards This specifies the specific shards to create, on the node given above. You can also specify a comma-separated list of shards. See Installing and configuring Solr shards to view examples of creating shards when calling the REST URLs directly.
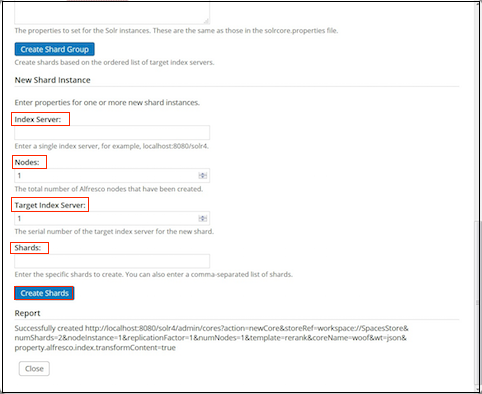
- Click Create Shards to create the new shard based on the specified instance properties.
-
Use Report to get detailed information on shard creation and
execution.
- Click Close to close the Index Server Shard Management window.
You have successfully created an SkyVault core and an archive core. To verify, in a browser, navigate to the Solr URL, https://localhost:8983/solr. In the Solr Admin UI, select the core selector drop-down list and verify that both the SkyVault and archive cores are present in the list.
Validate that you can execute queries from the search public API to the archive core.
curl -X POST --header 'Content-Type: application/json' --header 'Accept: application/json' --header 'Authorization: Basic YWRtaW46YWRtaW4=' -d '{ "query": { "query": "foo" }, "scope": { "stores": ["archive://SpacesStore"] } }' 'http://localhost:8080/alfresco/api/-default-/public/search/versions/1/search' -
Use Existing Index Servers to view a list of existing index
servers and to create new index servers.
-
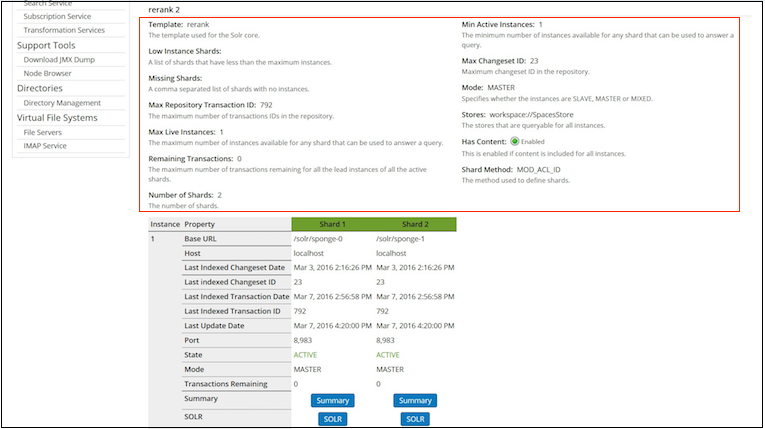
Under Shard Groups, you can view information about all the shards
in the group.
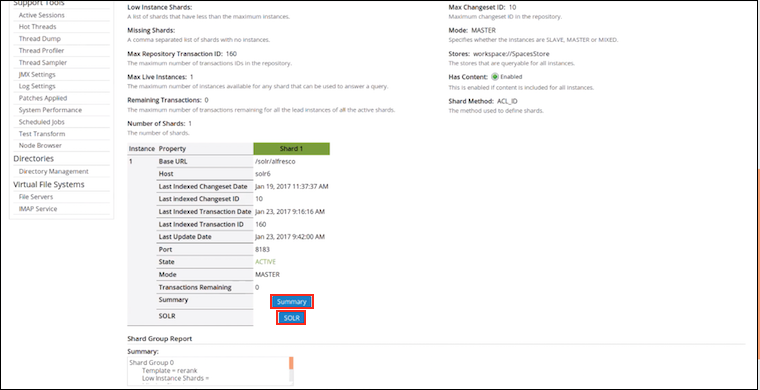
Shard registration property Example setting What is it? Template rerank This specifies the template used for the Solr core. Low Instance Shards This specifies a list of shards that have less than the maximum number of instances. Missing Shards 100 This specifies a comma-separated list of shards with no instances. Max Repository Transaction ID 14,637 This specifies the maximum number of transaction IDs in the repository. Max Live Instances 1 This specifies the maximum number of instances available for any shard that can be used to answer a query. Remaining Transactions 2 This specifies the maximum number of transactions remaining for all the lead instances of all the active shards. Number of Shards 4 This specifies the total number of shards. Min Active Instances 1 This specifies the minimum number of instances available for any shard that can be used to answer a query. Max Changeset ID 104 This specifies the highest change set id in the repository. Mode MASTER This specifies whether the instances are SLAVE, MASTER, or MIXED. Note: The SLAVE and MIXED instances are not supported for a sharded installation.Stores workspace://SpacesStore This specifies the stores that are queryable for all instances. Has Content Enabled This property is enabled if content is included for all instances. Shard Method DB_ID This specifies the method used to define shards. The default shard method is DB_ID. You can specify your own shard method in Index Server Shard Management screen > New Shard Group > Properties. For example, shard.method=ACL_ID.
You can also set this property in the SkyVault-search-services-1.0.0.zip/solrhome/templates/rerank/conf/solrcore.properties file.
-
Use the instance property table to view detailed entity information for all the shards.
This is the same information that is displayed in the JMX console, for example,
Base URL, Host, Last Indexed Changeset
Date, and more.
For more information, see Indexing information available in a JMX client.
-
Click Summary to go to the http://localhost:8080/solr4/admin/cores?action=SUMMARY page on Solr for the
specific core.
For more information, see Unindexed Solr Transactions.
-
Click SOLR to go to the Solr Admin screen for the specific
core.
For more information, see Connecting to the SSL-protected Solr web application.
-
Click Summary to go to the http://localhost:8080/solr4/admin/cores?action=SUMMARY page on Solr for the
specific core.
-
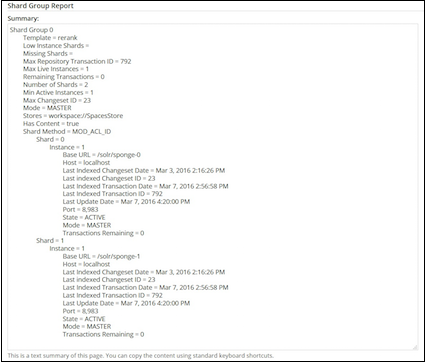
The Shard Group Report section displays information about the
shard groups and instances. A tabular view of this information is displayed in the shard
table in Step 9. This information is read-only.
-
Click Save to apply the changes you have made to the index
server shards.
If you do not want to save the changes, click Cancel.
If you unload or delete a shard from the Solr Admin Console, make sure you restart the Solr server and restore your indexes so that SkyVault can work properly.
